
Installing a Frigidaire microwave can change how you use your kitchen. It can save space, cook food faster, and make your cooking routine more efficient. But installing a microwave isn’t just about plugging it in. There are important steps and safety checks you need to follow. This guide will walk you through everything, using simple language, clear steps, and helpful tips—even if you’re new to DIY projects.
Many people worry that installing a microwave is too hard. With the right tools, a clear plan, and a little patience, you can do it safely and correctly. This article covers every detail: planning your installation, preparing your space, step-by-step instructions, electrical tips, and common mistakes to avoid. You will find real-world examples, advice for specific kitchen setups, and answers to common questions. Let’s begin your journey to a better kitchen with your new Frigidaire microwave.
Understanding Your Frigidaire Microwave
Before you start, it’s important to know which Frigidaire microwave model you have. The installation process can change depending on whether it’s a countertop, over-the-range, or built-in model.
Types Of Frigidaire Microwaves
- Countertop microwaves: These sit on your kitchen counter. They are easy to set up—just unbox, plug in, and use.
- Over-the-range (OTR) microwaves: These mount above your stove. They often include a vent to help with cooking smoke.
- Built-in microwaves: These fit into a cabinet or wall space. They require a trim kit and more complex installation.
Most people who buy a Frigidaire microwave choose the over-the-range model. It saves space and offers extra features like lights and fans.
Key Features To Know
- Wattage: Frigidaire microwaves usually range from 900 to 1200 watts.
- Size: Common widths are 24, 27, or 30 inches.
- Venting options: OTR models can vent outside (external) or back into the kitchen (recirculating).
Check your product manual for the model number and specific requirements. This helps you avoid mistakes later.
Planning The Installation
Good planning makes installation much easier. A microwave is heavy and needs strong support. The area above your stove must also be safe and ready for mounting.
Measure Your Space
Use a tape measure to check the area where you want to install the microwave. For over-the-range models, measure the width, depth, and height between your cabinets and above your stove.
- Minimum clearance: Most microwaves need at least 30 inches between the cooktop and the bottom of the cabinet.
- Cabinet depth: Make sure your upper cabinets are deep enough for the microwave.
- Wall space: There must be a strong wall or mounting plate to support the weight.
Write down all measurements before buying or unboxing your microwave.
Electrical Requirements
A microwave uses a lot of power. It needs a dedicated 120-volt grounded outlet. Never use an extension cord. If you are not sure about your wiring, ask a licensed electrician.
- Amps: Most Frigidaire models need a 15 or 20-amp circuit.
- Location: The outlet should be inside the upper cabinet or behind the microwave.
Venting Decisions
Decide if you want your microwave to vent outside or recirculate air back into the kitchen. Venting outside is better for removing smells and smoke, but it requires a duct.
- External venting: Needs a duct to the outside of your house.
- Recirculating vent: Uses a filter to clean air and sends it back into the kitchen.
Some kitchens do not have an outside vent. If so, you can use the recirculating option.

Credit: www.youtube.com
Tools And Materials Needed
You need the right tools and materials to install your Frigidaire microwave safely. Gather everything before you start.
- Drill and drill bits
- Phillips and flathead screwdrivers
- Tape measure
- Level
- Stud finder
- Pencil
- Masking tape
- Wrench or socket set
- Utility knife
- Wire stripper (if electrical work is needed)
- Mounting template (comes with most Frigidaire microwaves)
- Mounting plate (included)
- Screws, toggle bolts, or lag bolts (included)
- Ductwork and vent cap (if venting outside)
- Charcoal filter (if recirculating air)
- Safety goggles and gloves
Having everything ready avoids delays and keeps you safe.
Preparing The Installation Area
A clean, clear space makes the job easier. Remove any items from your stove, upper cabinets, and counters nearby.
Turn Off The Power
For safety, turn off power to the kitchen circuit at your breaker box. This prevents shocks when working with wires.
Remove The Old Microwave (if Replacing)
If you have an old microwave, unplug it first. Remove any screws holding it to the cabinet above. Support the microwave as you loosen the last screws—it can fall suddenly.
Ask someone to help you. Microwaves are heavy and awkward to lift alone.
Check The Wall And Cabinet
Use a stud finder to locate wall studs. Mark them with pencil. The mounting plate must attach to at least one stud for strength.
Inspect your cabinet floor. It must be flat and strong to hold the microwave’s weight.
Prepare The Vent
- If venting outside, make sure the duct hole is clear and the vent cap is in place.
- If venting inside, have the charcoal filter ready to install.
Wipe dust and grease from the area. This helps the mounting plate stick and the microwave fit snugly.
Step-by-step Installation Guide
Now you’re ready for the main event: installing your Frigidaire microwave. Take your time and follow each step.
1. Read The Manual
Before you do anything, read the installation manual for your model. Frigidaire sometimes changes the design or screw sizes. The manual gives exact details for your microwave.
2. Attach The Mounting Template
Most Frigidaire over-the-range microwaves come with a paper or cardboard template. Tape this to the bottom of the upper cabinet and to the wall.
- The template shows where to drill holes for mounting screws, bolts, and the power cord.
- Double-check alignment with your level.
3. Drill Holes
Drill holes in the cabinet bottom for the power cord and mounting screws. If needed, drill holes in the wall for toggle bolts or lag screws.
- Make sure holes line up with wall studs.
- Use a drill bit that matches the screws or bolts.
4. Install The Mounting Plate
Attach the mounting plate to the wall. Secure it with screws or bolts into the wall studs. If no stud is available, use heavy-duty toggle bolts.
| Fastener Type | Best For | Strength |
|---|---|---|
| Lag bolts | Wood studs | Very strong |
| Toggle bolts | Drywall (no stud) | Strong, but less than lag bolts |
| Wood screws | Cabinets | Moderate |
Check the plate with your level. It must be perfectly straight, or the microwave will tilt.
5. Set Up The Venting
- For external venting, connect the duct adapter (included with most models) to the microwave.
- For recirculating, insert the charcoal filter into the vent slot.
Some models need you to rotate the fan inside the microwave. Read the manual for details.
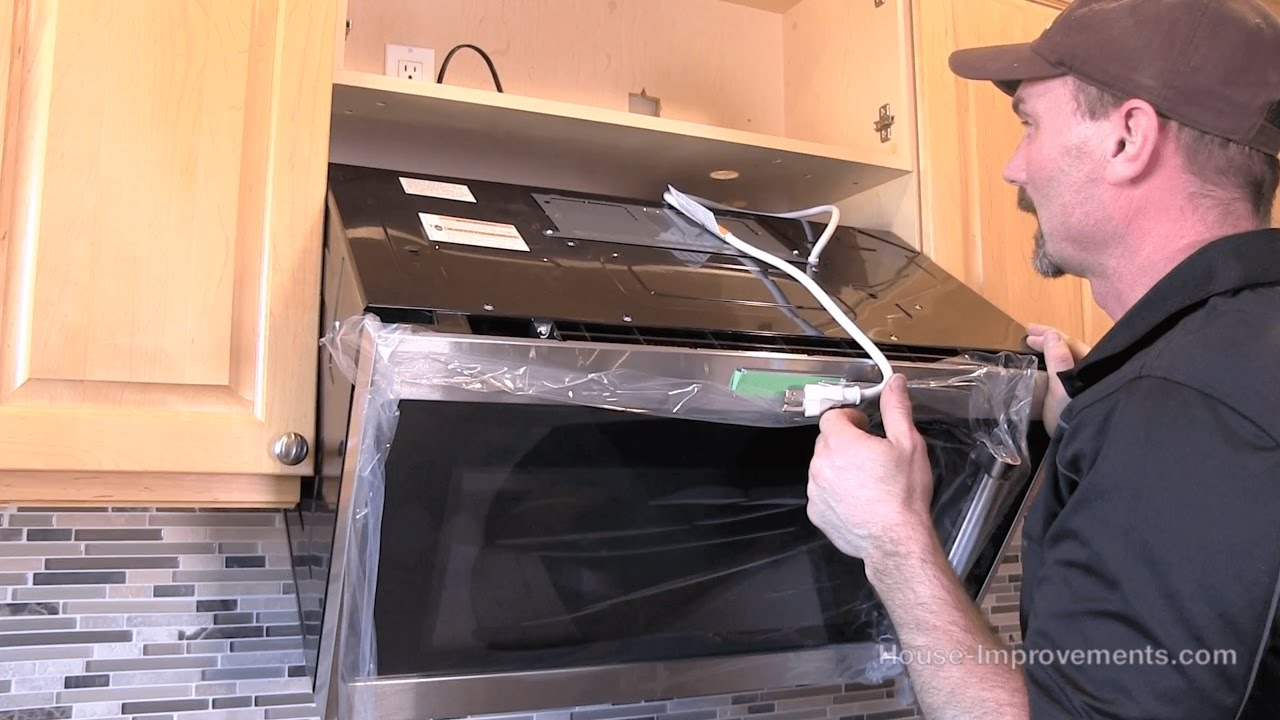
6. Lift The Microwave Into Place
This step is heavy—get help! Carefully lift the microwave. The back hooks onto the mounting plate. Tilt it up and push the power cord through the cabinet hole.
- Make sure the microwave is centered.
- The top of the microwave should touch the bottom of the cabinet.
7. Secure The Microwave
From the cabinet above, insert the mounting screws through the holes you drilled earlier. Tighten until the microwave is snug, but don’t overtighten—you can crack the cabinet.
Check that the front of the microwave is flush with your cabinets.
8. Connect Vent And Power
- If venting outside, attach the duct to the adapter. Seal any gaps with aluminum tape.
- Plug the power cord into the outlet inside the cabinet.
Do not turn on the microwave yet.
9. Install Filters And Accessories
- For recirculating, snap the charcoal filter into place.
- Install the grease filters under the microwave (they slide in easily).
- If your model includes a turntable, place it inside the microwave.
10. Final Checks And Test
Check everything: screws, plate, vent, and power. Remove any tools, packaging, or debris from the area.
Turn the power on at the breaker box. Plug in the microwave and run a short test (like boiling a cup of water).
- Check that the lights, fan, and turntable work.
- Test the vent by running the fan and holding a paper towel near the vent.
If you hear strange noises or see sparks, turn off the power and check your work.
Tips For A Professional Installation
Even if you’re not a pro, small details make your installation look and work better.
- Use a level at every step. A crooked microwave is hard to fix later.
- Seal the duct with aluminum tape to stop leaks.
- Label your circuit breaker so you know which switch controls the microwave.
- Ask for help with lifting. Dropping a microwave can damage it and hurt you.
- Keep the manual in a safe place for future reference.
Common Mistakes To Avoid
People often make simple errors when installing a microwave. Here’s what to watch out for:
- Using the wrong screws: Always use the hardware included with your microwave or recommended in the manual.
- Not finding a stud: Mounting only to drywall is unsafe. The microwave can fall.
- Misaligning the plate: Even a small tilt can cause problems with the door and vent.
- Forgetting the vent direction: Some microwaves need you to rotate the fan inside for correct venting.
- Over-tightening screws: This can crack your cabinets or the microwave case.
- Skipping the test run: Always check every feature before finishing.
Many first-time installers forget to check for wall studs or use weak screws. This can lead to accidents, especially if the microwave is used daily.
Special Situations And Kitchen Layouts
Every kitchen is different. Some have custom cabinets, thick tile backsplashes, or no venting at all.
Installing With A Tile Backsplash
Drilling into tile is tricky. Use a carbide-tipped drill bit and go slowly. Place masking tape over the spot to stop the drill from slipping.
Installing In A Corner
Corner cabinets may need a trim kit for a snug fit. Check for enough clearance on all sides so the door opens fully.
No Upper Cabinet
If you don’t have an upper cabinet, you can buy a wall-mount shelf designed for microwaves. Make sure it holds the weight.
Replacing An Old Model
If your old microwave was a different brand, the mounting plate and holes may not line up. Patch old holes with spackle and drill new ones as needed.
Built-in Installations
Built-in models often need a trim kit to fill gaps. Follow the trim kit instructions for a smooth look.
Electrical Safety And Permits
Electricity is dangerous. If you don’t feel confident, hire a licensed electrician.
- GFCI outlets: In some kitchens, codes require Ground Fault Circuit Interrupter outlets. Check your local rules.
- Permits: Some towns require a permit for electrical work. Check before starting.
- Wire gauge: The wire should be at least 14-gauge for a 15-amp circuit, or 12-gauge for 20-amp circuits.
Never cut corners with electrical safety. A poor connection can cause fires.
Microwave Placement Comparison
Choosing where to install your microwave matters. Here’s how the main options compare:
| Placement Type | Pros | Cons | Best For |
|---|---|---|---|
| Countertop | Easy setup, portable | Takes up counter space | Renters, small kitchens |
| Over-the-Range | Saves space, includes vent | Harder to install, needs strong support | Modern kitchens, families |
| Built-In | Custom look, saves space | Most expensive, needs trim kit | High-end kitchens |

Credit: registerappliance.com
Maintenance After Installation
Installing your Frigidaire microwave is just the first step. Keeping it working well saves money and avoids repairs.
Cleaning Tips
- Wipe the interior with a damp cloth weekly. Spilled food can cause smells or smoke.
- Wash grease filters every month with warm, soapy water.
- Change charcoal filters every 6-12 months if you use recirculating venting.
- Clean the exterior with a gentle cleaner and soft cloth.
Never use harsh chemicals inside the microwave.
Checking For Problems
- If the microwave makes strange noises, check the turntable and fan for loose items.
- If the door doesn’t close well, check for leftover packing tape or misaligned screws.
- If the lights or fan stop working, check your circuit breaker and outlet.
Routine checks can catch small problems before they get bigger.
Troubleshooting Common Installation Issues
If something goes wrong, don’t panic. Here are solutions to the most common problems:
Microwave Won’t Turn On
- Check the outlet and breaker.
- Make sure the power cord is plugged in tightly.
- Test the outlet with another appliance.
Microwave Shakes Or Vibrates
- Check that all screws are tight.
- Make sure the mounting plate is level.
- Remove any packing materials inside.
Poor Venting Performance
- Check for blockages in the duct.
- Make sure the vent direction matches your setup (external or recirculating).
- Clean the filters.
Microwave Door Won’t Close
- Check for screws that are too long under the cabinet.
- Make sure the microwave isn’t tilted.
Display Shows Error Codes
- Look up the code in your manual.
- Try unplugging the microwave for 60 seconds, then plugging it in again.
Upgrading Your Kitchen: Is Diy Installation Right For You?
A DIY installation saves money and gives a sense of accomplishment. But it’s not for everyone. If you have never used power tools or worked with electricity, it’s wise to ask for help or hire a professional.
- Professional installation costs $100 to $300 in most areas.
- Many stores offer installation services when you buy the microwave.
Doing it yourself is possible if you follow instructions carefully and respect safety rules.
Real-world Example: Installing A Frigidaire Ffmv1846v
Let’s walk through a real example with the Frigidaire FFMV1846V model, one of the most popular over-the-range microwaves.
- Unbox the microwave and check for all parts: Mounting plate, screws, filters, and manual.
- Measure the cabinet and wall to confirm fit.
- Attach the mounting template to the wall and cabinet bottom.
- Drill pilot holes as marked.
- Install the mounting plate with lag bolts into the stud.
- Rotate the fan for recirculating venting (if needed).
- Lift the microwave onto the plate with help.
- Insert and tighten the top screws from the cabinet.
- Plug in the cord and test.
On average, this installation takes about 2 hours for two people. Most of the time is spent measuring, leveling, and drilling.
Two Insights Most Beginners Miss
- Venting direction matters more than you think. If you forget to set up the fan for the correct vent direction, steam and smoke will go into your cabinets or wall. Always check this before lifting the microwave.
- Supporting the microwave during the install prevents damage. Many people try to balance it alone, which can scratch the stove, break the glass turntable inside, or cause injury. Use a strong box, a microwave stand, or ask someone to hold it while you secure the screws.
When To Call A Professional
- If your kitchen has old wiring or no grounded outlet.
- If you need to cut a new vent hole in an outside wall.
- If your cabinets are weak or show signs of water damage.
- If you are not comfortable using drills or working overhead.
A professional can install your microwave quickly and safely, and sometimes the warranty requires professional installation.
Credit: www.villagehomestores.com
How Frigidaire Microwaves Compare With Other Brands
Frigidaire is known for reliable appliances at a fair price. Compared to other brands, their microwaves are easy to install and maintain.
| Brand | Average Price | Ease of Installation | Warranty |
|---|---|---|---|
| Frigidaire | $250 – $400 | Easy to Moderate | 1 Year |
| Samsung | $280 – $500 | Moderate | 1 Year |
| GE | $300 – $600 | Moderate | 1 Year |
| LG | $280 – $550 | Moderate | 1 Year |
Frigidaire’s manuals are clear, and their customer service is good. This makes them a solid choice for first-time installers.
Final Thoughts
Installing a Frigidaire microwave is a project almost anyone can do with patience and care. Planning, measuring, and using the right tools are the keys to a safe and professional result. Remember to check venting, always mount into a stud, and test all features before using your new microwave daily.
If you run into problems, don’t rush. Take a break, check the manual, or call for help if needed. With proper installation, your microwave will give you many years of safe, efficient cooking.
For more details and official guides, visit the Frigidaire Owner Center.
Frequently Asked Questions
How Long Does It Take To Install A Frigidaire Microwave?
Most installations take 1.5 to 2.5 hours if you have all the tools and help. If you are replacing an old microwave, it can be faster. First-time installers should allow more time to read instructions and measure carefully.
Can I Install A Frigidaire Microwave Without An Upper Cabinet?
Yes, but you’ll need a wall-mount shelf or bracket designed for microwaves. Make sure it is rated for at least 70 pounds. Follow the shelf’s instructions and always mount into studs for safety.
What If My Kitchen Doesn’t Have An Outside Vent?
You can use the recirculating vent option. Install the charcoal filter and make sure the fan is set to blow air through the filter. This works well for most homes, but venting outside removes more smoke and smells.
Is It Safe To Install A Microwave Over A Gas Stove?
Yes, as long as you follow all clearance requirements. Most Frigidaire microwaves need at least 30 inches between the cooktop and the microwave bottom. Check your manual and local codes for any special rules.
Do I Need A Professional Installer For My Frigidaire Microwave?
A professional is not required for most homes, but it’s a good idea if you are uncomfortable with electrical work or drilling. Some stores offer installation for a fee, and it can save time if your kitchen needs extra preparation.
Installing your Frigidaire microwave can feel challenging, but following these steps will help you succeed. Enjoy your new kitchen upgrade!