
Installing a range hood on a vaulted ceiling is a project that requires more planning and attention to detail than a standard installation. Vaulted ceilings look beautiful and make a kitchen feel spacious, but they add unique challenges. If you want your kitchen to stay fresh and free from smoke and cooking odors, a well-installed range hood is essential. Many people worry about the angles, the vent path, and how to secure the hood safely. This guide will walk you through every step, from tools you need to special tips that make the job easier.
A well-installed range hood not only removes smoke and grease but also protects your kitchen cabinets and keeps indoor air healthy. When done right, it becomes both a functional and stylish centerpiece above your stove. But with a vaulted ceiling, mistakes can lead to poor airflow, leaks, or even safety hazards.
This article will help you avoid those problems by showing you exactly how to plan, measure, and install a range hood on a vaulted ceiling, even if you’re new to this type of project.
Understanding Range Hoods And Vaulted Ceilings
Before starting, it’s important to understand why vaulted ceilings make range hood installation more complex. In a regular kitchen, the ceiling above the stove is flat and parallel to the floor. Most range hoods are designed for this. But with a vaulted ceiling, the ceiling is sloped, often at a sharp angle, and it may be much higher above the stove.
This changes three things:
- The mounting surface for the range hood is not flat.
- The distance from stove to ceiling is greater, affecting the hood’s effectiveness.
- The vent pipe must travel at an angle, which changes how you cut and fit the ductwork.
Choosing the right range hood and planning the vent path are crucial. If you skip planning, you might end up with a hood that’s too far from the stove to work well, or a vent that leaks air into your attic.
Planning Your Installation
Proper planning will save you time and headaches. Start by asking yourself these questions:
- What type of range hood do you need?
- Wall-mounted or island style? Most vaulted ceilings above stoves are in open kitchens, so an island range hood is common.
- Where will the vent exit?
- Through the ceiling to the roof, or out the side wall? Roof is most common for vaulted ceilings.
- What is the ceiling height and angle?
- Measure carefully. The steeper the angle, the more custom work is needed.
- Are there rafters or joists in the way?
- Use a stud finder or check your attic to avoid cutting into important structural parts.
- Do you need an electrician?
- Most hoods require wiring. Plan for power before starting.
Take notes and measurements. Draw a simple diagram if it helps you visualize the path from your stove to where the vent will exit.

Credit: www.reddit.com
Tools And Materials Needed
Gathering all materials before you begin makes the job smoother. Here’s a basic list:
- Range hood (suited for your space and cooking needs)
- Mounting brackets (often included with the hood)
- Ductwork (rigid or flexible metal, usually 6” diameter)
- Duct elbows and connectors
- Chimney extension kit (if your ceiling is extra high)
- Wall or roof vent cap
- High-temperature duct tape or metal clamps
- Drill and screwdriver
- Jigsaw or reciprocating saw
- Level
- Stud finder
- Tape measure
- Pencil
- Wire nuts and electrical cable (if wiring is needed)
- Caulk or spray foam (to seal gaps)
- Ladder or scaffolding
Depending on your kitchen, you may need extra brackets or custom trim pieces.
Choosing The Right Range Hood For A Vaulted Ceiling
The range hood you pick is critical. Not all models work with vaulted ceilings, and not all hoods can be extended high enough to reach a sloped surface.
Here’s what to look for:
1. Range Hood Type
- Island range hood: Hangs from the ceiling and is designed for open areas.
- Wall-mounted hood: Mounts to the wall, suitable if your stove is near a wall under a vault.
2. Chimney Extension
Most hoods come with a chimney cover that hides the duct. Measure your ceiling height from the stove to the point where the hood will attach. If your ceiling is higher than the standard chimney, you’ll need a chimney extension kit. Some brands sell these separately.
3. Venting Power (cfm Rating)
CFM means Cubic Feet per Minute—how much air the hood moves. For vaulted ceilings, the hood may be farther from the stove, so choose a model with higher CFM (at least 600 CFM for strong ventilation).
4. Duct Size
Most hoods require a 6-inch or larger duct. A smaller duct will reduce suction power and increase noise.
5. Mounting Hardware
Check that the hood includes adjustable brackets for angled ceilings. If not, you may need to buy or fabricate custom mounting hardware.
6. Ductless Vs. Vented
Ductless hoods use filters to clean air and recirculate it. These are easy to install but less effective, especially in open kitchens. Vented (ducted) hoods are best for removing smoke and odors completely.
Comparison Of Range Hood Types
| Type | Best For | Pros | Cons |
|---|---|---|---|
| Island Hood | Open kitchens, vaulted ceilings | Strong ventilation, stylish look | Complex installation, needs ceiling support |
| Wall-Mounted Hood | Against a wall, angled ceilings | Easier to install, stable | Not for open islands |
| Ductless Hood | Rentals, no vent access | Simple install, no vent needed | Weaker air cleaning, filter changes |
Measuring And Marking For Installation
Accurate measuring and marking are vital. This step affects how well the hood works and how it looks in your kitchen.
1. Find The Center Point
If you have a cooktop on an island, stand on a ladder and use a plumb line (a string with a weight) or laser level to find the exact center of the stove on the ceiling. Mark this spot.
2. Measure Mounting Height
Most hoods should be 28 to 34 inches above the cooktop for best performance. Too high, and they lose suction; too low, and they get in the way.
Because the ceiling is sloped, measure the vertical distance, not just along the slope. Mark the mounting points according to the hood’s bracket instructions. For angled surfaces, you may need to adjust the mounting hardware so the hood hangs straight.
3. Mark The Duct Path
Use a pencil to mark where the duct will enter the ceiling. Plan a straight path up, if possible, then through the roof or out the wall. For long or angled runs, minimize the number of bends to keep airflow strong.
4. Check For Obstacles
Use a stud finder to locate ceiling joists or rafters. If the duct must pass through a rafter, you may need to adjust the location or consult a contractor.
Preparing The Ceiling
Vaulted ceilings are often made from drywall over rafters, with insulation above. Cutting through this requires care.
1. Turn Off Power
If there are any electrical wires where you will cut, turn off the power to that area at the breaker box.
2. Cut The Duct Hole
Use the hood’s template (usually included) or trace around the duct collar. Use a jigsaw or reciprocating saw to cut a clean hole. Wear safety glasses and a mask.
For a 6-inch duct, cut a 6. 25-inch hole to allow for slight adjustments.
3. Install Support Blocking
On a steeply angled ceiling, the hood may not have solid wood to attach to. Install blocking—a piece of 2×4 wood—between rafters. Attach it securely so the hood and chimney can be mounted with solid screws. This step is often missed by beginners and leads to wobbly hoods.
4. Prepare Electrical Wiring
If your hood needs power, run a new cable from the nearest junction box. Leave about 12 inches of extra wire hanging through the hole for easy hookup.
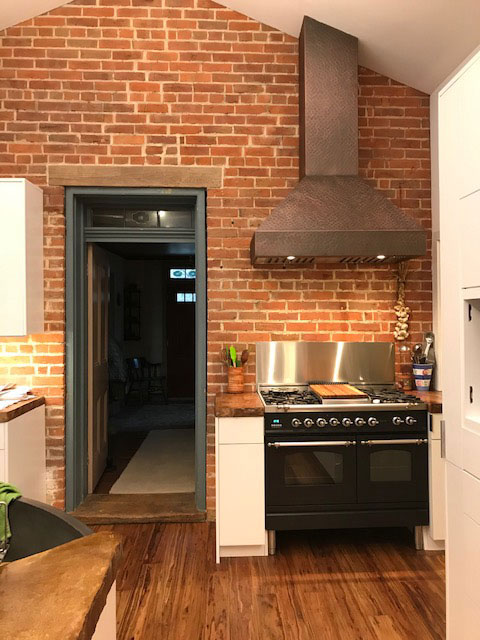
Credit: www.worldcoppersmith.com
Installing The Range Hood Mounting Bracket
Most range hoods use a mounting bracket that attaches first. This bracket must be perfectly level, even if the ceiling is sloped.
1. Level The Bracket
Hold the bracket against the ceiling at your marked spot. Use a bubble level to make sure the hood will hang straight down, not at an angle. Mark the screw holes.
2. Drill Pilot Holes
Drill small pilot holes for the screws. If you added wood blocking, make sure your screws are long enough to reach the wood.
3. Attach The Bracket
Screw the bracket tightly to the blocking or rafters. Test by pulling gently to see if it holds firm. This step is critical for safety.
4. Double-check Position
Before moving on, double-check that the bracket lines up with the duct hole and is centered over your stove.
Assembling And Installing The Range Hood
With the bracket secure, you can now assemble the hood and chimney.
1. Attach The Duct Collar
Most hoods have a round collar on top where the duct attaches. Secure this piece with the included screws.
2. Connect The Duct
Run your metal duct from the hood’s collar through the ceiling hole. Use elbows if you need to angle the duct, but keep bends as gentle as possible. For each joint, seal with high-temperature duct tape or metal clamps.
Pro Tip
Don’t use plastic or flexible foil ducting—these can crush or melt under heat. Always use rigid or semi-rigid metal duct.
3. Install The Chimney Cover
Slide the chimney extension over the duct and attach it to the hood body. Some extensions are telescoping and can be adjusted for the exact height and angle of your vaulted ceiling.
4. Hang The Range Hood
With help (these units are heavy), lift the hood and hang it on the bracket. Secure with the included hardware. Make sure it’s level and not tilting due to the ceiling angle.
5. Wire The Hood
Connect the electrical wires: black to black, white to white, green to ground. Use wire nuts and tuck the wires neatly into the junction box. If you’re unsure about wiring, call a licensed electrician.
6. Secure The Chimney
Attach the upper part of the chimney cover to the ceiling or bracket. Seal any gaps with caulk or spray foam to prevent air leaks.
Venting Through The Roof
Venting through a vaulted roof is often the hardest part. This step requires cutting through roofing materials and installing a weatherproof vent cap.
1. Locate The Exit Point
From inside, use a long drill bit to make a small pilot hole where the duct will exit. Go up on the roof and find this hole.
2. Cut The Roof Opening
Trace a circle the size of your vent cap. Use a reciprocating saw to cut through shingles and roof sheathing. Wear proper safety gear.
3. Install The Roof Vent Cap
Slide the cap’s collar into the hole. Use roofing nails to secure the flange to the roof. Apply roofing sealant around all edges to prevent leaks.
4. Connect The Duct
From inside, slide the duct up to the vent cap. Seal the joint with metal tape. Support long duct runs with metal strapping as needed.
5. Insulate The Duct
In cold climates, wrap the duct with insulation to prevent condensation and dripping.
Roof Vs. Wall Venting Comparison
| Venting Method | Best For | Pros | Cons |
|---|---|---|---|
| Roof Vent | Vaulted ceilings, open kitchens | Direct path, less visible | Harder install, roof leak risk |
| Wall Vent | Stoves near exterior wall | Easier access, less roof work | Longer duct run, less efficient |
Sealing And Final Checks
A common beginner mistake is to skip sealing joints, which lets cooking air leak into the attic or ceiling.
1. Seal All Duct Joints
Use high-temperature foil tape (not cloth duct tape) on all duct connections. Leaks here reduce suction and can lead to mold.
2. Seal Around The Chimney
Use caulk or spray foam where the chimney cover meets the ceiling, especially if there are gaps due to the angle.
3. Test The Hood
Turn on the power. Test the hood at each speed. Hold a tissue up to the filter—if it pulls tightly, airflow is strong. Listen for rattling, which can mean a loose duct.
4. Clean Up
Remove all tools, dust, and packaging. Wipe down the hood and surrounding area.
Common Mistakes And How To Avoid Them
Even experienced DIYers make mistakes with vaulted ceiling installations. Here’s what to watch for:
- Mounting the hood too high: If the hood is 40 inches or more above the cooktop, it won’t capture smoke well. Stick to 28–34 inches if possible.
- Not using blocking: Drywall alone cannot support a heavy hood. Always add wood blocking for solid mounting.
- Skipping sealing: Unsealed ducts leak air and energy. Tape every joint.
- Using flexible plastic duct: This can sag and reduce airflow. Always use metal duct.
- Ignoring insulation: In cold areas, an uninsulated duct can drip water back into your kitchen.
- Forgetting about code requirements: Local building codes may require specific types of duct or vent caps.
- Cutting through rafters without checking: Never cut structural roof members without consulting a professional.
- Not planning for power: Running new electrical can be tricky on a high or angled ceiling. Plan wiring before you start.
- Insecure chimney covers: If not attached firmly, they can rattle or fall.
- Incorrect vent direction: The duct should always slope slightly upward to the outside to avoid backflow.
Professional Vs. Diy: Should You Hire Help?
Installing a range hood on a vaulted ceiling is a challenging project, but many handy homeowners do it themselves. When should you call a pro?
Diy Is Fine If:
- You’re comfortable with ladders and power tools.
- You can safely work at heights.
- You can follow electrical and venting instructions.
Call A Professional If:
- Your ceiling is very high (over 12 feet).
- You need to cut through rafters or complex roofing.
- You’re not sure about wiring or vent codes.
- You want to guarantee a leak-free, safe job.
A professional may cost $500–$1,500 or more, depending on complexity, but they bring expertise and insurance.

Credit: www.reddit.com
Maintenance Tips For Range Hoods On Vaulted Ceilings
Keeping your new range hood working well means regular maintenance.
- Clean the filters: Metal filters should be washed every month. Carbon filters (in ductless models) should be replaced every 6–12 months.
- Wipe the exterior: Grease can build up on the hood body and chimney. Use a mild cleaner.
- Check the vent cap: Once a year, go on the roof to check for bird nests or blockages.
- Test suction: Hold a tissue to the filter—weak pull may mean a blocked duct.
- Listen for noise: Unusual rattling or squeaking means something is loose.
Practical Tips And Non-obvious Insights
Most guides skip these advanced tips, but they make a big difference:
- Use a telescoping chimney extension for sloped ceilings. Some brands let you adjust the angle and length, making alignment easier.
- Install a backdraft damper in the duct. This prevents cold air from blowing back into your kitchen.
- Consider a remote blower (motor outside the kitchen). This reduces noise, especially in open kitchens with high ceilings.
- Add extra lighting above your stove. Range hood lights may not be enough in a tall, open space.
- Paint touch-up: After cutting drywall or wood, repaint the ceiling area for a seamless look.
- Check warranty terms: Some range hoods require professional installation to keep the warranty valid.
- Soundproofing: Use foam tape around the chimney if you notice vibration noise.
Cost Breakdown Of Installing Range Hood On Vaulted Ceiling
To help you plan your budget, here’s a typical cost breakdown:
| Item | Low Estimate | High Estimate |
|---|---|---|
| Range Hood | $300 | $1,500+ |
| Ducting & Materials | $60 | $200 |
| Chimney Extension Kit | $80 | $300 |
| Roof Vent Cap | $40 | $120 |
| Professional Labor | $500 | $1,500+ |
| Electrical Work | $100 | $400 |
Your total cost can range from $600 (DIY, basic hood) to over $3,000 (pro install, premium hood).
Safety And Code Considerations
Never overlook building safety. Some key points:
- Use UL-listed metal duct for fire safety.
- Do not use dryer vent hose (foil or plastic)—these are not safe for kitchen hoods.
- Check local codes: Some areas require permits or inspections for venting new appliances.
- Fire-block penetrations: Seal around ducts with fire-rated foam if required.
- Don’t share ducts: Each hood needs its own vent—never connect to a bathroom fan or dryer duct.
If in doubt, ask your building department or check a trusted resource like the National Fire Protection Association.
Frequently Asked Questions
How High Should A Range Hood Be Above The Cooktop On A Vaulted Ceiling?
Most experts recommend 28 to 34 inches between the cooktop and the bottom of the hood. This height gives the best balance between capturing smoke and staying out of your way. If your ceiling is much higher, use a chimney extension to keep the hood at the right level.
Can I Install A Range Hood If My Ceiling Is Very Steep Or High?
Yes, but you may need a custom chimney extension and longer ductwork. Some brands offer special kits for high or angled ceilings. In extreme cases, a professional may need to build a custom mount or support system.
What Is The Best Way To Vent A Range Hood On A Vaulted Ceiling—roof Or Wall?
Roof venting is usually best for vaulted ceilings, especially over kitchen islands. It gives a straight path for air to exit. Wall venting can work if the stove is near an exterior wall, but longer ducts reduce efficiency.
Do I Need A Professional To Install A Range Hood On A Vaulted Ceiling?
If you’re skilled with tools and comfortable working at height, you can do it yourself. But if your ceiling is very high, or you’re unsure about electrical and venting codes, hiring a professional ensures safety and code compliance.
Can I Use A Ductless Range Hood With A Vaulted Ceiling?
You can, but ductless hoods are less effective at removing smoke and odors, especially in large, open kitchens. Vented (ducted) hoods are much better for air quality.
Installing a range hood on a vaulted ceiling is a challenging project, but with careful planning and the right tools, it’s very possible—even for a motivated DIYer. Take your time, follow each step closely, and don’t hesitate to ask for professional help if you feel uncertain.
In the end, you’ll enjoy a clean, beautiful kitchen with fresh air and a stylish focal point above your cooktop.