
Laying out recessed lighting in a kitchen can feel overwhelming. People often worry about shadows, glare, or having too many lights. But a well-planned kitchen lighting layout makes cooking, cleaning, and even family gatherings much more enjoyable. You want your kitchen bright enough for chopping vegetables but also cozy enough for breakfast with your family.
The right recessed lighting design is the secret to achieving this balance.
Many homeowners and even some professionals make common mistakes. They might space lights unevenly, forget about shadows, or ignore the impact of cabinets and appliances. Other times, people follow “rules of thumb” that simply do not work for every kitchen.
This article will walk you through everything you need to know for a perfect recessed lighting layout in your kitchen. From understanding your space, to choosing the right number and placement of lights, to avoiding hidden pitfalls—this guide covers it all.
By the end, you’ll be confident about creating a kitchen lighting plan that is both practical and beautiful.
Understanding Kitchen Lighting Needs
Every kitchen is different. The size, shape, and layout of your kitchen directly impact how you should design your recessed lighting. Before you buy or install anything, think about how you use your kitchen and what tasks you perform most often.
Task lighting is the most important for kitchens. You need bright light over counters, sinks, and cooking areas. Ambient lighting fills the whole space and makes the kitchen feel welcoming. Sometimes, accent lighting highlights features like open shelves or an island.
If your kitchen is large or has an unusual shape (like an L or U), you will need more detailed planning. Even small kitchens can have tricky corners that need extra attention. Always consider the following:
- Where do you prepare food?
- Where do you eat or do homework?
- Is there a kitchen island or breakfast bar?
- Are there any dark corners or shadows?
- Do you want to highlight any features (backsplash, art, etc. )?
Taking the time to answer these questions helps you avoid uneven lighting and dark spots later.
Measuring Your Kitchen For Lighting Layout
Before you can plan your layout, you need the exact measurements of your kitchen. This step is easy to skip, but guessing will almost always lead to mistakes.
- Measure the length and width of the entire kitchen. Write down these numbers in feet or meters.
- Note the location of large appliances (refrigerator, stove, dishwasher) and features (sink, island, peninsula).
- Mark the position of upper cabinets, as they create shadows on work surfaces.
- Check the ceiling height. Standard is 8 feet (about 2.4 meters), but many kitchens are higher.
Here is an example:
- Kitchen size: 15 feet long x 12 feet wide
- Ceiling height: 9 feet
- Island: 3 feet x 6 feet in center
These measurements will be your guide for spacing and positioning your recessed lights.
Key Principles Of Recessed Lighting Layout
Lighting experts follow a few basic principles when designing kitchen layouts. These rules help ensure even, useful lighting.
The Spacing Rule
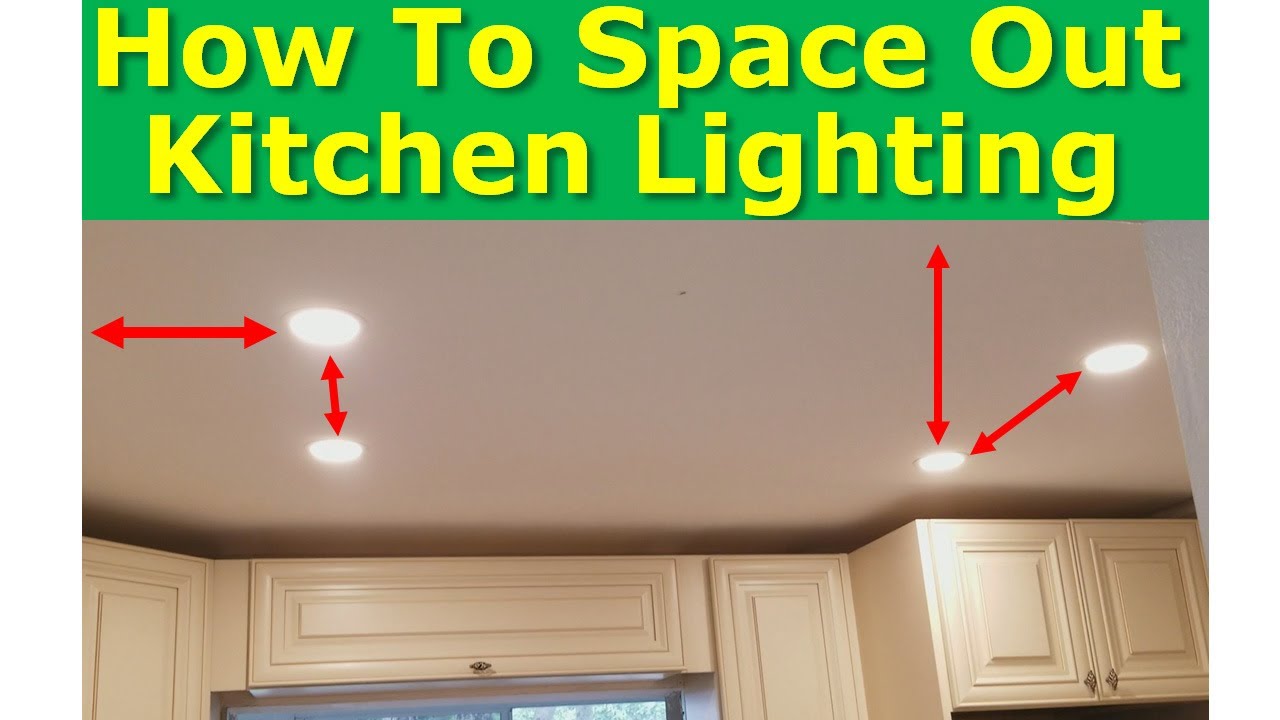
A common method is to space recessed lights half the ceiling height apart. For example, if your ceiling is 8 feet high, space lights about 4 feet apart. For 9-foot ceilings, use 4.5 feet. This helps avoid bright spots and dark “holes.”
Distance From Walls
Never install recessed lights too close to walls or cabinets. Usually, keep the first row of lights 18 to 24 inches away from the wall or edge of a cabinet. This prevents harsh shadows and keeps the lighting even.
Focus On Work Areas
Place lights directly above work surfaces like counters, sinks, and stoves. This ensures you have enough light for chopping, reading recipes, or washing dishes.
Layer Your Lighting
Do not rely only on recessed lights. Use a mix of under-cabinet lighting and pendant lights for islands or dining areas. This makes the kitchen more comfortable and flexible.
Choosing The Right Recessed Lights
There are many types of recessed lights. Choosing the right ones makes a big difference in your kitchen’s look and function.
Trim Styles
- Baffle trim: Reduces glare, best for task lighting.
- Reflector trim: Shiny inside, makes the light brighter.
- Adjustable (eyeball) trim: Can be tilted to highlight features or avoid glare.
- Shower trim: Moisture resistant, for areas near sinks.
Bulb Types
- LED: Most efficient, long-lasting, cool temperature.
- Halogen: Brighter but less energy efficient.
- Incandescent: Old style, not recommended due to high energy use.
Light Temperature
- Warm white (2700K–3000K): Comfortable, cozy feeling.
- Cool white (3500K–4000K): Brighter, good for tasks.
- Daylight (5000K–6500K): Very bright, can feel harsh.
Most kitchens look best with cool white or warm white. You can mix temperatures, but be careful—too many colors can look messy.
Light Output (lumens)
A kitchen needs about 30–40 lumens per square foot. For a 200 square foot kitchen, you need 6000–8000 lumens. Each 6-inch LED recessed light gives about 700–900 lumens. Plan your number of lights accordingly.
Size Of Fixtures
- 4-inch: Good for accent lighting or smaller kitchens.
- 5-inch or 6-inch: Best for general and task lighting in most kitchens.
Steps To Layout Recessed Lighting In Kitchen
Let’s go step-by-step so you can create your own recessed lighting plan. This is where many people make mistakes by skipping details.
Step 1: Draw Your Kitchen
Use graph paper or a simple drawing app. Draw your kitchen’s shape to scale. Mark:
- All walls
- Windows and doors
- Appliances and sinks
- Islands and peninsulas
- Upper cabinets
This helps you see where light is needed most.
Step 2: Mark Work Areas
Identify work zones like:
- Main countertop prep area
- Stove and oven
- Sink
- Island
- Pantry or coffee bar
These Are Your Lighting “hot Spots.”
Step 3: Decide On Lighting Zones
Divide your kitchen into zones, such as:
- Main area
- Island
- Perimeter/countertops
- Accent areas
Each zone may need its own group of recessed lights.
Step 4: Plan The Spacing
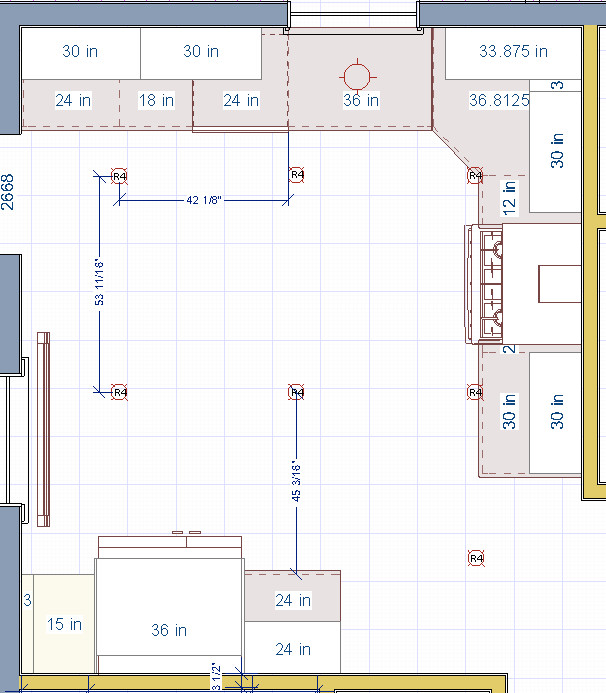
Based on ceiling height, decide your spacing. For example, with an 8-foot ceiling, lights should be 4 feet apart. Mark these points on your drawing. Adjust so each work surface has even coverage.
Example Calculation
Kitchen: 12 Feet X 15 Feet, 8-foot Ceiling
- Space lights 4 feet apart (based on ceiling height).
- Start first row 2 feet from the wall.
- Place rows every 4 feet across the ceiling.
Sample Layout
- Row 1: 2 feet from wall, then lights every 4 feet (at 2, 6, 10, 14 feet).
- Row 2: 6 feet from wall, lights at same intervals.
- Row 3: 10 feet from wall, same intervals.
This covers the entire kitchen evenly.
Step 5: Avoid Obstacles
Check for beams, HVAC vents, or pipes in the ceiling. Adjust your layout if a light would hit an obstacle.
Step 6: Adjust For Cabinets And Appliances
If you have deep upper cabinets, move lights slightly forward so they shine on the counter, not just the cabinet doors. For a typical 12-inch deep upper cabinet, install recessed lights 12–18 inches from the wall.
Step 7: Add Island Lighting
Islands often need their own row of lights. Center these over the island, spaced about 3 to 4 feet apart. For a large island, 2–3 lights may be needed.
Step 8: Check For Shadows
Stand in your kitchen (or imagine it from your drawing). Make sure every work area has direct light above. Adjust placement if your head would create a shadow when working at the counter.
Step 9: Plan Switches And Dimmers
Plan to put each lighting zone on a separate switch or dimmer. This gives you control for different tasks and moods.
Step 10: Review And Finalize
Check your layout again. Ask:
- Is every work area well lit?
- Are lights spaced evenly?
- Are there dark corners?
- Is there overlap of light beams for even coverage?
Make any last changes before installation.
Common Mistakes To Avoid
Even careful planners can make these errors:
- Too few lights: Creates dark spots and makes the kitchen feel gloomy.
- Too many lights: Wastes energy and makes the kitchen feel harsh and uncomfortable.
- Lights too close to cabinets: Causes glare and highlights cabinet imperfections.
- Ignoring ceiling obstacles: Leads to last-minute changes or extra costs.
- No dimmers: You lose flexibility to change the mood or brightness.
- Forgetting under-cabinet lights: Leaves counters dark, even with good ceiling lights.
- Mixing too many light temperatures: Makes the kitchen look chaotic.
- Using old, inefficient bulbs: Increases electricity bills and heat.
Always double-check your plan and ask for feedback from someone with experience.
Credit: www.youtube.com
How Many Recessed Lights Do You Need?
It’s easy to underestimate or overestimate. Use the lumens per square foot method for accuracy.
Calculating Lumens Needed
- Kitchen size: 12 x 15 feet = 180 square feet
- Needed: 35 lumens/sq ft x 180 = 6300 lumens
If each LED recessed light provides 800 lumens:
- 6300 / 800 = 7.8 lights
Round up—plan for 8 lights total.
Adjust For Kitchen Features
- Add extra lights for a large island or long counters.
- Use fewer lights if you have many windows and lots of natural light.
- Add under-cabinet lights to reduce ceiling light needs.
Quick Reference Table
Here’s a simple guide for typical kitchens:
| Kitchen Size (sq ft) | # of Recessed Lights (LED, 800 lm each) |
|---|---|
| 100–150 | 4–6 |
| 150–200 | 6–8 |
| 200–250 | 8–10 |
| 250–300 | 10–12 |
This is just a starting point. Always adjust for your unique layout.
Recessed Lighting Layouts For Different Kitchen Types
Not every kitchen is a simple rectangle. Here’s how to adapt for different shapes.
Galley Kitchen
- Narrow and long.
- Use two parallel rows of lights, centered over each counter.
- Space lights about 3–4 feet apart.
L-shaped Kitchen
- Place lights along both “legs” of the L.
- Focus extra lights at the corner and main work zones.
U-shaped Kitchen
- Use three rows—one for each leg of the U.
- Extra light at the central prep area.
Kitchen With Island
- Main ceiling lights for the perimeter.
- Separate row of lights directly over the island.
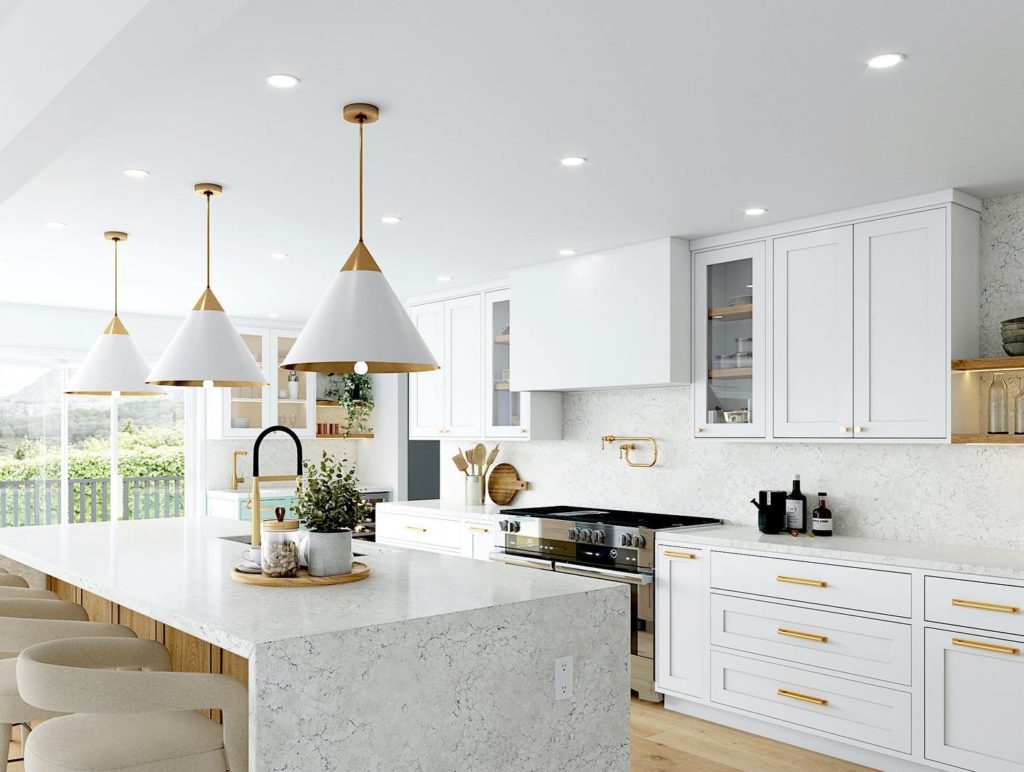
- Combine with pendant lights for style.
Open-plan Kitchen
- Use recessed lights to define the kitchen area.
- Add accent lights or pendants for dining/living space transitions.
How To Choose Switches And Dimmers
Control is just as important as placement. The right switches and dimmers give you flexibility for any activity.
Grouping Lights
- Put main ceiling lights on one switch.
- Island or accent lights on another.
- Under-cabinet lights on a third.
Using Dimmers
Dimmers let you change the light level for different needs. For example:
- Bright for cleaning or cooking.
- Dim for dinner or late-night snack.
LED-compatible dimmers are essential for modern kitchens.
Smart Controls
Smart switches or bulbs let you control lights from your phone or by voice. Helpful for busy kitchens and when your hands are full.
Installing Recessed Lighting: What To Expect
Many people hire an electrician, but understanding the process helps you plan and avoid surprises.
Typical Steps
- Mark light locations on the ceiling.
- Check for wiring, pipes, and insulation.
- Cut holes for each light.
- Run wiring to each location.
- Install and connect light fixtures.
- Add switches, dimmers, or smart controls.
- Test all lights before finishing.
Safety Tips
- Always turn off power before working.
- Use IC-rated fixtures for insulated ceilings.
- Hire a licensed electrician if unsure.
Real-world Example: A Practical Layout
Let’s say your kitchen is 14 feet by 12 feet with a 9-foot ceiling and a 4×7 foot island.
- Space main recessed lights 4.5 feet apart, starting 2 feet from walls.
- Plan two rows of three lights each for the main area.
- Add two lights directly over the island, spaced evenly.
- Place one recessed light over the sink.
- Add under-cabinet LED strips for all counters.
This gives balanced, shadow-free lighting for cooking, cleaning, and family time.
Comparing Recessed Lighting To Other Kitchen Lighting Options
Recessed lights are popular, but how do they compare to other choices?
| Lighting Type | Pros | Cons |
|---|---|---|
| Recessed | Sleek look, even light, saves ceiling space | Requires ceiling holes, not for all ceilings |
| Pendants | Decorative, good for islands | Can block sightlines, not for general lighting |
| Flush Mount | Easy to install, bright | Can look bulky, uneven light |
| Under-Cabinet | Great for tasks, no shadows | Does not light whole room |
Most kitchens use a mix for best results.
Credit: www.houzz.com
Advanced Tips For A Professional-looking Layout
- Use adjustable trims near open shelves to highlight decor.
- Install a dedicated light over the sink—never skip this.
- For high ceilings (over 10 feet), use higher wattage bulbs or more lights.
- Offset lights from ceiling fans to avoid flicker or moving shadows.
- When in doubt, “mock up” your plan with tape on the ceiling before cutting holes.
What Beginners Often Miss
- Overlooking the impact of cabinet shadows. Even with perfect ceiling lights, counters can be dark. Always add under-cabinet lights.
- Not considering future changes. If you plan to remodel or add appliances, run extra wiring now.
- Forgetting about color rendering index (CRI). Choose lights with CRI over 80 for accurate food and surface colors.
- Not using gimbal or adjustable trims near decorative areas. These prevent glare on shiny backsplashes.
Maintenance And Upgrades
Recessed lights are low maintenance, but some care keeps them working their best.
- Clean trim and lenses every few months to prevent dust buildup.
- Replace bulbs with LEDs for energy savings and longer life.
- Upgrade to smart switches or dimmers for better control.
- If a fixture flickers, check for loose wiring or replace the bulb promptly.
Sustainability And Energy Efficiency
Modern kitchens should be energy efficient. LED recessed lights use up to 80% less energy than old bulbs and last over 10 years. Dimmers and smart controls further reduce waste. When possible, use ENERGY STAR rated fixtures.
If you want more data and official recommendations, the U.S. Department of Energy offers a helpful guide on kitchen lighting at energy.gov.
Credit: www.1800lighting.com
Frequently Asked Questions
How Far Apart Should Recessed Lights Be In A Kitchen?
For most kitchens, space recessed lights half the ceiling height apart. For an 8-foot ceiling, this means about 4 feet between each light. Always adjust for obstacles and work zones.
Should Recessed Lights Be Centered Over The Counter Or In The Aisle?
Aim to place recessed lights slightly in front of cabinets, about 12–18 inches from the wall. This directs light onto the counter and avoids shadows from upper cabinets.
How Many Recessed Lights For A 12×15 Kitchen?
A 12×15 kitchen is 180 square feet. At 35 lumens per square foot, you need about 6300 lumens. If each LED recessed light provides 800 lumens, you need 8 lights for even coverage.
Can I Mix Recessed Lighting With Other Types Of Lights?
Yes, a combination of recessed, under-cabinet, and pendant lights gives the best results. This creates layers for task, accent, and ambient lighting.
What Is The Best Color Temperature For Kitchen Recessed Lights?
Most kitchens look best with 3000K (warm white) or 3500K (cool white). This gives a bright but comfortable feel for cooking and gathering.
Planning your kitchen’s recessed lighting layout may take time, but the results are always worth it. Good lighting transforms your kitchen from a workspace into the heart of your home. With these steps and tips, you can design a practical, beautiful lighting plan that fits your life perfectly.