
Leveling your stove may not seem important at first, but it makes a big difference in your kitchen. A stove that is not level can cause many problems: uneven cooking, oil or liquids pooling on one side, pots sliding while you stir, or even a poorly fitted oven door. These small frustrations can add up, making every meal more difficult. Many people do not realize that their cooking results depend as much on a properly set-up stove as on their recipe. The good news is, leveling a stove is something you can do at home without calling a professional, as long as you know the steps and pay attention to detail.
In this guide, you’ll learn everything about how to level a stove. You’ll see what tools you need, the exact steps to follow, common mistakes to avoid, and tips for different stove types. By the end, you’ll not only know how to do it, but you’ll also understand why a level stove matters for your safety, your food, and your kitchen’s appearance.
Why Leveling A Stove Matters
A stove that is even and stable is more than just a detail. When your stove is level, your pots and pans sit flat. This means heat spreads evenly, food cooks properly, and nothing slides off the burners. You also reduce the risk of spills, which can lead to burns or fires. If your stove has an oven, a level surface makes sure your cakes, casseroles, and baked goods rise and cook the same on all sides.
Another benefit: leveling your stove can help extend its life. An unbalanced stove can put stress on the frame and connections, especially for gas models. Over time, this stress may cause leaks, cracks, or damage. Fixing these problems later costs much more than spending a few minutes to level your stove now.
Tools And Materials You Need
Before you start, gather the right tools. You don’t need anything fancy, but using the correct equipment makes the process easier and more precise.
- Bubble level: A small, simple tool with a liquid-filled tube that shows when a surface is even. A longer level (24 inches or more) is best, but even a short one works.
- Adjustable wrench or pliers: For turning the stove’s leveling legs.
- Flashlight: To see under or behind the stove.
- Work gloves: To protect your hands, especially if you must move the stove.
- Flat board or baking sheet: Optional, for checking surface level.
- Carpenter’s square: Optional, for checking vertical alignment.
- Vacuum or broom: To clean under the stove if needed.
Pro Tip: If you don’t have a bubble level, you can use a smartphone app with a built-in level feature. However, traditional bubble levels are usually more accurate for this task.
Credit: www.thekitchn.com
Preparing To Level Your Stove
Before you get started, take these important steps to make sure you can work safely and efficiently.
- Turn off the stove and oven. Make sure all burners are off and cool. If you have a gas stove, it’s a good idea to turn off the gas supply valve.
- Clear the area. Remove anything around or on top of the stove, like pots, pans, and food. This gives you space to work and prevents accidents.
- Unplug the stove. For electric stoves, pull the plug from the wall. For gas stoves, this step is optional, but if there’s a plug for electronics or clock, unplug it for safety.
- Check the floor. Sweep or vacuum under and around the stove. Dirt or debris can affect the level and make it harder to adjust the legs.
- Read the manual. If you have your stove’s manual, check the section about leveling. Every model is a little different, and the manual may have special instructions.
Understanding Stove Leveling Legs
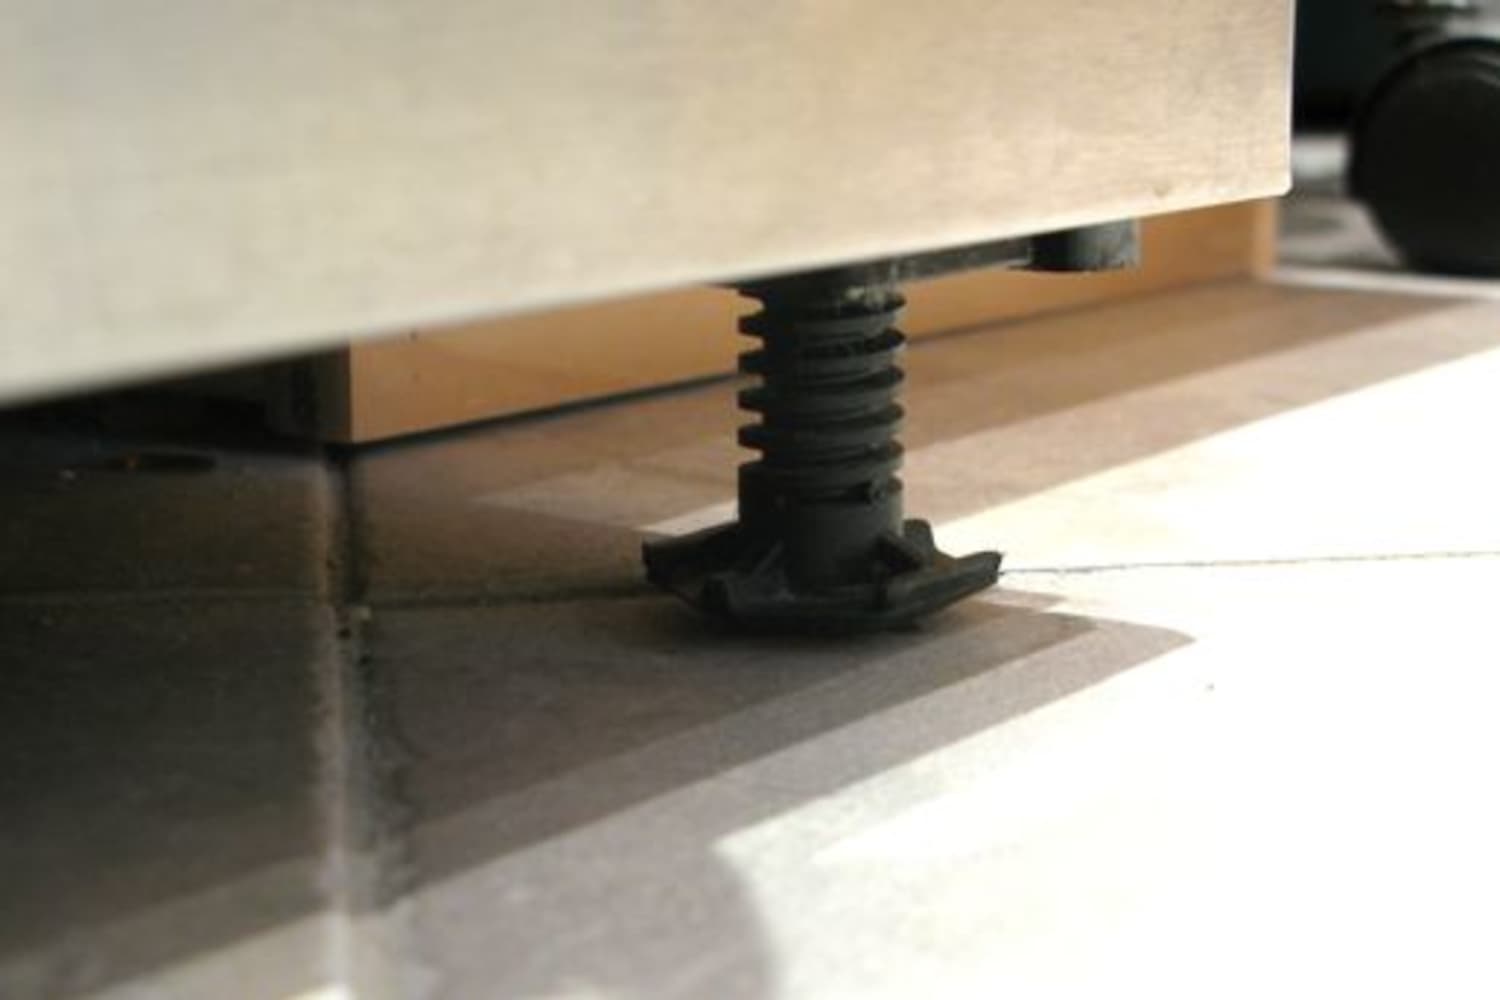
Most modern stoves have adjustable leveling legs at the bottom corners. These legs usually screw in or out to raise or lower the stove’s height. Some legs are adjusted by hand, while others require a wrench or pliers.
Older stoves might not have adjustable legs. In these cases, you may need to use shims—thin, sturdy pieces of material like wood or metal—under the stove corners to make it level.
Not obvious: Some stoves have a decorative bottom drawer or cover that hides the legs. You may need to open or remove this before you can see and adjust the legs.
Step-by-step Guide: How To Level A Stove
Let’s break down the process into simple steps you can follow.
1. Find The High And Low Sides
Place the bubble level on top of the stove, running from left to right (side to side). Watch the bubble. If it sits in the center, your stove is already level in this direction. If it drifts to the left or right, that side is higher.
Now place the level from front to back (depth). Again, check the bubble. This tells you if the stove tilts toward the wall or out into the room.
Tip: For best accuracy, check both the stove top and a flat baking sheet placed on the burners. Sometimes burner grates are not perfectly flat.
2. Adjust The Leveling Legs
Depending on where the bubble shows a tilt, you’ll need to raise or lower one or more corners.
- To raise a side: Turn the leg clockwise (to the right).
- To lower a side: Turn the leg counterclockwise (to the left).
Usually, you adjust the two front legs first, since they’re easier to reach. If the back is still off, carefully pull the stove forward and adjust the rear legs.
Not obvious: Some legs are stiff, especially if the stove is old. Spray a little WD-40 or a similar lubricant if they won’t turn easily.
3. Recheck The Level
After adjusting, put the bubble level back on the stove and check both directions again. It may take a few tries. Small changes make a big difference, so adjust a little at a time.
If possible, also check with a pot of water. Place a pan with water on the burners. If the water sits flat, you’re close. If it pools to one side, you need more adjustment.
4. Secure And Test
When the stove is level, gently push on the corners to make sure it doesn’t wobble. Some stoves have locking nuts on the legs to hold them in place—tighten these if needed.
Plug the stove back in and, for gas models, turn the gas supply back on. Test the burners and oven. Watch for any problems.
If you moved the stove away from the wall, push it back gently. Make sure the cord and gas line are not pinched or kinked.
Special Considerations For Different Stove Types
Not all stoves are the same. Here’s how to handle special situations.
Gas Stoves
Gas stoves are usually heavier and may have a flexible gas line. Always be gentle when moving the stove. Never force the stove back if the line feels tight. If you’re worried, ask a professional for help.
Some gas stoves have legs that require a special tool to adjust. Check your manual for details. Also, make sure the burners sit flat after leveling, as uneven burners can cause flames to burn unevenly or go out.
Electric Stoves
Electric stoves are usually lighter and easier to move. However, the rear legs are often harder to reach because of the power cord and wall connection. Some newer models have wheels on the back and adjustable front legs only. In this case, leveling is done mostly from the front.
Slide-in And Drop-in Stoves
Slide-in and drop-in stoves fit between cabinets and may have side lips that rest on the countertop. For these, leveling is even more important for a good fit and appearance. Sometimes, you’ll need to adjust both the stove’s legs and the cabinet height or shims to achieve a perfect result.
Older Or Built-in Stoves
If your stove is old or built into a special cabinet, you may not have adjustable legs. In these cases, use shims or thin pieces of metal, tile, or wood under the corners. Make sure they’re sturdy and won’t slip.
Never use cardboard or anything that can crush or catch fire.
How To Level A Stove On An Uneven Floor
Many kitchens have floors that are not perfectly flat—especially in older homes. This can make stove leveling tricky.
- Find the lowest point. Use your bubble level on the floor itself to see which way it slopes.
- Adjust the stove legs as much as possible. Try to raise the low side and lower the high side.
- Use shims if needed. If the legs can’t adjust enough, place shims under the corners that need extra height. Make sure the shims are fireproof and stable.
- Check stability. The stove should not rock or move when you push it.
Pro Insight: In homes with very sloped floors, consider adding a small platform or base under the stove. This is a bigger project, but it solves the problem for good.
Common Mistakes And How To Avoid Them
Even simple jobs can go wrong if you miss key details. Here are mistakes people often make when leveling a stove—and how to avoid them.
1. Not Checking Both Directions
People often level from side to side but forget front to back. Your stove must be even in both directions for best results.
2. Using The Wrong Tool
Trying to adjust legs with pliers when a wrench is needed can strip or damage the legs. Use the correct tool for your model.
3. Forgetting To Unplug Or Turn Off Gas
Safety comes first. Always unplug electrical stoves and turn off the gas supply before moving or adjusting.
4. Ignoring The Oven Door Fit
After leveling, check the oven door. It should close tightly and line up with the rest of the stove. If it doesn’t, adjust the level again.
5. Not Cleaning Under The Stove
Debris under the legs can throw off your work. Always clean the area first.
6. Over-tightening The Legs
Some people turn the legs too hard, damaging the threads or breaking the legs. Adjust gently and don’t force anything.
7. Using Unsafe Shims
Never use cardboard, plastic, or other flammable materials under your stove. Only use fire-safe options like metal or tile.
How To Level A Stove With Caster Wheels
Some stoves, especially commercial or heavy-duty models, have small wheels (casters) instead of fixed feet. These allow the stove to roll for cleaning or maintenance. Leveling with wheels is a bit different.
- Lock the wheels. Most caster wheels have a brake or lock. Engage this before adjusting.
- Add shims or adjust the caster height. Some casters are adjustable; others need shims underneath.
- Recheck after moving. Each time you roll the stove, recheck the level, as the wheels can settle differently.
Data Comparison: Stove Leveling Methods
Here’s a comparison of the most common ways to level a stove, showing their pros and cons:
| Method | Pros | Cons | Best For |
|---|---|---|---|
| Adjustable Legs | Easy, fast, built-in | Limited range, can wear out | Most modern stoves |
| Shims | Works on any surface, flexible | Can slip if not secured, must use fireproof material | Old stoves, uneven floors |
| Platform/Base | Permanent, stable | Requires construction, not for renters | Homes with very sloped floors |
| Adjustable Casters | Easy movement, height adjustment | May not lock tightly, can collect dirt | Commercial kitchens |

Credit: www.youtube.com
How Often Should You Check Your Stove’s Level?
Most people level their stove once and forget about it. But stoves can shift over time, especially if you move them to clean behind, remodel your kitchen, or if your floor settles. It’s a good idea to check your stove’s level every six months, or whenever you notice:
- Food cooking unevenly
- Pots sliding or tilting on burners
- Oven doors not closing smoothly
- New gaps between the stove and countertop
Pro Tip: Mark the position of your stove legs on the floor with a bit of tape. If you move the stove, you’ll know exactly where it was for easy reset.
What To Do If You Can’t Level The Stove
Sometimes, no matter what you try, the stove just won’t sit right. Here’s what you can do:
- Check for damaged legs. Sometimes the legs are bent or stripped and need replacement.
- Inspect the floor. If it’s badly sloped or damaged, fixing the floor may be the only solution.
- Ask for help. If your stove is built-in, gas lines are rigid, or you feel unsure, contact a licensed appliance installer.
Safety Tips When Leveling A Stove
Leveling a stove isn’t dangerous, but a few safety rules keep you and your kitchen safe.
- Always unplug electric stoves before moving.
- Turn off gas supply valves for gas stoves.
- Wear gloves to avoid cuts or pinches.
- Don’t force the stove—gas lines and cords can break if stretched.
- After leveling, check all connections before using again.
Leveling A Stove In Special Situations
Leveling A Stove Next To A Countertop
Many stoves sit between counters. If the stove is higher or lower than the counter, it can look bad and make it hard to move pots. Try to match the height as closely as possible. Sometimes, you must adjust the countertop, not just the stove.
Leveling A Stove On Tile Or Uneven Surfaces
Tile floors can be uneven, with high and low spots. Move the stove a little at a time and check the level at each spot. Use small, fireproof shims under the legs as needed.
Leveling A Stove For The First Time
If your stove is brand new, check the legs before installing. Sometimes, they’re shipped screwed all the way in. Adjust before you push the stove into place to avoid scratching your floor or cabinets.
Signs Your Stove Is Not Level
It’s not always obvious when a stove is uneven. Watch for these signs:
- Oil or liquids pool on one side of the pan
- Food burns on one side but is raw on the other
- Baked goods rise unevenly
- Oven racks slide out by themselves
- The stove wobbles when you stir
If you notice these problems, it’s time to check your stove’s level.
Stove Leveling And Appliance Warranty
Some appliance warranties require that the stove be installed and leveled according to the manual. If you don’t, you might void your warranty. Always keep your installation receipts and photos if you have a new stove.
Leveling A Stove Vs. Leveling Other Appliances
You might wonder how leveling a stove compares to other kitchen appliances. Here’s a quick look:
| Appliance | Leveling Method | Reason for Leveling |
|---|---|---|
| Stove | Adjustable legs, shims | Even cooking, safety |
| Refrigerator | Front adjustable legs, rear rollers | Door seals, compressor function |
| Washing Machine | All four legs adjustable | Vibration, noise reduction |
| Dishwasher | Adjustable feet at front | Proper drainage, door fit |
When To Call A Professional
Most people can level their stove without help. But call a professional if:
- The stove is too heavy to move safely.
- The gas line is rigid, old, or leaking.
- You cannot adjust the legs or shims properly.
- You notice damage to the stove or flooring.
A technician can also check for gas leaks, electrical issues, or other safety problems. This is especially important for built-in or commercial stoves.
Credit: danmarcappliance.com
Real-life Example: Leveling A Stove In An Old House
Sam bought a 1950s house with a sloped kitchen floor. Every time he fried eggs, the oil pooled in one corner. He tried adjusting the stove legs, but they couldn’t reach high enough on the low side. Instead, Sam used metal shims under the lowest leg.
He checked the level in all directions, made small adjustments, and finally, his pans sat flat and his food cooked evenly.
Lesson: Sometimes, you need both adjustable legs and shims, especially in older homes.
Stove Leveling And Kitchen Remodeling
If you’re remodeling your kitchen, always check the level of your floor before installing new cabinets or appliances. A perfectly level floor makes installing everything easier and helps your kitchen look its best.
Pro Insight: Some new stoves have built-in spirit levels to make setup easier. Ask about this feature if you’re shopping for a new model.
Where To Find More Help
If you need more information, many manufacturers have support pages with diagrams and tips. For a deeper look at appliance installation and safety, see the U.S. Department of Energy’s Appliance Maintenance Tips.
Frequently Asked Questions
What If My Stove Has No Adjustable Legs?
You can use fireproof shims like metal or tile under the corners that need extra height. Make sure the stove is stable and does not wobble.
How Do I Know If My Stove Is Level Enough?
The bubble level should stay between the lines in both directions (side to side and front to back). Also, pots and pans should sit flat and liquids should not pool on one side.
Can I Use Cardboard Or Plastic As Shims?
Never use cardboard, plastic, or wood under a stove. These can crush, burn, or cause the stove to shift. Only use fire-safe materials like metal or ceramic tile.
Does Leveling The Stove Affect The Oven?
Yes. An uneven stove can cause the oven racks to tilt, which can lead to uneven baking and problems with the oven door sealing.
How Often Should I Check If My Stove Is Still Level?
Check your stove’s level every 6 months, or whenever you move it or notice uneven cooking.
Leveling your stove is a small task that brings big rewards: safer cooking, better meals, and less stress in your kitchen. Taking a few minutes now can save you many headaches later. With the right tools and these clear steps, you can level your stove confidently—no professional needed.