
Making your refrigerator flush with cabinets is a popular home upgrade that brings a seamless, high-end look to your kitchen. It’s not just about style—this design choice also improves space flow, makes cleaning easier, and can even increase your home’s value.
But achieving this flush look is more than pushing your fridge closer to the wall. It takes careful planning, the right tools, and sometimes professional help. Many homeowners start the project and run into unexpected issues with airflow, wiring, or appliance fit.
This guide will walk you through every step, from measuring and planning to installation and finishing touches. You’ll also discover practical tips and common mistakes to avoid, so you can create a kitchen that looks custom-built, even if you’re working with standard appliances.
Understanding The Flush Refrigerator Look
The flush look means the refrigerator doors and sides are even with the surrounding cabinet faces. This is different from most kitchen setups, where the fridge sticks out several inches. Achieving this look can be done in a few ways, but the main goal is a clean, unified surface. Some people use counter-depth refrigerators for this purpose, but not all counter-depth models are truly flush with cabinets.
Why Homeowners Want This
- Modern style: Flush appliances create a sleek, minimalist design.
- Space efficiency: Less protrusion means better flow in tight kitchens.
- Easier cleaning: No hard-to-reach gaps behind or beside the fridge.
- Increased home value: High-end buyers often look for custom details.
What Flush Is Not
It’s important to know the difference between “flush” and “built-in. ” A truly built-in refrigerator sits completely inside cabinetry, but flush means only the front surface is even with cabinet doors. Most standard fridges cannot be fully built-in without major remodeling.
Planning Your Project
Getting a refrigerator flush with cabinets is not just about buying the right appliance. Planning is the key to success. Skipping this step leads to poor fit, airflow problems, and even damaged appliances.
Measuring Your Space
- Width: Measure the space between the cabinets where the fridge will go. Leave at least 0.5–1 inch of extra room for easy sliding and ventilation.
- Height: Measure from the floor to the lowest point of the upper cabinets or trim.
- Depth: Standard cabinets are 24 inches deep. Many refrigerators are 30–36 inches deep with doors, so they stick out. Counter-depth fridges are usually 24–27 inches deep.
Checking Floor And Wall Conditions
Not all kitchen floors are perfectly level or walls perfectly straight. Use a level tool to check both. If the floor is uneven, you may need to add shims under the fridge or adjust the feet.
Considering Door Swing And Clearance
A flush refrigerator must open fully without hitting the wall or cabinets. Some doors need extra space to open past 90 degrees. Check the manufacturer’s specifications for minimum door clearance.
Power And Water Access
Make sure the electrical outlet and water line (if your fridge has ice/water features) are in the right place. Ideally, these should be behind or beside the fridge, not behind cabinets.
Choosing The Right Refrigerator
Selecting the right refrigerator is probably the most important step. Not every model is suitable for flush installation.
Counter-depth Vs. Standard Refrigerators
Here’s how the two main types compare:
| Feature | Counter-Depth | Standard Depth |
|---|---|---|
| Depth (without doors) | 24–27 inches | 30–36 inches |
| Capacity | 10–25 cu. ft. | 18–32 cu. ft. |
| Flush Fit | Possible | Usually not possible |
| Price | Higher | Lower |
Built-in Refrigerators
These are designed to sit completely inside cabinetry and are always flush or slightly set back. They are expensive and usually require custom installation.
Important Features To Look For
- Flat doors: Curved doors stick out.
- Reversible hinges: Increases flexibility for door swing.
- Cabinet-depth body: Make sure the body (not just the doors) fits inside the cabinetry depth.
Mistakes To Avoid
- Ignoring the refrigerator’s ventilation requirements. Some fridges need space behind or above for airflow.
- Choosing a fridge with thick handles that stick out far.
- Not checking the actual cabinet depth (sometimes base cabinets are deeper than 24 inches due to countertop overhang).
Preparing Your Cabinets
In most cases, you will need to adjust your cabinets or add panels to achieve a flush look. This may be a DIY job or require a carpenter.
Modifying Existing Cabinets
- Remove baseboard trim behind the fridge if it blocks installation.
- Resize or move side cabinets if the opening is too tight or not square.
- Add filler strips to create a perfect fit between the fridge and cabinets.
Building Out The Cabinets
If your cabinets are shallower than the fridge, you can “build out” the cabinets to match the fridge depth. This is often done with plywood or MDF panels attached to the sides and back of the cabinet frames.
Example:
Suppose your fridge is 27 inches deep and your cabinets are 24 inches. You would add a 3-inch build-out panel behind the cabinets on either side of the fridge space.
Creating A Refrigerator Enclosure
Many custom kitchens have a fridge enclosure—panels on both sides and a cabinet above. This frames the appliance and makes it look built-in.
| Enclosure Component | Purpose |
|---|---|
| Side Panels | Hide fridge sides, provide structure |
| Upper Cabinet | Fills space above, adds storage |
| Filler Strips | Close gaps, keep look seamless |
Matching Panels And Colors
Use the same material and color as your cabinets for all visible panels. Some people use end panels that reach the floor for a true built-in effect.
Ventilation And Safety
One of the biggest mistakes is blocking airflow around your fridge. All refrigerators need some ventilation to prevent overheating.
Minimum Air Gaps
Check your fridge’s manual for ventilation requirements. Most need at least:
- 1 inch behind the fridge
- 0.5 inch above and on each side
Never push the fridge tight against the wall or panels without checking.
Hidden Vents
Some high-end refrigerators vent from the front. These can be installed nearly flush with minimal side clearance.
Fire Safety
Make sure the electrical outlet is accessible. Don’t bury it behind cabinets or panels you can’t remove.
Moving And Installing The Refrigerator
Once the space is prepared, it’s time to move your fridge into place. This part can be tricky—modern fridges are heavy and awkward.
Safe Moving Tips
- Use an appliance dolly with straps.
- Protect floors with cardboard or mats.
- Move slowly to avoid damaging cabinets.
Connecting Water And Power
Plug in the fridge before sliding it fully into place. If your fridge has a water line, connect it carefully and check for leaks.
Adjusting The Level
Most fridges have adjustable feet. Use a level tool and adjust until the fridge sits flat and doors align with the cabinets.
Creating A Seamless Look
Even with the right fridge and cabinets, small gaps can ruin the flush appearance. Here’s how to perfect the look:
Adding Side Trim
Install narrow trim strips between the fridge and cabinets. These cover any small gaps and make the design look intentional.
Using Cabinet Panels
Some refrigerators accept custom cabinet panels that attach to the doors. This makes the fridge look like part of the cabinetry. Only certain models offer this feature.
Masking The Toe Kick
Extend the cabinet toe kick (the recessed baseboard under cabinets) in front of the fridge space. This hides the gap at the floor and makes the fridge blend in.
Hiding Hinges
Choose a fridge with concealed hinges. Exposed hinges can stick out and break the clean line.
When To Hire A Professional
While many handy homeowners can handle this project, some situations need professional help:
- Custom cabinetry: Building or modifying cabinets for a perfect fit.
- Electrical or plumbing changes: Moving outlets or water lines.
- Heavy built-in appliances: Some built-in fridges need two or more people to install safely.
A carpenter or kitchen designer can help you avoid costly mistakes, especially if you want a true custom look.
Real-world Examples
Let’s look at two different kitchen scenarios to see how flush refrigerator installation works in practice.
Example 1: Upgrading An Existing Kitchen
Maria has a standard-depth fridge that sticks out 6 inches from her cabinets. She wants a flush look, but her cabinets are only 24 inches deep.
Steps she takes:
- Buys a 24-inch deep counter-depth fridge.
- Removes the old fridge and trims the baseboard.
- Adds 3-inch deep plywood panels to the sides of the cabinets.
- Installs the new fridge and fills small side gaps with matching trim.
- The final look: The fridge is almost perfectly flush with the cabinet doors.
Example 2: New Kitchen Build
Eric is building a new home and wants a seamless kitchen.
Steps he takes:
- Works with his kitchen designer to order 27-inch deep base cabinets for the fridge wall.
- Chooses a built-in fridge with front venting.
- The builder installs a full enclosure with matching side panels and overhead cabinet.
- The fridge sits perfectly flush, and the doors align with the cabinets.
Cost Breakdown
How much does it cost to make your refrigerator flush with cabinets? The answer depends on your choices.
| Item | Low Estimate | High Estimate |
|---|---|---|
| Counter-depth fridge | $1,200 | $3,000+ |
| Cabinet modifications | $300 | $1,000 |
| Custom panels | $250 | $700 |
| Professional installation | $200 | $1,000 |
| Total project cost | $1,950 | $5,700+ |
Many people save money by doing cabinet work themselves, but always budget for unexpected issues.
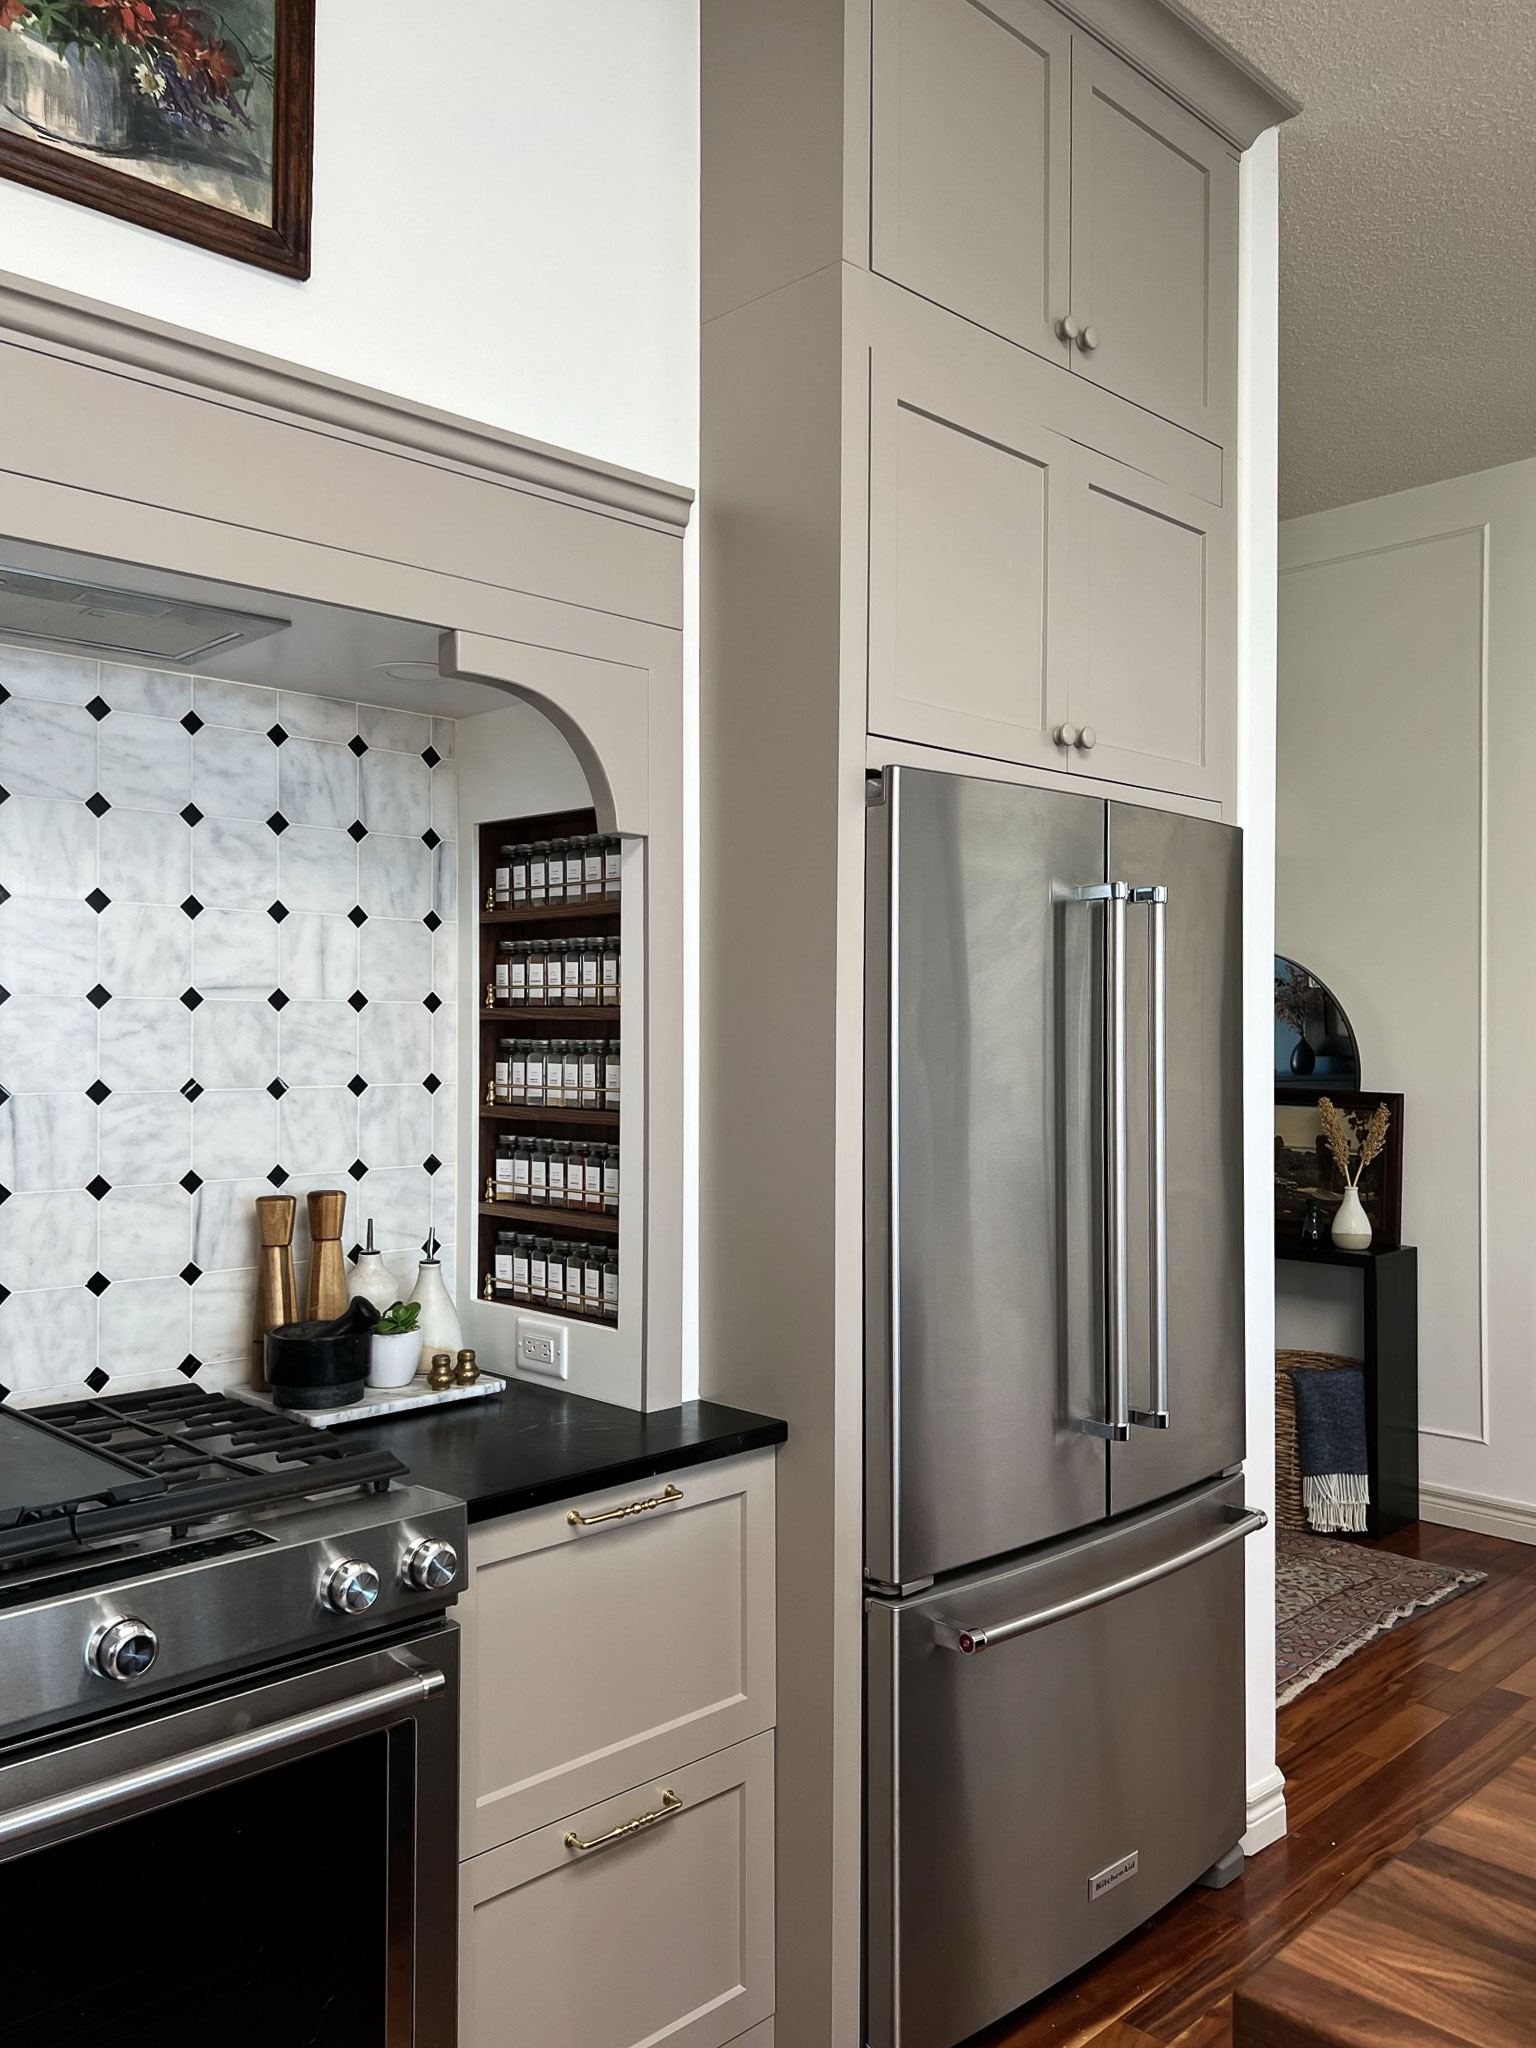
Credit: erinzubotdesign.com
Common Mistakes And How To Avoid Them
Many DIYers make the same errors when trying to get their refrigerator flush with cabinets. Knowing these mistakes can save you time and money.
Not Allowing Enough Ventilation
This is the most common error. Without enough space for heat to escape, your fridge will work harder and may break early.
Tip: Always check the manufacturer’s airflow requirements before finalizing your design.
Choosing The Wrong Refrigerator
A standard-depth fridge rarely sits flush with cabinets. Even many counter-depth models are not truly flush.
Tip: Look for models with flat doors and check the depth with handles and doors included.
Ignoring Door Swing
If the fridge door can’t open fully, you won’t be able to remove shelves or clean inside.
Tip: Make sure there is clear space for the door to swing past 90 degrees.
Blocking Power Or Water Access
If you can’t reach the outlet or shutoff valve, repairs become a nightmare.
Tip: Design your enclosure so you can slide out the fridge easily.
Poor Panel Matching
Mismatched panels ruin the seamless look.
Tip: Order panels from your cabinet supplier, or paint them to match.
Advanced Tips For A Perfect Flush Look
Want your kitchen to look like a magazine photo? Here are some advanced tips:
- Inset cabinet doors: These sit inside the cabinet frame, making it easier to align the fridge perfectly.
- Touch-latch panels: Use push-to-open panels on the fridge for a handleless look.
- Integrated lighting: Add under-cabinet lighting around the fridge enclosure for a luxury effect.
- Smart fridge options: Some brands offer Wi-Fi-enabled flush models with hidden displays.
Maintenance After Installation
Once your fridge is flush with the cabinets, keeping it that way takes a little care.
- Clean the vents: Dust can build up, so vacuum the vent area every few months.
- Check for leaks: If you have a water line, inspect it twice a year.
- Inspect trim and panels: Make sure nothing comes loose over time.
Non-obvious Insights Most Beginners Miss
- Counter-depth is not always flush: Many “counter-depth” fridges still stick out past cabinet doors because the doors are thicker than the body. Always check the total depth including handles.
- Appliance panel weight: Adding custom panels to fridge doors can be heavy. Not all fridges are designed to support this extra weight, which can stress the hinges over time.

Credit: www.reddit.com
Resources For More Information
If you want to explore more about kitchen appliance installation and design, you can visit the This Old House website for detailed guides and videos.
Frequently Asked Questions
What Is The Difference Between Flush And Built-in Refrigerators?
Flush refrigerators sit even with the cabinet faces, while built-in refrigerators are installed fully inside a cabinet enclosure. Built-in models are usually more expensive and require custom installation, but both styles create a seamless look.
Can I Make A Regular Fridge Flush With Cabinets?
It’s very difficult. Regular, or standard-depth, refrigerators are deeper than most cabinets and will always stick out. You can build out the cabinets or use panels to reduce the appearance, but a true flush look is best achieved with a counter-depth or built-in model.
How Much Space Do I Need For Ventilation?
Most refrigerators need at least 1 inch of space behind and 0.5 inch on each side for proper airflow. Always check the manufacturer’s instructions before installing.
Are There Ready-made Kits To Help Install A Flush Fridge?
Some manufacturers offer trim kits or side panels designed for their specific refrigerator models. These can help create a built-in look, but you’ll usually need to modify cabinets or buy matching panels separately.
Will Making My Refrigerator Flush With Cabinets Increase My Home’s Value?
Yes, especially in high-end or newly renovated homes. Buyers like the custom, seamless look. However, value also depends on the quality of installation and the overall kitchen design.
Making your refrigerator flush with cabinets is a project that pays off in style and function. With good planning and attention to detail, you can enjoy a modern kitchen look and improved usability for years to come.

Credit: www.reddit.com