
Making your refrigerator look built-in can turn an ordinary kitchen into a space that feels custom and high-end. Many people dream of a seamless kitchen, where appliances blend smoothly with cabinets. The good news is, you don’t need to buy an expensive built-in fridge to get this look.
With some planning, creativity, and simple steps, you can make almost any standard refrigerator appear as if it was made for your kitchen design.
This guide will show you how to achieve a built-in refrigerator look without a full remodel. From measuring and panel installation to clever trim work and cost-saving alternatives, you’ll discover practical advice for every budget and skill level. Whether you own your home or rent, want a quick fix or a more permanent solution, you’ll find answers here. Plus, you’ll learn expert tips and common mistakes to avoid, so your project looks polished and professional.
Understanding The Built-in Refrigerator Look
The built-in refrigerator style is popular in modern and luxury kitchens. These fridges are installed flush with cabinets and may even have doors that match the surrounding panels. The goal is to create a unified appearance, making the refrigerator almost disappear into the cabinetry.
Why do people want this look?
- It makes kitchens feel larger and less cluttered.
- It adds a custom, expensive touch.
- It helps resale value by appealing to buyers.
However, real built-in refrigerators are costly. They often require custom cabinets and professional installation. Luckily, you can get a similar effect with a few smart strategies—no need to break the bank.
Planning Your Built-in Refrigerator Project
Before you start, planning is essential. A built-in look is all about details and fit. Rushing can lead to expensive mistakes or a result that looks unfinished.
Measure Everything Carefully
First, measure your refrigerator’s:
- Height
- Width
- Depth (including the doors and handles)
Next, measure the fridge opening in your kitchen. Write down these numbers. Most built-in looks work best if your fridge fits snugly, but not tightly, between cabinets or walls.
Pro Tip: Always leave at least 1 inch of space at the sides and top for air circulation. Without this, your fridge might overheat.
Study Your Kitchen Layout
Look at where your refrigerator sits. Is it between cabinets? At the end of a counter? Near a wall? Each position needs different solutions.
Common layout challenges:
- Fridges sticking out past cabinets
- Gaps at the sides or top
- Visible appliance sides
Planning for these will help you choose the right solution.
Decide Your Budget And Skills
Some methods cost more or need professional help. Others are simple DIY projects. Decide:
- Are you willing to build or buy panels?
- Will you hire a carpenter, or do it yourself?
- Are you allowed to make permanent changes (if renting)?
Knowing this will narrow down your best options.

Credit: refrigeratortrimkits.com
Main Strategies To Make Your Refrigerator Look Built-in
You don’t need to use every method below. Choose the ones that fit your kitchen, budget, and taste.
1. Add Side Panels
One of the most effective ways is to add side panels on both sides of your fridge.
How to do it:
- Buy or build panels from plywood or MDF. They should match your cabinets.
- Paint or cover them with matching laminate.
- Attach the panels to the wall and cabinet above with screws or brackets.
Benefits:
- Hides the sides of your fridge.
- Makes the appliance look like it’s part of the cabinetry.
Insight: For a smoother look, extend the panels from floor to ceiling. This draws the eye upward and makes the kitchen feel taller.
2. Install A Cabinet Above The Refrigerator
Most built-in fridges have a cabinet above. This closes the gap and helps blend the fridge with the rest of the kitchen.
Steps:
- Measure the space above your fridge.
- Buy or build a cabinet that matches your others.
- Install with wall anchors for safety.
If your fridge is taller than standard, you may need a custom or open shelf instead.
Mistake to avoid: Don’t forget to check your fridge’s door swing. The cabinet should not block the door from opening fully.
3. Use Filler Strips Or Trim
Gaps between the fridge and cabinets ruin the built-in look. Filler strips or trim can solve this.
What to use:
- Paintable wood strips
- Cabinet manufacturer’s fillers
- Decorative molding
How to install:
- Cut to the right height and width.
- Attach with small finishing nails or screws.
- Caulk and paint for a seamless finish.
Pro Tip: Match the trim style to your existing cabinets. Simple, flat strips suit modern kitchens. Crown molding works for traditional styles.
4. Apply Cabinet-matching Panels To Refrigerator Doors
High-end kitchens often use panel-ready fridges, which allow panels to be attached to the doors. You can mimic this by adding panels to a standard refrigerator.
How:
- Order custom panels from a cabinet shop, or cut plywood to size.
- Use strong double-sided tape or removable adhesive strips for a non-permanent solution.
- For a more secure fit, use screws (check fridge warranty first).
Things to know:
- Some fridges can’t support heavy panels; check your model.
- Door panels add thickness, so leave enough space for doors to swing open.
Example: A white fridge with white panel overlays and brushed metal handles can look almost identical to a built-in model.
5. Build A Refrigerator Enclosure
If you want the most seamless look, build a full refrigerator enclosure. This is a box or frame that wraps around the fridge, often with side panels and a top cabinet.
Steps:
- Measure and build side panels as above.
- Install a top cabinet or box.
- Add trim or fillers for small gaps.
- Paint or finish everything to match.
Consider: This option is more permanent. It may not be allowed in rentals or if you plan to move soon.
Non-obvious insight: Use a slightly deeper enclosure (about 2 inches more than your fridge) to allow for future appliance upgrades.
6. Extend The Depth Of The Surrounding Cabinets
Many kitchens have 24-inch deep cabinets, but most standard fridges are deeper (28–36 inches). This makes the fridge stick out. To hide this:
- Build out the cabinets on each side with extra filler panels.
- Add a deeper countertop above the fridge area.
- Use deep pantry cabinets next to the fridge to reduce the visual bump-out.
Example: Adding 4-inch deep filler boxes behind side cabinets can help align the fridge with the cabinet fronts.
7. Paint The Sides And Top Of The Refrigerator
For a fast and affordable fix, paint the fridge sides and top to match your cabinets or panels.
How to do it:
- Clean the surface well.
- Use appliance paint or spray paint designed for metal.
- Apply thin, even coats.
Result: While this won’t hide the fridge, it reduces contrast, so the appliance blends in better.
8. Cover The Refrigerator With Peel-and-stick Wraps
Vinyl wraps come in many colors and patterns. You can cover the fridge in woodgrain, stainless steel, or any color you want.
Steps:
- Measure and cut wrap to fit.
- Peel and stick onto clean surfaces.
- Smooth out bubbles with a squeegee.
Benefits:
- Removable, so good for renters.
- Inexpensive compared to new appliances.
Non-obvious tip: Use a wrap with a matte finish for a more realistic panel look.
9. Use Open Shelving Above Or Beside The Refrigerator
If you can’t add a full cabinet, open shelves can help.
- Install wood or metal shelves above the fridge.
- Store baskets, cookbooks, or decor items.
- Paint or stain shelves to match cabinets.
Why it works: It fills empty space and draws attention away from the fridge.
10. Add Decorative Hardware
Changing the handles and pulls on your refrigerator can make it match your cabinets.
- Choose handles in the same style and finish as your cabinet hardware.
- Make sure the new handles fit your fridge’s mounting holes.
Example: If your cabinets have black bar pulls, add similar ones to your fridge doors.
11. Hide The Refrigerator With A Custom Door
For a dramatic look, install a custom cabinet door in front of the refrigerator.
How:
- Build a lightweight door that matches your cabinets.
- Attach it to the fridge using heavy-duty hinges or a sliding rail.
- Make sure you can still access all fridge functions.
Consider: This works best for side-by-side or French door fridges.
12. Frame The Refrigerator With Tall Pantry Cabinets
Placing tall cabinets on both sides of the fridge creates a built-in effect.
- Buy or build pantry cabinets the same depth as the fridge.
- Secure them to the wall and each other.
- Add trim at the top for a finished look.
Pro Tip: If space allows, use one cabinet for food and the other for cleaning supplies or small appliances.
13. Lower The Refrigerator’s Visual Impact With Color
Dark fridges stand out against light cabinets and vice versa. To make your refrigerator blend:
- Paint nearby walls and trim in a color close to the fridge.
- Use decor in similar tones.
- Add a small chalkboard or magnetic board to the fridge door.
Non-obvious insight: Even changing just the wall color behind your fridge can make it “disappear” into the design.
14. Upgrade To A Counter-depth Refrigerator
If you’re replacing your fridge, consider a counter-depth model. These are about 24–27 inches deep, so they sit closer to the cabinet fronts.
Compare:
| Type | Average Depth | Fits Flush? | Cost (avg.) |
|---|---|---|---|
| Standard | 30–36 in | No | $800–$2,000 |
| Counter-Depth | 24–27 in | Yes | $1,200–$3,500 |
| Built-In | 24–25 in | Yes | $5,000–$10,000+ |
Why this matters: Even without panels, a counter-depth fridge looks more custom.
15. Hide Small Gaps With Flexible Caulk Or Foam
Tiny gaps between your fridge and panels can collect dust and look sloppy. Use paintable caulk or flexible foam strips to seal these spaces.
- Apply a thin bead, then smooth with a wet finger.
- Paint over to match the panels.
Benefit: Gives a truly seamless finish, especially with custom panels.
16. Install A Refrigerator Surround Kit
Some cabinet makers sell refrigerator surround kits. These include side panels, a top cabinet, trim, and sometimes back panels.
- Kits are often available in popular cabinet colors.
- Easier and faster than building from scratch.
Tip: Check for kits from brands like IKEA, Home Depot, or local cabinet shops.
17. Add A Toe Kick Or Baseboard
A toe kick is the recessed area at the bottom of cabinets. Adding a matching toe kick under your fridge enclosure improves the built-in look.
- Use leftover baseboard or matching cabinet toe kick material.
- Attach with glue or small nails.
Pro Tip: Leave the back open for air flow.
18. Light The Area Above The Refrigerator
Install LED strip lights or puck lights above the fridge or inside an open cabinet.
- Lights draw the eye upward, minimizing the fridge’s bulk.
- Adds a luxury, finished touch.
Non-obvious insight: Use motion-sensor lights so they turn on automatically when you walk by.
19. Use Custom Cabinetry For The Ultimate Built-in
For the most seamless look, hire a carpenter or cabinetmaker to build custom cabinets around your fridge.
- They can match wood, paint, and hardware exactly.
- Can include built-in features like spice racks or wine shelves.
Cost: This is the most expensive option, but it adds the most value and style.
20. Combine Multiple Methods For The Best Result
Often, the best built-in look uses several of these ideas together. For example:
- Add side panels, a top cabinet, and filler strips.
- Paint the fridge sides and change the hardware.
- Install LED lighting above and a toe kick below.
Combining strategies lets you customize the look to your kitchen.
Cost Comparison: Diy Vs. Professional Solutions
Let’s break down common costs for making your refrigerator look built-in:
| Solution | DIY Cost | Pro Install Cost | Time Needed |
|---|---|---|---|
| Side Panels | $100–$400 | $300–$900 | 1 day |
| Top Cabinet | $150–$350 | $250–$600 | Half day |
| Custom Panels | $200–$600 | $500–$1,500 | 2 days |
| Paint/Wrap | $40–$150 | N/A | 2–3 hours |
| Full Surround | $400–$1,200 | $1,000–$4,000 | 2–3 days |
Insight: DIY is much cheaper, but hiring a pro may be necessary for custom cabinetry or if you want a perfect finish.
Step-by-step: Making Your Refrigerator Look Built-in
Here’s a practical example for a standard fridge between cabinets:
- Measure everything (fridge and opening).
- Buy or build side panels (3/4-inch plywood, painted to match).
- Install panels with L-brackets to the wall and cabinet above.
- Add a top cabinet (pre-made or custom depth).
- Install filler strips for any gaps.
- Paint or wrap fridge sides if visible.
- Add hardware to match cabinets.
- Seal gaps with caulk.
- Install LED lighting above, if desired.
Result: Your fridge will look custom and built-in—at a fraction of the cost.
Common Mistakes To Avoid
- Not leaving enough space for ventilation: This can shorten your fridge’s life or void the warranty.
- Blocking the door swing: Always check how far the door needs to open.
- Using heavy panels that strain the hinges.
- Skipping secure mounting: Unstable panels can fall or cause injury.
- Forgetting about appliance service access: Leave enough space to pull out the fridge for maintenance.
Maintenance And Cleaning Tips
After you finish your built-in fridge look, keep it fresh with these tips:
- Wipe down panels and trim regularly. Dust collects quickly around appliances.
- Check caulk and filler strips for cracks or gaps every few months.
- If you used paint or wraps, clean gently with a damp cloth—avoid harsh chemicals.
- Make sure vents are never blocked by decor, panels, or dust.
When To Call A Professional
Some tasks are best left to an expert:
- Building custom cabinetry
- Electrical work for lights or outlets
- Installing heavy panels or doors
- If you’re unsure about safe ventilation
Spending more on a pro can save money and stress in the long run.

Credit: amywardcreates.com
Real-life Examples
Example 1: A small condo with a white fridge and oak cabinets. The owner added white-painted side panels and a new cabinet above. The fridge now looks like it came with the kitchen.
Example 2: A modern kitchen with deep gray cabinets and a black fridge. The owner used vinyl wrap in gray for the fridge and installed LED lights above. The fridge blends perfectly.
Example 3: A family home with a French door fridge at the end of a cabinet run. A carpenter built a surround with a wine rack above and tall pantry cabinets on both sides. The fridge is now a design feature.
How Built-in Looks Affect Home Value
A kitchen with a built-in refrigerator look is attractive to buyers. According to a report from the National Association of Realtors, kitchen upgrades are among the top ways to add value to a home.
Key reasons:
- Makes the kitchen feel larger and more organized
- Shows attention to detail
- Sets your home apart from others with basic appliances
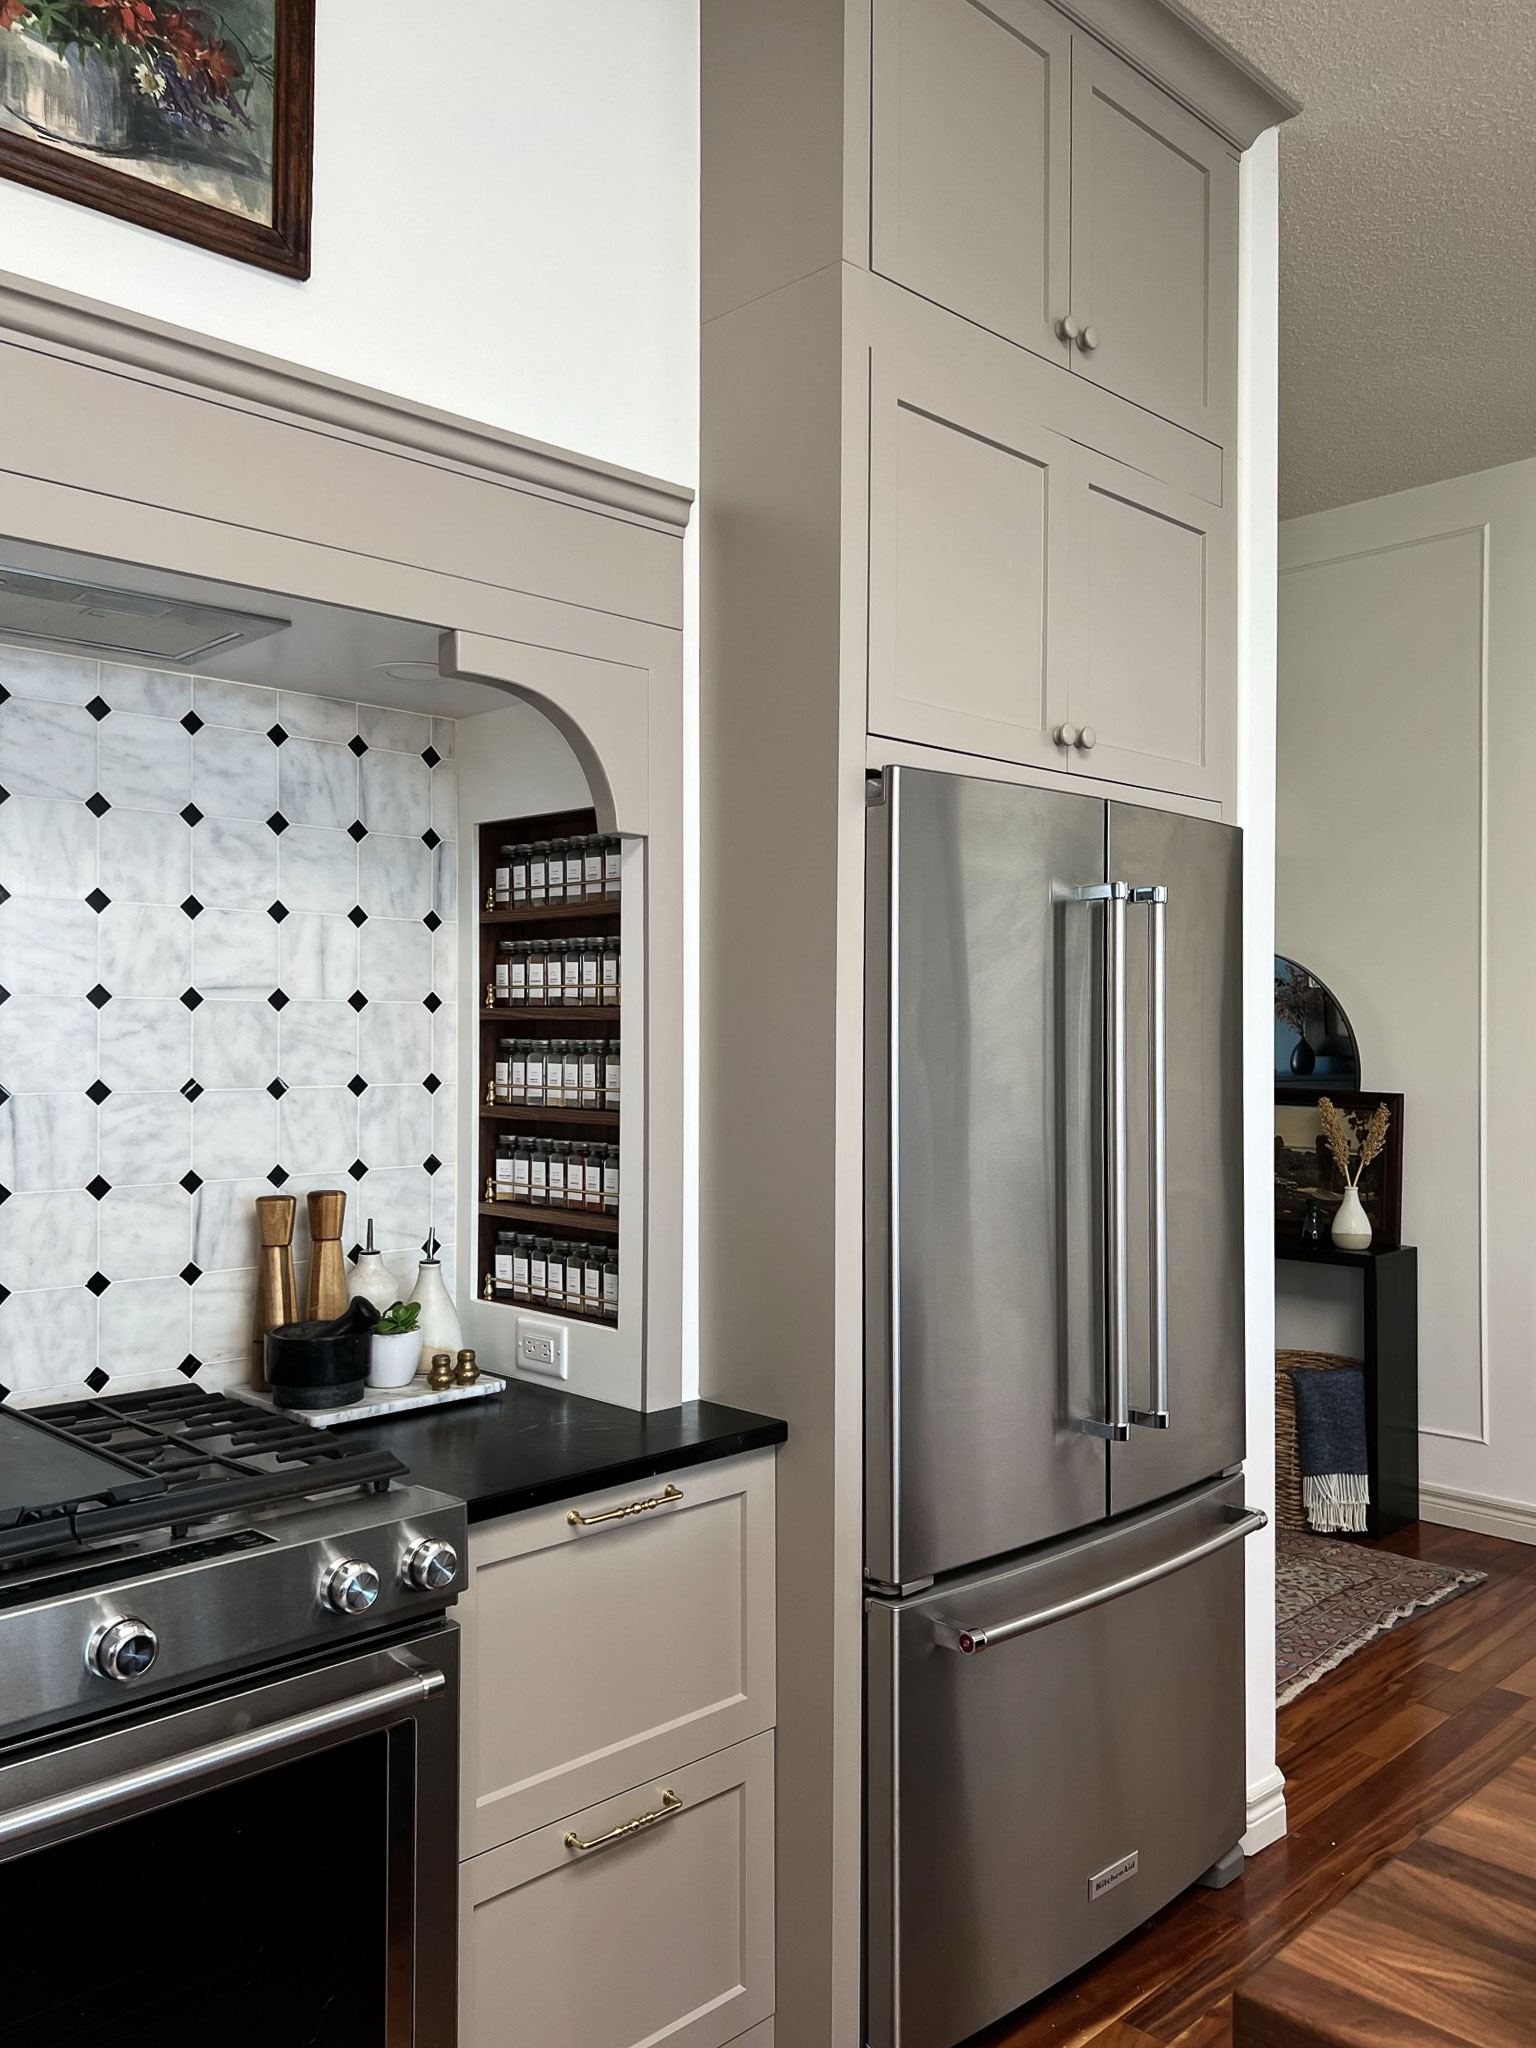
Credit: erinzubotdesign.com
Frequently Asked Questions
How Much Space Should I Leave Around My Refrigerator For Ventilation?
Most fridges need at least 1 inch of space at the sides and top, and 2 inches at the back for proper airflow. Check your fridge’s manual for exact requirements. Never block vents with panels or trim.
Can I Make A Built-in Look If I Rent My Home?
Yes, choose removable solutions like peel-and-stick panels, vinyl wraps, or free-standing side panels. Avoid permanent changes or drilling into walls.
What’s The Difference Between Counter-depth And Built-in Refrigerators?
Counter-depth refrigerators are shallower and sit nearly flush with cabinets, but may still show the doors. Built-in refrigerators are designed to be installed inside cabinetry and can be fully covered with matching panels. Learn more at Wikipedia.
Is It Possible To Add Panels To Any Refrigerator?
Not all fridges can support heavy panels. Look for models with flat doors and strong hinges. Some manufacturers make panel-ready models for this purpose.
How Do I Choose The Right Style For My Kitchen?
Match your panels, trim, and hardware to your existing cabinet style. For modern kitchens, use clean lines and simple panels. For traditional kitchens, add decorative molding or raised panels.
A built-in refrigerator look is within reach for nearly any kitchen and budget. With good planning and a few smart upgrades, you can enjoy a seamless, stylish space that feels custom-made—without the luxury price tag.