
Giving your stove hood a fresh coat of paint can transform your kitchen, making it look cleaner and more modern without spending a lot of money. Many people think painting a stove hood is difficult or only for professionals, but with the right steps, you can do it yourself and get great results.
The process requires some patience, careful preparation, and attention to detail. Whether you want to cover up old stains, update the color to match new appliances, or just refresh the look, painting a stove hood is a manageable project for most homeowners.
A common mistake is to rush or skip important steps, which often leads to paint peeling, uneven surfaces, or even damage to the hood. This guide will walk you through everything you need to know, from choosing the right paint to final touches for a professional finish.
You’ll learn tips that beginners usually overlook, like handling greasy surfaces and avoiding common paint issues. If you follow these steps, you can enjoy a beautiful, durable result that lasts for years.
Understanding Your Stove Hood
Before you begin, it’s important to know what type of stove hood you have. Most stove hoods are made from stainless steel, aluminum, or coated metal. The material affects how you prepare the surface and what type of paint you should use. Some older hoods may have a plastic trim or parts, which need different preparation. Check if your hood is ducted (vents air outside) or ductless (recirculates air), as this affects how much cleaning and care you need, but the painting process itself is similar.
Another important point: painting a stove hood is mainly a cosmetic change. If your hood is rusty, damaged, or not working properly, consider fixing or replacing it before painting. Painting cannot fix structural or mechanical problems.
Tools And Materials You Will Need
Gathering the right tools and materials before starting will help your project go smoothly. Here’s what you’ll need:
- Degreaser or heavy-duty cleaner (such as TSP or Krud Kutter)
- Sponge or cleaning cloths
- Medium and fine-grit sandpaper (120 and 220 grit)
- Sanding block (optional, but makes sanding easier)
- Painter’s tape (blue tape or similar)
- Drop cloth or old sheets to protect counters and floors
- Screwdriver (for removing parts, if needed)
- Small plastic bags and labels (for screws and small parts)
- Primer (specifically for metal or multi-surface primer)
- High-heat or appliance spray paint (suitable for metal and kitchen use)
- Spray paint handle (optional, for easier spraying)
- Disposable gloves
- Face mask (for sanding and painting)
- Fine brush (for detail work)
- Microfiber cloth (for dust removal)
- Fan or open windows for ventilation
Having these items ready will save time and help you achieve a smooth, even finish.
Choosing The Right Paint And Primer
One of the most common mistakes is picking the wrong paint. Kitchen stove hoods face heat, steam, and grease. Regular wall paint won’t last—it will peel or discolor. You need a high-heat spray paint or appliance paint that is made for metal surfaces and can handle kitchen temperatures. These are available in spray cans at hardware stores and come in popular appliance colors like white, black, and stainless steel. Some brands offer colors like red or blue if you want a unique look.
For primer, use a metal primer or a multi-surface primer that specifically lists metal. Primer helps the paint stick and prevents rust. Do not skip primer unless the paint clearly says “primer included.” Even then, a separate primer usually gives better results.
Paint And Primer Comparison
Below is a comparison of common types of paint and primer used for stove hoods:
| Type | Heat Resistance | Finish Options | Dry Time | Durability |
|---|---|---|---|---|
| High-Heat Spray Paint | Up to 1200°F | Matte, Satin, Gloss | 30 mins to 1 hour | Very High |
| Appliance Epoxy Paint | Up to 200°F | Gloss, Satin | 1-2 hours | High |
| Standard Metal Primer | N/A | Flat | 1 hour | High |
| Multi-Surface Primer | N/A | Flat | 1 hour | Medium |
For most kitchen stove hoods, high-heat spray paint combined with a metal primer gives the best, longest-lasting finish.
Preparing The Stove Hood For Painting
Preparation is the most important part of painting a stove hood. If you skip steps or rush, the paint will not stick well and may peel or bubble.
Cleaning
Stove hoods collect a lot of grease and dust. Even if the hood looks clean, there’s usually a thin layer of oil. Use a strong degreaser or a mixture of warm water and dish soap. Wipe all surfaces—top, sides, underside, vents, and corners. Pay extra attention to edges near the stove, as these get the most buildup. Rinse with clean water to remove any cleaner residue.
It’s important to let the hood dry completely before moving to the next step. Any moisture left can affect how the primer and paint stick.
Removing Parts
If possible, remove the stove hood from the wall or cabinet. This makes painting easier and avoids paint drips inside your kitchen. If you can’t remove it, use painter’s tape to mask off the wall, cabinets, and stove. Remove filters, light covers, and any knobs or removable parts.
Put screws and small items in labeled bags so they don’t get lost.
Sanding
Lightly sand all surfaces you want to paint. Use medium-grit (120) sandpaper first to remove any gloss or bumps. Then switch to fine-grit (220) for a smoother finish. Sanding helps the primer and paint stick. After sanding, wipe away dust with a microfiber cloth.
Masking
Use painter’s tape to cover any areas you don’t want to paint: buttons, switches, lights, or nearby walls and cabinets. Lay a drop cloth under the hood to catch drips.
Ventilation
Painting inside a kitchen can be smelly and the fumes are not good to breathe. Open windows, turn on fans, and wear a mask. Good ventilation helps the paint dry faster and keeps you safe.
Priming The Surface
Priming is a step many people skip, but it makes a big difference in how your paint looks and lasts. Shake the primer spray can well. Hold it about 8-12 inches from the surface and spray in light, even passes.
Don’t try to cover everything in one coat—several thin coats are better than one thick one.
Let the primer dry fully (check the label, but usually 1 hour). If the surface feels rough, lightly sand with fine sandpaper and wipe away dust before painting. Most hoods need only one coat of primer, but two coats can help cover dark colors or stains.
Painting The Stove Hood
Now comes the fun part—adding color. For a smooth, professional look, use spray paint. Shaking the can well is key. Test the spray on cardboard first to check the pattern.
Spray in thin, even coats, moving steadily across the hood. Begin each spray pass off the edge of the hood and finish off the other edge to avoid drips and heavy spots. Let each coat dry completely (usually 30 minutes to 1 hour) before adding another.
Most stove hoods need 2-3 coats for full coverage.
Don’t rush or spray too close. Heavy coats cause drips and uneven texture. If you see a drip, wait for the paint to dry, gently sand the drip, and spray again.
Brush Vs. Spray: Which Is Better?
| Method | Finish Quality | Ease of Use | Best For |
|---|---|---|---|
| Spray Paint | Smooth, even, no brush marks | Quick, needs ventilation | Large, flat surfaces |
| Brush/Roller | May show strokes | Good for details | Small parts, trim |
Spray paint is usually better for stove hoods because it leaves a smooth finish with no brush marks. Use a small brush for tight corners or detail areas if needed.
Letting The Paint Cure
After the final coat, allow the paint to cure—not just dry, but harden fully. This step is often missed but is critical for durability. Most paints feel dry to the touch after a few hours, but curing can take up to 7 days. Avoid touching, cleaning, or installing parts until the paint is fully cured.
If you reinstall parts too soon, you may leave fingerprints or marks. If you need to use your stove, cover the hood with a clean sheet until the paint is hard.
Reassembling And Final Touches
Once the paint is fully cured, carefully remove all painter’s tape. Reinstall all parts—filters, lights, screws. Use your labeled bags to remember where everything goes. Clean the painted surface with a soft, dry cloth. Avoid strong cleaners for the first few weeks, as the paint is still hardening.
If you spot any missed spots or small chips, touch them up with a brush and leftover paint. Let these touch-ups cure before regular use.

Credit: www.houseonasugarhill.com
Cleaning Up Safely
Dispose of used paint cans and rags according to local rules—many communities have special collection days for paint. Don’t pour paint or thinner down the drain. Wash brushes and tools in warm, soapy water if you used water-based paints; use mineral spirits for oil-based paints.
Store leftover paint in a cool, dry place for future touch-ups.
Common Mistakes And How To Avoid Them
Painting a stove hood is simple, but small mistakes can ruin the finish. Here are some common problems and how to prevent them:
- Not cleaning grease fully: Even a little grease can make paint bubble or peel. Clean thoroughly with a degreaser.
- Skipping sanding: Smooth, shiny metal does not hold paint well. Always sand.
- Using regular wall paint: It will not withstand heat and cleaning. Use only high-heat or appliance paint.
- Spraying too thickly: Causes drips and uneven finish. Use several thin coats.
- Not waiting for paint to cure: Handling too soon can leave marks. Wait at least a few days.
Advanced Tips For A Pro Finish
For those who want the absolute best result, here are some tips that professionals use:
- Warm the spray can: Place the spray paint can in warm (not hot) water for 5 minutes before using. This helps the paint spray more evenly.
- Work in good lighting: Shadows hide missed spots. Use a bright, even light to check your work.
- Wet sand between coats: For a glass-smooth finish, lightly wet sand with ultra-fine sandpaper (400 grit) between coats. Be gentle and dry the surface before the next coat.
- Seal with a clear coat: Some appliance paints can be finished with a clear, heat-resistant topcoat for extra shine and durability. Make sure the clear coat is safe for high heat.
- Label parts and screws: Take pictures before disassembly and label everything. This avoids confusion during reassembly.
- Test color and finish: Spray a small test piece before starting. Paint can look different on metal than on the cap or in the can.
When To Call A Professional
Most people can paint a stove hood themselves, but there are situations where a professional is a better choice:
- If your hood is rusty, dented, or damaged
- If the hood is very large or built-in with hard-to-reach areas
- If you want a specialty finish (like faux stainless steel or custom graphics)
- If you have health concerns about paint fumes
Professionals have the tools and experience to fix damage and create a perfect finish. For most standard hoods, however, DIY painting is a safe and effective option.
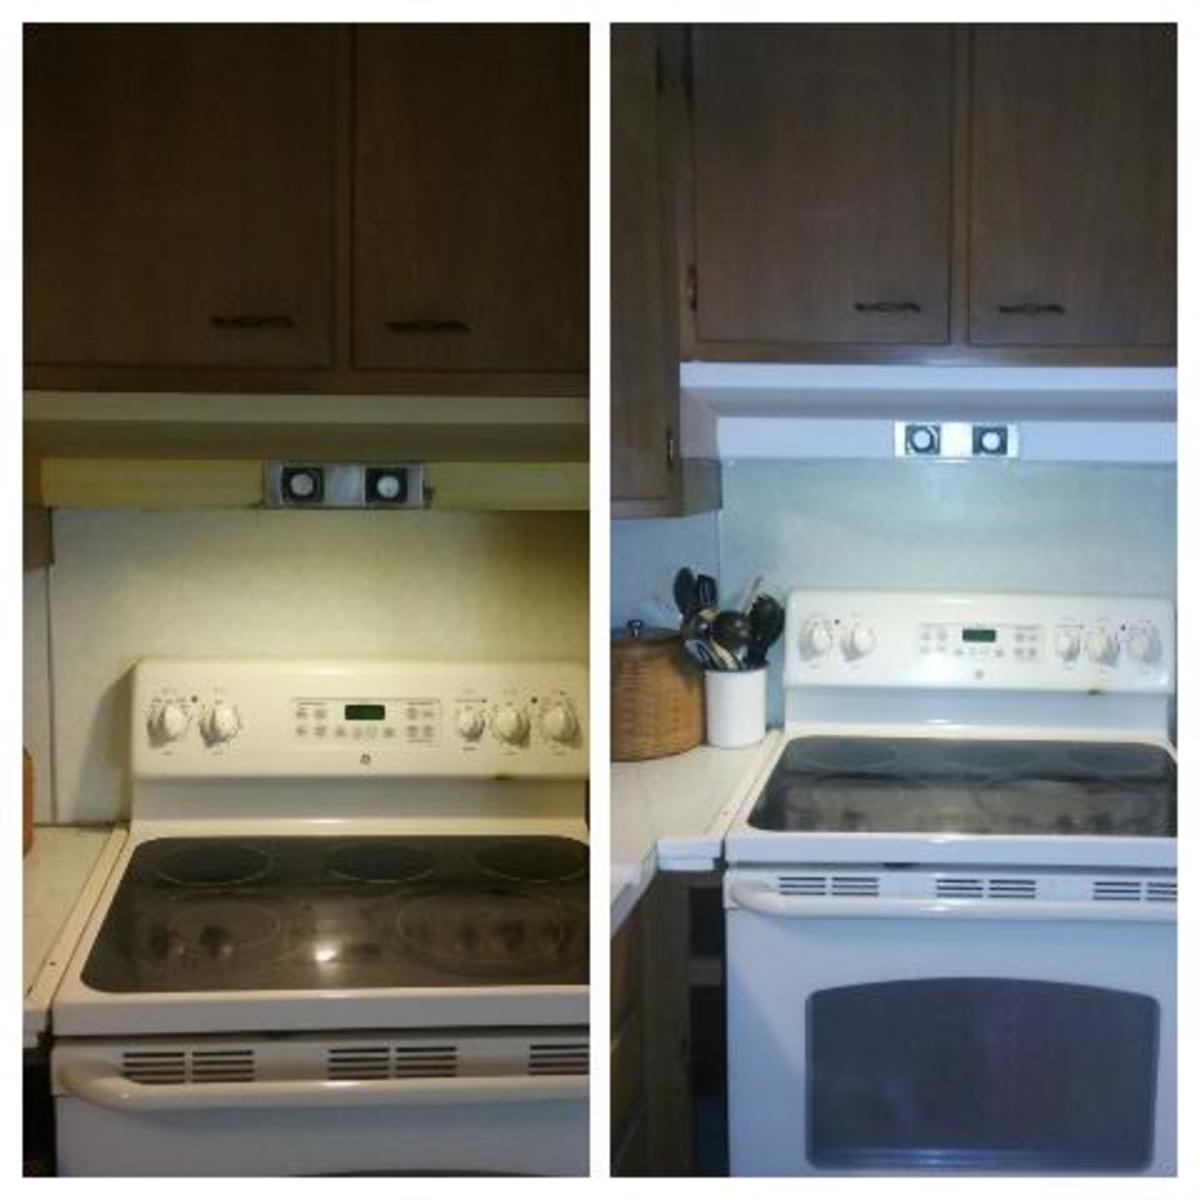
Credit: discover.hubpages.com
How Long Will A Painted Stove Hood Last?
With proper preparation and the right paint, a painted stove hood can look great for 5-10 years. The finish will last longer if you:
- Clean grease regularly with mild soap and water
- Avoid harsh scouring pads or abrasive cleaners
- Touch up small chips or scratches quickly
Heavy cooking, high heat, or poor ventilation can shorten the life of the finish. However, repainting is always possible if you want to refresh the look.
Cost Comparison: Diy Vs. Professional Painting
Many people wonder if painting a stove hood is worth the time and money compared to buying a new one or hiring a pro. Here’s a simple cost breakdown:
| Method | Estimated Cost | Time Needed | Longevity |
|---|---|---|---|
| DIY Painting | $30-$70 | 1-2 days (plus cure time) | 5-10 years |
| Professional Painting | $150-$400 | 1-2 days (plus cure time) | 5-10 years |
| Buying New Hood | $100-$600+ | Varies (plus installation) | 10+ years |
DIY painting is clearly the most affordable way to update your kitchen’s look, especially if your hood is in good shape.
Environmental And Safety Considerations
Paint products can impact the environment and your health. Here are some tips to stay safe:
- Always paint in a well-ventilated area. Open windows and use fans.
- Wear a face mask and gloves to avoid breathing fumes or getting paint on your skin.
- Store paint and chemicals away from children and pets.
- Recycle or dispose of leftover paint responsibly. Many communities offer recycling programs for paint and spray cans. For more on safe paint disposal, check your local waste authority or visit the EPA’s Paint Management page.
Frequently Asked Questions
How Long Does It Take To Paint A Stove Hood From Start To Finish?
Painting a stove hood usually takes 1-2 days, depending on dry times for primer and paint. You’ll need a few hours for cleaning, sanding, priming, and painting, plus extra time for each coat to dry. Full curing can take up to 7 days for maximum durability.
Can I Use Regular Spray Paint Or Wall Paint On My Stove Hood?
No, regular spray paint and wall paint are not designed for heat or grease. Always use high-heat spray paint or appliance paint made for metal and kitchen use. These are more durable and resist heat and cleaning.
Do I Need To Remove The Stove Hood Before Painting?
It’s not required, but it makes the job easier and helps you avoid paint getting on kitchen walls or appliances. If you leave it in place, use painter’s tape and drop cloths to protect surrounding areas.
How Do I Prevent Drips Or An Uneven Finish?
Spray in thin, even coats and keep the spray can moving. Don’t spray too close. Let each coat dry fully before adding another. If you get a drip, let it dry, sand it smooth, and repaint the area.
Is It Safe To Use My Stove After Painting The Hood?
Wait until the paint is fully cured—usually at least 3-7 days—before using your stove as usual. This helps the paint set and prevents marks or damage. Always check the paint label for specific cure times.
Painting your stove hood is a practical way to update your kitchen without spending a lot of money. With careful preparation and the right products, you can achieve a finish that looks professional and lasts for years. Take your time, follow each step, and enjoy the transformation you create.

Credit: www.youtube.com