
Painting a checkerboard pattern in your kitchen can completely change its look. This classic design adds both charm and visual interest, whether you want a bold statement or a subtle accent. Many people think it’s difficult to achieve at home, but with careful planning and the right tools, you can paint a beautiful checkerboard pattern on floors, walls, or even tabletops.
This guide breaks down every step, from preparation to finishing touches, using simple language and practical tips. You’ll learn not just the “how,” but also the “why” behind each step, so your project succeeds without surprises.
Why Paint A Checkerboard Pattern In The Kitchen?
Many kitchens look plain because they use only one color. Checkerboard patterns add energy and style. They can make small kitchens seem larger or help break up a big empty space. Black and white is the most classic, but you can choose any two colors to match your kitchen’s theme. Besides style, painted patterns are easier to clean than some tiles and cost much less than new flooring or wall panels.
Choosing Where To Paint The Checkerboard
Before you start, decide where you want the checkerboard. The most popular places are:
- Kitchen floor: Makes the whole room stand out.
- Backsplash wall: Adds a playful accent without being overwhelming.
- Tabletop or island: Gives a unique look to a central surface.
- Accent wall: Creates a focal point behind dining areas or open shelves.
Pick a spot that fits your kitchen’s size and layout. For example, a busy floor might need more durable paint, while a wall pattern can use lighter colors.
What You Need Before You Start
Proper preparation makes painting easier and gives better results. Gather everything first so you won’t need to stop mid-way.
Materials
- Two paint colors (floor, wall, or furniture paint depending on your surface)
- Primer (if painting raw wood, tile, or concrete)
- Painter’s tape (high-quality for clean lines)
- Measuring tape and ruler or yardstick
- Pencil or chalk
- Paint roller (for large areas)
- Angled paintbrush (for corners and edges)
- Level (for straight lines)
- Drop cloths (to protect surfaces)
- Sandpaper or sander (if prepping old paint or rough surfaces)
- Paint tray
- Bucket of soapy water and sponge (for cleaning)
- Protective gloves and mask (especially for sanding or strong paints)
Optional Extras
- Stencil (if you want perfectly uniform squares)
- Clear sealer or topcoat (for extra durability, especially on floors)
- Kneepads (if working on the floor for hours)
Planning The Pattern: Getting It Right
Many beginners start taping and painting too soon. Careful planning is the difference between a pro look and a messy result.
Choosing Square Size
Square size affects how the pattern looks. Large squares (10–12 inches) make a bold, retro look and cover space fast. Small squares (4–6 inches) feel busier but fit smaller kitchens or accent areas better. For most kitchen floors, 8-inch squares work well.
Always measure your space to see what fits best.
Measuring And Marking
Follow these steps for perfect squares:
- Measure the area: Use a tape measure to get the width and length.
- Find the center point: Mark the middle of your surface. This keeps the pattern balanced.
- Draw a grid: Using a ruler or level, lightly draw straight lines to create a grid of squares. Start from the center and work out. This avoids having tiny, awkward pieces at the edges.
- Double-check lines: Use your level to make sure lines are straight. Crooked squares are very noticeable.
Pro tip: For floors, measure from one wall to the other and adjust square size so you don’t end up with tiny slivers at the edges. For example, if your floor is 96 inches wide, 8-inch squares fit perfectly.
Picking The Best Paint And Tools
Not every paint works for every surface. Choosing the right type prevents peeling, chipping, and fading.
Paint Types
| Surface | Best Paint Type | Special Notes |
|---|---|---|
| Wood Floor | Porch & floor enamel | Durable, resists scratches |
| Concrete Floor | Concrete floor paint | Needs primer for good bond |
| Tile Floor | Epoxy or tile paint | Strong fumes, wear mask |
| Wall/Backsplash | Interior latex paint | Washable, easy to apply |
| Tabletop/Counter | Furniture or cabinet paint | Seal for water resistance |
Tools
- Use a small roller for large flat areas.
- Use a brush for edges and corners.
- Painter’s tape is essential for sharp lines.
Non-obvious insight: Cheap tape often leaks paint underneath. Always pick high-quality tape labeled “sharp line” or “delicate surface” for best results.
Surface Preparation: The Key To A Long-lasting Pattern
Many paint jobs fail because of poor prep, not bad paint. Spend extra time here for a finish that lasts.
Cleaning
- Remove all dirt, grease, and dust. Kitchen surfaces, especially near stoves, can be greasy. Use a degreaser or strong soapy water and rinse well.
- Let the surface dry completely.
Sanding
- For glossy surfaces (old paint, tiles, sealed wood), lightly sand to create a rough surface. This helps paint stick.
- Wipe away all dust with a damp cloth.
Repairs
- Fill any cracks or holes with filler. Uneven surfaces make the checkerboard look messy.
- Smooth filler with sandpaper after it dries.
Priming
- Use a primer suited for your surface. For raw wood, tile, or concrete, primer is not optional.
- Let primer dry completely as directed on the can.
Taping And Masking: Creating Clean, Sharp Squares
Taping is the most important step for straight, crisp lines.
- Place tape along the edges of every other square, following your pencil lines.
- Press tape down firmly with a plastic card or your fingernail. Pay special attention to corners.
- Cover areas you do not want to paint with drop cloths or extra tape.
Advanced tip: After taping, paint a thin layer of the base color over the tape’s edge. This seals any gaps and prevents the second color from bleeding under the tape.
Painting The First Color
Start with your base color. This will be the color of half the squares, usually the lighter shade.
- Use a roller for large areas and a brush for edges.
- Paint a thin, even coat. Don’t overload the roller or brush.
- Let the first coat dry completely. Check your paint can for drying times—usually 2–4 hours.
- Add a second coat if needed for solid coverage.
Let the base color dry at least overnight before starting the next color.
Painting The Second Color
Once the base color is dry, you’re ready for the second color—the other half of the checkerboard.
- Using your grid, tape around the alternate squares (the ones you didn’t paint first).
- Press tape down very well for sharp lines.
- Use a clean brush or roller to apply the second color. Start with a thin coat.
- Let dry, then apply a second coat if needed.
Pro tip: Paint each square in the same direction for a uniform look. This avoids visible brush or roller marks.
Removing Tape And Touching Up
This part is exciting but also delicate. Pulling the tape too soon or too late can ruin your lines.
- Wait until the second color is just dry to the touch, not fully cured. This is usually 1–2 hours after painting.
- Gently pull the tape off at a 45-degree angle. Pull slowly to avoid lifting paint.
- If you see any bleed-through or wobbly lines, use a small artist’s brush to touch up.
Non-obvious insight: If paint starts to peel with the tape, use a craft knife to lightly score along the tape edge before pulling.
Sealing The Pattern For Durability
Especially for kitchen floors or tabletops, a clear sealer protects your work from scratches, spills, and stains.
Choosing A Sealer
| Surface | Best Sealer | Finish Options |
|---|---|---|
| Floor | Polyurethane (water-based) | Gloss, semi-gloss, satin |
| Wall/Backsplash | Clear acrylic topcoat | Satin or matte |
| Tabletop/Counter | Food-safe polyurethane | Satin |
Apply the sealer as directed. Usually, you need 2–3 thin coats with light sanding in between. Let each coat dry fully. Avoid heavy use or cleaning until the final coat cures (often 3–5 days).
Choosing Colors: Beyond Black And White
While black and white checkerboards are classic, you have many options.
- Gray and white: Softer, modern look.
- Navy and cream: Feels traditional but less stark.
- Earth tones: Browns and tans for warmth.
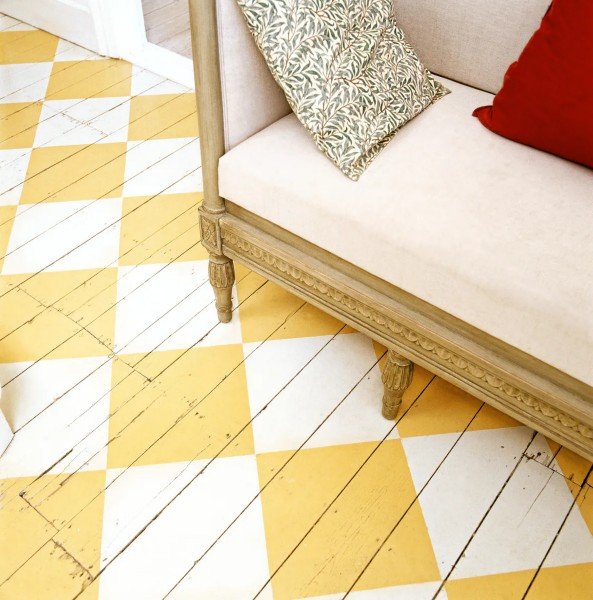
- Colorful pairs: Try green and white or blue and yellow for a playful kitchen.
When choosing colors, consider:
- Light colors show dirt less but may fade.
- Dark colors feel bold but show scratches easier.
- Use kitchen color samples or online visualizers to preview combinations.
Expert tip: Always test your two chosen colors together on a scrap board or hidden spot before committing.
Common Mistakes And How To Avoid Them
Many DIY painters make the same errors. Here’s how to avoid them:
- Rushing prep: Skipping cleaning or sanding causes peeling.
- Cheap tape: Causes paint bleed and ragged lines.
- Crooked grids: Always use a level, not just a ruler.
- Painting too thick: Thick coats run and take much longer to dry.
- Not letting paint dry: If you tape over wet paint, it peels.
- No sealer: For high-traffic areas, your pattern won’t last without a protective coat.
Insider tip: Take photos of each step. If you need touch-ups later, you’ll remember your exact process and colors.
Real-life Example: Checkerboard Kitchen Floor Makeover
Maria, a homeowner in Illinois, had an old linoleum floor that always looked dirty. Instead of replacing it, she decided to paint a black and white checkerboard. She chose 10-inch squares to cover her 100-square-foot kitchen. After cleaning and sanding, she used a strong primer, then painted two coats of white floor enamel.
Using a chalk line and level, she measured and taped out her pattern, then painted the black squares. Two coats of water-based polyurethane finished the project.
The total cost was under $120, and the project took a weekend plus drying time. Two years later, the pattern still looks fresh, with only a few small touch-ups needed. Maria’s main advice: “Don’t rush the taping. That’s what makes the pattern look perfect.”
Maintenance And Cleaning Tips
A painted checkerboard pattern is easy to clean, but it does need gentle care:
- Use a soft mop or cloth, not abrasive scrubbers.
- Clean spills quickly to avoid stains.
- Avoid harsh chemicals, especially on sealed floors or walls.
- For small chips or scratches, keep a little of each paint color for touch-ups.
Long-term tip: Re-seal kitchen floors every 2–3 years if you notice dullness or wear. This keeps the pattern bright and protected.
Checkerboard Pattern Variations
You can customize your checkerboard in many ways:
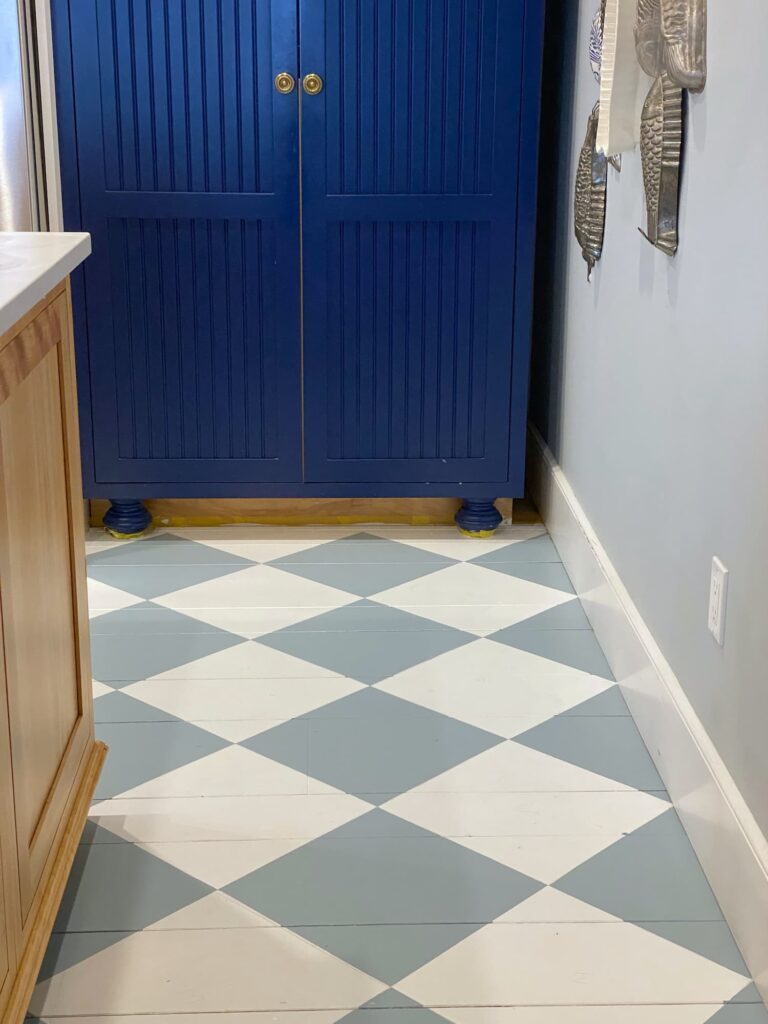
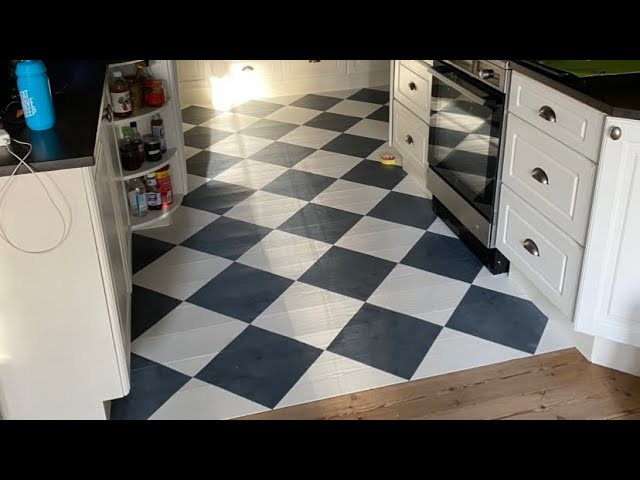
- Diagonal orientation: Turn the pattern 45 degrees for a diamond look.
- Border squares: Add a border of solid color around the edge.
- Tiny squares: Use 2–4 inch squares for a more intricate look on small areas.
- Distressed effect: Lightly sand after painting for a vintage feel.
Mixing up the checkerboard style makes your kitchen unique. Just keep the pattern clear and the lines sharp.
Credit: mollyinmaine.com
How Long Does The Whole Project Take?
Here’s a typical timeline for painting a kitchen floor (about 100 sq. ft.):
| Step | Time Needed |
|---|---|
| Cleaning and prepping | 2–3 hours |
| Measuring and taping | 2–3 hours |
| Painting base color (2 coats) | 4–6 hours (plus overnight dry) |
| Taping and painting second color | 3–4 hours |
| Removing tape/touch-ups | 1–2 hours |
| Sealing (2–3 coats) | 3–4 hours (plus curing time) |
Allow for overnight drying between main steps. Most people finish over a weekend, with a few days for the sealer to fully cure before moving furniture back.
Safety Tips And Precautions
Painting can be messy and some products have strong fumes. Stay safe by following these tips:
- Ventilate the kitchen well. Open windows and use fans.
- Wear a mask when sanding or working with strong-smelling paints.
- Protect your skin with gloves.
- Keep children and pets away from the work area until all paint and sealer are dry.
Non-obvious safety tip: Store leftover paint in tightly sealed containers, away from heat and flame. Some floor paints are flammable until fully dry.
Budgeting: How Much Will It Cost?
A painted checkerboard is much cheaper than new flooring or tile. Here’s an average cost breakdown for a medium-size kitchen floor (100 sq. ft.):
- 1 gallon of each paint color: $30–$50 each
- Primer: $20–$30
- Painter’s tape: $8–$15
- Rollers and brushes: $10–$20
- Sealer: $25–$40
Total: $100–$180 (not including tools you already own)
Cost-saving tip: Use leftover paint from other projects if the colors fit.
Mistakes Beginners Make (and How To Fix Them)
1. Uneven Squares
If your squares turn out different sizes, it’s usually from measuring errors. Double-check with your tape and level before taping. If it’s too late, you can touch up with a small brush and the right color.
2. Fuzzy Lines
This comes from tape not being pressed down well or using low-quality tape. Seal tape edges with the base color before painting the second color for best results.
3. Paint Bleed
If paint gets under the tape, don’t panic. Use a small artist’s brush and your two colors for careful touch-ups.
4. Peeling Paint
This usually means poor surface prep or taping over wet paint. Sand, clean, and prime properly next time. For small peels, touch up and re-seal.
5. Pattern Looks “off”
If your checkerboard isn’t centered, it can feel unbalanced. Always start your grid from the center of the space. If you’re already done, add a border or rug to distract the eye.
Credit: www.youtube.com
Advanced Tips For A Professional Look
- Test your full process on a small, hidden area before starting.
- Label your paint trays and brushes if you take breaks, so you don’t mix up colors.
- Use a laser level for large rooms to keep lines perfect.
- For floors, wait a full 48 hours before heavy traffic and 5–7 days before putting furniture back.
- Photograph your tape lines before painting so you know where to touch up later.
Inspiration: Creative Checkerboard Kitchen Ideas
- Black and white floor with bright cabinets (red, blue, yellow)
- Soft gray and white pattern for a modern farmhouse look
- Navy and cream on an accent wall behind open shelves
- Checkerboard tabletop on a kitchen island
- Diagonal checkerboard “rug” under the dining table, bordered with a solid color
Look online or in magazines for more ideas. Some designers use three or four colors or add gold or metallic paint for a luxury look.
When To Call A Professional
Most people can paint a checkerboard with patience and good prep. However, call a pro if:
- Your kitchen floor is very uneven or damaged.
- You want a very complex pattern (multi-color, curves, or tiny squares).
- You have allergies or can’t ventilate the space.
A professional painter can finish large or complex spaces quickly but will cost much more than DIY.
Comparing Painted Checkerboard Vs. Tiled Checkerboard
| Feature | Painted Checkerboard | Tiled Checkerboard |
|---|---|---|
| Cost | Low ($100–$200) | High ($800+) |
| Time | 1–2 weekends | Multiple days to weeks |
| Customization | Any color, any size | Limited by tile options |
| Durability | Good with maintenance | Excellent, long-lasting |
| Repair | Easy touch-ups | Tile replacement needed |
Painted patterns are best for those who want quick results and flexibility. Tile works for permanent, heavy-use kitchens, but costs and installation time are much higher.
Credit: www.theottohouse.com
Resources For More Ideas
If you want to see examples or detailed videos, check resources like design magazines, home improvement channels, or trusted guides such as This Old House.
Bringing It All Together
Painting a checkerboard pattern in your kitchen is a project almost anyone can do with a little patience. It adds style, hides flaws, and costs far less than new tile or flooring. The keys to success are measuring carefully, prepping the surface, using high-quality tape, and not rushing.
Choose colors you love, and don’t be afraid to get creative. With these steps, your kitchen can look like a designer space—without the designer price tag.
Frequently Asked Questions
How Long Will A Painted Checkerboard Floor Last?
With proper surface prep, quality paint, and a good sealer, a painted checkerboard floor can last 3–5 years before needing touch-ups. In low-traffic kitchens, it may last even longer. Resealing every few years helps maintain its look.
Can I Paint Over Old Tiles Or Linoleum?
Yes, but only if you clean, sand, and prime the surface well. Use a strong bonding primer and floor paint designed for difficult surfaces. Poor prep causes peeling.
How Do I Avoid Paint Bleeding Under The Tape?
Press tape down firmly and seal the tape edge with a thin coat of your base color before painting the second color. Use high-quality painter’s tape for best results.
What’s The Best Way To Clean A Painted Checkerboard Floor?
Use a soft mop and mild soap. Avoid harsh chemicals or abrasive scrubbers. Clean spills quickly. Reseal as needed to protect the pattern.
Can I Use More Than Two Colors In My Checkerboard?
Yes! While classic patterns use two, you can use three or more for a creative look. Just plan your pattern carefully so it stays balanced and not too busy.
With these tips and details, you’re ready to start your kitchen checkerboard project with confidence. Enjoy your new, eye-catching kitchen!