
Painting cherry cabinets can change the whole look of your kitchen or bathroom. Many people love the rich color of cherry wood, but after years, tastes change. Maybe your cabinets look too dark, or you want a fresh, modern style. The good news: you can paint cherry cabinets and get beautiful results. But cherry wood has a strong grain, and the finish is often glossy, making painting a bit tricky. With the right steps and materials, though, you can get a smooth, durable finish that lasts for years.
This guide covers everything you need. You’ll learn how to prepare cherry cabinets, which primers and paints to use, and how to get a factory-like finish. Even small details like cleaning, sanding, and choosing the right brushes matter. If you’ve tried painting furniture before, you’ll find a few important differences when working with cherry wood.
And if you’re new to painting, don’t worry—this article explains each step clearly. By the end, you’ll know how to transform your cherry cabinets with confidence.
Why Paint Cherry Cabinets?
Cherry cabinets are known for their deep reddish-brown color and smooth grain. But this style doesn’t fit every home or design trend. Here are a few reasons why people choose to paint cherry cabinets:
- Brighten the space: Cherry wood can make rooms feel dark, especially in smaller kitchens or bathrooms. Painting them a lighter color opens up the space and reflects more light.
- Modernize the look: Many modern homes use white, gray, or blue cabinets. Painting cherry cabinets gives your kitchen a trendy, updated style without a full remodel.
- Save money: Replacing cabinets is expensive. Painting costs much less and delivers a dramatic change.
- Hide damage: Scratches, stains, or faded spots are easier to cover with paint than to repair in natural wood.
- Personal expression: Paint lets you choose any color or finish to match your taste.
A non-obvious benefit: painted cabinets are easier to clean if you use the right paint. Semi-gloss and satin finishes resist stains and wipe down easily—something that cherry wood in its natural state sometimes lacks.
What Makes Cherry Cabinets Different?
Before you begin, it helps to understand cherry wood’s unique features. Cherry is a hardwood with a tight, fine grain, but it also has natural oils and a rich color. Two main challenges make painting cherry cabinets different from painting other woods:
- Bleed-through: Cherry wood can release tannins (natural chemicals) that seep through paint, causing yellow or pink stains.
- Smooth finish: Cherry often has a glossy, sealed surface. Paint will not stick well unless you prepare it correctly.
Many people miss a key detail: temperature and humidity affect cherry more than some other woods. If your home is very humid or dry, let the wood adjust to your indoor climate for a few days before starting.

Credit: pnpcraftsmen.com
Tools And Materials Needed
Having the right tools makes the project faster and the results better. Here’s what you need:
- Screwdriver (for removing doors and hardware)
- Mild soap or degreaser (like TSP substitute)
- Sponge and clean rags
- Painter’s tape
- Drop cloths or plastic sheeting
- Sandpaper (120-grit, 220-grit)
- Sanding block or electric sander (optional)
- Vacuum or tack cloth
- High-quality primer (stain-blocking, shellac-based or oil-based)
- Cabinet paint (acrylic, alkyd, or enamel)
- Paint tray and liners
- 2-inch angled brush (for corners and edges)
- 4–6 inch foam roller (for flat surfaces)
- Small paint sprayer (optional, for ultra-smooth finish)
- New hardware (optional)
- Safety gear: Gloves, mask, goggles
Pro tip: Use a shellac-based primer if you want to block tannin bleed-through—this is more reliable than regular stain-blocking primers.
Preparation: The Key To Success
Preparation is the most important part of painting cherry cabinets. Skipping or rushing these steps can lead to peeling, chipping, or uneven color.
Remove Doors And Hardware
Take off all cabinet doors, drawers, and hardware. Label each door and its matching location with painter’s tape and a number. This small step saves hours later when you reassemble.
Clean Thoroughly
Cherry cabinets often have a glossy finish that attracts grease and dirt. Paint will not stick unless the surface is perfectly clean.
- Mix a few drops of mild soap or TSP substitute in warm water.
- Scrub all surfaces with a sponge, focusing on corners and around handles.
- Rinse with clean water and let dry completely.
Fill Holes And Repair Damage
Inspect for dents, scratches, or old hardware holes. Fill with wood filler and let dry, then sand smooth. If changing hardware, fill old screw holes now.
Sand The Surface
Sanding helps the primer stick. For cherry wood, this step is essential because of the smooth finish.
- Start with 120-grit sandpaper to remove gloss.
- Finish with 220-grit sandpaper for a smooth base.
- Wipe away dust with a tack cloth or vacuum.
Don’t over-sand—just scuff the surface. You want a slightly dull look, not bare wood.
Mask And Protect
Cover countertops, floors, and walls with drop cloths or plastic. Use painter’s tape along edges. Take your time—clean lines make the job look professional.
Choosing The Right Primer
Not all primers work well for cherry cabinets. The wrong primer can let stains bleed through or peel off later.
Types Of Primer
- Shellac-based primers: Block tannin stains and dry fast. Best for cherry wood.
- Oil-based primers: Good stain blocking, but longer drying time and strong smell.
- Water-based primers: Easy to clean, but may not block stains as well.
If you want to avoid bleed-through, shellac-based is the safest choice. Brands like Zinsser BIN are popular with professionals.
Applying Primer
- Stir the primer well.
- Use an angled brush for corners and detailed areas.
- Use a foam roller for flat surfaces.
- Apply a thin, even coat.
- Let dry completely (usually 1 hour for shellac-based).
- Lightly sand with 220-grit sandpaper.
- Wipe away dust and apply a second coat if needed.
Do not rush this stage. Uneven primer shows through your paint later.
Choosing Paint For Cherry Cabinets
Paint choice matters for durability and looks. Kitchen and bathroom cabinets face heat, moisture, and frequent cleaning.
Types Of Paint
- Acrylic latex: Water-based, low odor, easy cleanup. Look for cabinet-specific formulas.
- Alkyd: Oil-modified, very durable, smooth finish. Some brands offer water-based alkyds.
- Enamel: Hard, glossy finish, resists chipping. Good for high-use cabinets.
The best finish is semi-gloss or satin. Flat paint shows fingerprints and is harder to clean.
Color Choices
Light colors like white, cream, or pale gray make rooms feel bigger. Navy, forest green, or black are bold options. When covering cherry, test your color on a small area first—the red tone can affect the final color.
Non-obvious tip: Some cabinet paints have self-leveling properties, which help hide brush strokes and roller marks. These are especially useful on cherry wood.
Painting Cherry Cabinets Step-by-step
Now you’re ready for the fun part. Painting takes patience, but the results are worth the effort.
Step 1: Paint Detailed Areas First
Use your angled brush to paint corners, edges, and inside grooves. Work slowly and avoid drips.
Step 2: Paint Flat Surfaces
Roll paint onto flat panels using a foam roller. Work in long, even strokes. Don’t overload the roller—thin coats look smoother and dry harder.
Step 3: Let Dry And Sand Lightly
Let the first coat dry fully (check your paint’s label—usually 4–6 hours). Lightly sand with 220-grit sandpaper to remove any bumps. Wipe away dust.
Step 4: Apply Second Coat
Repeat the same process. Most cabinets need two coats for even coverage. Very dark cherry may need a third coat, especially with light colors.
Step 5: Inspect And Touch Up
Check for missed spots, drips, or brush marks. Touch up as needed. Let everything cure at least 48 hours before reattaching doors and hardware.
Using A Paint Sprayer For A Professional Look
If you want a super-smooth, factory-style finish, consider a small paint sprayer. Sprayers can be tricky for beginners but give excellent results if you practice first.
- Use thin coats and keep the sprayer moving.
- Practice on cardboard or scrap wood before starting your cabinets.
- Wear a mask and ventilate the room well.
Sprayers waste more paint and need more prep, but the finish is hard to beat.
Reassembling Your Cabinets
Once the paint is dry and fully cured, it’s time to put everything back together.
- Remove painter’s tape carefully.
- Reinstall hardware and hinges.
- Hang doors and slide drawers back in place.
If you want a new look, install modern handles or knobs. This small upgrade makes painted cabinets feel brand new.
Care And Maintenance
Painted cabinets are durable, but they need a little care to stay looking fresh.
- Wipe spills immediately to prevent stains.
- Clean with a damp, soft cloth—avoid harsh chemicals.
- Use felt pads inside doors and drawers to prevent chips.
- Avoid hanging wet towels over painted surfaces.
Insight: Painted cherry cabinets need a few weeks to reach full hardness. Be gentle for the first month to avoid dents or scratches.
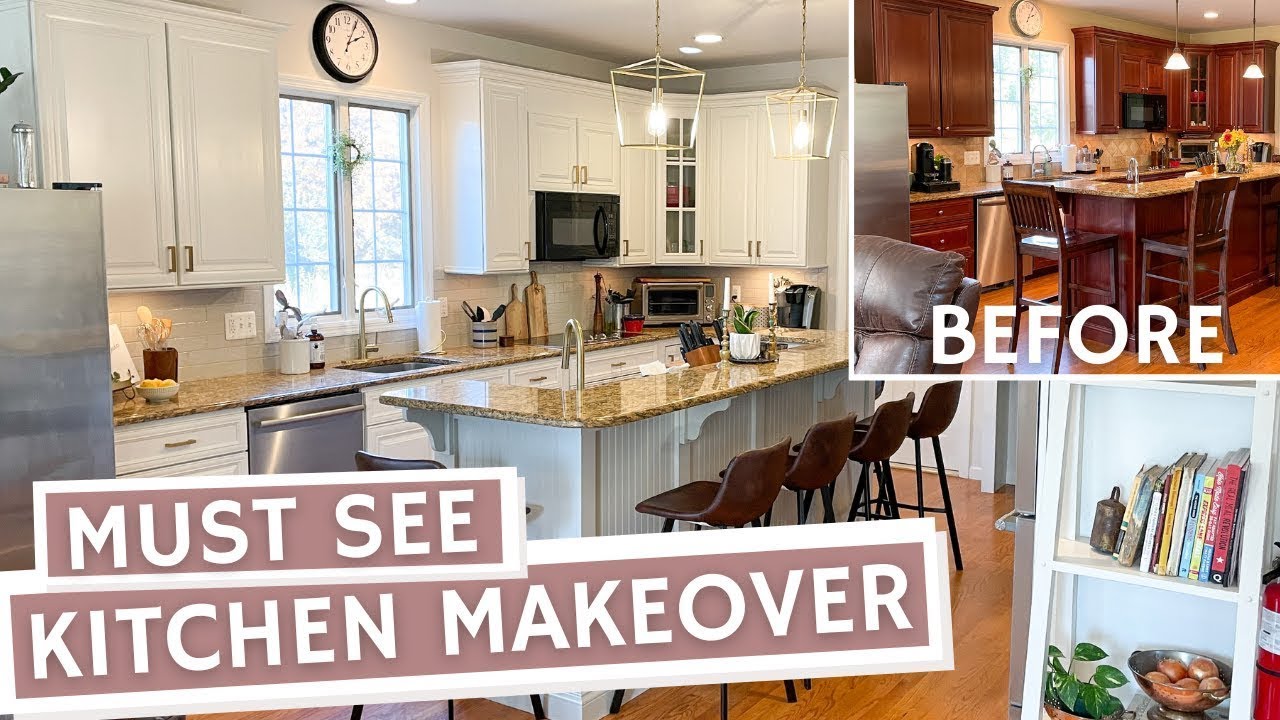
Credit: www.youtube.com
Common Mistakes And How To Avoid Them
- Skipping cleaning: Grease or dirt prevents paint from sticking.
- Not sanding enough: Cherry’s smooth finish needs to be scuffed for primer to bond.
- Choosing the wrong primer: Water-based primers often let stains bleed through cherry wood.
- Rushing between coats: Paint needs time to dry and cure for a hard, durable finish.
- Using cheap brushes/rollers: Low-quality tools leave marks and shed bristles.
A common beginner mistake is using only one coat of primer or paint. Cherry’s dark color needs extra coverage, especially if you want a light finish.
Cost And Time Estimates
How much will this project cost and how long will it take? Here’s a quick comparison:
| Task | DIY Cost (USD) | Time Required |
|---|---|---|
| Cleaning & Prep | $20–$40 | 2–3 hours |
| Primer & Paint | $60–$120 | 2–3 hours per coat |
| Brushes/Rollers | $20–$40 | — |
| Hardware (optional) | $40–$120 | 1–2 hours |
Total cost: $100–$300 for most kitchens. Total time: 2–3 days, depending on drying time.
Comparing Painted Vs. Natural Cherry Cabinets
If you’re still unsure, compare the pros and cons:
| Feature | Painted Cherry Cabinets | Natural Cherry Cabinets |
|---|---|---|
| Appearance | Any color, modern look | Classic, warm wood tones |
| Maintenance | Easy to clean, touch up | May need refinishing over time |
| Durability | High if done right | Very durable, but scratches show |
| Resale Value | Good in modern homes | Good in traditional homes |
| Cost | Low | High if replacing |
Advanced Tips For A Flawless Finish
- Tint your primer: Many paint stores will tint primer to match your final color. This helps cover cherry’s dark base.
- De-glosser: If you want to skip sanding, use a liquid de-glosser (liquid sandpaper). Wipe it on, then prime.
- Edge protection: Paint edges of cabinet doors lightly to avoid sticking when reassembling.
- Number every door and drawer: Use small stickers or tape on the back of each piece to remember their position.
- Ventilation: Open windows or use fans to speed up drying and reduce fumes.
Real-life Example: Transforming A Cherry Kitchen
Consider a family in Atlanta with a 1990s cherry kitchen. They wanted a brighter, more modern feel but didn’t want to spend $10,000 on new cabinets. They followed the steps above and painted their cabinets a soft white. After two coats of primer and two coats of paint, the kitchen looked brand new.
They also changed the handles to brushed nickel for a more contemporary style.
The project took one weekend and $220 in supplies. The family says the kitchen feels twice as big and gets compliments from every guest. This is a great example of how painting cherry cabinets can add value and style at a fraction of the cost of replacement.
Environmental Impact And Safety
Painting cabinets is generally safe, but it’s smart to protect your health and the environment.
- Use low-VOC paints and primers when possible.
- Wear gloves and a mask, especially when sanding or using shellac/oil-based products.
- Dispose of old paint and rags responsibly—check local recycling rules.
- Ventilate well, especially if you have pets or children.
For more on safe painting practices, see the EPA Safer Choice program.
Credit: dfrancowallpaper.com
Frequently Asked Questions
How Long Does It Take To Paint Cherry Cabinets?
Painting cherry cabinets usually takes 2–3 days. This includes cleaning, prepping, priming, painting, and drying between coats. If you use a fast-drying primer and paint, you might finish in two days, but allow extra time for curing before heavy use.
Can I Paint Cherry Cabinets Without Sanding?
Sanding gives the best results, but you can use a liquid de-glosser if you want to skip this step. However, sanding is still recommended, especially for glossy or very smooth cherry wood, to ensure the primer and paint stick well.
What Is The Best Paint For Cherry Cabinets?
The best paint is a high-quality acrylic enamel or alkyd-based cabinet paint in a semi-gloss or satin finish. These paints resist chips, stains, and cleaning chemicals. Some brands offer special cabinet paint formulas that self-level for a smoother look.
Will The Cherry Color Bleed Through The Paint?
Cherry wood can bleed tannins, which show as yellow or pink stains. To prevent this, use a shellac-based primer before painting. If you see stains after the first coat, add another layer of primer before continuing.
Is It Worth Painting Cherry Cabinets Or Should I Replace Them?
Painting is much cheaper and faster than replacing cherry cabinets. If your cabinets are in good shape, painting can dramatically change the look for less money. Replacement is only needed if the cabinet boxes or doors are damaged or the layout no longer works for you.
Painting cherry cabinets is a rewarding project that can add style and value to your home. With careful prep, the right materials, and a bit of patience, you’ll enjoy a fresh new look for years to come.