
Swimming pools are a highlight of summer, a place for fun, relaxation, and exercise. But every pool owner knows that maintenance is a key part of enjoying crystal-clear water all season. One of the most important, yet sometimes overlooked, components of a pool’s circulation system is the return jet. Sometimes, you need to plug or block these jets—maybe for repairs, winterizing, or to troubleshoot water flow issues. But how do you actually plug a pool return jet the right way? Many pool owners try makeshift solutions or skip steps, leading to leaks or damage. This guide will take you through everything you need to know, from the basics to advanced troubleshooting. Whether you’re a new pool owner or have years of experience, you’ll find practical advice, step-by-step instructions, and expert insights you won’t find elsewhere.
Understanding Pool Return Jets
Before you plug a pool return jet, you need to know what it is and why it matters. Return jets are small fittings in your pool wall where clean, filtered water is pushed back into the pool. They’re usually round and sit just below the water’s surface. Most pools have two or more return jets, depending on size.
When water leaves the pool through the skimmer and main drain, it passes through the filter and heater (if you have one) and returns through these jets. They help circulate chemicals, keep the water moving, and prevent algae growth.
Why Might You Need To Plug A Pool Return Jet?
- Winterizing – In cold climates, you need to plug jets to prevent water from entering pipes, freezing, and causing cracks.
- Repairs – If you’re fixing a leak, changing a fitting, or working on the plumbing, you may need to isolate a jet.
- Testing – To troubleshoot water leaks or flow problems, plugging jets can help you find the issue.
- Renovation – During tile or plaster repairs, jets might need to be blocked to keep the area dry.
Ignoring the need to plug a return jet can lead to costly repairs. Freezing water can split pipes. Leaks can waste water and chemicals, and make your pool unsafe.
Types Of Pool Return Jet Plugs
Different situations call for different types of plugs. Using the right plug is critical for a tight seal and avoiding damage.
| Plug Type | Material | Best Use Case | Reusability |
|---|---|---|---|
| Expansion Plug | Rubber + Metal | Winterizing, Repairs | Reusable |
| Threaded Plug | Plastic or Brass | Long-term Sealing | Reusable |
| Foam Plug | Dense Foam | Temporary, Testing | Single Use |
| Custom Cap | PVC or Metal | Special Installations | Reusable |
1. Expansion Plugs
The most common plug for pool jets. Expansion plugs use a rubber body and a metal wing-nut or handle. When you twist or tighten the handle, the rubber expands, creating a watertight seal inside the jet.
2. Threaded Plugs
Some return jets have internal threads, and you can screw in a threaded plug. They’re usually made of plastic or brass, and often have a rubber gasket for extra seal.
3. Foam Or Tapered Plugs
These are wedge-shaped plugs made from dense foam. They’re useful for quick tests, but don’t hold well under high pressure.
4. Custom Caps
For some pools with unique plumbing, you might need a custom PVC or metal cap. These are less common and usually made by pool pros.
Non-obvious tip: Not all plugs fit all jets. Always check the diameter of your return jet opening (usually 1.5″ or 2″) before buying a plug.
Tools And Materials Needed
Plugging a pool return jet is simple if you have the right gear. Here’s what you’ll need:
- Return jet plug (correct type and size)
- Adjustable wrench or pliers (for expansion plugs)
- Teflon tape (for threaded plugs)
- Pool pole or extension (if jets are deep)
- Towel or sponge (to dry area)
- Safety goggles and gloves (optional but recommended)
You might also need:
- Bucket or small pump (to lower water below jet)
- Lubricant (silicone-based, for o-rings)
Pro insight: Many beginners try to plug jets with the pool full. In some cases, you can do this, but lowering water level below the jet makes installation easier and helps the plug seal better.
Step-by-step: How To Plug A Pool Return Jet
Let’s break down the entire process, from prep to final check. Follow these steps for a professional result.
Step 1: Turn Off Pool Equipment
Always turn off the pump and heater before working on any pool fittings. This stops water flow and prevents damage to equipment.
- Flip the circuit breaker or use the pool’s power switch.
- Wait for water to stop moving completely.
Step 2: Lower Water Level (if Needed)
If your pool’s water is above the return jet, you can either:
- Use a submersible pump or siphon hose to lower the water below the jet.
- Or, if you’re using an expansion or threaded plug, you can sometimes install it underwater (trickier for beginners).
Extra tip: If you’re plugging for winter, always lower water below jets to avoid freeze risk.
Step 3: Remove Existing Fittings
Most return jets have a directional eyeball fitting. You need to remove this before plugging.
- Unscrew the outer ring by hand or with a strap wrench.
- Pull out the eyeball insert.
- Clean around the jet opening with a towel.
Many pool owners forget to clean debris or sand from the jet opening. This causes leaks around the plug.
Step 4: Select And Prepare The Plug
Choose the right size and type for your jet. For threaded plugs, wrap the threads with Teflon tape to improve seal.
- Expansion plug: Check rubber for cracks or wear.
- Threaded plug: Apply Teflon tape to threads.
Beginner mistake: Forcing a too-large plug can crack the fitting. Never jam a plug in; it should fit snugly but not require hammering.
Step 5: Install The Plug
For Expansion Plugs:
- Insert the rubber end into the jet opening.
- Hold the plug steady and turn the wing-nut or handle.
- As you tighten, the rubber will expand and press against the walls.
- Stop when the plug feels secure; do not overtighten.
For Threaded Plugs:
- Align the threads of the plug with the return jet fitting.
- Turn clockwise by hand until snug.
- Use a wrench for a final quarter-turn, but don’t overtighten.
For Foam Plugs:
- Press the foam wedge into the opening.
- Push firmly until it’s seated.
- Only use for short periods, as these are less reliable.
Step 6: Check The Seal
Once installed, check for leaks:
- Wipe around the plug and look for water seepage.
- If installed underwater, watch for bubbles.
- Tighten slightly if needed, but don’t overtighten.
If you see leaks, remove the plug, clean the area, and reinstall. Persistent leaks may mean the plug is the wrong size or the fitting is damaged.
Step 7: Restore Water Level And Power
If you lowered the water, refill the pool to the proper level. When safe, turn the pool equipment back on.
Pro tip: Never run the pump with the plugs in place, unless you’re only plugging one jet for testing. Running the system with all returns plugged can damage the pump.

Credit: www.youtube.com
When To Plug Vs. When Not To Plug
Plugging return jets is sometimes needed, but not always the best solution. Here’s a comparison to help you decide:
| Situation | Plug? | Alternative |
|---|---|---|
| Winterizing in freezing climate | Yes | Blow out lines, use plugs |
| Minor leak at jet | Temporarily | Schedule repair |
| Routine cleaning | No | Keep jets open for circulation |
| Pressure testing plumbing | Yes | Use expansion plugs |
| During swimming season | No | Keep jets running |
Plugging is a temporary fix in most cases. For long-term problems, always address the root cause.
Common Mistakes And How To Avoid Them
Even experienced pool owners make errors when plugging return jets. Here are mistakes to avoid:
- Using the wrong plug size – This causes leaks and can damage the fitting.
- Not cleaning the jet opening – Dirt or sand prevents a watertight seal.
- Overtightening plugs – Can crack plastic fittings, leading to bigger leaks.
- Forgetting Teflon tape – Threaded plugs without tape often leak.
- Leaving plugs in too long – Can cause plugs to get stuck or rubber to degrade.
- Not lowering water for winter – Water above jets can freeze and break pipes, even with plugs.
- Running pump with all jets plugged – This can burn out your pool pump.
Expert insight: Always label and store your plugs in a dry place after use. Sun and pool chemicals can break down rubber if left outside.
Advanced: Winterizing Your Pool Return Jets
In colder climates, winterizing your pool is a must. Plugging return jets is just one part of a bigger process.
Steps To Winterize Return Jets
- Balance your pool water – Adjust pH, alkalinity, and chlorine before closing.
- Lower the water below the return jets – This prevents freeze risk.
- Blow out the return lines – Use a shop-vac or air compressor to force water out of the pipes.
- Insert expansion or threaded plugs – Make sure they’re tight and watertight.
- Add pool antifreeze (if needed) – For extra protection, pour non-toxic pool antifreeze into the lines before plugging.
- Double-check all seals – A single drip can freeze and break pipes over winter.
Extra tip: Mark the location of each jet and plug on a diagram. This helps for spring opening, especially if you have multiple returns.
Removing A Pool Return Jet Plug
In spring or after repairs, you’ll need to remove the plug. Here’s how:
- Lower water if needed – If the water level is above the plug, lower it to prevent flooding.
- Loosen the plug – For expansion plugs, turn the handle counterclockwise. For threaded plugs, unscrew by hand.
- Check for stuck plugs – If a plug won’t move, gently wiggle or use a strap wrench. Never use excessive force.
- Inspect the fitting – Look for cracks or damage before reinstalling the eyeball fitting.
- Restore the eyeball fitting – Screw back the directional fitting for regular use.
Pro tip: Sometimes, rubber expansion plugs can get stuck after months in place. A little pool-safe lubricant on the rubber before storage prevents this.
Troubleshooting Leaks And Problems
If you’re still seeing leaks after plugging, don’t panic. Here’s a quick guide:
- Leak around plug: Plug is likely wrong size or not tight enough. Try a larger size or retighten.
- Crack in fitting: Stop and repair before refilling pool. Epoxy can work for small cracks.
- Water still draining: The problem may be further down the line, not at the jet. Pressure test with all jets plugged to find the leak.
- Plug pops out: Pressure buildup or undersized plug. Never run the pump with all returns plugged.
Pro insight: Always keep a few spare plugs of each size. Sometimes, rubber ages and loses flexibility, causing surprises when you need them most.
Comparing Plugging Methods
Some pool owners ask if it’s better to plug from the inside (pool side) or outside (equipment pad). For most residential pools, the only practical way is from inside the pool. External capping is rare and usually only possible for above-ground pools.
Here’s a quick comparison:
| Method | Pros | Cons |
|---|---|---|
| Inside (Pool Side) Plug | Easy access, fits all pools, quick | Requires pool access, sometimes underwater |
| Outside (Pad Side) Cap | Works for above-ground, no swimming needed | Hard for in-ground, often not possible |
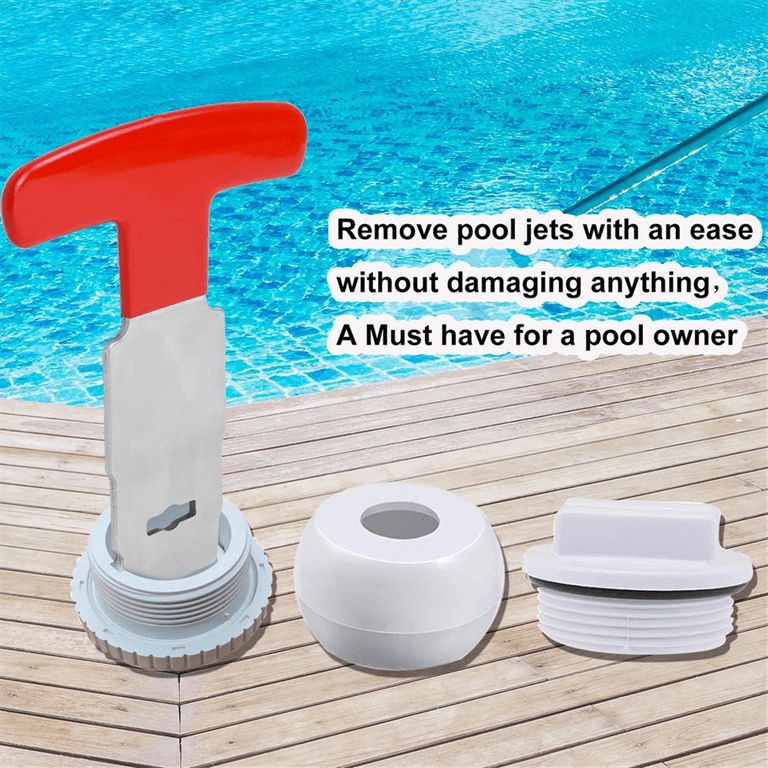
Most in-ground pools are designed for inside plugging. If you want to upgrade your return jets to threaded models for easier plugging, you can often swap out the fitting.
Credit: www.walmart.com
Safety Tips And Best Practices
Working with water and plumbing always has risks. Here’s how to stay safe:
- Never work on pool plumbing with the pump running.
- Wear gloves and goggles if using tools underwater.
- Always check for electrical hazards around the pump area.
- Don’t use makeshift plugs or random objects—only use plugs made for pools.
- Store plugs and tools in a dry, safe place when not in use.
Non-obvious insight: If your pool is used by children or pets, always remove tools and loose plugs before swimming. Small parts can be a choking hazard.
Environmental And Cost Impacts
Plugging return jets is a small job, but it can have a big impact on your pool’s efficiency and operating costs.
- Water savings: Stopping leaks saves hundreds of gallons per season.
- Chemical savings: Leaks can waste expensive chemicals. Plugging keeps them in the pool.
- Energy savings: Proper circulation means the pump runs less, saving electricity.
Data point: According to the EPA, a pool leak as small as 1/32 of an inch can waste up to 970 gallons of water a day. Plugging jets quickly prevents this waste.
When To Call A Professional
Some jobs are best left to the pros. Call a pool technician if:
- You see cracks around the jet fitting.
- The plug won’t seal and water keeps leaking.
- You’re unsure about winterizing steps.
- You have a complex or commercial pool system.
A professional can also pressure test your system and recommend upgrades for easier maintenance.
Resources For Further Reading
For more in-depth technical details, pool owners can check the Association of Pool & Spa Professionals or find step-by-step guides on the Wikipedia Swimming Pool page.

Credit: www.amazon.com
Frequently Asked Questions
How Do I Know What Size Plug I Need For My Pool Return Jet?
Measure the inside diameter of your return jet opening with a tape measure. Most are 1. 5 or 2 inches. Bring this measurement when buying plugs. If unsure, take the eyeball fitting to a pool store for sizing.
Can I Plug A Pool Return Jet Underwater?
Yes, you can, but it’s trickier. Expansion and foam plugs can be installed underwater, but you’ll need to work quickly and carefully. For beginners, lowering the water below the jet makes it much easier.
How Long Can I Leave A Plug In A Pool Return Jet?
For winterizing, you can leave a plug in for the whole off-season (4-6 months). For repairs, remove the plug as soon as possible. Prolonged use can cause the rubber to degrade or stick to the fitting.
What If The Plug Keeps Leaking?
Check that you’re using the right size. Clean the jet opening, and try retightening. For threaded plugs, use Teflon tape. If the fitting is cracked or damaged, you may need repair or replacement.
Is It Safe To Swim With A Return Jet Plugged?
It’s not recommended. Plugging a jet can change water flow, trap debris, or even cause suction hazards. Always remove plugs and restore normal jet fittings before allowing swimming.
Enjoying a pool means more than just swimming—it’s about keeping every part working right. Knowing how to plug a pool return jet is a simple skill that can save you time, money, and stress in the long run. With the right tools and steps, you’ll keep your pool safe, efficient, and ready for the next swim.