
Pumping water from a natural spring is a task that connects people with nature’s basic resources. For centuries, springs have been vital for drinking water, irrigation, and livestock. Today, many rural homes, farms, and off-grid cabins still depend on them.
But while the idea seems simple—collecting water where it bubbles from the ground—the actual process involves important steps and decisions. Mistakes can cause contamination, wasted money, or even a failed water supply. Understanding how to properly pump water from a spring makes all the difference for long-term safety and reliability.
This article explains the full process of pumping water from a natural spring, from identifying a good site to building a durable system. Whether you want water for a small homestead or a bigger project, you’ll find practical advice, real-world examples, and expert tips for every stage.
You’ll also learn about the best pump types, system components, common challenges, and how to protect your water source for years to come.
Understanding Natural Springs
A natural spring is where groundwater flows naturally to the earth’s surface. Springs are often found in hilly or mountainous areas, but they can appear anywhere the water table meets the ground. The water comes from rain or melting snow that soaks into the soil, travels underground, and exits at a weak spot in the rock or soil.
Key advantages of spring water:
- Usually very clean, as soil and rock filter the water
- Flows continuously, even during dry seasons
- Often cool and pleasant to drink
However, not all springs are the same. Some produce only a trickle, while others deliver hundreds of gallons per minute. Some are clean, but others are at risk of contamination from animals or chemicals.
Assessing Your Spring: Is It Suitable?
Before you set up a pump, you need to check if your spring can provide enough clean water. This step is often skipped, but it’s critical for long-term success.
Steps To Assess A Spring
1. Measure The Flow Rate
Use a bucket and stopwatch. For example, if it takes 10 seconds to fill a 5-gallon bucket, your spring flows at 30 gallons per minute (5 gallons x 6).
2. Check Water Quality
Collect a sample in a clean bottle. Test for bacteria, nitrates, and other contaminants at a certified lab. Even clear water can contain harmful bacteria.
3. Watch The Spring Over Time
Some springs dry up in late summer. Monitor flow weekly for several months if possible.
4. Inspect For Contamination Sources
Check for animal droppings, old septic tanks, or farm runoff uphill from the spring.
5. Look At The Terrain
Is the spring at the base of a hill? Is it easy to reach with tools and pipes?
Non-obvious insight: Springs can change with the seasons or after heavy rain. A spring that seems strong in April might shrink by September.
Planning Your Water System
A good plan will save you time, money, and stress. Decide early how you want to use your spring water and where you need it.
Key Planning Questions
- How much water do you need?
Average American homes use about 80-100 gallons per person per day. Livestock or gardens may need more.
- How far is your house or tank from the spring?
Longer distances require stronger pumps and larger pipes.
- Is there enough elevation drop for gravity flow?
If your house or tank is lower than the spring, you might not need a pump at all.
- Is power available?
If not, you may need a solar, wind, or hand pump.
Non-obvious insight: Planning for future needs—like more animals or a second cabin—can prevent headaches later.
Protecting And Developing The Spring
Before you pump any water, it’s essential to protect the spring from contamination. This process is called spring development.
Basic Steps For Safe Spring Development
1. Clear The Area
Remove leaves, mud, and debris from the spring outlet.
2. Divert Surface Water
Build a small berm or ditch uphill to keep rainwater, mud, and animal waste away from the spring.
3. Install A Spring Box
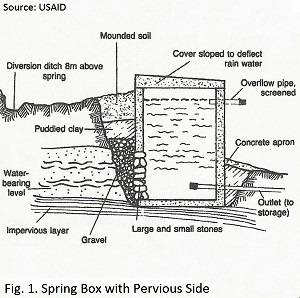
A spring box is a sealed container (usually concrete or plastic) that collects water right at the spring exit. It prevents dirt and animals from entering.
4. Lay A Collection Pipe
Place a perforated pipe (with small holes) in the wettest part of the spring to collect water. Cover with clean gravel, then soil.
5. Backfill And Seal
Use clean clay or bentonite to seal around the spring box. This stops dirty water from leaking in.
6. Add An Overflow Pipe
This lets extra water flow away safely, preventing flooding.
7. Fence The Area
Keep livestock and pets at least 50 feet from the spring.
Example: A farm in Kentucky lost its main water source when cattle trampled the spring area. After fencing and installing a spring box, the water cleared up in two weeks.

Credit: www.youtube.com
Choosing The Right Pump
The heart of your system is the pump. Choosing the right one depends on your spring’s flow, distance, elevation, and available power.
Main Pump Types
| Pump Type | Best For | Pros | Cons |
|---|---|---|---|
| Jet Pump | Short lifts, moderate flow | Simple, reliable, easy to maintain | Noisy, loses prime if air enters |
| Submersible Pump | Deep or submerged sources | Quiet, high pressure, efficient | Harder to repair, more costly |
| Hand Pump | No power areas, backup | No electricity, simple design | Low flow, tiring for large needs |
| Solar Pump | Remote sites, small flows | Free energy, low maintenance | High upfront cost, sun needed |
| Ram Pump | Spring above tank/house | No power needed, durable | Requires drop, wastes some water |
Jet pumps are common for shallow lifts (less than 25 feet vertical). Submersible pumps are best for deeper systems. Ram pumps can move water uphill using only the force of flowing water, but you need at least a 2-foot drop from the spring to the pump.
Example: A cabin 300 feet downhill from a spring uses a ram pump to push water 50 feet uphill to a storage tank.
Pro tip: Always size your pump based on the highest daily water use, not just your average.
Pipes, Fittings, And Storage Tanks
Moving water from your spring to where you need it requires strong, clean pipes and fittings.
Common Pipe Materials
| Material | Cost | Lifespan | Notes |
|---|---|---|---|
| Polyethylene (PE) | Low | 20-50 years | Flexible, easy to bury, durable |
| PVC | Low-Moderate | 25-40 years | Rigid, easy to glue, not for sunlight |
| Galvanized Steel | High | 30-50 years | Strong, but rusts over time |
Most homesteads use black PE pipe because it’s cheap, easy to work with, and handles freezing better than PVC.
Sizing Pipes And Tanks
- For flows under 10 gallons per minute, 1-inch pipe usually works well for runs up to 300 feet.
- Storage tanks should hold at least 1-2 days’ water supply. For a family of four, a 300-500 gallon tank is common.
- Tanks can be plastic, fiberglass, or concrete. Place them uphill if you want gravity pressure.
Non-obvious insight: Burying pipes below frost level (usually 2-4 feet deep) prevents winter freeze-ups.
Filtration And Water Treatment
Even the cleanest springs can harbor bacteria, parasites, or sediment. A simple filter and disinfection system protect your health.
Basic Water Treatment Steps
1. Sediment Filter
Removes sand and dirt. Usually a 5-20 micron cartridge.
2. Carbon Filter
Reduces taste, odor, and some chemicals.
3. Uv Sterilizer Or Chlorine
Kills bacteria and viruses. UV is low-maintenance and chemical-free.
4. Test Water Yearly
Check for bacteria, especially after heavy rain or flooding.
Real-world example: After adding a UV filter, one remote cabin saw a drop in stomach illnesses among visitors.
Step-by-step: Pumping Water From Your Spring
Here is a practical guide for setting up a basic pumped spring water system.
1. Secure Permissions
In many areas, you need a permit to develop a spring or pump water. Check with your local health department or water agency.
2. Develop The Spring
As described above, clean the spring, divert surface water, and install a spring box with a collection pipe.
3. Install Intake Pipe
Place a non-toxic, food-grade intake pipe into the spring box. Attach a screen to prevent leaves, frogs, or debris from being sucked in.
4. Lay Main Supply Pipe
Trench a path from the spring box to your pump and storage tank. Slope pipe slightly downhill to reduce air pockets.
5. Set Up The Pump
- Place the pump on a solid base, protected from rain and freezing.
- Connect intake and output pipes with strong, leak-free fittings.
- For submersible pumps, lower the pump into the spring box or a nearby sump.
6. Install Storage Tank
Put your tank on a stable, level pad. Connect the output pipe from your pump to the tank inlet. Add an overflow pipe to carry away excess water.
7. Add Pressure Tank (if Needed)
If you want pressurized water in your house, install a pressure tank and switch between the pump and your plumbing.
8. Filter And Treat The Water
Install sediment and carbon filters after the storage tank. Place a UV sterilizer or chlorinator if desired.
9. Test And Adjust
Run the system and check for leaks or air in the pipes. Adjust pressure settings as needed. Test water quality before regular use.
10. Maintain The System
Clean filters monthly and check the spring box for silt or damage. Inspect pipes and tanks before winter.
Non-obvious insight: Many leaks are caused by loose fittings or freezing pipes, not by the pump itself.
Credit: www.clean-water-for-laymen.com
Power Options For Spring Pumps
Choosing the right power source is key, especially in remote areas.
Main Power Options
1. Grid Electricity
Most reliable for homes near power lines.
2. Solar Power
Good for sunny, off-grid sites. Solar pumps can move 1-2 gallons per minute on a sunny day.
3. Gas Or Diesel Generator
Use for short-term or backup pumping.
4. Manual Pumps
Best for emergencies or small daily needs.
5. Hydraulic Ram Pump
Needs no electricity, but only works with certain springs.
Example: A ranch in Oregon uses solar panels to power a submersible pump, filling a 1,000-gallon tank for cattle.
Pro tip: Oversize your solar panels and batteries for cloudy days.
Common Problems And How To Solve Them
Every spring system faces challenges. Knowing what to watch for can save you trouble.
Low Flow Or Dry Spring
- Check for clogged intake or spring box
- Monitor flow during dry months before relying on the spring for all water
Pump Won’t Start
- Check power supply (breaker, solar charge, or fuel)
- Look for air leaks in intake line
- Prime the pump if needed (for jet pumps)
Dirty Or Cloudy Water
- Inspect for recent rain or animal activity
- Replace or clean filters
- Consider upgrading to a spring box if you haven’t already
Frozen Pipes
- Bury pipes below frost line
- Use insulated covers for above-ground sections
- Drain unused lines before winter
Loss Of Pressure
- Check for leaks in the system
- Inspect the pressure tank and switch
Non-obvious insight: A sudden change in spring flow or water quality often signals a problem uphill, like construction, logging, or a broken pipe.
Legal And Environmental Considerations
Spring water often falls under local, state, or national water rights laws. Developing a spring can affect neighbors, streams, or local wildlife.
- Always check legal requirements before building.
- Protect wetlands and avoid draining ponds.
- Respect neighbor boundaries—water can travel underground.
For more information on water rights, see this Wikipedia article.
Comparing Spring Water Systems
Here’s a side-by-side look at three common ways to get water from a spring:
| System Type | Cost | Reliability | Power Needed | Best For |
|---|---|---|---|---|
| Gravity Flow | Low | High | No | Spring above house/tank |
| Pumped System | Medium-High | High | Yes | Spring below house/tank |
| Ram Pump | Medium | Medium-High | No | Limited flows, elevation drop |
Non-obvious insight: Gravity systems are nearly maintenance-free but only work if the spring is higher than your water use point.
Safety And Health Tips
- Never assume spring water is safe without testing.
- Boil water if you suspect contamination.
- Mark all pipes clearly for drinking or non-drinking use.
- Inspect spring protection regularly, especially after storms or animal activity.
- Keep chemicals, fuels, and waste far from the spring area.
Real-world Example: A Small Farm System
A family in Tennessee developed a hillside spring to supply their home and livestock. They measured flow at 15 gallons per minute in spring, dropping to 5 gallons per minute in late summer. They fenced the spring, installed a concrete spring box, and used 1.
5-inch PE pipe to carry water 400 feet to a 500-gallon storage tank. A submersible pump fills the tank, and a pressure tank supplies the house. They added a UV filter after a water test found bacteria. The system has run for 10 years with only minor repairs and yearly filter changes.
Lesson: Careful planning and regular maintenance keep a spring system running smoothly for decades.

Credit: www.youtube.com
Frequently Asked Questions
How Much Water Can I Get From A Spring?
The amount varies from a few gallons per day to hundreds of gallons per minute. Measure your spring’s flow rate over several weeks to find the average. Remember, flow can drop during dry months.
Do I Need To Treat Spring Water Before Drinking?
Yes, always filter and test your water. Even clear spring water can carry bacteria or parasites. A sediment filter and UV sterilizer or chlorine are recommended for safety.
Can I Pump Water Uphill From A Spring?
Yes. Use a pump sized for the distance and elevation gain. Hydraulic ram pumps can move water uphill without power if there’s enough drop at the spring.
What’s The Best Pipe To Use For Spring Water Systems?
Most people use black polyethylene (PE) pipe for its flexibility, durability, and low cost. Use only food-grade pipes for drinking water.
How Do I Keep My Spring Water System Working In Winter?
Bury pipes below frost line, insulate exposed parts, and drain unused lines before freezing weather. Check the spring box for ice buildup during cold snaps.
Pumping water from a natural spring is both an art and a science. Careful site assessment, protection, and the right equipment ensure a clean, reliable supply for years to come. With proper setup and maintenance, your spring can be a dependable resource that outlasts most wells or city water connections.