
Removing glaze from kitchen or bathroom cabinets can seem like a big job. Over time, many people want to return their cabinets to their natural look, change the color, or fix glaze that is cracked or worn. Some homeowners feel frustrated when they try to clean or paint over glaze, only to find it does not come off easily.
The good news is, with the right steps, you can safely remove glaze and give your cabinets a fresh start. This guide explains everything you need to know, from understanding what glaze is, to the tools you’ll need, and the safest way to get your cabinets looking brand new again.
Understanding Cabinet Glaze
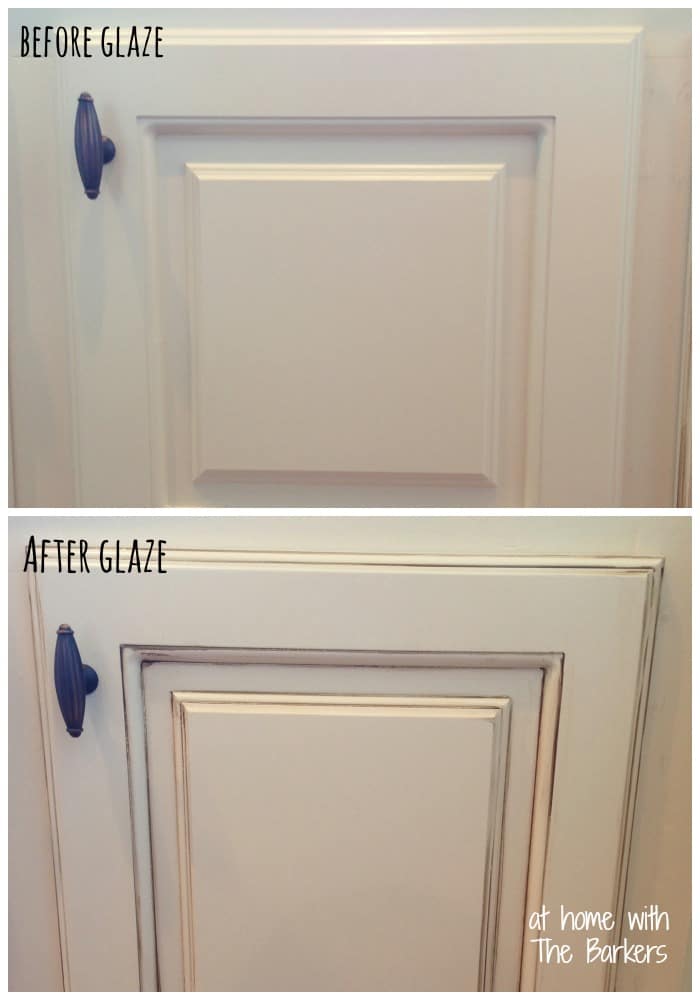
Before you start, it’s important to know what glaze is. Cabinet glaze is a thin, semi-transparent layer put over paint or stain. Its main purpose is to add depth, highlight details, and protect the wood or paint. Many glazed cabinets have a more “antique” or “distressed” look. The glaze can be oil-based or water-based, and sometimes is mixed with a protective topcoat.
Why does this matter? The type of glaze affects how you remove it. Oil-based glazes are tougher and often need stronger products. Water-based glazes are easier to remove but may still need special care, especially if sealed with a clear coat.
Another detail that’s easy to miss: some glazes are tinted to match the paint or stain underneath, making it hard to see exactly where the glaze is sitting on the surface. This is why you may notice uneven color or dull patches after partial removal.
Many people make the mistake of sanding or scrubbing too hard, which can damage the wood or paint underneath. Others try to paint over glaze without removing it, leading to peeling or uneven results.
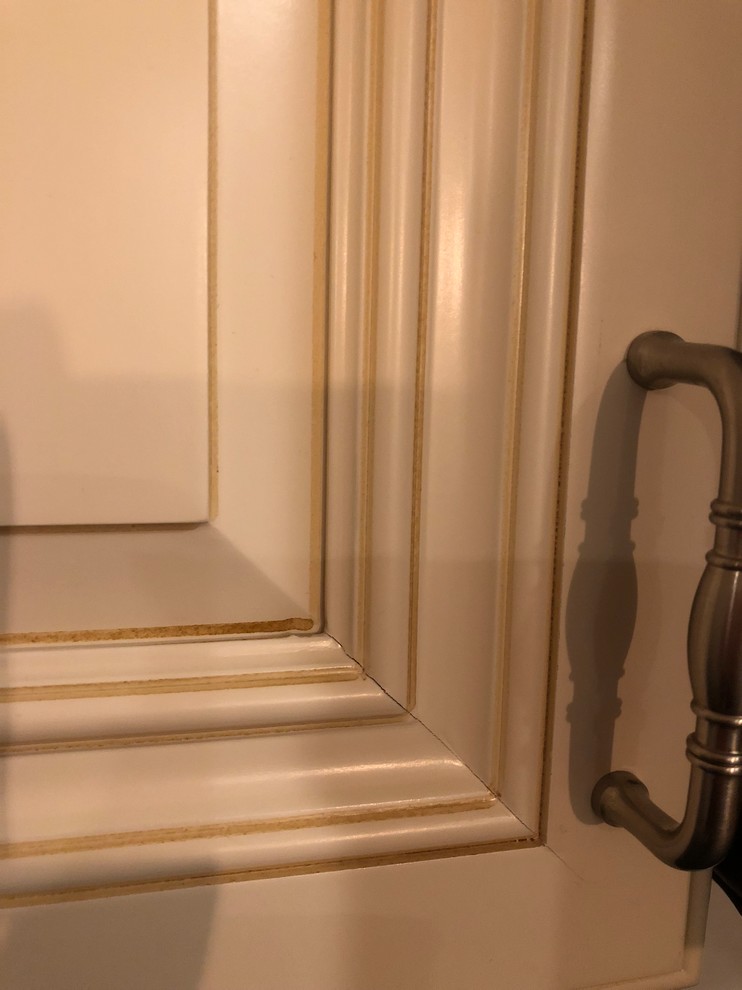
If your cabinets have fine details, such as grooves or raised panels, glaze can sit heavier in those areas. This means you may need to spend extra time on intricate parts to fully remove the old glaze and get a consistent look.
When Should You Remove Glaze?
Not every cabinet with glaze needs glaze removal. Here are the most common reasons:
- Color change: You want to paint the cabinets a new color or refinish them. Glaze can affect how new paint looks and bonds.
- Damage: The glaze is chipped, cracked, or worn. Damaged glaze can attract dirt and make cabinets look older than they are.
- Style update: The glazed look feels outdated, and you prefer a cleaner, modern finish. Many modern kitchens use flat, solid colors instead of a glazed, antique style.
- Cleaning issues: The glaze holds dirt or has yellowed over time. Especially in kitchens, smoke and grease can stain glaze.
A key thing to remember: If your cabinets have a thick protective topcoat over the glaze, you’ll likely need to remove or break through the topcoat first.
It’s also worth noting that sometimes, simply cleaning or lightly sanding the glaze is enough if you plan to apply a similar color or finish. Full removal is only necessary when you want a completely different look or when the glaze is badly damaged.
Credit: athomewiththebarkers.com
Tools And Materials Needed
Having the right tools makes the job easier and helps avoid mistakes. Here is a list of what you’ll need for most cabinet glaze removal projects:
- Rubber gloves (for safety)
- Protective goggles
- Dust mask or respirator
- Screwdrivers (to remove cabinet doors and hardware)
- Drop cloths or old towels
- Painter’s tape
- Plastic scraper (not metal to avoid scratches)
- Fine and medium grit sandpaper (220 and 150 grit)
- Sanding sponge or block
- Clean rags and sponges
- Buckets
- Mild detergent
- Mineral spirits or denatured alcohol
- Paint stripper (gel or paste for furniture/cabinets)
- Steel wool (0000 grade for fine work)
- Old toothbrush
- Vacuum with brush attachment
Pro tip: Always test products on a small, hidden part of your cabinet first. Some finishes react differently.
You might also find a small putty knife with rounded edges useful for tight corners. A hair dryer or heat gun can help soften stubborn glaze, but be careful—too much heat can damage the finish or warp the wood. Keep all tools organized and within reach to avoid delays once you start.
Step-by-step Guide: How To Remove Glaze From Cabinets
1. Prepare The Work Area
Start by clearing your workspace. Removing cabinet doors and drawers is best—this makes the job easier and helps you reach every corner.
- Lay down drop cloths to protect floors and counters from drips.
- Remove hardware like handles and hinges.
- Label the doors and hardware if needed for easy reassembly.
Proper ventilation is important. Open windows or use fans, especially if using chemical strippers. If you have a ceiling fan, turn it on low to help move air without stirring up dust.
Take a moment to set aside a bucket for waste and another for clean water. This helps you stay organized and keeps dirty rags from touching clean surfaces.
2. Clean The Cabinets Thoroughly
Before doing anything else, clean your cabinets with mild detergent and warm water. Grease, oils, and dirt can get in the way of glaze removal.
- Use a soft sponge or cloth. Don’t use abrasive scrubbers, as these can scratch the existing finish.
- Rinse with clean water and let dry completely.
- For tough spots, use a little denatured alcohol.
Pay special attention to corners, edges, and spots near the stove or sink, as these areas often have extra buildup. If you skip cleaning, chemicals and sanding will only push dirt deeper into the wood, making the job harder.
3. Test The Glaze Type
Not all cabinets use the same glaze. Here’s how you can quickly test:
- Dab a cloth with mineral spirits and rub a small hidden spot.
- If the glaze comes off, it’s likely oil-based.
- If not, try water and see if the glaze softens (water-based).
- If nothing happens, it may have a strong topcoat.
- If unsure, try a small spot with paint stripper.
Knowing the type helps you pick the right removal method.
If you’re still not sure, check for any product labels inside the cabinets or ask the previous homeowner (if possible). Sometimes, manufacturers list the finish type on a sticker inside a door or drawer.
4. Remove Or Soften The Topcoat (if Needed)
Many glazed cabinets have a clear protective layer over the glaze. You must remove or at least roughen this so you can get to the glaze.
- Lightly sand the surface with 220-grit sandpaper.
- For thick topcoats, use a chemical stripper following the instructions.
- Wipe away residue with a clean rag.
Tip: Don’t sand too hard! You only want to remove the shiny layer, not the wood or painted finish beneath.
If the topcoat is especially stubborn, try applying a small amount of stripper, then cover the area with plastic wrap to slow down evaporation. This helps the chemical work longer and can make tough finishes easier to remove.
5. Apply A Paint Or Glaze Remover
Choose a gel or paste stripper made for cabinets. These stick to vertical surfaces and work slowly, reducing splatter and fumes.
- Wear gloves and goggles.
- Apply a thick, even coat with a brush.
- Let sit for the time on the product label (usually 15-30 minutes).
- The glaze should bubble or soften.
Work in sections if you have a large kitchen—don’t try to do everything at once.
If you’re working in a bathroom, protect the sink and any tile with extra towels or plastic. Some strippers can damage stone or tile if spilled.
6. Scrape Off The Glaze
Once the glaze softens:
- Use a plastic scraper to gently lift off the loosened glaze.
- For corners and details, use an old toothbrush or steel wool.
- Wipe off excess with clean rags.
If some glaze remains, repeat the stripper process. Don’t rush—patience prevents damage.
For really stubborn spots, a small amount of denatured alcohol can help break up residue. Just make sure to test first and avoid over-saturating the wood.
7. Neutralize And Clean The Surface
After removing the glaze, many strippers need neutralizing.
- Use a damp rag with mild soap, or follow the product’s instructions.
- Rinse with clean water.
- Let everything dry fully.
Skipping this step can cause problems with paint or new finishes sticking later.
Don’t forget to check the cabinet edges and undersides—these spots are easy to miss but can affect the look and durability of your final finish.
8. Sand Smooth
Sand all cabinet surfaces with fine (220-grit) sandpaper or a sanding sponge. This smooths the wood and removes any last traces of glaze.
- Always sand with the wood grain.
- Wipe dust with a damp cloth or vacuum.
A smooth, clean surface is key for the final look.
If you find small patches of glaze that won’t budge, gently spot-sand these areas. Take care not to create flat spots or grooves.
9. Inspect And Repeat If Needed
Check every inch of your cabinets in good light. Is any glaze left? If yes, repeat the stripper and sanding on those spots.
Don’t rush to paint or stain until you’re sure all glaze is gone.
Look at the cabinets from different angles, as leftover glaze can sometimes be almost invisible straight on but will show up as shine or dullness from the side.
10. Finish And Reassemble
Once the cabinets are clean and dry:
- Apply your new finish (paint, stain, or clear coat).
- Let everything cure fully.
- Reattach doors, hardware, and enjoy the new look.
If your kitchen is busy, consider waiting at least 48 hours before heavy use to let finishes harden. Labeling hardware and doors during removal makes reassembly much easier.
Comparing Glaze Removal Methods
Choosing the right method depends on your cabinet’s finish, glaze type, and your comfort with chemicals. Here’s a quick comparison:
| Method | Best For | Pros | Cons |
|---|---|---|---|
| Chemical Stripper | Thick or old glazes | Effective, less sanding needed | Strong fumes, requires gloves, can damage if left too long |
| Sanding | Thin glazes, small areas | No chemicals, low cost | Time-consuming, can scratch wood |
| Denatured Alcohol | Water-based glaze | Gentle, easy cleanup | Not for oil-based or sealed glazes |
| Professional Refinishing | Large jobs, high-end cabinets | Expert results, less risk | Expensive |
Another thing to consider: for cabinets with a mix of flat and detailed areas, you might need to combine methods. For example, use a chemical stripper on the main panels and sanding or denatured alcohol on grooves and edges.
Common Mistakes And How To Avoid Them
Many DIYers run into problems when removing glaze. Here’s what to watch out for:
- Skipping the test spot: Always test products in a hidden area to avoid surprises.
- Over-sanding: Sanding too much can remove wood details or damage the cabinet base.
- Not removing all glaze: Even a thin layer left behind can affect new paint or stain.
- Using metal scrapers: These can scratch or gouge wood. Use plastic tools instead.
- Not wearing safety gear: Some chemicals can irritate skin or eyes. Gloves, goggles, and good ventilation are essential.
Extra insight: Many people underestimate how long glaze removal takes. Plan for at least a full weekend for a small kitchen.
Another common mistake is starting to paint or stain before the cabinets are fully dry. Moisture trapped in the wood can cause bubbles, poor adhesion, or a cloudy finish later. Give cabinets extra time to air out, especially in humid climates.
How To Remove Glaze From Detailed Or Raised Cabinets
Cabinets with grooves or raised panels need extra care. Here’s a focused approach:
- Use an old toothbrush or soft-bristle brush to apply and remove stripper in grooves.
- For stubborn corners, a wooden toothpick can help lift glaze without scratching.
- Avoid letting stripper dry in detailed areas; wipe away as soon as possible.
- Finish with fine steel wool to smooth tight spots.
This careful work pays off, especially on decorative doors.
On intricate doors, patience is key. Work on one section at a time and use a flashlight to check for hidden bits of glaze. If glaze remains in deep grooves, a cotton swab dipped in stripper or alcohol can help.
Dealing With Stubborn Or Old Glaze
Some glazes, especially on older cabinets, are very tough to remove. Here’s what you can try:
- Switch to a stronger, furniture-grade paint remover.
- Let the stripper sit longer, but never let it dry out—cover with plastic wrap if needed.
- If glaze still won’t budge, consult a professional refinisher.
Hidden tip: Sometimes, two thin applications of stripper work better than one thick coat.
If you suspect the glaze is lead-based (possible on very old cabinets), do not sand or scrape until you’ve checked local safety guidelines. Lead dust is dangerous, and professional help may be required.
Cleaning And Care After Glaze Removal
Once all the glaze is gone, your cabinets will need special care. The wood or paint underneath may be bare and more sensitive to moisture or stains.
- Wipe with a damp (not wet) cloth regularly.
- Avoid harsh cleaners for at least a week after refinishing.
- Consider adding a protective finish if you want a natural look.
If you plan to paint, use a high-quality primer for the best results.
If you prefer a natural wood look, choose a water-based polyurethane or a wax finish for a softer sheen. Always check your finish on a test spot first to see how the wood will react.
Estimated Time, Cost, And Difficulty
Here’s a quick look at what to expect for a standard kitchen (10-15 cabinets):
| Task | Time Estimate | Approximate Cost | Difficulty |
|---|---|---|---|
| Preparation & Cleaning | 2-3 hours | $10 (cleaners, rags) | Easy |
| Glaze Removal | 8-12 hours | $30-$60 (strippers, sandpaper) | Moderate |
| Finishing & Assembly | 3-6 hours | $20-$100 (paint/stain, topcoat) | Moderate |
Pro insight: Removing glaze yourself is far cheaper than hiring a pro, which can cost $500 to $2,000+ depending on kitchen size.
Don’t forget to budget for extras like new hinges or handles if you want a completely refreshed look. Many people use this project as a chance to update hardware or add soft-close features.
Safety And Environmental Considerations
Many products used in glaze removal contain strong chemicals. Here’s how to stay safe:
- Always work in a well-ventilated area.
- Wear gloves, goggles, and a dust mask.
- Never mix different chemicals.
- Dispose of rags and stripper residue according to local rules—some are flammable.
- Keep products away from children and pets.
For greener options, look for citrus-based strippers that have fewer fumes, but remember they may take longer to work.
If you have allergies or sensitive skin, choose products labeled “low-VOC” or “eco-friendly. ” Always wash your hands and arms after working, even if you wore gloves.
When To Call A Professional
Glaze removal is a big project, especially for large kitchens or expensive, solid wood cabinets. Call a pro if:
- The cabinets have heavy, thick glaze and topcoat.
- The wood is antique or valuable.
- You don’t have time or feel unsure about chemicals.
- You want a factory-smooth finish.
Professionals have special tools and products that most homeowners do not.
If your cabinets are part of a matching set with built-in pieces, a pro can help keep the finish consistent. In some cases, a professional can also offer spray finishes for the smoothest look.
Credit: www.houzz.com
Painting Or Staining After Glaze Removal
Once your cabinets are glaze-free, you can paint or stain. Here’s how to get the best results:
- Sand lightly for a smooth surface.
- Wipe away all dust.
- Use a high-quality primer if painting.
- For stain, use a wood conditioner first (especially for soft woods).
- Apply finish coats in thin layers for better durability.
Important: Let each coat dry fully before adding the next.
If you want a custom look, try two-tone finishes or add soft glaze back only in certain areas. This gives a modern twist but keeps some of the old charm.
Frequently Asked Questions
What Is The Difference Between Glaze And Topcoat?
Glaze is a decorative layer that adds color and highlights details. It is usually applied over paint or stain. Topcoat is a clear protective finish (like polyurethane) that seals in the glaze or paint and protects against moisture, scratches, and stains.
Can I Paint Over Glazed Cabinets Without Removing The Glaze?
Painting over glaze is risky. Paint may not stick well, leading to peeling or chipping. For best results, remove or at least sand and prime the glazed surface before painting.
Is It Safe To Use Chemical Strippers Indoors?
Yes, but you must have good ventilation. Open windows, use fans, and wear a mask. Some newer strippers have fewer fumes, but always read the safety instructions.
How Do I Know If The Glaze Is Oil-based Or Water-based?
Test a hidden spot with mineral spirits (for oil-based) and water (for water-based). The glaze will soften or come off if the product matches the glaze type. If neither works, it’s likely sealed with a strong topcoat.
Will Glaze Removal Damage My Cabinets?
If you follow the steps carefully and use the right products, damage is unlikely. Avoid over-sanding or using metal scrapers. Always test first and go slowly, especially on older or delicate wood.
Removing glaze from cabinets is a project that takes time and patience, but it’s a great way to refresh your kitchen or bathroom. With the right tools, careful planning, and the steps above, you can achieve a beautiful, clean look—ready for a new finish or simply to enjoy the natural wood. For more details on wood finishes and safety, you can visit Wikipedia’s Wood Finishing page. Take your time, protect your workspace, and you’ll be proud of the results.
Credit: www.houzz.com