
Removing the door on a Whirlpool oven might sound simple, but doing it right is important for safety and for keeping your oven in good shape. Whether you need to clean the glass, replace a gasket, or fix a hinge, taking off the door is often the first step. Many people worry they might break something, but with the right advice and a little patience, you can do this task with confidence. In this guide, you’ll find step-by-step instructions, common mistakes to avoid, and expert tips most beginners never hear. By the end, you’ll know exactly how to remove your Whirlpool oven door safely and correctly.
Why Remove The Door On A Whirlpool Oven?
There are several reasons why you might need to remove your oven door, and understanding these can help you plan better. The most common reasons include:
- Deep cleaning: Cleaning the inside glass and hard-to-reach spots.
- Replacing parts: Changing door gaskets, hinges, or glass panels.
- Easier access: When moving the oven or making repairs inside.
- Door alignment: Fixing a door that doesn’t close properly.
Manufacturers like Whirlpool design their oven doors to be removed with minimal tools, but only if you follow the correct process. Skipping steps or using too much force can damage the door or hinges. This is why knowing the right way matters.
Understanding Whirlpool Oven Door Design
Whirlpool makes several types of ovens, but their door mechanisms share some similarities. Most use a hinge locking system. This means the door is held in place by strong metal hinges with locks that secure it during normal use.
There are two main designs you may encounter:
- Hinged doors with locking tabs: These have small levers or tabs on each hinge. You unlock them before lifting the door off.
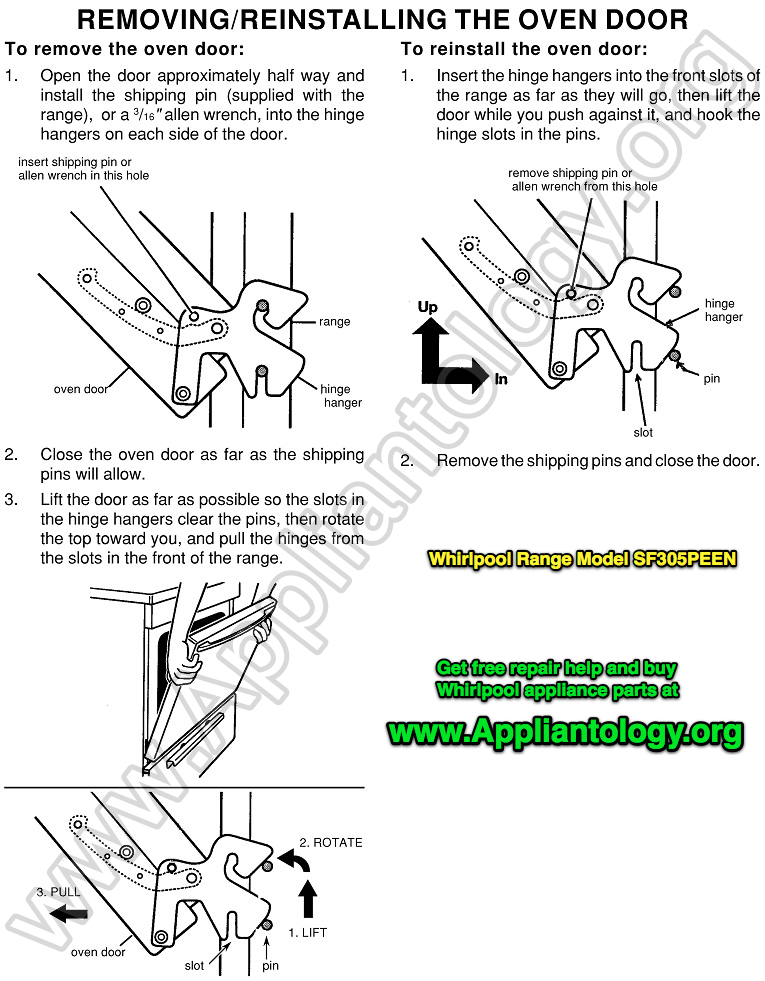
- Slot-and-pin hinges: The hinge fits into a slot in the oven frame. After opening the door to a certain angle, you can lift it out.
Both types are designed to prevent accidental removal but allow easy access when needed. It’s important to know which type your oven uses before starting.
Safety Precautions Before Removing The Door
Working with large, heavy parts like an oven door requires attention to safety. Here’s what you should always do:
- Unplug the oven: Even if you’re not working with wires, unplugging prevents accidental starts.
- Let the oven cool: Wait until the oven is completely cool before starting.
- Clear the area: Make space around the oven and remove anything that could get in the way.
- Protect the floor: Place a towel or soft mat in front of the oven to prevent scratches.
- Use gloves: Protect your hands from sharp edges, especially if the glass is broken.
- Get help if needed: Oven doors are heavier than they look. Don’t hesitate to ask someone to help you lift.
These steps might seem simple, but skipping them is one of the most common mistakes beginners make.
Tools And Materials You’ll Need
Most Whirlpool oven doors can be removed without special tools, but having the right items ready will make the job smoother:
- Flat-head screwdriver: For releasing locking tabs.
- Phillips screwdriver: Sometimes needed for screws on handle or trim.
- Protective gloves: To avoid cuts.
- Towel or mat: For setting the door down safely.
- Small container: To keep screws or parts together.
Having these items nearby saves time and reduces the risk of losing important pieces.
Step-by-step Guide: How To Remove The Door On A Whirlpool Oven
Now it’s time to get hands-on. Here is a clear, detailed process to follow for most Whirlpool ovens:
1. Prepare The Area And Oven
Start by unplugging the oven. If it’s a wall oven, turn off the circuit breaker. Remove any racks from inside the oven. Place a towel or mat on the floor in front of the oven to rest the door on after removal.
2. Open The Oven Door Fully
Carefully pull the oven door open all the way, so it lies flat in the open position. This gives you access to the hinges and locking mechanism.
3. Locate The Hinge Locks
Look at both bottom corners where the door connects to the oven. You should see metal hinges. Near the base of each hinge, there is usually a small latch or tab—this is the hinge lock. Some models have a visible lever that you can flip with your hand; others may require a flat-head screwdriver.
4. Engage The Hinge Locks
Using your finger or a screwdriver, flip the hinge locks toward you and up until they rest against the oven frame. When done correctly, the lock will hold itself in place. Repeat on both sides.
5. Partially Close The Door
Slowly lift the door until it is about one quarter open (about a 30-45 degree angle). In this position, the hinges should be partially out of the oven cavity, but the door is still held by the locks.
6. Lift And Remove The Door
With both hands, grip each side of the door firmly. Lift the door straight up and away from the oven. The hinges will slide out of the slots in the oven frame. The door may be heavy; lift with your legs, not your back, and ask for help if needed.
Gently lay the door on your prepared towel or mat.
7. Set Aside The Door
Place the door face down, with the handle and glass on the towel or mat. This prevents scratches and protects the glass. Keep any removed screws or small parts in your container.
Special Tips For Different Whirlpool Oven Models
Whirlpool makes several oven types, and while the steps above cover most, some have unique features. Here’s how to handle the most common variations:
Slide-in And Built-in Ovens
These often have slightly heavier doors, and the hinge locks may be less visible. If you can’t find the hinge lock, check your owner’s manual or look behind a trim piece at the bottom of the door.
Double Ovens
Each door is removed separately, using the same process. Make sure to support each door fully—never let it hang on one hinge.
Older Whirlpool Models
Older ovens may use screws instead of hinge locks. If you see screws where the hinge meets the oven, remove them before lifting the door.
Self-cleaning Ovens
These may have extra insulation, making the door heavier. Always get a second person to help if you feel any strain.
Credit: www.reddit.com
Comparison: Hinge Lock Vs. Slot-and-pin Designs
To help you identify your oven’s hinge type, here’s a simple comparison.
| Feature | Hinge Lock Design | Slot-and-Pin Design |
|---|---|---|
| Locking Mechanism | Metal tab or lever | No visible lock |
| Removal Step | Flip lock, lift door | Open to specific angle, lift |
| Tools Needed | Finger or screwdriver | Usually none |
| Common on Models | Most new Whirlpool ovens | Some older or high-end models |
Knowing which design you have will make the process much easier.
Practical Examples: When And Why You Might Remove The Door
Sometimes it’s easier to understand a process when you see real-life situations. Here are three scenarios where removing the oven door makes sense:
- Deep Cleaning: After a holiday, you notice grease and food have built up between the glass panels. Removing the door allows you to separate the panels and clean them thoroughly.
- Replacing a Gasket: The oven isn’t sealing well, causing heat to escape. You need to remove the door to access and replace the worn gasket.
- Fixing a Misaligned Door: The door seems crooked and doesn’t close fully. Taking it off helps you inspect the hinges and reseat the door properly.
In each case, following the correct removal steps can save you time and prevent costly repairs.
Credit: appliantology.org
Common Mistakes And How To Avoid Them
Even careful people can make mistakes when removing an oven door. Here are the most frequent errors and how to avoid them:
- Forgetting to engage hinge locks: If you skip this step, the hinges can snap back and damage the oven or hurt your fingers.
- Forcing the door: If the door doesn’t lift easily, check for locks or screws you might have missed.
- Not supporting the door properly: Oven doors are heavier than expected. Always use two hands and get help if needed.
- Losing small parts: Use a container to keep screws and tabs in one place.
- Laying the door on a hard surface: Always use a towel or mat to prevent scratches and cracks.
These simple tips can save you from frustration and extra repair costs.
What To Do After Removing The Door
Once the door is off, what you do next depends on your goal. Here’s what to consider:
Cleaning The Glass And Panels
If you’re cleaning, you can now access the inner glass. Most Whirlpool doors can be separated by removing a few screws on the side or bottom. Carefully lift apart the panels, clean with a gentle glass cleaner, and reassemble.
Replacing Parts
For gasket or hinge replacement, follow the instructions in your oven’s manual. Make sure to use genuine Whirlpool parts for the best fit and safety.
Inspecting And Lubricating Hinges
With the door off, inspect hinges for signs of wear, rust, or bending. If they look dry, apply a drop of high-temperature lubricant to keep them moving smoothly.
Storing The Door
If you need to leave the door off for more than a few hours, store it in a safe place, away from children and pets. Make sure the glass is protected.
How To Reinstall The Door On A Whirlpool Oven
Putting the door back is as important as taking it off. Here’s the correct way:
- Align the hinges: Hold the door at the same angle (about 30-45 degrees) and line up the hinges with the slots in the oven frame.
- Slide hinges into place: Push the door down gently until the hinges are fully in the slots.
- Open the door fully: Once the hinges are in, open the door all the way.
- Disengage hinge locks: Flip the hinge locks back down to their original position. This secures the door.
- Test the door: Open and close the door a few times to make sure it moves smoothly and closes tightly.
Never force the door if it doesn’t fit. Double-check that the hinges are fully seated before closing the door.
Troubleshooting: If The Door Won’t Come Off Or Go Back On
Sometimes, even when you follow every step, things don’t go as planned. Here are solutions for common problems:
- Door won’t lift off: Check that both hinge locks are engaged. Some models may require a firmer lift; others may have hidden screws.
- Door won’t fit back on: Make sure the hinges are at the correct angle. If they have moved, use pliers to gently reposition them.
- Hinges snap back into the oven: Use a flat-head screwdriver to pull them out carefully. Always keep your hands clear of the hinge’s path.
- Door feels loose after reinstalling: The hinges may not be fully seated. Remove the door and try again, making sure to push the hinges in as far as they go.
If you’re still stuck, refer to your oven’s manual or contact Whirlpool customer service.

Credit: www.youtube.com
Data Table: Whirlpool Oven Door Weights
Knowing the weight of your oven door can help you decide if you need help lifting it. Here’s a reference for some common models.
| Model Type | Average Door Weight (lbs) | Recommended Assistance |
|---|---|---|
| Single Wall Oven | 18-25 | 1 person |
| Double Wall Oven | 25-35 | 2 people |
| Freestanding Range | 15-22 | 1 person |
| Slide-In Range | 20-27 | 1-2 people |
Always use your best judgment, and never risk injury.
Two Non-obvious Insights Most Beginners Miss
Most guides stop at the basics, but here are two things many people overlook:
- Check for Glass Panel Alignment Before Reinstalling: If you take the door apart for cleaning, make sure the glass panels are seated correctly before screwing everything back together. Misaligned glass can cause leaks or rattles when the oven heats up.
- Inspect Door Gasket Carefully: Even a small tear or gap in the gasket can cause the oven to lose heat. When the door is off, run your hand around the gasket to feel for worn spots. Replacing a weak gasket is easier now than waiting for a bigger problem.
When To Call A Professional
There are times when removing the oven door yourself is not recommended. If you notice any of these issues, it’s best to contact a qualified appliance technician:
- Damaged hinges or bent frame
- Broken glass panels
- Electrical issues or exposed wires
- Difficulty removing the door after following all steps
A professional has the experience and tools to handle these situations safely.
Additional Resources
If you want more details, Whirlpool offers official manuals and video guides on their support website. You can also find helpful step-by-step videos on reputable home improvement sites. For a deeper look at oven door mechanisms and safety, check out this Wikipedia page on oven doors.
Cost And Time Estimates
For most people, removing and reinstalling a Whirlpool oven door takes about 15–30 minutes. If you are cleaning glass or replacing a gasket, expect to spend 45–60 minutes in total.
If you need to buy replacement parts, here’s what you can expect:
- Door gasket: $15–$40
- Replacement hinges: $20–$50 each
- Glass panel: $40–$100
Hiring a professional to remove and reinstall the door usually costs $75–$150, depending on your location and the complexity of the job.
How To Keep Your Oven Door In Good Shape
Regular care can prevent problems with your oven door. Here are a few simple habits:
- Wipe the door and gasket after each use: Prevents buildup of food and grease.
- Check hinge movement: If the door squeaks or sticks, clean and lubricate the hinges.
- Inspect seals regularly: A tight seal keeps heat in and improves cooking.
- Avoid slamming the door: This can damage hinges and glass.
- Clean between the glass panels every few months: Keeps your oven looking clear and avoids odors.
These small steps can extend the life of your oven and reduce the need for repairs.
Frequently Asked Questions
How Heavy Is A Whirlpool Oven Door?
Most Whirlpool oven doors weigh between 15 and 35 pounds depending on the model. Single oven doors are usually lighter, while double or self-cleaning oven doors are heavier. Always use two hands and get help if you feel any strain when lifting.
Do I Need Any Special Tools To Remove The Door?
For most Whirlpool ovens, you only need a flat-head screwdriver to flip the hinge locks. Some older or less common models may require a Phillips screwdriver to remove screws. Always check your manual if you’re not sure.
Can I Clean Between The Glass Panels After Removing The Door?
Yes. Removing the door makes it much easier to clean between the glass panels. You may need to remove a few screws from the side or bottom of the door to separate the glass. Clean gently to avoid scratches, and make sure the panels are dry before reassembling.
What Should I Do If The Door Won’t Go Back On?
If the door doesn’t fit back on easily, double-check that the hinges are at the correct angle and fully inserted into the slots. Make sure the hinge locks are flipped back to the unlocked position before closing the door. If the problem continues, consult your manual or call a professional for help.
Is It Safe To Use My Oven With The Door Removed?
No, it is not safe to use the oven without the door in place. The oven will not hold heat, and exposed hinges can be a safety hazard. Only use your oven after the door has been reinstalled correctly.
Removing the door on a Whirlpool oven is a practical skill that can make cleaning and repairs much easier. With careful preparation, the right tools, and a clear understanding of the process, you can do this task safely and confidently.
Remember to take your time, ask for help if needed, and always put safety first. If you ever feel unsure, don’t hesitate to seek professional advice—your oven is an important investment worth protecting.