
Running a stove pipe through a wall can feel like a big project, but it’s a task many homeowners and DIYers tackle every year. Whether you’re adding a wood stove to your cabin or upgrading your home heating, safe stove pipe installation is essential.
Done the right way, it keeps your home warm and cozy. Done the wrong way, it creates fire risks, leaks, and expensive repairs. This guide will walk you through every step, from planning and choosing materials to making the final connection.
You’ll learn what really matters, common mistakes to avoid, and how to get professional results—even if this is your first time.
Understanding Stove Pipes And Safety
Before you start, it’s important to know what a stove pipe does and why proper installation is so critical. The stove pipe carries smoke and hot gases from your stove through the wall and outside your home. If installed incorrectly, these gases can leak indoors, causing health hazards. Worse, a poorly installed pipe can overheat nearby materials and start a fire.
Building codes and manufacturers’ instructions exist for a reason. Always check both before you begin. Codes vary by region, so what’s safe in one place may not be in another. As a rule, never run a single-wall stove pipe directly through a wall—this is a major fire hazard. Instead, you’ll use a thimble or a specially designed wall pass-through system.
Many people overlook the importance of clearances—the minimum space required between the stove pipe and anything flammable (like wood framing or drywall). Typical clearance for single-wall pipe is 18 inches, while double-wall pipe can be as little as 6 inches. Some wall pass-through systems reduce this further, but always check the label.
Planning Your Stove Pipe Run
Good planning is the foundation of a safe installation. Start by deciding exactly where your stove will sit and where the pipe will exit. Most stove pipes run straight up and through the roof, which is easiest and safest. Sometimes, though, you need to run the pipe horizontally through a wall, such as in a one-story home or a shed.
Here’s what you need to consider:
- Location of the Stove: Place your stove at least 36 inches from walls and furniture. Check the stove’s manual for specific clearance requirements.
- Wall Selection: Choose an exterior wall with no electrical wires, plumbing, or gas lines in the area where the pipe will run.
- Pipe Route: Keep the pipe as straight and short as possible. Every 90-degree bend reduces draft and increases creosote buildup.
Non-obvious Insight: Many beginners forget to check what’s on the other side of the wall. Always go outside and look—sometimes a bush, deck, or window is right in the way.
Before you cut any holes, double-check the following:
- The stove pipe route is clear of framing, wiring, and pipes.
- There’s enough vertical rise in the pipe for a good draft (at least 1/4 inch per foot of horizontal run).
- The final chimney height meets code (usually 3 feet above the roof and 2 feet higher than anything within 10 feet).
Choosing The Right Materials
Picking the right materials is just as important as the installation itself. There are several types of stove pipe and wall pass-throughs, and each has its place.
Types Of Stove Pipe
- Single-wall stove pipe: Simple, cheap, but requires large clearances and can’t pass through walls.
- Double-wall stove pipe: More expensive, with reduced clearance needs.
- Class A chimney pipe: Insulated and rated for passing through walls and roofs.
Wall Thimbles And Pass-throughs
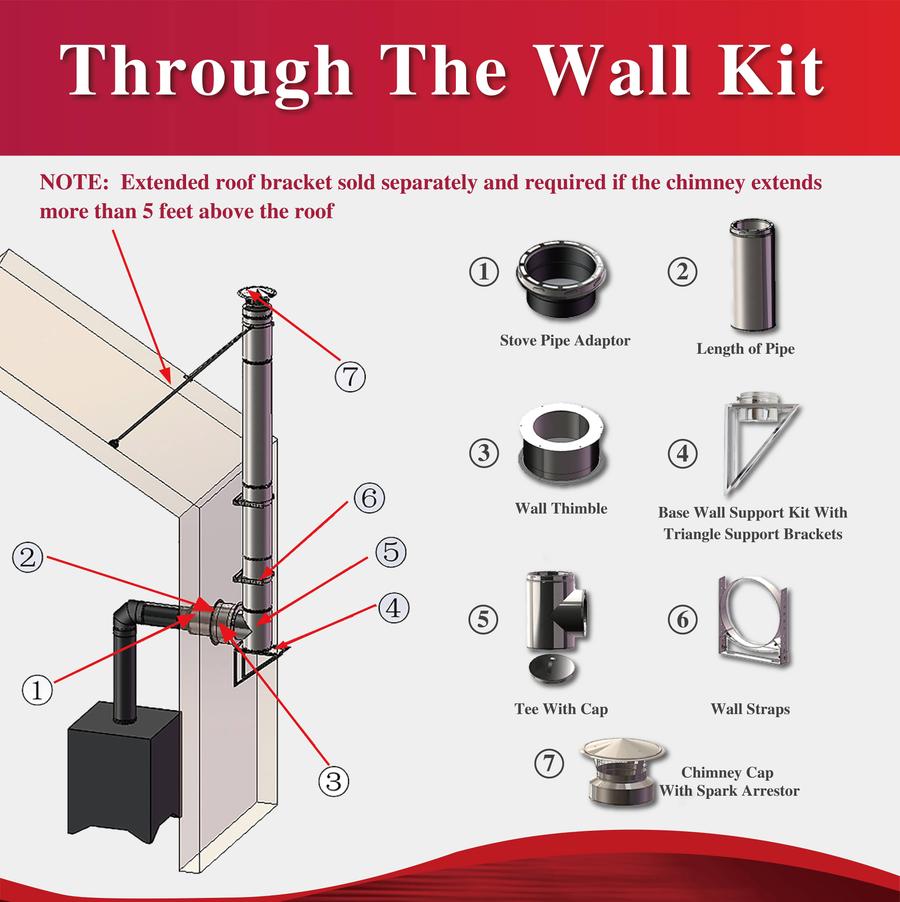
A wall thimble is a special metal box or sleeve that keeps the hot pipe separate from the wall materials. Not all thimbles are the same—some are only for double-wall pipe, others are for Class A chimney pipe.
Materials Checklist
You will need:
- Stove pipe sections (single or double-wall, as required)
- Elbows (usually 90-degree for wall exits)
- Wall thimble or pass-through kit
- Exterior chimney pipe (Class A, insulated)
- Storm collar and chimney cap
- High-temperature silicone or sealant
- Metal screws and brackets
- Fire-resistant caulk or mortar (if required by kit)
Practical Tip: Buy all materials from the same manufacturer if possible. Mixing brands can lead to poor fits and leaks.
Tools You’ll Need
Having the right tools makes the job easier and safer. Here’s a list:
- Tape measure
- Stud finder
- Level
- Drill and bits
- Reciprocating saw (or hole saw)
- Screwdriver
- Sheet metal snips
- Safety glasses and gloves
- Ladder (for exterior work)
- Caulking gun
Non-obvious Insight: Use a magnetic stud finder if you’re working on older walls with metal lath or nails—standard ones can give false readings.

Credit: www.youtube.com
Step-by-step Guide: Running A Stove Pipe Through A Wall
Now, let’s break down the process into clear steps. This method works for most modern wood stoves and pellet stoves.
1. Mark The Wall Exit Point
Set the stove in its final location. Measure from the stove’s flue collar (the pipe connection) to the wall. Mark the center point of the pipe on the wall. Double-check the height and horizontal position, making sure it lines up with the exterior.
Pro tip: Use a plumb line or laser level to keep everything straight.
2. Check Inside And Outside
Go outside and transfer the mark. Make sure nothing will block the pipe—like gutters, eaves, or outdoor obstructions.
3. Cut The Wall Opening
Follow your wall thimble’s template to draw the opening. Most thimbles require a square or round hole 2-4 inches wider than the pipe diameter. Use a stud finder to locate wall studs and avoid cutting through them.
Cut the interior wall (drywall or paneling) first, then the exterior siding. Remove any insulation from the hole—never let insulation touch the pipe.
Common mistake: Cutting too small a hole or forgetting to allow for the thimble’s size. Measure twice, cut once.
4. Install The Wall Thimble
Assemble the thimble according to the manufacturer’s instructions. Some thimbles fit together in two halves (inside and outside), while others have a telescoping sleeve.
Insert the thimble into the wall hole. Secure it with screws. Make sure it’s level and centered. Seal around the thimble with high-temperature silicone or fire-resistant caulk, inside and out, to prevent drafts and water leaks.
5. Assemble The Stove Pipe
Inside, connect the stove pipe to the flue collar on the stove. Use metal screws at each joint (usually three per connection) to prevent movement. If using double-wall pipe, follow the instructions for securing the inner and outer pipes.
Attach a 90-degree elbow to direct the pipe toward the wall thimble. Measure and cut the pipe if needed, using sheet metal snips.
Practical tip: Always install the male (crimped) end of the pipe facing down toward the stove. This keeps creosote and condensation inside the pipe, not leaking out at joints.
6. Run The Pipe Through The Wall
Slide the pipe through the wall thimble. It should fit snugly, with no gaps. If the thimble is for double-wall or Class A chimney pipe, connect the stove pipe to an adapter before entering the thimble.
Outside, attach the exterior chimney pipe to the end of the thimble. Class A chimney pipe is insulated and designed for outdoor use.
7. Secure The Exterior Chimney
The chimney pipe should rise at least 3 feet above the point where it exits the wall, and at least 2 feet higher than anything within 10 feet horizontally. This ensures a proper draft and meets most codes.
Secure the chimney with brackets to the wall. Install a storm collar and chimney cap to keep out rain, snow, and animals.
8. Seal And Finish
Seal all joints and around the wall thimble with high-temperature silicone or fire-resistant caulk. Inside, use fire-resistant trim if desired for a neat appearance.
Check the entire installation for stability. The pipe should not move or wiggle.
9. Test The System
Light a small fire in the stove and check for smoke leaks at every joint. Also, go outside and check for proper draft. If smoke leaks indoors, stop and fix the problem—usually, it’s a loose joint or poor seal.
Pro tip: Use a carbon monoxide detector near the stove for extra safety.
Wall Pass-through Systems Compared
Several types of wall pass-through systems exist. Each has its pros and cons. Here’s a comparison to help you choose:
| System Type | Fire Safety | Clearance Needed | Installation Ease | Cost |
|---|---|---|---|---|
| Basic Metal Thimble | Good for double-wall pipe | 6-9 inches | Easy | Low |
| Insulated Thimble (Class A) | Best for all stoves | 2 inches | Moderate | Medium |
| Site-built Masonry Pass-through | Excellent | Varies by code | Hard | High |
Straight-to-the-point tip: Most homeowners choose an insulated Class A thimble for safety and code compliance.

Credit: www.tinywoodstove.com
Common Mistakes And How To Avoid Them
Even experienced DIYers make mistakes when running a stove pipe through a wall. Here are the most common errors—and how to avoid them:
- Using single-wall pipe through the wall. This is a fire hazard. Always switch to Class A pipe at the wall.
- Ignoring clearances. Keep the minimum required space between pipe and combustibles. Never pack insulation against the pipe or thimble.
- Improper sealing. Gaps let smoke and gases leak into your home. Use the right high-temp sealant.
- Cutting into wiring or plumbing. Always check for hidden pipes and wires before cutting.
- Poorly supported chimney. Exterior pipes must be firmly attached to the wall or roof to withstand wind and snow.
- Incorrect pipe direction. The crimped end always faces down toward the stove.
Non-obvious insight: Don’t rely on “eyeballing” clearances—measure every gap. Building inspectors will.
Understanding Building Codes And Permits
Many regions require a permit for installing a stove pipe or wood stove. Codes exist to protect your home and family. Permits may seem like a hassle, but skipping them can void your insurance or lead to fines.
Always:
- Check with your local building department before starting.
- Follow both local codes and the manufacturer’s instructions. Where they differ, use the stricter requirement.
- Schedule an inspection after installation.
Pro tip: Keep all paperwork and photos of your installation. You may need them for insurance or when selling your home.
Maintenance And Safety Checks
Once your stove pipe is installed, maintenance is key to long life and safety.
- Clean the pipe and chimney at least once a year, or more often if you burn a lot of wood.
- Check all joints for leaks, rust, or damage.
- Make sure the chimney cap is clear of debris and not blocked by birds or leaves.
- Test your smoke and carbon monoxide detectors monthly.
Here’s a quick comparison of maintenance tasks and their frequency:
| Task | How Often | Tools Needed |
|---|---|---|
| Pipe/Chimney Cleaning | Yearly | Chimney brush, vacuum |
| Sealant Inspection | Every 6 months | Flashlight, caulk gun |
| Cap/Draft Check | Before each season | Ladder, screwdriver |
Skipping these steps can lead to dangerous creosote buildup or leaks.
Cost Breakdown: Diy Vs. Professional Installation
Many homeowners want to know if it’s worth hiring a pro or doing it themselves. Here’s a cost comparison:
| Expense | DIY Estimate | Professional Estimate |
|---|---|---|
| Materials | $300 – $800 | $300 – $800 |
| Labor | $0 | $500 – $1,500 |
| Permit | $50 – $150 | $50 – $150 |
| Total | $350 – $950 | $850 – $2,450 |
Straight-to-the-point tip: If you have good DIY skills, you can save a lot. But if you’re unsure, hire a professional—safety always comes first.
When To Call A Professional
There are times when it’s best to let an expert handle the job:
- Your walls contain hidden wiring or plumbing.
- You need to pass through a masonry or brick wall.
- You have a multi-story home.
- Your insurance requires professional installation.
- You don’t feel confident about any step.
A certified installer will ensure everything is to code and safe.
Real-world Example: Installing A Stove Pipe In A Cabin
Let’s look at a real-world scenario. John wanted to install a wood stove in his weekend cabin. He chose the gable end wall for the pipe exit because it had no windows or wiring.
He measured the stove’s flue collar height, marked the wall, and checked both inside and outside for obstructions. After buying a Class A wall thimble and insulated chimney pipe, he cut the wall and installed the thimble.
John used double-wall stove pipe inside for reduced clearances, connected everything with three screws per joint, and sealed with high-temp silicone. Outside, he attached the chimney with wall brackets and made sure it extended 3 feet above the roofline.
After a test fire, he checked for leaks and found none. He cleans the pipe every fall and has had no problems in three years.
Practical tip: Following each step carefully saves time and money in the long run.
Credit: dominusheat.com
Frequently Asked Questions
How Big Should The Hole In The Wall Be For A Stove Pipe?
The hole should be at least 2-4 inches larger in diameter than the stove pipe to allow for the wall thimble. Always use the template or measurements from your thimble or pass-through kit. Never cut the hole the same size as the pipe itself—this is a fire risk.
Can I Run A Single-wall Stove Pipe Through A Wall?
No, single-wall stove pipe should never pass through a wall, ceiling, or floor. Always switch to an insulated, UL-listed Class A chimney pipe at the wall and use a proper wall thimble. This is a common code requirement for fire safety.
What’s The Minimum Clearance Between Stove Pipe And Wall?
For single-wall pipe, the minimum clearance from combustibles is usually 18 inches. Double-wall pipe may allow as little as 6 inches. Class A chimney pipe and wall thimbles can reduce this to 2 inches or less. Always check the manufacturer’s label and local codes.
Do I Need A Permit To Install A Stove Pipe?
In most areas, yes. A permit ensures the installation meets code and is safe. Contact your local building department before starting. Not getting a permit can lead to problems with insurance or when selling your house.
How Do I Clean A Stove Pipe That Runs Through A Wall?
Use a chimney brush and rods designed for your pipe’s diameter. Disconnect sections as needed. Clean both the interior pipe and the exterior chimney at least once a year. Always wear safety gear and check for creosote buildup.
If you want more technical details, the Chimney Safety Institute of America offers comprehensive information on standards and codes.
Running a stove pipe through a wall is a project that rewards careful planning and attention to detail. By following the steps above, choosing the right materials, and respecting safety codes, you can enjoy a warm, safe home for years to come.
Don’t rush—measure twice, cut once, and always put safety first. If in doubt, consult a pro. With the right approach, your stove installation will be both reliable and efficient, giving you comfort and peace of mind every winter.