
Sealing a pipe as it passes through concrete is a task that looks simple but can become a headache if not done correctly. This process is common in both new construction and renovations, whether you’re running water, gas, or electrical conduits.
Without a proper seal, you risk water leaks, air gaps, structural damage, or even pest entry. For non-native English readers, the steps and choices may seem confusing. In this guide, you’ll find clear, step-by-step advice on how to seal a pipe through concrete, covering different scenarios, materials, and expert tips to get a long-lasting, professional result.
Why Proper Pipe Sealing Matters
Most people think concrete is waterproof. In reality, water and air can pass through even the smallest gaps around a pipe. If you don’t seal these gaps, you might face:
- Water leaks: Rain or groundwater can seep through, causing mold or weakening the structure.
- Energy loss: Unsealed pipes can let warm or cool air escape, raising energy bills.
- Pest entry: Mice, insects, and other pests can squeeze through cracks around pipes.
- Corrosion: Moisture can cause pipes to rust, especially metal ones.
- Building code violations: Many codes require pipes to be sealed where they pass through walls or floors.
A good seal protects your property, saves money, and keeps your building safe.
Types Of Pipes And Concrete Penetrations
Before starting, you need to know what type of pipe you are sealing and what kind of concrete structure you are dealing with. Each situation may require a different method.
Common Pipe Materials
- PVC (Polyvinyl Chloride): Used for water, waste, and vent pipes.
- Copper: Common for water supply lines.
- Steel or Iron: Often used for gas or heavy-duty plumbing.
- PEX (Cross-linked Polyethylene): Flexible and popular for modern plumbing.
- Conduit: For electrical wires.
Types Of Concrete Structures
- Slabs: Flat floors, usually in basements or ground floors.
- Walls: Vertical barriers, interior or exterior.
- Ceilings: Sometimes pipes go through concrete ceilings, especially in multi-story buildings.
Knowing your pipe and structure helps you select the right sealing method and materials.
Preparing For The Job
A successful seal starts with good preparation. Rushing or skipping steps can lead to leaks later.
Tools And Materials You Will Need
- Measuring tape: For precise pipe and hole sizes.
- Drill or core cutter: To make or widen holes in concrete.
- Wire brush: For cleaning the hole.
- Vacuum or blower: To remove dust and debris.
- Sealing materials (explained later): Such as expanding foam, sealant, cement, or pipe sleeves.
- Protective gear: Gloves, safety glasses, dust mask.
- Putty knife or trowel: For applying sealant or mortar.
Safety First
Drilling or cutting into concrete creates dust and can damage pipes if you’re not careful. Always:
- Wear a mask and goggles.
- Check for hidden wires or pipes before cutting.
- Work slowly to avoid cracks.
Making Or Preparing The Hole
If you’re working in new construction, pipes are usually placed before the concrete is poured. But in most repairs or upgrades, you must create or adjust a hole in existing concrete.
Drilling A New Hole
- Mark the center: Use a marker to show where the pipe will go.
- Choose the right size: The hole should be just big enough for the pipe plus a gap for sealing (usually 1–2 cm larger than the pipe diameter).
- Drill carefully: Use a hammer drill or core drill, depending on the size.
- Clear debris: Use a vacuum or blower to remove dust.
Cleaning And Sizing The Gap
- Clean edges: Use a wire brush to make the hole edges rough. This helps the sealant stick better.
- Check for cracks: If the concrete around the hole is cracked, repair it first with concrete patch.
Credit: www.wermac.org
Choosing The Right Sealing Method
There isn’t one best way to seal every pipe. The right method depends on:
- The pipe material and size
- The gap size between pipe and concrete
- Location (indoor/outdoor, above/below ground)
- Exposure to water or chemicals
Let’s look at the most reliable sealing methods.
Using Pipe Sleeves
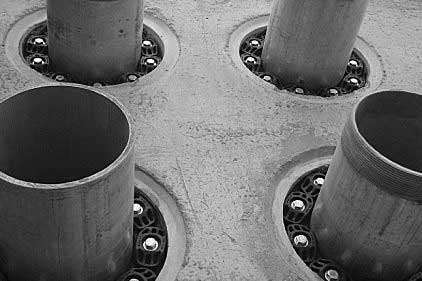
A pipe sleeve is a larger pipe or tube that goes into the hole before the concrete is poured or before sealing. The actual pipe passes through the sleeve, leaving a small gap that’s easy to seal.
Advantages Of Pipe Sleeves
- Allow pipe movement (for expansion/contraction)
- Make replacement easier without breaking concrete
- Help prevent leaks
How To Install A Pipe Sleeve
- Cut a sleeve (usually PVC or metal) about 2–3 cm wider than the pipe.
- Place the sleeve in the hole so it’s centered.
- Pass your pipe through the sleeve.
- Seal both ends of the sleeve with foam, sealant, or cement.
If you’re working with existing concrete, you can create a sleeve by inserting a section of larger pipe into the hole before sealing.

Credit: www.youtube.com
Sealing With Expanding Foam
Expanding polyurethane foam is a popular choice for filling gaps around pipes. It expands to fill the space, hardens, and blocks air and water.
Steps For Foam Sealing
- Make sure the gap is dry and clean.
- Shake the foam can well.
- Insert the nozzle into the gap and spray foam slowly.
- Let the foam expand and harden (usually 1–2 hours).
- Trim excess foam with a knife.
- Cover the exposed foam with cement or mortar for protection.
When To Use Expanding Foam
- Good for indoor pipes or pipes above ground.
- Not ideal for locations with constant water pressure or very wide gaps.
Using Hydraulic Cement
Hydraulic cement is a fast-setting cement that expands as it hardens, sealing gaps quickly.
How To Apply Hydraulic Cement
- Mix the cement according to instructions (it sets fast, so only mix what you can use in 5–10 minutes).
- Wet the area around the pipe.
- Push the cement into the gap using a putty knife or trowel.
- Hold in place for a few minutes until it begins to set.
When To Use Hydraulic Cement
- Works well for active water leaks.
- Suitable for both indoor and outdoor use.
- Not flexible, so not the best where pipes move.
Sealing With Silicone Or Polyurethane Sealant
Silicone and polyurethane sealants are flexible, waterproof, and stick well to most pipes and concrete.
How To Seal With Flexible Sealant
- Clean the area around the pipe and hole.
- Cut the tip of the sealant tube at an angle.
- Use a caulking gun to apply a bead around the pipe.
- Smooth with a gloved finger or spatula.
- Allow to cure as per manufacturer instructions (usually 24 hours).
When To Use Sealant
- Best for small gaps (less than 1 cm).
- Good for pipes that may move slightly.
- Not suitable for large gaps or high-pressure water.
Mortar Or Concrete Patching
For larger gaps or outdoor pipes, mortar or concrete patch is a strong, permanent solution.
Steps For Mortar Sealing
- Mix mortar or patching concrete to a thick paste.
- Dampen the hole and pipe.
- Pack the mortar into the gap, pressing firmly.
- Smooth and shape for a neat finish.
- Allow to cure for at least 24 hours.
When To Use Mortar
- Best for wide gaps or when the pipe is fixed in place.
- Suitable for outdoor and below-ground pipes.
- Not ideal for pipes that may move or vibrate.
Comparing Pipe Sealing Methods
Here’s a quick side-by-side look at the sealing methods discussed:
| Method | Best For | Flexibility | Waterproof | Durability |
|---|---|---|---|---|
| Pipe Sleeve | New builds, easy replacement | High | Good | High |
| Expanding Foam | Small to medium gaps | Medium | Good | Medium |
| Hydraulic Cement | Active leaks, large gaps | Low | Excellent | High |
| Flexible Sealant | Small gaps, moving pipes | High | Good | Medium |
| Mortar/Concrete Patch | Large, fixed pipes | Low | Excellent | High |
Step-by-step Guide: Sealing A Pipe Through Concrete
Now, let’s bring it all together. Here’s a step-by-step process you can follow for most situations.
1. Assess The Situation
- What pipe material and size?
- How big is the gap?
- Is this area exposed to weather or water?
- Will the pipe need to move or be replaced later?
2. Prepare The Area
- If needed, drill or widen the hole carefully.
- Clean the area of dust, oil, and loose debris.
- Repair cracks in the surrounding concrete.
3. Choose The Right Method
- For small, indoor gaps: Flexible sealant.
- For wide gaps or leaks: Hydraulic cement or mortar.
- For new installations: Use a pipe sleeve.
- For temporary or easy fixes: Expanding foam.
4. Install A Pipe Sleeve (if Using)
- Insert a sleeve into the hole.
- Center the pipe inside the sleeve.
5. Apply Your Chosen Sealing Material
- For foam: Fill the gap, let expand, trim, and cover.
- For hydraulic cement/mortar: Pack tightly, smooth, and let cure.
- For sealant: Apply evenly, smooth out, and let cure.
6. Inspect And Test
- Wait for the material to fully cure (check manufacturer’s guidelines).
- Test for water leaks or air gaps by running water or using a smoke test.
7. Finish And Protect
- For outdoor or exposed areas, paint or cover the seal for UV protection.
- If sealing around electrical conduit, double-check fire code requirements.
Dealing With Special Situations
Not every pipe-through-concrete job is the same. Here are solutions for a few tricky scenarios.
Pipes Below Ground Level
When pipes pass through a basement wall or underground slab, water pressure is higher, and sealing must be extra strong.
- Use hydraulic cement or a waterproof sealant rated for below-grade use.
- Apply waterproofing membrane or paint on the outside of the wall if possible.
- Check local codes for additional requirements.
Large Gaps Or Odd-shaped Holes
Sometimes, the hole is much bigger than the pipe, or it’s irregular.
- Use backer rod (a foam rope) to fill most of the gap before sealing.
- For very large holes, build a form and pour new concrete around the pipe.
Pipes Carrying Hot Liquids Or Steam
Heat can damage some sealants or cause them to fail.
- Use high-temperature rated sealant or mortar.
- Avoid expanding foam, which can break down with heat.
Pipes That Will Move Or Vibrate
If the pipe might move due to expansion, contraction, or mechanical vibration:
- Use a pipe sleeve and flexible sealant.
- Avoid rigid materials like mortar or hydraulic cement.
How Codes And Standards Affect Pipe Sealing
Building codes are local laws that set minimum standards for construction. Codes often require firestopping for pipes passing through walls, especially in multi-story buildings. Firestopping means using special materials that block fire and smoke from spreading between rooms or floors.
- For fire-rated walls, use a firestop sealant or collar.
- Always check local code or ask your inspector before sealing.
Common Mistakes And How To Avoid Them
Sealing pipes through concrete isn’t hard, but small mistakes can cause big problems. Watch out for these common errors:
- Not cleaning the hole: Dirt and dust prevent materials from sticking.
- Wrong sealant for the job: Indoor caulk won’t last outdoors or under water pressure.
- Making the hole too large: Bigger gaps are harder to seal and weaken the structure.
- Ignoring movement: Rigid seals break if pipes shift.
- Skipping code requirements: Missing firestopping or waterproofing can lead to costly repairs.
- Sealing before testing: Always check for leaks before finishing the job.
When To Call A Professional
Sometimes, the job is too complex for a DIY approach:
- Large or structural concrete walls and floors
- Pipes carrying gas or chemicals
- Major water leaks or flooding
- Fire-rated assemblies
In these cases, it’s safer to hire a licensed contractor or plumber.
Cost Considerations
The price to seal a pipe through concrete depends on:
- The size of the hole
- The chosen sealing method
- Labor, if you hire help
Here’s an example comparison:
| Sealing Method | DIY Material Cost (USD) | Pro Installation (USD) | Typical Lifespan |
|---|---|---|---|
| Foam | $5–$10 | $50–$100 | 5–10 years |
| Hydraulic Cement | $10–$20 | $75–$150 | 20+ years |
| Flexible Sealant | $5–$15 | $50–$120 | 5–10 years |
| Mortar Patch | $10–$25 | $100–$200 | 20+ years |
| Pipe Sleeve (installed at build time) | $10–$20 | $100–$250 | 25+ years |
Expert Tips For A Lasting Seal
- Double-seal in wet areas: Use both a sleeve and sealant for extra protection.
- Check material compatibility: Some sealants react with certain plastics or metals.
- Leave room for maintenance: Don’t bury all joints—allow access if possible.
- Label sealed pipes: Especially for gas or high-pressure lines.
- Use UV-resistant materials outdoors: Sunlight can break down some foams and sealants.
Credit: www.therealsealllc.com
Real-world Example
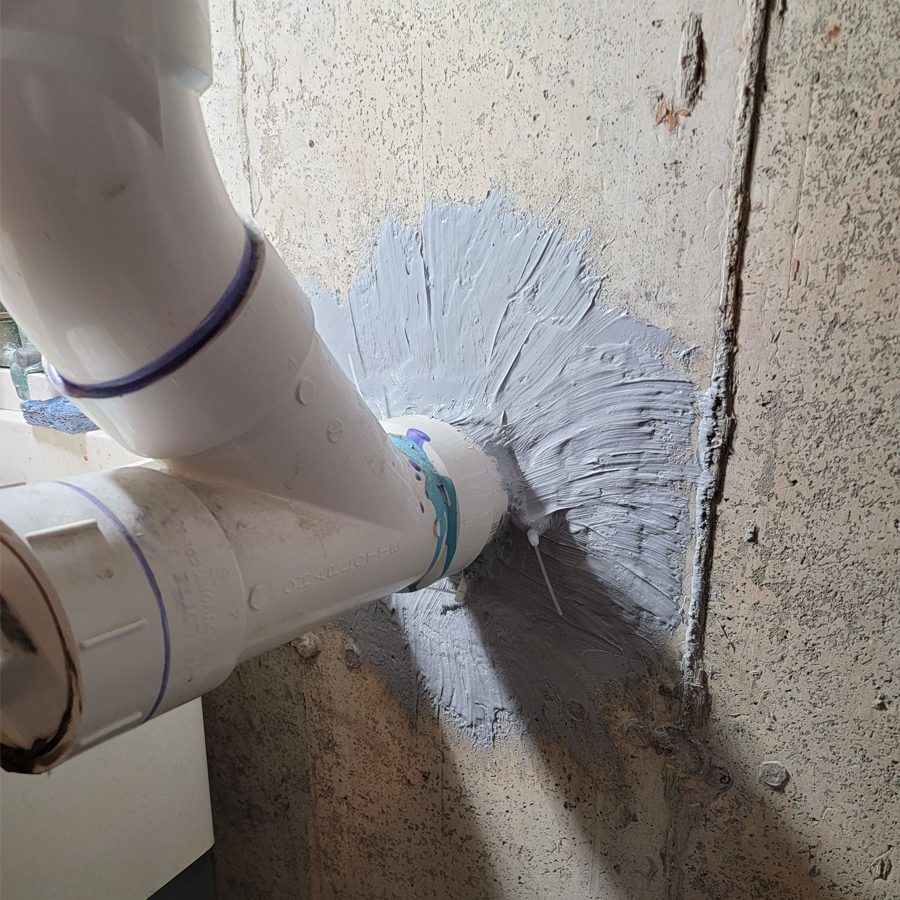
Imagine you’re sealing a 2-inch PVC water pipe through a basement wall:
- The hole is 3 inches wide.
- The pipe is centered, leaving a 0.5-inch gap all around.
Here’s how you’d do it for a lasting, code-compliant result:
- Clean the area and check for leaks.
- Insert a 3-inch PVC sleeve if possible.
- Fill the gap around the pipe with hydraulic cement, packing tightly.
- After curing, apply a layer of waterproof sealant for extra protection.
- Paint the outside edge with a waterproofing membrane.
- Test with water pressure after 24 hours.
This method protects against leaks, allows for future pipe replacement, and meets most building codes.
Frequently Asked Questions
What Is The Best Sealant For Pipes Through Concrete?
It depends on the gap size, location, and pipe material. For small, indoor gaps, silicone or polyurethane sealant is usually best. For outdoor or below-ground pipes, hydraulic cement or mortar offers better waterproofing and durability.
Can Expanding Foam Be Used To Seal Pipes Through Concrete?
Yes, expanding foam works well for small to medium gaps, especially for indoor pipes. However, it is not as durable for outdoor or below-grade use, and it may degrade with heat or constant moisture.
Do I Need A Pipe Sleeve When Sealing Through Concrete?
A pipe sleeve is not always required, but it makes sealing easier and allows for pipe movement or future replacement. It is strongly recommended for new construction or large pipes.
How Do I Seal A Leaking Pipe In Concrete?
If the pipe itself is leaking, it must be repaired or replaced. To seal a leak around a pipe (not the pipe itself), use hydraulic cement for active leaks, or a suitable sealant if the area is dry.
Are There Building Codes For Sealing Pipes Through Concrete?
Yes, many building codes require pipes to be sealed for fire safety and waterproofing. For pipes through fire-rated walls or floors, you must use approved firestop materials. Always check your local code or consult an inspector.
Sealing a pipe through concrete is a simple project if you know the right steps and materials. With careful preparation and the proper sealant, you can protect your home or building for many years. For more detailed technical standards, you can review the guidelines at the International Code Council.
Taking the time to do this job right saves money, prevents damage, and keeps your property safe. Whether you’re a homeowner, contractor, or just curious, you now have the knowledge to seal pipes through concrete like a professional.