
Setting the clock on your Samsung Smart Range might seem like a small detail, but it matters more than you think. If your clock is not accurate, your timed cooking features won’t work correctly. You may even miss out on smart functions like delayed cooking, Sabbath mode, and automatic oven shut-off.
Whether you just installed your range, experienced a power outage, or want to adjust for daylight saving time, knowing how to set the clock is essential.
This guide gives you a complete, step-by-step explanation for setting the clock on all major Samsung Smart Range models. You’ll find clear instructions, helpful tips, troubleshooting advice, and answers to common questions. Even if you’re not tech-savvy, you’ll feel confident by the end of this article.
Understanding Your Samsung Smart Range
Before setting the clock, it’s helpful to know what makes a Samsung Smart Range unique. These ranges combine classic oven and stove features with smart technology. You can connect them to Wi-Fi, control them with an app, and use advanced features like voice commands or synchronization with other smart home devices.
Many new owners are surprised at how much integration these ranges offer. For example, some models can link with your Samsung refrigerator or other kitchen devices for coordinated notifications. This means you might get an alert on your phone or even your TV when the oven timer ends, or if the range clock is not set.
Why Clock Settings Matter
The clock on your Samsung range is not just for telling time. It controls:
- Timed bake and cook functions
- Automatic oven shut-off
- Delayed start and end times
- Sabbath mode (for certain models)
- Notifications and reminders
A wrong clock setting can cause your oven to start or stop at the wrong time, making your cooking experience frustrating.
Additionally, if you use smart features like recipe guidance or remote cooking, these depend on the range’s clock being in sync with your devices. If the time is off, you may miss notifications or have recipes start or end at the wrong time.
Types Of Clock Displays
Samsung Smart Ranges may have different types of displays:
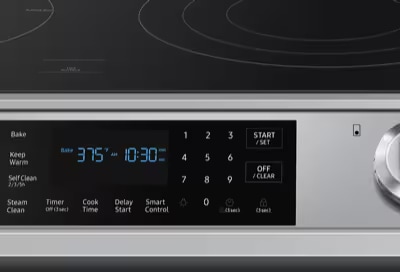
- LED digital clocks (basic models)
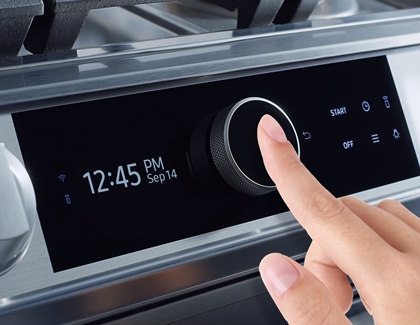
- Touchscreen LCD panels (advanced models)
- Control knobs with digital display
- Wi-Fi–enabled ranges with app control
Each display has its own clock-setting method. This guide covers them all.
Some older models may combine two methods, such as a knob and a small LED display, making the clock-setting process a little less intuitive. If you’re unsure which type you have, check your user manual or look for a model number sticker, usually found inside the oven door frame.
Preparing To Set The Clock
Before you begin, make sure:
- The range is plugged in and powered on.
- There are no error messages on the display.
- You have access to the control panel (clear any objects or covers).
If your range is connected to Wi-Fi, have your phone or tablet nearby for app control if needed.
A good habit is to wipe the control panel with a dry, clean cloth before starting. Smudges or grease can sometimes make touch controls less responsive. If your kitchen is noisy or busy, try to set the clock when you can focus, as some steps require quick button presses.
Step-by-step: How To Set The Clock (all Methods)
1. Setting The Clock Using The Control Panel Buttons
This is the most common method for Samsung Smart Ranges with physical or touch buttons.
Basic Steps:
- Locate the Clock or Time button. It’s usually marked with a clock icon or labeled “Clock”.
- Press the Clock button. The display will either blink or show “00: 00” or “12:00”.
- Set the time. Use the “+” or “-” buttons, or number pad, to enter the current time.
- Confirm the time. Press the Clock or Start/Set button to save.
Example:
If you want to set the time to 3:45 PM:
- Press “Clock”.
- Enter “3”, “4”, “5” using the number pad or “+”/“-”.
- Press “Start” or “Clock” again.
Tips:
- Many models let you switch between 12-hour and 24-hour formats. Press and hold the Clock button for 3 seconds to change the format (if supported).
- If the time starts blinking after a power outage, you must reset it.
- On some models, you need to set the hour and minute separately, confirming each one before moving to the next.
Some ranges have a “Cancel” or “Clear” button. If you make a mistake, press “Cancel” to start over without turning off the oven.
2. Setting The Clock On Touchscreen Lcd Models
Advanced Samsung Smart Ranges have a touchscreen. Here’s how to set the clock:
- Tap Menu or Settings. This opens the main menu.
- Select “Time” or “Clock”.
- Set the time. Use the on-screen number pad or scroll to the correct time.
- Choose AM or PM (if in 12-hour mode).
- Save changes. Tap “OK” or “Save”.
Touchscreen controls may be sensitive to pressure or even the warmth of your finger. If the screen does not respond, make sure your hands are clean and dry.
Non-obvious Insight:
Some models have a “Sync with Internet Time” option. If your range is connected to Wi-Fi, you can let it set the time automatically. This is helpful during daylight saving changes or after a power outage.
Another feature is the ability to adjust brightness or display style when setting the clock. This can make the time easier to read from across the kitchen, especially in low light.
3. Setting The Clock With The Smartthings App
Samsung’s SmartThings app lets you control your range from your smartphone.
Steps:
- Open the SmartThings app.
- Select your range device.
- Go to Device Settings.
- Find the “Clock” or “Time” setting.
- Enter the correct time or choose “Sync with device” (your phone’s time).
- Save or apply the new time.
Extra Tip:
If your range clock drifts or shows the wrong time often, keep it synced with your smartphone via the app.
You can also use the app to schedule reminders for cleaning, maintenance, or even to check if the oven was left on. These reminders depend on the clock being accurate.
Many users don’t realize that if your phone changes time zones (for example, when traveling) and your range is set to sync, the oven clock may update automatically too.
4. Setting The Clock With Control Knobs
Some Samsung models have control knobs plus a digital display.
- Press and hold the knob labeled “Time” or “Clock”.
- Turn the knob to adjust the hour, then press to confirm.
- Turn the knob to set the minutes, then press to confirm.
This method is less common but found on some premium models.
If you overshoot the correct time, just keep turning the knob—most models loop back to the start after hitting 12 or 24, depending on the format.
A helpful trick: rotate the knob slowly. Some ranges are sensitive to fast turning and might skip numbers or not register each step.
5. Special Methods For Older Or Unique Models
Some older Samsung Smart Ranges (especially those made before 2016) may require a different process. Always check your user manual if the above methods do not work.
- If your model has no clear clock button, try holding down both “Bake” and “Broil” for 3 seconds.
- If you see “C” or “CL” on the display, consult your manual for the correct reset method.
A few rare models have a small “Set” button inside the oven door frame. Pressing this with a pen tip, followed by the “Clock” button on the main panel, can sometimes start the clock-setting mode.
Common Problems When Setting The Clock
Even with step-by-step instructions, you might face some issues. Here’s how to handle them:
Power Outages
After a power outage, your range may display “12:00” or flash the clock. Just follow the steps above to reset.
Some users find that after a brief power flicker, the clock holds the old time, but the oven functions may not work until you reset the clock. Always check the display after storms or electrical work in your home.
Clock Won’t Save
If the time does not save:
- Make sure you press “Start”, “Set”, or “OK” to confirm.
- Check if the child lock is on; this can block settings.
On models with touch controls, not holding your finger long enough can cause changes not to save.
Buttons Not Responding
If your control panel is unresponsive:
- Unplug the range for 30 seconds, then plug it back in.
- Clean the buttons gently; dirt can block touch sensors.
- If the problem continues, contact Samsung support.
On some models, too much moisture (from steam or cleaning) can temporarily freeze the controls. Give it a few minutes to dry out before trying again.
Wi-fi Or App Sync Issues
If your SmartThings app cannot set the clock:
- Make sure your range is connected to Wi-Fi.
- Update the app to the latest version.
- Restart your phone and the range.
If you changed your Wi-Fi password recently, you may need to reconnect your range to your home network using the app or the range’s settings.
Table: Samsung Smart Range Clock-setting Methods By Model
Here’s a quick comparison of common Samsung Smart Range models and how to set the clock:
| Model Series | Display Type | Clock Setting Method | Wi-Fi/App Control |
|---|---|---|---|
| NX58 Series | LED | Physical Buttons | No |
| NE63 Series | Touchscreen LCD | Touchscreen | Yes |
| Flex Duo | LED + Knob | Knob/Buttons | Some Models |
| Bespoke Smart Range | LCD Touch | App/Touchscreen | Yes |
If you’re unsure which series you own, the model number is usually printed on a sticker inside the oven door or on the back of the range.
How To Change Time Format (12-hour Vs. 24-hour)
Many Samsung Smart Ranges let you pick between 12-hour (AM/PM) or 24-hour (military) time.
Steps:
- Press and hold the Clock button for 3 seconds.
- The display will switch formats.
- Confirm by pressing Start/Set.
On touchscreen models:
- Go to Settings > Clock > Time Format.
If your model does not support this, it will default to 12-hour format.
When To Use Each Format
- Use 12-hour format if you prefer AM/PM.
- Use 24-hour format for more precise timing or if you’re used to military time.
Some users find that recipes or cookbooks from other countries use the 24-hour format. Matching your range clock can avoid confusion, especially for complex recipes with multiple steps.
If you have children in the house, the 12-hour format can be easier for them to read and understand.

Credit: www.youtube.com
Using Automatic Time Sync
Some Samsung Smart Ranges, especially those with Wi-Fi, can set the clock using your internet connection.
How It Works
- The range connects to Samsung’s servers and sets the time based on your location.
- Automatic updates handle daylight saving time.
- Requires an active Wi-Fi connection.
This feature is especially useful if your area observes daylight saving changes or if you travel frequently and want your appliances to always show the correct local time.
How To Enable
- Open SmartThings or the range’s touchscreen settings.
- Find “Auto Time Sync” or “Sync with Internet”.
- Turn it on.
If you move to a new time zone, don’t forget to update your location in the SmartThings app to keep the clock correct.
This feature also helps in busy households where the range might be unplugged or moved often. You won’t need to reset the clock every time.
Table: Manual Vs. Automatic Clock Setting
See the differences between setting your clock manually and using automatic sync.
| Feature | Manual Setting | Automatic Sync |
|---|---|---|
| Requires Wi-Fi | No | Yes |
| Needs Adjustment After Power Outage | Yes | No |
| Updates for Daylight Saving | No | Yes |
| More Accurate | Depends on user | Yes |
One more advantage: automatic sync reduces the chance of small errors that can add up over weeks, which is important for people who use their oven for long baking projects or bread making.
Credit: www.samsung.com
Troubleshooting: When Your Clock Still Won’t Set
Even after following all steps, you might find your clock still not working properly. Here’s what to check:
1. Child Lock Or Control Lock
Many Samsung ranges have a child lock feature. When this is on, you cannot set the clock or use most controls.
- To turn off, press and hold the “Lock” button for 3 seconds.
- Look for a padlock icon on the display.
Child lock is sometimes activated by accident during cleaning or by children pressing buttons. If you see a padlock symbol, always check this first.
2. Power Supply Issues
An unstable power supply can cause the clock to reset or run fast/slow.
- Check that your range is plugged into a stable outlet.
- Avoid plugging into a shared extension cord with heavy appliances.
If your home experiences frequent brownouts, consider using a surge protector to help avoid damage or clock resets.
3. Software Glitches
Sometimes, a software glitch will prevent the clock from setting.
- Unplug the range for 1 minute.
- Plug back in and try again.
- If the problem remains, update the range’s firmware using the SmartThings app (if available).
If updates are not available, or if you see error codes, note them down before contacting support.
4. Faulty Display Or Control Board
If nothing works, the display or control board may be damaged. This needs a professional repair.
A common sign is if some buttons work but not the clock button, or if the display is dim or flickering. Do not try to open the range yourself, as this can void the warranty.
5. Outdated Smartthings App
If you’re using the app and the clock doesn’t sync:
- Update the app from the Google Play Store or Apple App Store.
- Reconnect the range to Wi-Fi.
Try logging out and back into your Samsung account in the app if problems continue.
Tips For Accurate And Reliable Clock Settings
Setting your range’s clock is about more than just accuracy. Here’s how to get the best results:
- Update the firmware of your smart range regularly for new features and bug fixes.
- Keep your range connected to Wi-Fi if you want automatic time updates.
- Check the time after power outages—even with auto-sync, some outages can disrupt the connection.
- Use the same time format on all your kitchen appliances for less confusion.
If you use the delayed start feature, always double-check the clock before programming. A small error can mean your meal starts or ends at the wrong time.
Consider setting a reminder on your phone to check the range clock monthly, especially if you rely on timed features.
Table: Time-related Features And Their Dependence On Clock Accuracy
Some smart features only work if the clock is set correctly.
| Feature | Needs Correct Time? | Manual/Auto Clock Supported |
|---|---|---|
| Delayed Start/End | Yes | Both |
| Timed Bake | Yes | Both |
| Sabbath Mode | Yes | Both |
| Notifications/Reminders | Yes | Auto (best) |
Incorrect time can also affect the oven’s self-cleaning cycle if you set it to start at a certain hour.
Non-obvious Insights For Beginners
Many new users miss these points:
- Time zone settings matter. If you set up auto-sync, make sure your range is set to the correct time zone. Otherwise, the clock will be off by one hour or more.
- Battery backup is not common. Most Samsung Smart Ranges do not have a battery for the clock. Every time you lose power, you must reset the clock unless you use auto-sync.
Another thing beginners often overlook: the clock may need to be set before you can use other features for the first time (such as delayed cooking or Sabbath mode). If you skip this, those options might stay grayed out or unavailable.
If you live in an area that does not observe daylight saving time, you may want to turn off auto-sync or set the clock manually to avoid unwanted changes.
How To Set The Clock For Special Functions
Some cooking features require specific clock settings.
Delayed Cooking
To use delayed cooking, set the clock first. Then:
- Enter the time you want cooking to start or end.
- The range will only work if the clock is accurate.
If you have a recipe that requires preheating at a certain time, an accurate clock ensures your meal starts on time, even if you’re not home.
Sabbath Mode
Sabbath mode lets you keep the oven on for religious observance. You must set the clock first for this feature to work properly.
If your clock is not set, the oven may ignore your Sabbath mode request or turn off at the wrong time.
Some users find that setting the clock at least a few minutes ahead can help avoid accidental early shut-off during long Sabbath periods.
When To Contact Support
If you tried all the methods and troubleshooting but the clock still won’t set, it’s time to get help.
- Contact Samsung Customer Support.
- Prepare your model number, proof of purchase, and a description of the problem.
- For warranty repairs, do not try to open the range yourself.
If you need in-person service, most Samsung service centers can help with clock and control panel issues quickly.
For official help, visit the Samsung Support page.
Credit: www.samsung.com
Frequently Asked Questions
Why Does My Samsung Range Clock Reset After Every Power Outage?
Most Samsung Smart Ranges do not have a built-in battery. When power is lost, the clock resets to “12:00” or flashes. Set the clock again manually or use Wi-Fi auto-sync if available.
Can I Set The Clock From My Phone?
Yes, if your range is a smart model and connected to Wi-Fi, you can use the SmartThings app on your phone. Open the app, select your range, and adjust the clock in the device settings.
Why Is The Clock Time Wrong Even After I Set It?
Check if your range is set to the wrong time zone (for auto-sync) or if the display panel is faulty. Also, make sure you pressed “Start”, “Set”, or “OK” to confirm the time after setting.
Is It Possible To Switch Between 12-hour And 24-hour Formats?
On most modern Samsung Smart Ranges, you can switch formats by holding the Clock button for 3 seconds or using the settings menu on the touchscreen. If your model does not support it, it will stay in the default 12-hour mode.
What Do I Do If The Clock Button Does Not Respond?
Check if the child lock is enabled or if the control panel needs cleaning. Try unplugging the range for a minute and plug it back in. If the button is still dead, you may need professional service.
Setting the clock on your Samsung Smart Range is a simple task that unlocks the full potential of your appliance. Whether you use physical buttons, a touchscreen, or the SmartThings app, accurate timekeeping ensures all smart features work as designed.
If you follow these steps and tips, you’ll keep your kitchen running smoothly and your meals perfectly timed. And if you ever run into trouble, you now know exactly what to check—and when to call for help.