
Many people love their Ninja blender for its speed and power. It makes smoothies, soups, and sauces quickly. But after months of use, you may notice that your blender is not as sharp as before. Chunks stay in your drink. You need more blending time. Food gets stuck. This is frustrating, and you may think about buying a new blender or blade. Before spending money, there’s good news: you can sharpen your Ninja blender blades at home.
Sharpening blender blades is not a common kitchen task, but it can bring your blender back to life. With the right tools and careful steps, you can make your Ninja blender cut as well as it did when it was new.
This article will walk you through everything you need to know about sharpening Ninja blender blades, including safety tips, tools, step-by-step instructions, and maintenance advice. Even if you have never done this before, you will find the process clear and manageable.
Understanding Ninja Blender Blades
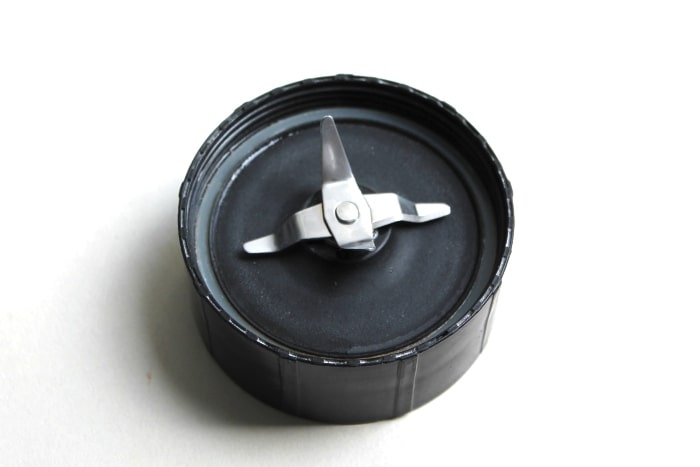
Ninja blenders are known for their stacked blade system. Unlike other blenders with blades at the bottom, Ninja blades are attached to a shaft running through the center of the jar. This unique design helps blend ingredients faster and more evenly. The blades themselves are made from stainless steel, which is strong and resistant to rust. However, they can still become dull over time due to regular use, ice crushing, or blending hard foods.
There are several types of Ninja blender blades, depending on the model:
- Total Crushing Blades: These are large, multi-level blades for ice and hard foods.
- Nutrient Extractor Blades: Smaller, flat blades for smoothies and purees.
- Dough Blades: For mixing dough, not sharp for cutting.
Before you begin sharpening, it’s important to know which type of blade you have, as the sharpening process is only for cutting blades, not dough blades.
Why Do Ninja Blender Blades Get Dull?
Even though stainless steel is durable, it loses sharpness because:
- Repeated impact with hard items (ice, frozen fruits, seeds)
- Washing in the dishwasher (harsh detergents, water jets)
- Blending dry or fibrous foods (nuts, carrots, kale)
A dull blade leads to poor blending, longer times, uneven results, and more strain on your blender’s motor.
Signs Your Blades Need Sharpening
Most people notice dull blades when:
- Blended foods have chunks or uneven texture
- It takes longer to blend
- The blender gets louder or shakes more
- Blades look visibly worn or rounded
If you see these signs, it’s time to sharpen.
Safety First: Precautions Before Sharpening
Working with blender blades is dangerous if you are not careful. Blades are sharp, and you can easily cut yourself. Before starting, follow these safety steps:
- Unplug the blender: Never work on a blender that is plugged in.
- Remove the blade assembly: Take the blades out of the jar to avoid accidents.
- Wear cut-resistant gloves: Protect your hands from sharp edges.
- Work on a stable surface: Use a countertop or table that does not move.
- Keep children and pets away: This is not a safe task for kids to watch or help.
- Read your Ninja blender manual: Some models have special instructions or warnings.
Many accidents happen because people rush or do not pay attention. Take your time and stay focused.
Tools And Materials You Will Need
Before sharpening, gather these basic tools and materials:
- Cut-resistant gloves: Always wear them.
- Screwdriver or wrench: To remove the blade assembly (depends on your model).
- Small sharpening stone or whetstone: About 6 inches is enough.
- Fine metal file: For extra dull or damaged blades.
- Soft cloth or towel: For drying and cleaning.
- Mild soap and water: To wash the blades after sharpening.
- Lubricant oil (food-safe): Optional, for maintaining the blades.
You do not need expensive equipment. Even a simple whetstone can make a big difference.
How To Remove Ninja Blender Blades Safely
Most Ninja blender blades are easy to remove, but the exact method depends on your model. Here are general steps:
- Unplug the blender and remove the pitcher or cup.
- Turn the pitcher upside down.
- Unscrew the base: For most Ninja models, the blade is attached to a plastic base. Hold the base and turn it counter-clockwise.
- Lift out the blade assembly: Hold the shaft or plastic center, not the blades.
- Set blades on a soft towel.
Some models, like the Nutri Ninja, have blades built into the lid or cup. Always check your manual for the exact removal process.

Credit: www.youtube.com
Step-by-step: How To Sharpen Ninja Blender Blades
Sharpening blender blades is not as hard as it sounds, but it requires patience and care. Here is a clear, step-by-step guide to sharpening your Ninja blender blades at home.
1. Clean The Blades Thoroughly
Before sharpening, wash the blades with warm, soapy water. This removes food particles, oils, and debris. Dry the blades completely with a towel.
2. Inspect The Blades
Look at each blade closely. Check for:
- Chips or cracks (do not sharpen if blades are damaged)
- Rust spots (light rust can be removed with a scrub pad)
- Extreme dullness or bent areas
If the blade is badly damaged or bent, sharpening will not fix it. You should order a replacement from Ninja.
3. Secure The Blade Assembly
Place the blade assembly on a towel to stop it from moving. Hold the shaft or plastic center with one hand (wearing gloves), keeping your fingers away from the cutting edge.
4. Use A Whetstone Or Sharpening Stone
Wet the stone with water. Hold the blade at a 20-degree angle against the stone. This is the best angle for most Ninja blades.
- For straight blades: Move the blade forward and backward along the stone, following the edge.
- For curved blades: Rock the blade gently as you move to follow the curve.
Make 5–10 passes on each edge, checking sharpness as you go.
5. Using A Metal File (for Extra Dull Blades)
If the blades are very dull, use a fine metal file first. File along the cutting edge, following the original angle. Do not press too hard, as this can remove too much metal.
6. Repeat On All Blade Edges
Ninja blender blades usually have 4–6 cutting edges. Repeat the sharpening process for each edge, keeping the angle consistent.
7. Clean And Dry The Blades Again
After sharpening, wash the blades with soap and water to remove metal dust. Dry them completely.
8. Test The Sharpness
Gently touch the edge (with gloves). It should feel sharper, but not razor-sharp. Ninja blades are designed for chopping and blending, not slicing like a knife.
9. Apply Food-safe Oil (optional)
A drop of food-safe mineral oil can protect the blades from rust. Wipe off extra oil before reassembling.
10. Reassemble The Blender
Carefully place the blades back into the base or cup. Tighten securely. Always double-check that everything is locked before use.
Practical Tips For Sharpening Ninja Blender Blades
Sharpening is simple, but a few extra tips can make the job easier and safer:
- Sharpen regularly: Every 4–6 months for heavy use, once a year for light use.
- Avoid electric sharpeners: These can remove too much metal and damage the blade shape.
- Never use sandpaper: It can scratch and weaken the metal.
- Do not over-sharpen: Too sharp blades can be dangerous and may chip easily.
- Work in good light: This helps you see the edge clearly.
- Keep the stone wet: Dry stones can heat the blade and make it less effective.
Many beginners forget to clean the blades after sharpening. Metal dust is not safe in food. Always wash and dry before using the blender again.

Credit: www.youtube.com
Common Mistakes To Avoid
Even simple sharpening can go wrong if you make these errors:
- Sharpening the wrong side: Only sharpen the original cutting edge, not both sides.
- Using too much force: Gentle pressure is enough; strong force can bend or break the blade.
- Not wearing gloves: Cuts happen quickly and can be deep.
- Forgetting to clean after sharpening: Metal shavings can end up in your food.
- Trying to fix badly damaged blades: If the blade is cracked or bent, replace it.
Some people try to sharpen blender blades without removing them from the jar. This is risky and can damage both the blade and the jar.
How Sharp Should Ninja Blender Blades Be?
You might think sharper is always better, but for Ninja blender blades, this is not true. They need to be sharp enough to chop and blend, but not razor-sharp like a chef’s knife. Over-sharpened blades can become thin, weak, and prone to chipping. A good test is to see if the blade can cut through a piece of paper or a soft vegetable with little effort. If so, it is sharp enough for blending.
When To Replace Instead Of Sharpening
Sharpening works well for normal wear, but not for all problems. Replace your Ninja blender blades if you notice:
- Cracks or breaks in the blade
- Bent blades that do not sit straight
- Severe rust that does not come off with cleaning
- Worn-down edges (blades are much shorter than new)
Blade replacement is easy. You can order official parts from Ninja’s website or other trusted sellers. This is safer than trying to fix a blade that is too damaged.
Comparing Sharpening Methods
Here is a quick comparison of common sharpening methods for Ninja blender blades:
| Method | Pros | Cons | Best For |
|---|---|---|---|
| Whetstone | Precise, gentle on blades, affordable | Requires practice, manual effort | Most users |
| Metal File | Removes large nicks, quick | Can remove too much metal if not careful | Very dull or chipped blades |
| Electric Sharpener | Fast, easy to use | May not fit blender blades, risk of damaging angle | Not recommended for Ninja blades |
| Professional Service | Expert results, safe | Costly, time-consuming | Specialty or high-value blades |
Most people have the best results with a simple whetstone or metal file.
How To Maintain Sharp Blender Blades
Keeping your blades sharp is easier than sharpening often. Try these tips:
- Rinse after each use: Do not let food dry on the blades.
- Avoid blending dry, hard items: Add some liquid to reduce wear.
- Do not run the blender empty: This can overheat and damage the blade.
- Hand wash instead of dishwashing: Harsh detergents and heat can dull the blade.
- Store with care: Do not toss blades in a drawer where they hit other metal.
A little care can extend the life of your Ninja blender blades by years.
Real-world Example: A User’s Experience
Maria, a busy mom, used her Ninja blender daily for smoothies and soups. After 18 months, she noticed her smoothies had chunks, and the blender made a loud noise. She was ready to replace the whole unit but decided to try sharpening first.
Using a simple whetstone and wearing gloves, she followed the steps above. After 10 minutes, she reassembled her blender and noticed a big difference. Her smoothies were smooth again, and the blender ran quietly. This saved her about $30 for a new blade assembly and avoided waste.
Many people think sharpening is too hard or dangerous, but with the right method, it can be safe and effective.
Data: Blade Lifespan And Sharpening Frequency
How long do Ninja blender blades last? It depends on how you use your blender.
| Usage Type | Blade Lifespan (Average) | Recommended Sharpening Interval |
|---|---|---|
| Daily (ice, frozen foods) | 12–18 months | Every 4 months |
| Weekly (smoothies, soft foods) | 2–3 years | Every 8 months |
| Occasional (purees, soups) | 3–5 years | Yearly |
These are average values. If you blend harder foods often, check your blades more frequently.
Cost Comparison: Sharpening Vs. Replacing Blades
Let’s look at the costs. Sharpening your Ninja blender blades at home is much cheaper than buying new ones.
| Option | Estimated Cost | Frequency | Notes |
|---|---|---|---|
| Sharpen at Home | $5–$15 (stone/file, one-time) | 4–6 times over blade life | Requires time and care |
| Replace Blade Assembly | $25–$40 per set | Every 1–2 years | Easy but more expensive long term |
| Professional Sharpening | $10–$20 per time | As needed | May not be available everywhere |
For most people, learning to sharpen blades at home is a smart investment.
Non-obvious Insights For Beginners
Many beginners think the blade must be super sharp to blend well. But blade shape and speed matter more than razor sharpness. Ninja blenders rely on strong motors and correct blade angles. Keeping the angle while sharpening is more important than making a thin edge.
Another thing beginners miss: dull blades can overwork your motor. If you ignore sharpening, you risk burning out the blender’s motor, which costs much more to replace than the blades.
How To Tell If Sharpening Worked
After sharpening, test your blender with a simple smoothie or by blending a few ice cubes. If the blades are sharp enough, you’ll see:
- Faster blending
- Smoother texture
- Less noise and shaking
- No large chunks left
If not, you may need to sharpen again, or the blades could be damaged beyond repair.
Additional Resources
For those who want more technical details or official guidance, the Ninja Kitchen support page has manuals and blade replacement guides. For general advice on blade sharpening, the Wikipedia page on sharpening stones is a useful resource.
Frequently Asked Questions
How Often Should I Sharpen My Ninja Blender Blades?
For most people, sharpening every 4–6 months is enough if you use your blender often. Light users can sharpen once a year. If you notice blending problems, check the blades sooner.
Can I Sharpen Ninja Blender Blades Without Removing Them?
No, you should always remove the blades before sharpening. Sharpening in the pitcher is unsafe and can damage both the jar and your hands.
Are There Special Tools For Sharpening Blender Blades?
You only need a small whetstone or fine metal file. Expensive or special sharpeners are not needed. Never use an electric knife sharpener, as it can ruin the blade’s angle.
What If My Blades Are Rusty Or Chipped?
Light rust can be cleaned off, but chipped or cracked blades must be replaced. Do not try to sharpen badly damaged blades.
Does Sharpening Affect The Blender’s Warranty?
Sharpening blades at home may void your warranty if done incorrectly. Always check your Ninja manual and warranty terms before starting.
Keeping your Ninja blender blades sharp is not only possible at home but also simple with the right tools and care. With this guide, you can enjoy smoother blends, longer blade life, and save money over time. Happy blending!
Credit: riseandblend.com