
A Vitamix blender is a trusted tool for anyone who loves making smoothies, soups, or nut butters at home. Many people believe Vitamix blades are self-sharpening and never need care, but the truth is more complex. Over time, even these high-grade stainless steel blades can lose their edge. When that happens, your blender may struggle with hard foods, blending takes longer, and you might see uneven textures. If you own a Vitamix and notice it’s not performing as it used to, sharpening the blades could bring it back to life.
Blender blades are not like kitchen knives. They are designed to crush and pulverize with speed, but a sharp edge still makes a difference. This article will show you how to sharpen Vitamix blades at home, with safety, proper technique, and care tips.
You’ll learn why blades dull, how to remove the blade assembly, what tools to use, and how to avoid common mistakes. Even if you’re new to blender maintenance, you’ll find step-by-step guidance, practical insights, and expert advice to keep your Vitamix working like new.
Why Vitamix Blades Lose Sharpness
Many people think stainless steel blades are immune to dulling. While Vitamix uses strong materials, even these blades can get dull over time. Here’s why:
- Regular use: Crushing ice, seeds, nuts, and frozen fruit puts stress on the blade edges.
- Hard objects: Accidentally blending things like pits, bones, or metal utensils can nick or bend blades.
- Mineral deposits: Over time, minerals in water or sticky food residue can coat blades, making them feel dull.
- Natural wear: Even with self-sharpening designs, friction slowly rounds the cutting edges.
A dull blade doesn’t just make blending slower. It can force the motor to work harder, leading to overheating or damage. It can also leave bits of unblended food, turning a creamy soup into a chunky disappointment.
Signs Your Vitamix Blades Need Sharpening
Before you start sharpening, make sure dullness is really the problem. Here are clear signs your Vitamix blades need attention:
- Food takes longer to blend. Smoothies or purees need extra time or multiple cycles.
- Texture is uneven. You notice large chunks or stringy bits in blended recipes.
- Motor strains or overheats. The blender sounds labored, or stops to cool down more often.
- You see nicks or dull edges. Inspecting the blades, they look rounded or damaged.
- Loud banging noises. Dull blades may bounce food around, causing harsh sounds.
If you notice these symptoms, sharpening your blades can restore performance without needing to buy a new container.

Credit: www.youtube.com
Safety Precautions Before Sharpening
Working with blender blades is not risk-free. Before you start, follow these safety tips:
- Unplug the blender. Never work on a Vitamix that’s still plugged in.
- Remove the container. Take the pitcher off the base.
- Wear cut-resistant gloves. The blades are sharp, even when dull.
- Work in a clean, well-lit area. You need good visibility and stability.
- Keep children and pets away. Don’t sharpen blades around distractions.
If you’re ever unsure, it’s safer to contact Vitamix support or a professional appliance technician.
Tools You’ll Need
Sharpening Vitamix blades at home requires the right tools. Avoid makeshift solutions; using the correct equipment ensures safety and good results.
Here’s what you need:
- Cut-resistant gloves
- Vitamix container wrench (or large pliers, if you’re careful)
- Small sharpening file or diamond sharpening rod
- Soft brush or old toothbrush
- Microfiber cloth
- Mild dish soap
- White vinegar (optional, for cleaning mineral build-up)
- Towel or non-slip mat
You do not need power tools or a grinding wheel. These can damage the blades and void your warranty.

Credit: www.ebay.com
How To Remove Vitamix Blades Safely
Most people don’t realize the blades are attached to the bottom of the container, not welded in place. Here’s how to remove the blade assembly for sharpening:
- Clean the container. Wash and dry it so food residue doesn’t get in your way.
- Turn the container upside down. Place it on a towel for stability.
- Locate the retaining nut. This is the large metal or plastic ring on the bottom.
- Use the Vitamix wrench (or pliers). Fit the tool around the nut and turn counterclockwise. It may be tight, so use steady pressure.
- Lift out the blade assembly. Carefully pull it out from the bottom.
- Set aside the rubber gasket. Do not lose this, or your blender will leak.
If the nut is stuck, avoid forcing it. Soak the bottom in warm, soapy water for 10 minutes, then try again. Forcing can crack the container.
Step-by-step Guide To Sharpening Vitamix Blades
Now that you have the blades out, follow these steps to sharpen them:
1. Clean Off Residue
First, remove any food or mineral build-up. Dullness is sometimes just a layer of hardened residue.
- Scrub the blades with a soft brush and mild dish soap.
- For mineral build-up, soak in white vinegar for 10-15 minutes, then scrub again.
- Rinse and dry thoroughly.
2. Inspect The Blade Edges
Look closely at each edge. Vitamix blades are not razor-sharp like knives. They have a slightly blunt, angled edge for crushing, not slicing. You are not trying to make them razor-thin—just restore their original bevel.
Check for:
- Nicks or chips
- Bent or damaged edges
- Heavy rounding or dullness
Minor nicks are normal, but large bends mean the blade should be replaced, not sharpened.
3. Choose The Right Sharpening Tool
A diamond sharpening rod or small fine-toothed file works best. Avoid sandpaper or electric sharpeners, which can overheat the metal.
4. Position The Blade Assembly
Hold the blade assembly with the base on a towel or non-slip mat. Make sure your gloved hand is steady. Only sharpen the top edge of each blade, following the existing angle.
5. File The Blade Edge
- Place the sharpening tool at the same angle as the original edge (usually about 20 degrees).
- Draw the file across the edge, moving from the base toward the tip.
- Use light, even strokes—about 5-8 passes per edge.
- Check your progress after each pass.
- Repeat on each blade, always filing away from your hand.
Do not over-sharpen. The goal is to refresh the bevel, not make it knife-sharp.
6. Remove Burrs And Wipe Clean
Sharpening creates tiny metal burrs. Wipe the blades with a microfiber cloth. Run the brush over each edge to remove metal dust.
7. Sanitize
Before reassembling, rinse the blade assembly in hot, soapy water and dry thoroughly. This prevents metal shavings from getting into food.
Reassembling The Vitamix Container
Putting the blade assembly back is as important as sharpening.
- Replace the rubber gasket in the container base.
- Insert the blade assembly from the bottom.
- Hand-tighten the retaining nut as much as possible.
- Finish tightening with the Vitamix wrench or pliers—do not overtighten.
- Test for leaks by filling the container with water and letting it sit for a few minutes.
If you see leaks, check the gasket or try reseating the assembly.
How Often Should You Sharpen Vitamix Blades?
Most home users need to sharpen their blades only every 1-2 years. However, your schedule may change based on:
- Usage frequency: Daily use with tough ingredients dulls blades faster.
- Type of foods: Crushing ice or frozen fruit wears blades more quickly than blending soft foods.
- Cleaning habits: Regular cleaning prevents mineral build-up, keeping blades sharp longer.
For commercial settings (e. g. , smoothie shops), check blades every 3-6 months.
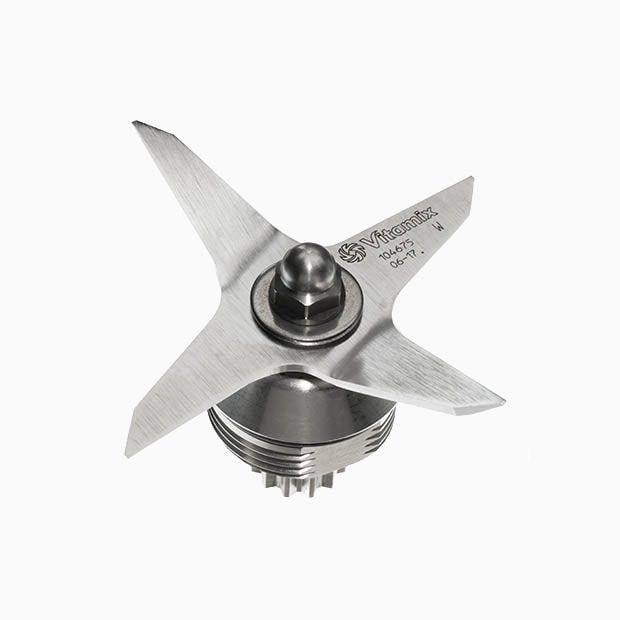
Credit: www.vitamix.com
Common Mistakes To Avoid
Sharpening Vitamix blades is simple, but mistakes can damage your blender.
- Using power tools: Grinders and Dremels can warp the blade or remove too much metal.
- Sharpening both sides: Only file the existing bevel—don’t make the back edge sharp.
- Over-sharpening: Making blades razor-thin leads to chipping and shortens life.
- Skipping cleaning: Failing to remove debris before sharpening can scratch the blade.
- Forgetting the gasket: Leaving out the gasket causes leaks and damages the motor.
- Oiling the blades: Do not use cooking oil or lubricants. It attracts dust and can contaminate food.
- Ignoring serious damage: Deep bends or cracks require a new blade assembly, not sharpening.
When To Replace Instead Of Sharpen
Sharpening is a good fix for normal wear, but sometimes replacement is smarter and safer. Replace your Vitamix blade assembly if you see:
- Deep cracks or splits in the blades
- Bent or warped blades (especially after hitting hard objects)
- Broken or missing tips
- Leaking or damaged bearing
- Stripped or loose retaining nut
- Odd noises or wobbling during use
Replacement assemblies are available from Vitamix and authorized dealers. Never use glue or tape to fix broken blades.
How Vitamix Blades Compare To Other Blenders
Vitamix is famous for its strong, durable blades, but how do they compare to other brands? Here’s a side-by-side look at popular blender blades:
| Brand | Blade Material | Self-Sharpening | Replacement Cost | Sharpening Needed |
|---|---|---|---|---|
| Vitamix | Hardened Stainless Steel | Yes (partially) | Medium-High | 1-2 Years |
| Ninja | Stainless Steel | No | Low-Medium | 1 Year |
| Blendtec | Thick Stainless Steel | No | High | Rarely |
| Oster | Stainless Steel | No | Low | 1 Year |
Vitamix blades last longer and need less frequent sharpening than most competitors. But they are not immune to dulling, especially with heavy use.
Professional Sharpening Vs. Diy
You may wonder if you should sharpen at home or trust a professional. Both have pros and cons.
| Method | Pros | Cons | Cost |
|---|---|---|---|
| DIY Sharpening | Cheap, convenient, immediate | Risk of mistakes, voids warranty | Low (tools only) |
| Professional Service | Safe, expert results, maintains warranty | Shipping, higher cost, wait time | Medium-High |
| Replacement | Like new, resets blade life | Most expensive | High |
If your blender is still under warranty, professional sharpening or replacement is often the best choice.
Extra Tips For Keeping Blades Sharp Longer
Sharpening is helpful, but smart habits can keep your Vitamix blades working their best:
- Clean immediately after use. Don’t let food dry on the blades.
- Avoid blending hard, non-food objects. Remove pits and bones before blending.
- Use the pulse function for tough ingredients instead of running the motor continuously.
- Soak in vinegar water monthly to remove mineral build-up.
- Store container dry to prevent corrosion.
- Don’t use blades to stir, chop, or scrape in the container. Always use a spatula.
These small steps make a big difference in blade life and blender performance.
Blade Sharpening And Blender Warranty
Vitamix offers long warranties—sometimes up to 10 years. But sharpening blades yourself can void the warranty if damage occurs. Here’s what you should know:
- Check your warranty. If still active, contact Vitamix customer service first.
- Vitamix may offer free repairs or replacements.
- DIY sharpening is at your own risk. If you damage the blades, Vitamix may not cover repairs.
If unsure, call Vitamix support. They may guide you or recommend a certified service center.
Real-world Example: Bringing Old Vitamix Blades Back To Life
Mary, a home cook, noticed her 5-year-old Vitamix was leaving chunks in her morning green smoothies. She considered buying a new container, but after researching, she decided to try sharpening the blades.
- She cleaned the assembly, found mineral build-up, and soaked it in vinegar.
- After cleaning, she used a diamond file to refresh each blade edge.
- Her next smoothie blended in 30 seconds, with a creamy, even texture.
Mary avoided a $150 replacement and restored her Vitamix with simple tools and 30 minutes of work. This story shows that regular sharpening can extend the life of your blender and save money.
Expert Insights Most Beginners Miss
- Mineral build-up can mimic dullness. Sometimes, cleaning with vinegar makes blades feel sharper without any filing.
- The blade angle matters. Filing at the wrong angle can reduce blending efficiency even if the edge feels sharp.
- Container leaks often come from the gasket, not the blade. Always check the gasket before blaming the blades.
- Sharpening won’t fix motor problems. If your blender is slow or stops, make sure the motor is healthy before assuming it’s a blade issue.
- Replacement is sometimes cheaper. If your time is valuable, or the blades are badly damaged, a new assembly can be a smart investment.
Frequently Asked Questions
How Do I Know If My Vitamix Blades Are Really Dull?
If blending takes longer, textures are uneven, or you see rounded blade edges, they are likely dull. Try cleaning with vinegar first, as mineral deposits can feel like dullness.
Can I Sharpen Vitamix Blades Without Removing Them From The Container?
It’s possible but not recommended. Removing the blades allows better access and avoids damaging the container. Filing inside the container is awkward and less effective.
Will Sharpening The Blades Void My Vitamix Warranty?
DIY sharpening can void the warranty if you damage the blades or container. If still under warranty, contact Vitamix before sharpening.
What’s The Best Tool For Sharpening Vitamix Blades At Home?
A diamond sharpening rod or small fine file is best. Avoid electric grinders or sandpaper, which can overheat or damage the blades.
How Do I Keep My Vitamix Blades Sharp For Longer?
Clean blades right after use, avoid blending hard non-food items, soak in vinegar monthly to remove build-up, and store your container dry. These habits extend blade life.
For more detailed guidance on blender maintenance, visit the official Vitamix support page.
Blender care doesn’t need to be complicated. With the right tools, a little attention, and safe habits, you can keep your Vitamix blades sharp and your smoothies silky for years to come.