
Testing an air admittance valve (AAV) may sound technical, but it’s a practical skill that can save both money and frustration. Whether you’re a DIY homeowner, a plumber, or simply curious about your plumbing system, knowing how to check if an AAV is working correctly is important.
A faulty AAV can cause bad smells, slow drains, and even health risks. The good news is you don’t need advanced tools or years of plumbing experience to test one. With a careful approach, clear steps, and a bit of attention to detail, you’ll be able to diagnose most AAV issues yourself.
This guide gives you everything you need to know about testing an air admittance valve. From understanding how these valves work, to recognizing warning signs, gathering the right tools, and performing step-by-step tests, you’ll gain practical knowledge. You’ll also discover common mistakes, troubleshooting tips, and when to call in a professional.
By the end, you’ll feel confident handling AAV problems and making sure your plumbing stays healthy.
What Is An Air Admittance Valve?
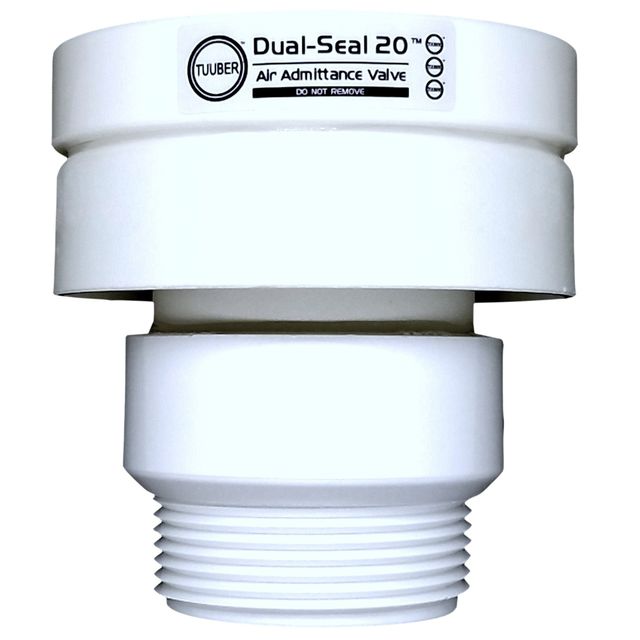
An air admittance valve is a special plumbing device that lets air enter the drain system when water flows through pipes but stops sewer gases from escaping. It’s often found in modern homes where traditional vent pipes aren’t practical. AAVs are especially common in bathrooms, kitchens, and laundry rooms.
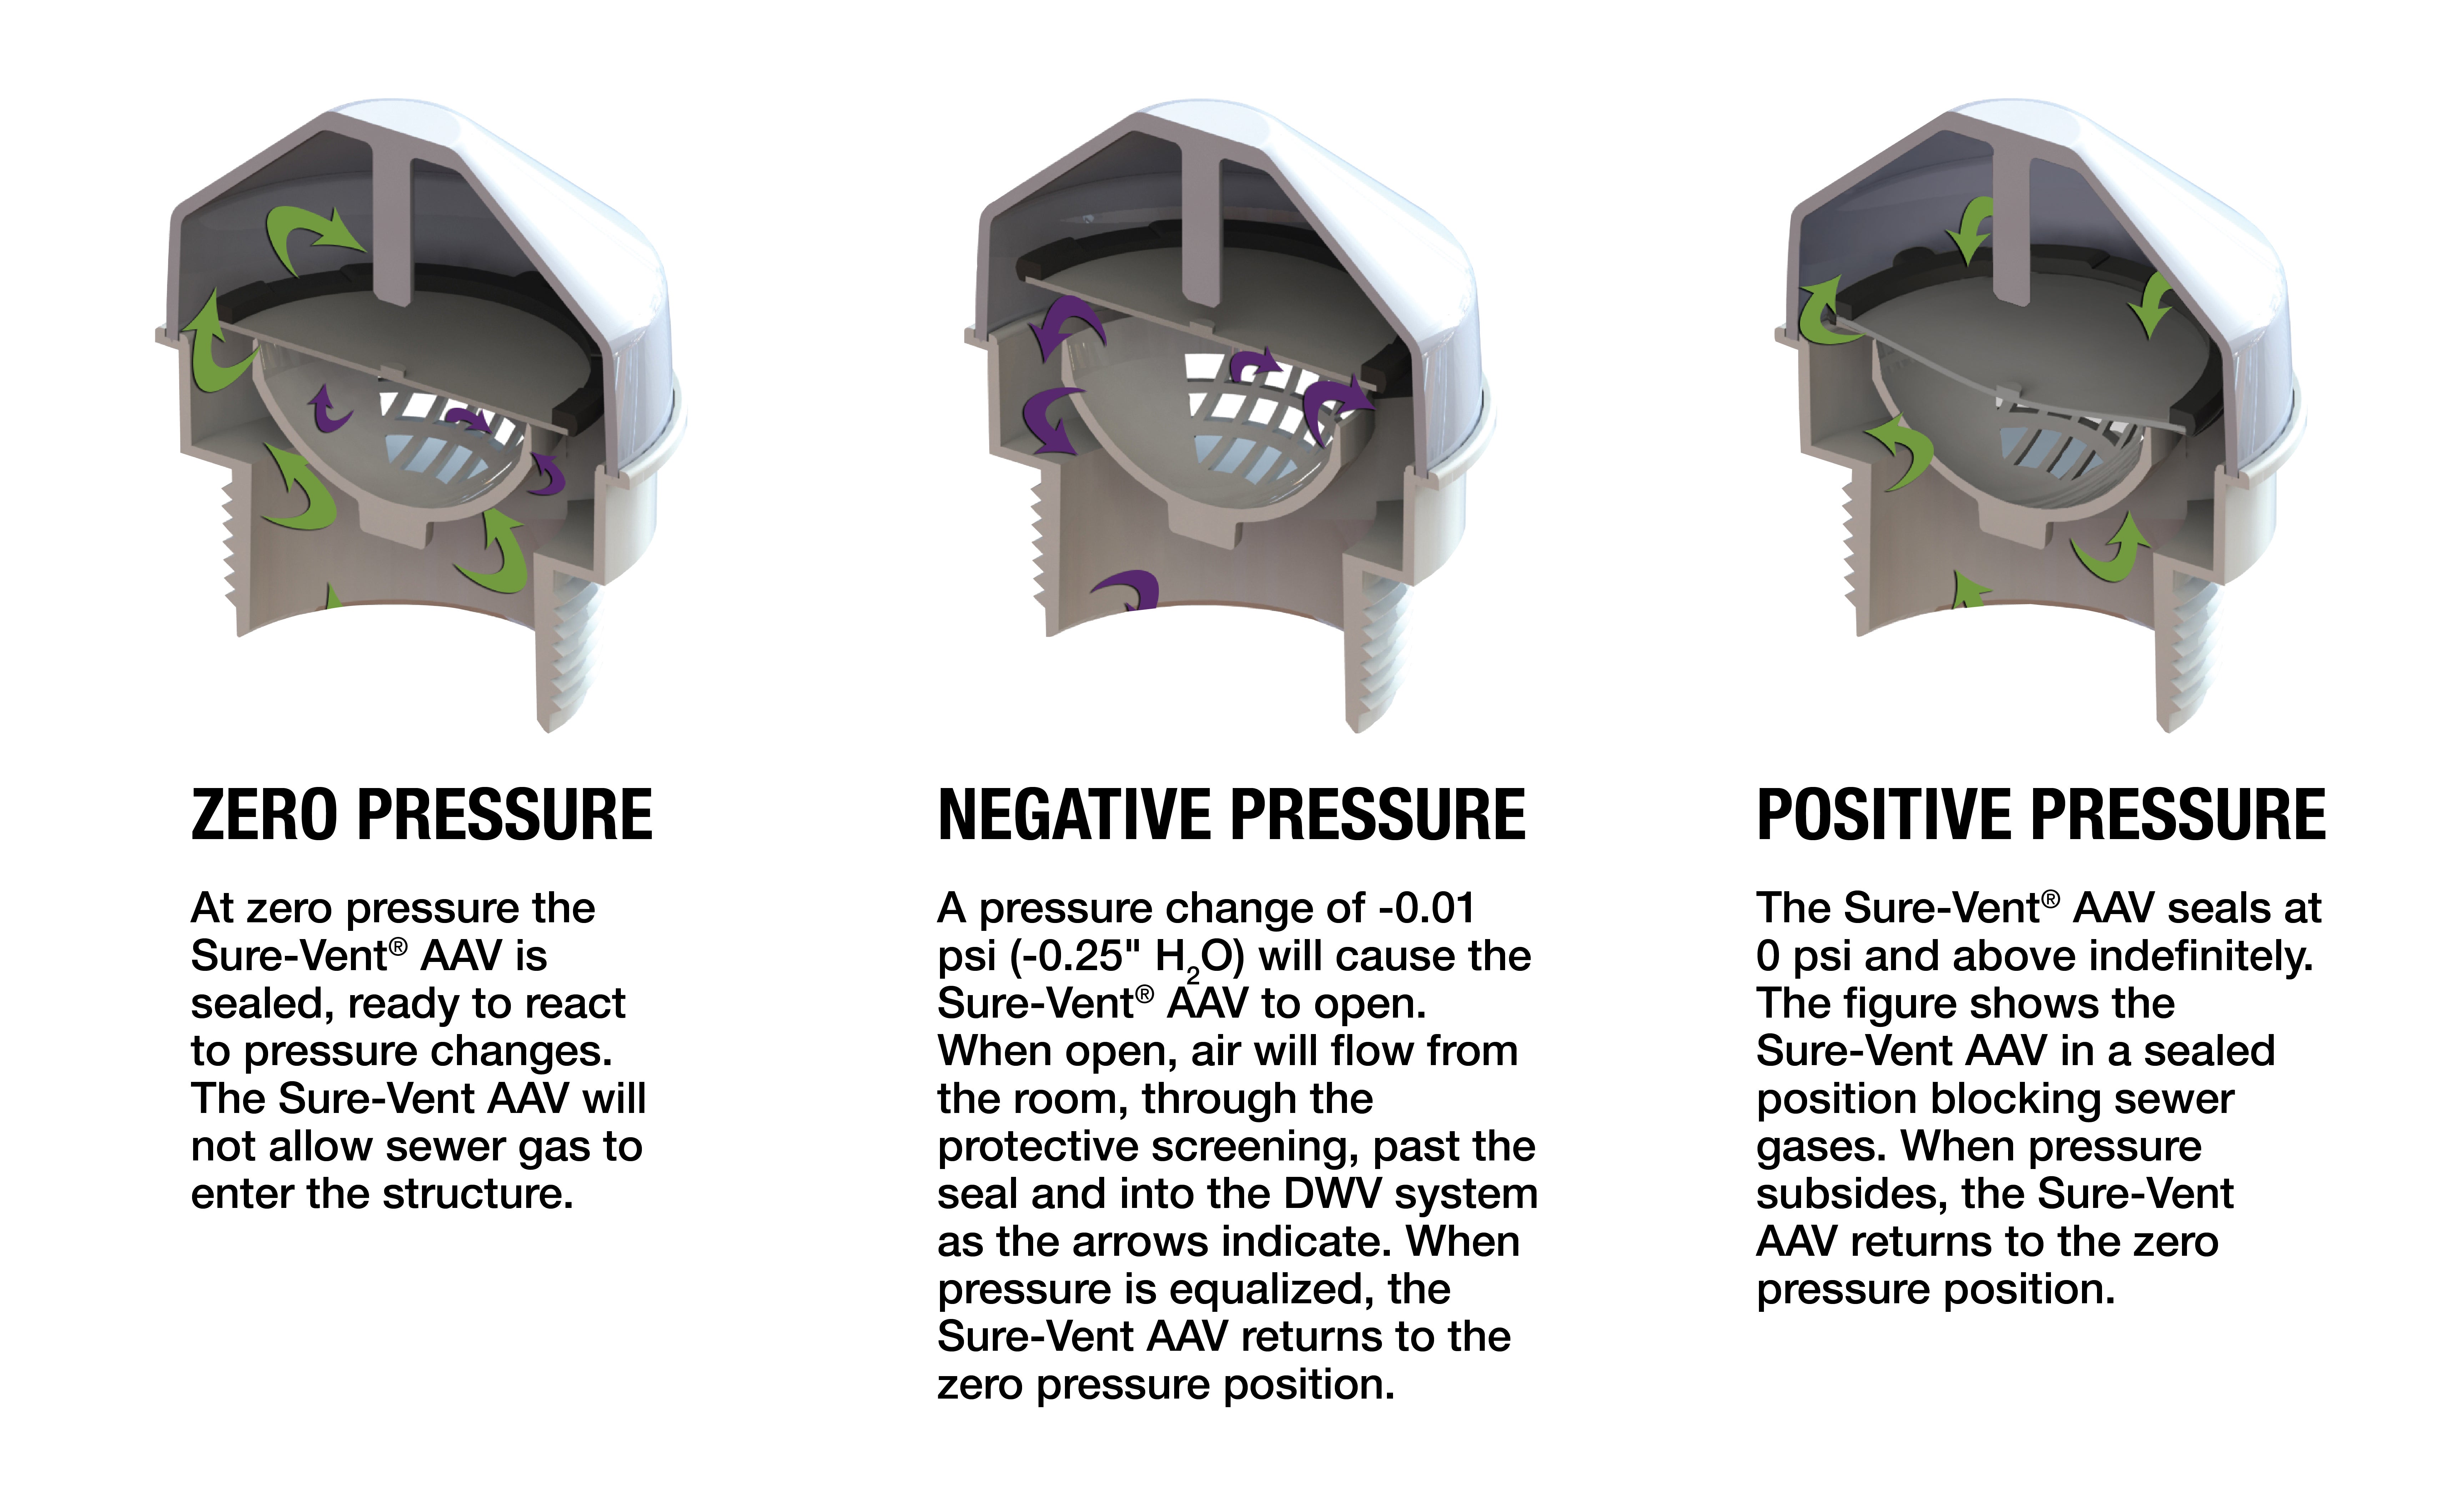
When water moves through a pipe (like when you flush a toilet or drain a sink), it creates negative pressure. If there’s no way for air to enter, the water in nearby traps can get sucked out, allowing sewer gases to enter your home.
An AAV opens only when needed, letting air in and preventing these problems. When there’s no suction, it stays shut, keeping smells and gases sealed out.
Why Test An Air Admittance Valve?
You might wonder why testing an AAV is necessary. These valves are mechanical and can fail over time due to dirt, age, or installation mistakes. If an AAV stops working, you may notice:
- Bad odors near sinks or drains
- Gurgling sounds from pipes
- Slow drainage in sinks, tubs, or toilets
- Water traps losing water (dry P-traps)
Ignoring these signs can lead to bigger plumbing issues or even health risks from sewer gas exposure. Regular testing helps catch problems early, keeping your plumbing safe and efficient.
How An Air Admittance Valve Works
Understanding the basic function of an AAV makes testing easier. Inside the valve is a rubber or silicone seal and a spring (in some models). When negative pressure happens (water rushing down a pipe), the seal lifts, letting air in.
When the pressure normalizes, the seal drops back into place, stopping gases from rising.
AAVs are designed to:
- Open only when needed (when water flows)
- Stay closed to block sewer gases
- Work silently without user control
Not all AAVs are identical. Some are made for single fixtures, while others handle whole bathrooms. Quality, brand, and design affect how reliable the valve is.
Signs Your Aav Needs Testing
It’s not always obvious when an AAV is failing. Here are signs to watch for:
- Unusual smells: If you smell sewage near a fixture, the AAV may not be sealing properly.
- Drains making noise: Gurgling or bubbling sounds suggest the valve isn’t letting air in as it should.
- Slow draining water: If sinks or tubs drain slower than usual, air might not be entering the pipes.
- Dry traps: If you check the trap under a sink and it’s dry, air may be pulled in the wrong way due to valve failure.
Catching these signs early can prevent plumbing emergencies.
Tools And Materials Needed
Testing an AAV is simple, but having the right tools makes the job easier and safer. Here’s what you’ll need:
- Flashlight: To see the valve clearly, especially in dark cabinets
- Adjustable wrench or pliers: For removing or tightening the AAV
- Small mirror: Helps you check for leaks or cracks
- Spray bottle with soapy water: For leak detection
- Bucket or towels: To catch any drips when removing the valve
- Gloves: To protect your hands from dirt or bacteria
- Step stool: If the valve is installed high up
Optional tools:
- Vacuum gauge: For more advanced negative pressure testing
- Replacement AAV: In case the old one fails
Safety Precautions
Before you start, safety is important. Here are some tips:
- Turn off water to the fixture if you need to remove the valve.
- Open windows or use a fan to keep air fresh, especially if you smell sewer gases.
- Wear gloves to avoid contact with dirty water or bacteria.
- Work slowly; rushing can damage the valve or plumbing.
If you ever feel unsure, call a professional plumber. Some plumbing codes may restrict DIY work on vent systems in certain areas.
Credit: www.nycc-mag.com
Preparing For The Test
Testing an air admittance valve is easier if you prepare well. Here’s how:
- Locate the AAV: Most are found under sinks, behind access panels, or near appliances.
- Clear the area: Remove any stored items for easy access.
- Check for leaks: Look for water stains or drips under the valve.
- Inspect the valve: Use a flashlight and mirror to look for cracks, corrosion, or loose fittings.
AAVs should be installed upright, at least 4 inches above the drain, and in a spot with good air flow. If yours is installed incorrectly, even a working valve may not function as intended.
Step-by-step Guide: How To Test An Air Admittance Valve
Testing an AAV involves a series of checks, both visual and functional. Follow these steps carefully:
1. Visual Inspection
Start with a close look at the valve and its surroundings.
- Check for cracks in the plastic body or cap.
- Look for leaks around the threads or base.
- Inspect for dirt or debris that could block the valve.
A dirty or damaged valve may not seal properly. If you see obvious cracks or heavy corrosion, replacement is usually best.
2. Listen For Unusual Sounds
Run water through the connected fixture (sink, tub, etc.). Listen for:
- Gurgling noises: This can mean the valve is stuck or slow to open.
- Whistling: May signal a poor seal or debris inside.
A functioning AAV usually works silently or with a soft click.
3. Smell Test
Odors are a big clue. If you notice a sewage smell when water is used, the valve may be stuck open or not sealing. Try to pinpoint the smell to the AAV, not the drain or trap.
4. Leak Test With Soapy Water
Mix dish soap with water in a spray bottle. Spray around the AAV’s threads and body while running water through the fixture. Bubbles forming mean a leak is present.
5. Negative Pressure Test
This step checks if the valve opens when needed.
- Run water quickly down the drain (fill the sink, then release the stopper).
- Listen for a soft click as the AAV opens.
- Watch the water in nearby traps. If it moves or sucks down, the valve may be slow or stuck.
For a more advanced test, use a vacuum gauge to measure pressure changes. Most homeowners can skip this, but it’s used by pros for complex cases.
6. Remove And Shake Test
If the valve is removable (most screw on/off), turn off the water, unscrew the AAV, and shake it gently.
- You should hear or feel the seal move.
- If it rattles loosely or sticks, the valve may need cleaning or replacing.
Be careful not to drop the valve or lose small parts.
7. Reinstall And Retest
After inspection, reinstall the AAV tightly. Run water again and repeat the above tests. If problems persist, replacement is usually the simplest fix.
Table: Common Aav Problems And Solutions
Below is a comparison of common AAV symptoms, likely causes, and solutions.
| Symptom | Likely Cause | Solution |
|---|---|---|
| Bad odors | Seal stuck open or damaged | Clean or replace AAV |
| Slow drainage | Valve not opening, blocked vent | Clean debris, check installation |
| Gurgling sounds | Delayed valve action | Lubricate or replace valve |
| Visible leaks | Loose or cracked threads | Tighten or replace valve |
| Dry traps | Valve not admitting air | Test and replace if faulty |
Table: Aav Types And Testing Differences
There are different types of air admittance valves. Here’s how testing may differ by type:
| Type of AAV | Location | Testing Notes |
|---|---|---|
| Single fixture | Under sinks, vanities | Easy to access, simple visual and functional tests |
| Branch or stack | Bathroom groups, laundry rooms | May require multiple drains tested at once |
| High capacity/commercial | Public restrooms, large kitchens | Often larger, may have multiple seals, advanced pressure tests recommended |
Cleaning And Maintenance Tips
Sometimes, what looks like a failing AAV just needs a bit of cleaning. Here are some tips:
- Wipe the exterior with a damp cloth to remove dust or grime.
- If removable, clean the seal with warm soapy water—avoid harsh chemicals.
- Check for insects or debris inside the vent holes.
- Lubricate the seal with a plumber-approved silicone spray if it sticks.
Never use oil-based lubricants, as these can break down rubber seals. If regular cleaning doesn’t solve the problem, replacement is best.
When To Replace An Air Admittance Valve
AAVs don’t last forever. Most brands recommend replacement every 5–10 years, but some fail sooner due to poor installation or heavy use. Replace the valve if:
- You see cracks or heavy wear
- It fails the negative pressure test
- Leaks or odors return after cleaning
- It rattles or the seal doesn’t move freely
Replacement is usually simple—just unscrew the old valve, clean the threads, and install a new one by hand. Use plumber’s tape if recommended by the manufacturer.
Table: Aav Lifespan By Brand (approximate)
Here’s a general idea of how long different AAV brands last:
| Brand | Estimated Lifespan | Warranty |
|---|---|---|
| Studor | 10–15 years | 10 years |
| Oatey | 5–10 years | 1–5 years |
| Sioux Chief | 10 years | 5 years |
Always check your local plumbing codes before replacing an AAV, as some areas have special rules for venting systems.
Common Mistakes When Testing Aavs
Even experienced DIYers can make mistakes. Here are common errors and how to avoid them:
- Skipping the visual check: Small cracks can cause big problems—always look closely.
- Testing with low water flow: AAVs react to strong negative pressure. Use a full sink or tub of water for the test.
- Ignoring installation height: If the valve is too low, it may not work. Check that it’s at least 4 inches above the trap arm.
- Not checking for debris: Hair, dust, or insects can block the valve.
- Using the wrong replacement: AAVs come in different sizes and capacities. Match the old valve’s specs.

Credit: www.youtube.com
Troubleshooting: What If Problems Remain?
If you’ve tested and cleaned the AAV but still have plumbing issues, try these steps:
- Check for other venting problems: Sometimes, a clogged main vent or blocked roof vent is the cause.
- Inspect all traps: A dry or leaky trap can mimic AAV failure.
- Look for drain clogs: A slow drain may be blocked, not vent-starved.
- Test with a replacement valve: If symptoms vanish, the old valve was faulty.
- Call a plumber: If you can’t find the problem, a professional can use advanced tools like smoke testers or cameras.
Real-world Example: Diagnosing A Kitchen Sink Odor
A homeowner notices a bad smell under the kitchen sink, especially after using the dishwasher. The AAV is about six years old.
- Visual check: No cracks, but some dust around the valve.
- Soapy water test: No bubbles, so no leaks.
- Negative pressure test: When draining a full sink, there is no soft click, and the trap water moves.
- Shake test: Valve seal feels sticky, not moving freely.
- Replacement: After installing a new AAV, the smell and trap movement stop.
This example shows that sometimes the seal can stick, even if the valve looks fine. Regular testing catches these issues before they get worse.
Tips For Choosing A Replacement Aav
If you need to replace your air admittance valve, keep these tips in mind:
- Match the pipe size: Most household AAVs are for 1.5″ or 2″ pipes.
- Check the flow rating: Choose a valve rated for your fixture (single, branch, or stack).
- Look for certification: Good AAVs are certified to standards like ASSE 1051 or 1050.
- Consider brand reputation: Well-known brands often have better seals and warranties.
- Buy from trusted suppliers: Avoid cheap, off-brand valves that may fail quickly.
For more in-depth standards on plumbing vents, see the Wikipedia: Plumbing Vent System.
Non-obvious Insights Most Beginners Miss
Many first-time testers overlook two key points:
- AAVs can fail silently: Sometimes, they stick only during very heavy use—like when the washing machine drains. Test during these high-flow moments, not just with a slow faucet.
- Temperature and humidity affect performance: In very cold or humid locations (like cabins or basements), the internal seal can stiffen or swell. If your AAV is in an extreme environment, check it more often and consider specialty models designed for those conditions.
Credit: www.oatey.com
When To Call A Professional
While testing and replacing an AAV is usually within DIY reach, call a plumber if:
- You smell strong sewer gas and feel unwell (headache, nausea)
- Multiple fixtures are affected at once
- You’re unsure about local plumbing codes
- The valve is hard to reach or installed in a wall or ceiling
Professionals have specialized tools and can check the entire venting system, not just the AAV.
Frequently Asked Questions
What Is The Main Purpose Of An Air Admittance Valve?
The main purpose of an air admittance valve is to let air into the plumbing drain system when water flows, preventing traps from being sucked dry. At the same time, it blocks sewer gases from escaping into your home, keeping the air safe and odor-free.
How Often Should I Test My Aav?
You should test your AAV at least once a year, or whenever you notice bad smells, slow drainage, or gurgling noises from your drains. More frequent checks are smart in older homes or places with heavy usage.
Can I Clean An Aav Or Do I Always Have To Replace It?
You can often clean the outside of an AAV and sometimes the seal inside, especially if dirt or dust is present. However, if cleaning doesn’t solve leaks, noises, or sticking, replacement is usually the best option.
Are Air Admittance Valves Legal Everywhere?
Not all areas allow AAVs in plumbing systems. Local plumbing codes may require traditional vent pipes in some buildings. Always check your local building codes or ask a professional before installing or replacing an AAV.
What Happens If I Ignore A Faulty Aav?
Ignoring a faulty AAV can lead to sewer gas leaks, bad odors, slow drains, and even health risks from exposure to harmful gases. Over time, traps can dry out and let pests or bacteria into your home. Testing and fixing problems early prevents these issues.
—
Knowing how to test an air admittance valve is a valuable skill for any homeowner or DIYer. By following these steps, using the right tools, and paying attention to both obvious and subtle signs, you’ll keep your plumbing system running smoothly.
Regular checks and quick action can save you time, money, and stress—giving you peace of mind and a fresher, safer home.