Baking bread at home can feel magical, especially when you see those beautiful patterns and shapes on artisan loaves. For many, the secret behind this look is a simple tool called the banneton. If you’re new to bread making or want to improve your results, learning to use a banneton can take your bread from ordinary to impressive.
A banneton, sometimes called a proofing basket or brotform, is more than just a container. It shapes your dough, supports it during rising, and adds those lovely lines you see on rustic loaves. But using a banneton isn’t just about putting dough inside and waiting.
There are steps, tricks, and details that make a big difference in your baking. Many beginners miss some of these points and end up with sticking dough, odd shapes, or even ruined loaves.
Whether you’ve just bought your first banneton or you’re thinking about adding one to your kitchen, this guide will walk you through everything you need to know. You’ll learn about different types, how to prepare your basket, how to use it properly, and how to avoid common mistakes.
By the end, you’ll feel confident about using a banneton for better, tastier bread.
What Is A Banneton?
A banneton is a basket used to support bread dough as it rises before baking. Traditionally, it’s made of natural materials like rattan, cane, or wood pulp. These materials help control moisture and create a slightly rough surface that gives bread its signature pattern.
Most bannetons are round or oval, but you can find many shapes. The basket is not used for baking in the oven; its purpose is for the final rise, known as proofing. The basket helps the dough keep its shape, so it doesn’t spread out too much and lose volume.
Some bakers call them proofing baskets, while others use the word brotform (German for “bread form”). No matter the name, the function is the same: shaping and supporting bread dough.
Why Use A Banneton?
Many home bakers ask why they should bother with a banneton when a bowl could work. The answer is in the results.
1. Structure And Shape
Dough can be sticky and soft, especially with higher hydration recipes. A banneton supports the dough and helps it keep a round or oval shape as it rises.
2. Surface Pattern
The spiral lines or ridges from the basket create patterns on the finished bread. This makes your loaf look rustic and professional.
3. Texture And Crust
The natural materials absorb some surface moisture. This helps the dough form a thin skin, leading to a crisp crust when baked.
4. Even Proofing
The basket encourages even rising and prevents dough from spreading too much.
5. Easier Handling
Shaped dough is easier to score (cut) and move into the oven. This reduces the chance of the dough deflating or losing air bubbles.
Many beginners don’t realize how much easier shaping and handling become with a banneton. Trying to proof directly on a tray or in a metal bowl often leads to flat, uneven loaves.
Types Of Bannetons
Bannetons come in various materials and shapes. Choosing the right one can make a difference in your baking routine.
Materials
1. Rattan
Traditional and most popular. Rattan is flexible, sturdy, and creates clear spiral patterns. It absorbs moisture well, helping with crust formation.
2. Wood Pulp
Made from compressed wood fibers. These bannetons give a smooth surface and are less likely to stick. They’re a good choice for wetter doughs.
3. Cane
Similar to rattan, but sometimes less durable. They’re often used for smaller baskets.
4. Plastic
Easier to clean and less expensive. Plastic bannetons don’t absorb moisture, so the crust might be less crisp. They’re a good option for people with allergies to plant fibers.
Shapes And Sizes
The two most common shapes are round (boule) and oval (batard). Both give classic results, but the shape affects how you bake and slice the bread.
Other shapes include:
- Long (for baguettes)
- Square
- Heart-shaped (for decorative loaves)
Bannetons also come in different sizes, usually from 500g up to 1. 5kg or more. Match the size to your recipe to prevent the dough from overflowing.
Material Comparison Table
Here’s a quick look at how different materials compare:
| Material | Absorbs Moisture | Pattern | Durability | Cleaning |
|---|---|---|---|---|
| Rattan | Yes | Spiral | High | Medium |
| Wood Pulp | Yes | Smooth | Medium | Medium |
| Cane | Yes | Spiral | Low | Medium |
| Plastic | No | Varies | High | Easy |
How To Prepare Your Banneton
Before using a new banneton, you need to prepare it. Skipping this step is a common mistake and often leads to dough sticking badly.
Seasoning The Basket
1. Dust With Flour
Sprinkle a generous amount of flour inside the basket. Tap and turn the banneton to coat all surfaces well.
2. Use The Right Flour
For the best non-stick effect, use rice flour or a mix of rice and wheat flour. Rice flour is less absorbent, so dough is less likely to stick.
3. Remove Excess Flour
Shake out any extra flour. You want a thin, even layer.
4. Let It Dry
If your banneton is brand new, some bakers suggest leaving the floured basket out for a few hours. This helps the flour stick to the fibers and builds a non-stick layer.
Using A Liner (optional)
Some bannetons come with a cloth liner. This can help prevent sticking, especially with very wet dough. To use:
- Place the liner inside the basket.
- Flour the liner well before adding dough.
Tip: Bannetons with liners give a smooth loaf surface, while baskets without liners create a rustic, lined pattern.
Step-by-step Guide: Using A Banneton
Here’s how to use a banneton from start to finish, with simple instructions for best results.
1. Shape The Dough
After your dough’s first rise (bulk fermentation), gently turn it out onto a lightly floured surface. Shape it into a tight ball (for round baskets) or an oval (for oval baskets). The shaping step is important—it gives your bread structure.
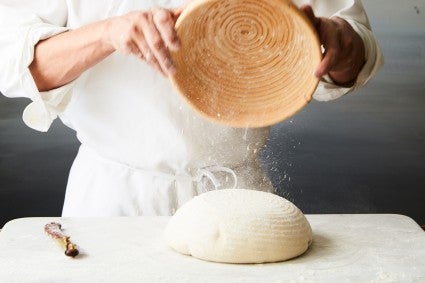
2. Flour The Banneton
Right before using, dust the inside of your banneton with flour. Don’t skip this even if you floured it earlier. For best results, use rice flour.
3. Place The Dough In The Basket
Put the shaped dough seam side up (the smooth side faces down). This lets you flip the dough out later, so the smooth side is on top for scoring and baking.
4. Cover And Proof
Cover the basket with a towel, plastic wrap, or place it inside a large plastic bag. Let the dough rise at room temperature or in the fridge, depending on your recipe.
5. Check For Proper Proofing
Gently press the dough with a finger. If it springs back slowly and leaves a slight indentation, it’s ready to bake. If it springs back quickly, it needs more time. If it collapses, it may be over-proofed.
6. Turn Out The Dough
Place parchment paper or a baking peel over the basket. Carefully flip the banneton so the dough drops out, smooth side up. If you used enough flour, the dough should release easily.
7. Score And Bake
Slash the top of the dough with a sharp blade (lame or knife). This allows the bread to expand in the oven and gives you control over the final look. Transfer the dough to a hot oven or Dutch oven for baking.
Step-by-step Banneton Use Table
To make things clearer, here’s a step-by-step summary:
| Step | Action | Details |
|---|---|---|
| 1 | Shape Dough | Round or oval, depending on basket |
| 2 | Flour Banneton | Use rice flour, coat evenly |
| 3 | Add Dough | Seam side up |
| 4 | Cover & Proof | At room temp or fridge |
| 5 | Check Proof | Finger test |
| 6 | Turn Out | Onto parchment or peel |
| 7 | Score & Bake | Slash top, bake immediately |
Tips For Best Results
Using a banneton well is about more than the basic steps. Here are practical tips that make a real difference:
1. Flour Generously (but Not Excessively)
Don’t be shy about flouring the basket, especially the first few times. Dough sticking is a common beginner problem. Over time, your banneton will develop a “seasoned” surface, needing less flour.
2. Use Rice Flour For Sticky Dough
Many new bakers use only wheat flour, but rice flour is a game-changer for high-hydration doughs (doughs with more water). It creates a barrier that prevents sticking without adding a raw taste to the crust.
3. Try Cold Proofing
Proofing dough in the fridge overnight gives better flavor and makes the dough firmer, so it’s easier to handle and less likely to stick.
4. Rotate Your Banneton
If you bake often, rotate between two baskets. This gives each one time to dry out completely between uses, stopping mold and odors.
5. Clean Carefully
Don’t wash your banneton with soap and water unless it’s absolutely necessary. Instead, tap out excess flour and brush away crumbs. If dough sticks, let it dry and then scrape it off.
6. Let Your Basket Dry
After each use, air-dry your banneton well to prevent mold. Store it in a dry, airy place.
7. Mark Your Banneton
If you have several baskets, label them for different dough weights. This saves confusion and ensures you always have the right size.
8. Don’t Over-proof
Over-proofed dough loses structure and can stick. Use the finger test to check for readiness.
9. Practice Makes Perfect
The more you use your banneton, the better you’ll understand how much flour to use and how your dough behaves.
Common Mistakes And How To Avoid Them
Even experienced bakers sometimes have trouble with bannetons. Here’s how to avoid the most common pitfalls:
Mistake 1: Dough Sticking
If your dough sticks, it’s usually because of:
- Too little flour
- Using the wrong type of flour (rice flour is best for preventing sticking)
- Very wet dough
- Not enough seasoning of a new basket
Solution: Use plenty of rice flour and let your banneton become “seasoned” over time.
Mistake 2: Dough Collapsing
This happens when:
- The dough is over-proofed
- The basket is too big for the dough
- The dough was not shaped tightly enough
Solution: Check dough size matches basket, shape dough firmly, and don’t proof too long.
Mistake 3: Mold Or Smell In Banneton
If you store your basket wet or in a closed space, it can develop mold.
Solution: Always let your banneton dry completely after use. Store in a dry, open area.
Mistake 4: Not Cleaning Properly
Washing with water can damage natural fiber baskets.
Solution: Tap out flour, brush crumbs, and scrape dried dough. Wash with water only if mold appears, then dry fully.
Mistake 5: Wrong Banneton Size
A basket that’s too large or too small changes the bread’s shape and rise.
Solution: Match the basket size to the recipe weight. Most home loaves use a 500g to 1kg banneton.
How To Clean And Care For Your Banneton
Proper care keeps your banneton working well for years. Here’s how to do it:
After Each Use
- Knock out extra flour over the sink or trash.
- Use a stiff brush to remove any stuck crumbs.
- Let air-dry completely, ideally in sunlight.
Deep Cleaning
If your banneton smells or shows mold:
- Rinse briefly with cool water (don’t soak).
- Dry in a warm oven (about 100°C/210°F) for 15-20 minutes.
- Let cool and air out before storing.
Tip: Never use soap or detergent, which can damage natural fibers and leave odors.
Storage
- Store in a dry, ventilated spot.
- Avoid plastic bags or closed containers that trap moisture.
- Occasionally, let your banneton sit in the sun to keep it dry and fresh.
Credit: www.kingarthurbaking.com
Banneton Vs. Alternatives
Some bakers use bowls, colanders, or even salad spinners for proofing. So, is a banneton really worth it? Let’s compare:
| Feature | Banneton | Regular Bowl | Colander |
|---|---|---|---|
| Shape Support | Excellent | Moderate | Moderate |
| Pattern | Distinct | None | May imprint holes |
| Non-stick Surface | With flour, very good | Needs cloth/flour | Needs cloth/flour |
| Crust Quality | Crisper | Softer | Softer |
| Durability | High | High | High |
| Cost | Medium | Low | Low |
A banneton is a small investment, but for serious bread bakers, the difference in appearance and crust makes it worth it.
When Not To Use A Banneton
Bannetons are great for lean doughs—those made with just flour, water, salt, and yeast or sourdough starter. But some bread types don’t need a banneton, such as:
- Very soft doughs (like focaccia), which are baked in pans
- Enriched doughs (brioche, challah) that are shaped and rise in tins
- Rolls or small buns
If you bake mostly these types, you may not need a banneton. But for rustic, artisan-style bread, it’s a must-have.
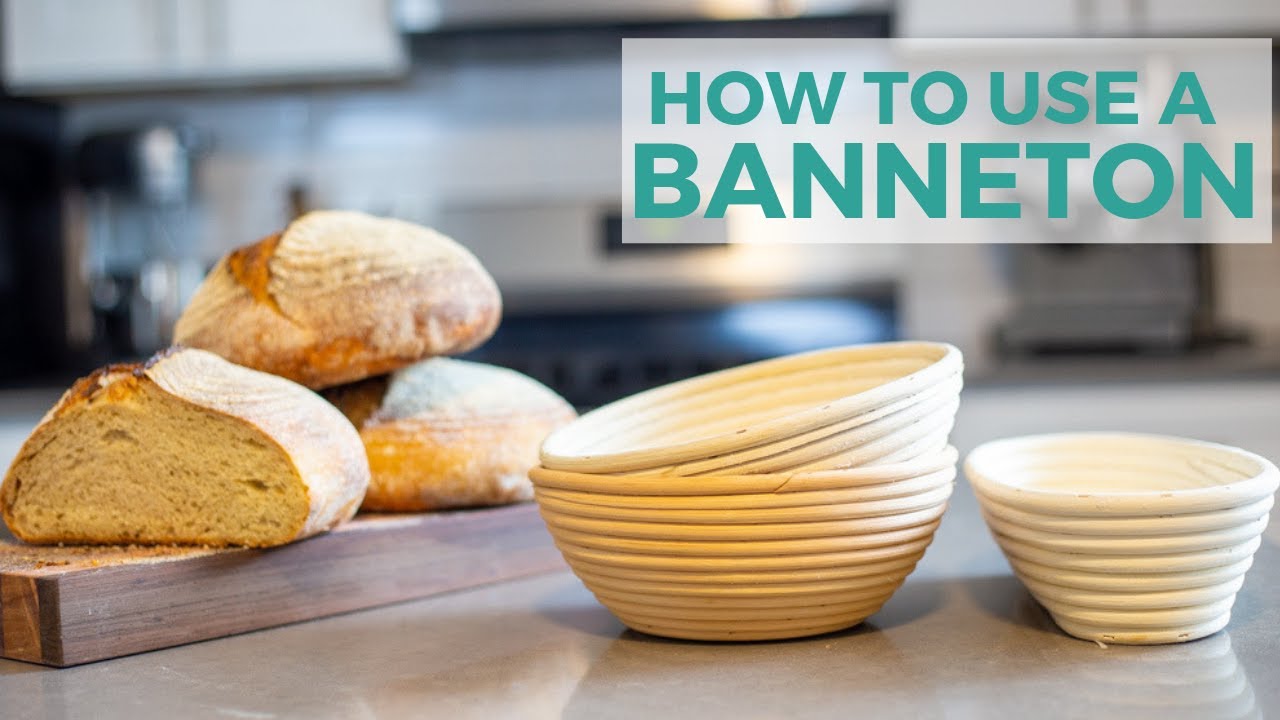
Credit: www.youtube.com
Advanced Banneton Techniques
Once you’ve mastered the basics, try these advanced tips to get even better results:
Stenciling Patterns
After proofing, dust the surface of the dough in the basket with flour and use a stencil before scoring. This creates attractive designs on your baked loaf.
Double Proofing
For extra flavor and texture, some bakers do an initial proof in a bowl, shape the dough, then proof a second time in the banneton. This technique is used for sourdough and complex recipes.
Using Different Flours
Experiment with different flour combinations for dusting. Rye flour, cornmeal, or semolina can add flavor and unique crust color.
Invert For “ear” Formation
Place the dough seam side down in the banneton if you want the loaf to form a large “ear” (a raised flap of crust) after scoring and baking. This is a classic look in artisan bakeries.
Choosing The Right Banneton For Your Needs
When buying a banneton, think about these factors:
1. Bread Size
Match the basket to your typical loaf size. Too small, and dough spills over; too large, and the loaf is flat.
2. Shape
Choose round for boules and oval for batards. Consider long baskets if you want to make baguettes.
3. Material
Rattan is traditional; wood pulp is less likely to stick; plastic is easy to clean.
4. With Or Without Liner
Liners give a smooth finish, but traditional baskets create rustic lines.
5. Budget
Most bannetons cost between $10 and $30. Cheaper options work well for beginners.
Non-obvious insight: Many bakers don’t realize that a well-seasoned banneton actually gets better with age. The fine layer of flour and tiny crumbs fills the gaps in the basket, making it more non-stick over time.
Real-world Examples: Banneton Success Stories
Bakers worldwide use bannetons for better bread. Here are a few stories that show their impact:
- Maria from Spain struggled with flat sourdough for months. After switching to a rattan banneton, her loaves rose higher and had a beautiful crust. She found that using rice flour solved her sticking problems.
- James in Canada bakes for a local market. He uses four oval bannetons, rotating them so each dries fully. This has prevented mold and kept his baskets in good shape for over two years.
- A home bakery in the UK uses stencils on banneton loaves for Instagram. They dust with rye flour before proofing and create unique patterns for every batch, adding value to their bread.
Where To Buy A Banneton
You can find bannetons at kitchen supply stores, online retailers, or specialty baking shops. Choose reputable brands for quality. For more about the history and use of bannetons, visit Wikipedia’s Proofing Basket page.

Credit: www.amazon.com
Frequently Asked Questions
How Do I Stop Dough From Sticking To My Banneton?
Use a generous amount of rice flour or a rice/wheat mix to dust the basket. Make sure your banneton is well-seasoned, and try proofing dough in the fridge for easier handling.
Can I Use A Banneton For All Types Of Bread?
Bannetons are best for artisan loaves—rustic breads with chewy crusts. They are not necessary for pan breads, rolls, or very wet doughs like focaccia.
How Do I Clean My Banneton?
Knock out flour and brush off crumbs. Let the basket air-dry fully. Only use water if you see mold, then dry in a warm oven. Never use soap or soak the basket.
Do I Need To Use A Liner With My Banneton?
No, a liner is optional. Use it for a smooth crust or if you have very wet dough. Without a liner, you’ll get the classic spiral pattern.
Why Does My Bread Lose Shape When I Turn It Out?
This usually means the dough was over-proofed or the basket was too large. Shape your dough tightly and match banneton size to recipe. The finger test helps check readiness before baking.
Using a banneton may seem like a small step, but for home bakers, it can make a big difference in both the look and quality of bread. With practice, care, and attention to detail, you’ll find your loaves rising higher, with crisp crusts and beautiful patterns—just like an artisan bakery.