
A cabinet scraper is a simple, yet powerful hand tool that can transform your woodworking results. Many woodworkers, especially beginners, overlook this small piece of steel, but once you learn to use it, you may wonder how you ever worked without one.
Cabinet scrapers remove thin shavings from wood, creating a glassy-smooth surface that sandpaper often cannot match. They are especially useful for taming tricky grain, cleaning up glue lines, and tackling finishing touches. But getting the best from a cabinet scraper takes a little practice and understanding.
This guide will walk you through everything you need to know about cabinet scrapers: what they are, why they are useful, choosing the right one, how to sharpen and set the burr, proper holding techniques, and real tips for getting professional results. Whether you are new to hand tools or looking to upgrade your skills, you’ll find practical advice, expert insights, and answers to common questions. Let’s unlock the full potential of the cabinet scraper in your workshop.
What Is A Cabinet Scraper?
A cabinet scraper is a thin, flat piece of high-carbon steel, usually rectangular or oval. Unlike a paint scraper, which scrapes off material with a blunt edge, a cabinet scraper uses a sharp, hooked burr to shave off fine wood fibers. This creates a super-smooth finish.
Most cabinet scrapers are about 0. 6mm to 1mm thick and 60mm by 150mm in size. When used properly, the cabinet scraper produces fine, curly shavings, similar to a hand plane, but thinner.
Key features of a cabinet scraper:
- No handle—held directly with your hands.
- Flexible steel allows for bowing during use.
- Works on flat, curved, or contoured surfaces.
- Requires sharpening and “turning a burr” for best results.
Cabinet scrapers are sometimes called card scrapers because of their shape. There are also scraper planes, which mount a scraper blade into a handled body for more control.
How Is A Cabinet Scraper Different From Sandpaper Or A Plane?
A scraper cuts wood fibers, while sandpaper abrades them. Sandpaper can leave tiny scratches, especially on end grain. A cabinet scraper leaves a polished surface that often needs little or no sanding afterward. Compared to a hand plane, a scraper can handle difficult grain (like curly or figured woods) without tear-out.
Why Use A Cabinet Scraper?
Scrapers offer unique advantages in woodworking. Here’s why they’re a must-have for both beginners and professionals.
- Superior surface finish: The tool produces a glassy-smooth surface, especially on difficult woods, that sandpaper often cannot achieve.
- No dust: Scrapers create shavings, not dust, making your workshop cleaner and healthier.
- Tackling difficult grain: They excel on woods with reversing grain, burls, or knots, where planes often tear out fibers.
- Removing finishes or glue: Scrapers quickly remove old finishes or dried glue with precision.
- Economical: A cabinet scraper is inexpensive and lasts many years with proper care.
- Quiet and simple: No power needed, just your hands. This makes it ideal for small shops or fine work.
Experienced woodworkers often say that a cabinet scraper is their “secret weapon” for perfect finishing.
Choosing The Right Cabinet Scraper
Selecting the right scraper for your needs is the first step. There are several types and shapes, each with its advantages.
Common Types Of Cabinet Scrapers
| Type | Shape | Best For |
|---|---|---|
| Rectangular | Flat rectangle | General flat surfaces |
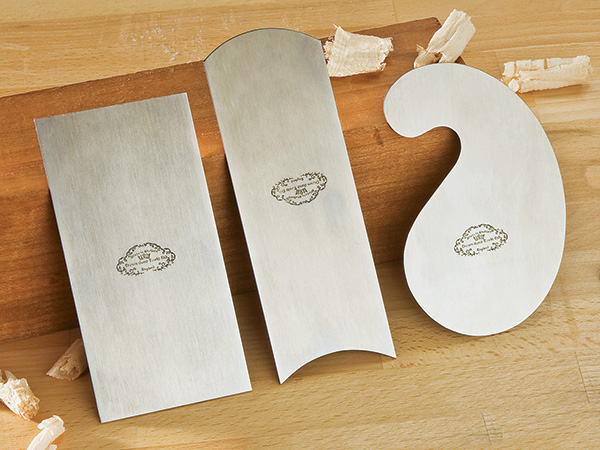
| Gooseneck | Curved with “neck” | Concave/convex shapes, curves |
| Oval | Rounded ends | Blending curves, irregular shapes |
| Mini / Small | Shorter, narrower | Small parts, tight spaces |
Rectangular scrapers are the most common and versatile. Gooseneck and oval scrapers are useful for chair seats, guitar backs, or any curved surface.
Key Factors In Choosing A Scraper
- Thickness: Thinner scrapers (0.6mm) flex more, better for fine shavings; thicker scrapers (1mm) are more rigid, useful for removing tough material.
- Steel quality: High-carbon steel holds a burr longer. Avoid cheap, soft steel.
- Edges: Pre-cut, smooth edges save you work. Some scrapers come with sharp edges that need to be stoned before use.
- Size: Larger scrapers cover more area; small ones are for detail work.
For most users, a standard rectangular scraper around 0. 8mm thick is a good starting point. As your skills grow, adding gooseneck or oval shapes expands your toolkit.
Preparing A Cabinet Scraper For Use
A new scraper is not ready out of the package. Proper preparation is essential. This involves two steps: jointing the edge and turning the burr.
Jointing The Edge
Jointing means making the edge perfectly flat and square, free of nicks or factory marks. Use a fine file or sharpening stone for this.
Steps:
- Hold the scraper in a vise or clamp it flat on your workbench.
- Use a mill file or diamond stone to run along the long edge, keeping it at 90 degrees to the face.
- Work until the edge feels smooth and flat to your fingertip.
- Repeat for all four edges.
A perfectly square edge is vital because the burr will follow the edge’s shape.
Polishing The Edge
After jointing, polish the edge with a fine sharpening stone (1000-8000 grit). This removes scratches and refines the steel, giving a cleaner burr.
Tip: Many beginners skip this step. A polished edge creates a sharper, longer-lasting burr and better performance.
Turning The Burr
The most important part of preparing a scraper is turning the burr. This means creating a tiny, hard hook along the edge using a burnisher.
What Is A Burnisher?
A burnisher is a hard, smooth rod, often made of hardened steel or carbide. Its job is to “roll” a fine hook on the scraper’s edge. Screwdrivers, drill bits, or even the back of a chisel are too soft—use a real burnisher for best results.
How To Turn The Burr
- Clamp or hold the scraper flat on your bench.
- Lubricate the edge with a drop of oil for smoother action.
- Hold the burnisher at a 5-10 degree angle to the face.
- Press firmly and draw the burnisher along the edge, using moderate, even pressure. One or two passes is enough.
- Feel for the burr: Run your finger gently across the edge. You should feel a tiny hook.
If you can’t feel the burr, repeat the process. Too much pressure can roll the hook over; too little may not create one.
Beginner insight: Many new users create too large a burr. A small, hard burr cuts cleaner and lasts longer than a big, soft one.

Credit: www.woodsmith.com
Holding And Using A Cabinet Scraper
Correct technique makes all the difference. Unlike planes, cabinet scrapers are held with your hands, and the way you grip, bow, and angle the tool controls its action.
The Right Grip
Hold the scraper with both hands, fingers at the sides, and thumbs pressing the middle. Bow the scraper slightly by pushing with your thumbs, making the center curve outward.
- Bowing the scraper raises the middle, so only the center edge touches the wood. This prevents the corners from digging in.
- The amount of bow affects the shaving thickness.
Setting The Angle
- Scraping angle: Hold the scraper at 60-80 degrees from the surface (almost vertical).
- If the burr is correct, you’ll hear a whisper and see thin shavings curling off.
- Too steep: The scraper chatters or skips.
- Too flat: The scraper just polishes, not cuts.
Tip: Experiment with the angle. Each scraper and wood type is a little different.
Applying Pressure
- Use even, moderate pressure with your thumbs to keep the center bowed.
- Push or pull the scraper along the wood. Most people push, but some prefer pulling for better control.
- Work in overlapping strokes for an even surface.
Avoiding Heat And Fatigue
Scraping creates friction. The scraper can get hot after a few passes. Take breaks to avoid burning your fingers. Some woodworkers wear thin gloves or use a cork block behind the scraper for comfort.
Non-obvious insight: If the scraper gets too hot to touch, the burr is probably dull. Time to re-sharpen.
Practical Techniques For Best Results
Using a cabinet scraper well takes practice. Here are proven techniques to help you master the tool.
Working With The Grain
Always scrape with the grain or slightly across it. Scraping directly against the grain can cause tearing. Watch how the wood fibers react and adjust your angle as needed.
Removing Tear-out
If you see torn fibers from planing, use the scraper to shave these areas smooth. Bow the scraper more for aggressive spots, less for finishing passes.
Blending Glue Lines
Scrapers are excellent for removing dried glue without gouging the wood. Let glue dry fully, then use a sharp scraper to lift it off in thin layers.
Dealing With Curved Surfaces
For curved furniture parts, use a gooseneck or oval scraper. Match the curve of the scraper to the workpiece. Flex the scraper to fit the surface, and scrape gently for a seamless finish.
Cleaning Up End Grain
End grain is hard to finish with sandpaper or planes. A sharp cabinet scraper can polish end grain to a mirror finish. Use light, controlled strokes and check your progress often.
Removing Old Finishes
Scrapers can remove shellac, lacquer, or paint faster than sandpaper, with less clogging. For thick finishes, use a heavier burr and more pressure.
Sharpening And Maintaining Your Cabinet Scraper
A dull scraper is frustrating and ineffective. Regular sharpening keeps your tool cutting smoothly.
Signs Your Scraper Needs Sharpening
- The scraper skids or polishes instead of cutting.
- Shavings become dust-like or stop altogether.
- The burr feels weak or missing when touched.
Steps For Sharpening
- File the edge flat: Remove the old burr with a file or coarse stone.
- Polish the edge: Use a fine stone for a mirror finish.
- Turn a new burr: Use the burnisher as before.
How often? Most woodworkers sharpen after 10-30 minutes of use, depending on wood type and pressure.
Common Mistakes In Sharpening
- Not polishing the edge enough: Leaves a rough burr and poor finish.
- Using a soft burnisher: Fails to turn a hard hook.
- Over-burnishing: Rolls the burr over, making it dull.
- Skipping edge squaring: Leads to uneven or broken burrs.
Pro tip: Practice turning the burr on scrap metal before working on your best scraper.
Troubleshooting Cabinet Scraper Problems
Even experienced woodworkers run into scraper issues. Here’s how to solve the most common problems.
Chatter Or Skipping
- Cause: Scraper not bowed enough, dull burr, or holding the tool too flat.
- Solution: Bow the scraper more, sharpen the burr, or adjust the angle.
Digging Corners
- Cause: Not enough bow, or using a damaged edge.
- Solution: Increase bow, or re-square and polish the edge.
No Shavings, Just Dust
- Cause: Burr is too small, or the scraper is too flat.
- Solution: Turn a stronger burr, or increase the scraping angle.
Uneven Finish
- Cause: Inconsistent pressure or angle, or uneven burr.
- Solution: Practice steady, overlapping strokes. Re-sharpen the burr.
Fatigue Or Hot Tool
- Cause: Prolonged use, friction heat.
- Solution: Take breaks, wear thin gloves, or use a cork block.
Non-obvious insight: If you’re struggling to get a burr on a new scraper, the steel may be too soft. Try a higher-quality tool.
Credit: www.woodworkersjournal.com
Comparing Cabinet Scrapers, Sandpaper, And Planes
Many woodworkers wonder when to use a scraper versus other tools. Here’s a quick comparison to help you choose.
| Tool | Best For | Finish Quality | Dust | Skill Required |
|---|---|---|---|---|
| Cabinet Scraper | Tricky grain, finishing, glue removal | Very smooth, glassy | Shavings (little dust) | Medium (sharpening needed) |
| Hand Plane | Leveling, removing large material | Smooth (can tear tricky grain) | Shavings | Medium-high |
| Sandpaper | General smoothing, curved areas | Good (may leave scratches) | Lots of dust | Low |
Key takeaway: For the final finish, a cabinet scraper often gives better results than sandpaper, especially on hard or figured woods.
Real-world Examples And Applications
Cabinet scrapers are used by furniture makers, luthiers (guitar builders), cabinetmakers, and hobbyists for a range of tasks.
- Furniture building: Scraping table tops, drawer fronts, or chair seats for a flawless finish.
- Musical instruments: Shaping and smoothing curved surfaces, such as violin backs or guitar sides.
- Restoration: Removing old finishes or glue without damaging delicate wood.
- Finishing work: Preparing wood before applying oil, varnish, or shellac.
One professional luthier shared that “the scraper is the only tool that lets me work figured maple without tear-out. ” Many find that once they learn to sharpen and use the scraper, sanding is needed only on complex curves or tight spots.
Safety Tips When Using A Cabinet Scraper
While cabinet scrapers are safer than power tools, they do have sharp edges.
- Protect your hands: Scraper edges can be sharp. If you are new, wear thin gloves or sand the corners slightly to avoid cuts.
- Avoid burning: If the scraper gets hot, set it down. Do not try to cool it with water, as this can warp the steel.
- Sharpen carefully: Use a stable surface and avoid slipping with the burnisher.
- Keep your work area clean: Scraper shavings can be slippery; sweep them up regularly.
Upgrading And Customizing Your Scraper
As you gain experience, you may want to customize your cabinet scrapers:
- Beveling edges: Some advanced users add a tiny bevel (5 degrees) to one edge for a special purpose burr.
- Shaping scrapers: You can file special curves or shapes into a scraper for unique molding or inlay work.
- Custom handles: Some woodworkers mount their scraper into a wooden block for comfort, creating a DIY scraper plane.
Non-obvious insight: Collecting old saw blades or high-carbon steel can provide material for making custom scrapers.
Caring For And Storing Your Cabinet Scraper
Good care ensures your scraper lasts for years.
- Keep dry: Wipe off moisture to prevent rust.
- Store flat: Avoid bending or dropping the scraper.
- Protect the edges: Store in a sleeve or wrap in a rag to avoid dulling the burr.
Sharpen and burnish the scraper before each use for best performance.
Frequently Asked Questions
What Is The Best Burnisher For Turning A Burr On A Cabinet Scraper?
The best burnisher is a tool made from hardened, polished steel or carbide. It should be harder than the scraper steel. Common alternatives like screwdrivers or files are usually too soft and will not create a proper burr. A dedicated burnisher, available from woodworking stores, gives the most consistent results.
How Often Should I Sharpen My Cabinet Scraper?
You should sharpen your scraper whenever it stops producing shavings or starts making dust instead. For most users, this means after 10-30 minutes of use, depending on the wood and your technique. Frequent, light sharpening is better than waiting until the burr is completely gone.
Can I Use A Cabinet Scraper On Plywood Or Mdf?
Cabinet scrapers can be used on plywood, but the results may not be as smooth as on solid wood. Plywood’s glue layers and cross-grain can dull the burr quickly. On MDF, a scraper is less effective because the material is too soft and abrasive. For these, sandpaper is usually better.
Why Does My Cabinet Scraper Chatter Or Skip Across The Wood?
Chatter happens when the scraper is not bowed enough, the burr is dull, or you are holding the tool at the wrong angle. Try increasing the bow with your thumbs, sharpening the burr, or adjusting the angle until you get smooth, even shavings.
Is A Card Scraper The Same As A Cabinet Scraper?
Yes, the terms card scraper and cabinet scraper usually refer to the same tool—a thin, flat piece of steel used for fine wood finishing. There are scraper planes (which mount a scraper blade in a body), but the card scraper and cabinet scraper are generally interchangeable names.
For more detailed information on scraper use, visit Wikipedia’s Card Scraper article.
A cabinet scraper is one of the most rewarding hand tools in woodworking. With a little skill and practice, it brings out the natural beauty of wood, reduces sanding time, and helps you achieve professional results. Whether you’re making fine furniture or restoring an old piece, mastering the scraper opens up new possibilities in your workshop.
Embrace this simple tool and let your craftsmanship shine.

Credit: www.melbournetool.com