A backyard pool is a wonderful addition to any home, offering fun, relaxation, and a cool escape during hot days. But nothing ruins that enjoyment faster than a pool pump that keeps losing prime every time it’s turned off. If you’ve noticed your pool pump struggles to get water flowing after you restart it—or if it sometimes won’t start at all—you are not alone. Many pool owners deal with this issue, but often feel lost about the real cause and the best solution.
This guide is here to help you understand exactly why your pool pump loses prime when turned off, what you can do about it, and how to keep your system healthy for years to come. Whether you are a new pool owner, a DIY enthusiast, or just tired of calling the pool guy, you’ll find practical advice and in-depth explanations here. Let’s dive into the details and get your pool back to smooth operation.
What Does “losing Prime” Mean In Pool Pumps?
Before you can fix the problem, it’s important to know what “losing prime” actually means. Priming is the process of filling your pool pump and its intake lines with water, so that the pump can create suction and move water from the pool to the filter. A primed pump pushes water efficiently; an unprimed pump, on the other hand, just spins and makes noise—moving little or no water at all.
When a pump loses prime, air enters the system, breaking the vacuum seal needed for the pump to work. This can happen while the pump is running or, more commonly, after the pump is turned off and restarted. If the pump has to “re-prime” every time, something is wrong.
Why does this matter? A pump that repeatedly loses prime not only fails to clean your pool properly, but can also suffer damage. Running dry can cause overheating, burned-out seals, or even a cracked pump housing. Fixing the root cause early saves you time, money, and stress.
Common Causes Of Pool Pump Losing Prime When Turned Off
Understanding why your pool pump loses prime is the first step to a real solution. There are several possible reasons, and often it’s a combination of small issues. Let’s explore the most common causes and how they affect your system.
1. Air Leaks On The Suction Side
The most frequent reason for losing prime is an air leak on the suction side of your pump—that is, anywhere between your pool skimmer and the pump itself. When the pump is off, air can seep into the pipes, replacing water and breaking the prime.
Typical places for leaks include:
- The pump lid O-ring or gasket: If this rubber seal is dry, cracked, or dirty, air can sneak in.
- The drain plugs: Most pumps have one or two plugs for draining water; loose or worn plugs can let in air.
- Pipe connections and fittings: Loose joints or damaged unions are common trouble spots.
- Cracked or aged pipes: Underground pipes or flexible hoses can develop invisible leaks over time.
2. Low Water Level In The Pool
A pool’s water level must be high enough to cover the skimmer opening. If the water is low, air will be sucked into the system when the pump is off, making it hard to prime again.
3. Clogged Or Blocked Lines
Leaves, debris, or even small toys can block water flow in the pipes or skimmer baskets. When the pump turns off, trapped debris may shift, allowing air to enter and water to drain back, losing the prime.
4. Faulty Or Worn Pump Components
Over time, parts like the pump lid, O-rings, and internal seals wear out. These small parts are essential for maintaining an airtight system; even a tiny defect can allow air to enter.
5. Malfunctioning Or Missing Check Valve
A check valve is a one-way valve that prevents water from flowing backward into the pool when the pump is off. If this valve is missing, stuck, or broken, gravity can cause water to drain out of the pump and pipes, leading to lost prime.
6. Equipment Position And Plumbing Design
If your pump is installed above pool water level (for example, on a raised deck), gravity works against you. Water naturally wants to flow back to the pool when the pump stops, making it much easier to lose prime—especially if there’s no check valve.
7. Leaks In Valves Or Multiport Valve
Older or poorly maintained valves on your pool equipment can be another source of air leaks. The multiport valve on your filter, or diverter valves used to switch between pool and spa modes, can develop small cracks or worn gaskets.
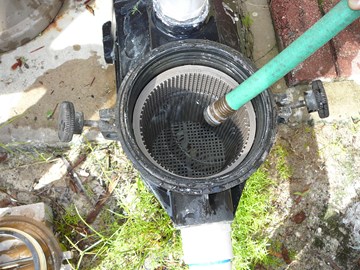
8. Poorly Sealed Pump Lid
Even if the pump lid looks tight, dirt, sand, or old grease can prevent a proper seal. If you see bubbles inside the pump basket when running, it’s a clear sign of an air leak.
9. Incorrectly Sized Or Damaged Plumbing
If your pipes are too small, too large, or have sharp bends, water flow becomes inefficient. Damaged pipes or improper installation can also introduce air pockets, which cause priming issues.
10. Environmental Factors
Heavy rain, shifting ground, or tree roots can move underground pipes, causing small leaks. Seasonal temperature changes can make plastic parts expand and contract, opening gaps for air.

Credit: www.inyopools.com
Signs Your Pool Pump Is Losing Prime
It’s not always obvious when your pump is losing prime. Here are some telltale signs to watch for:
- The pump gurgles or makes sucking noises when started
- No water movement in the pump basket at startup
- Visible air bubbles in the pump lid or pool return jets
- Pump needs manual priming every time
- Water pressure is low, or the filter pressure gauge reads near zero
- The pump shuts off suddenly, overheats, or feels hot to the touch
Catching these signs early helps prevent bigger problems—and expensive repairs.
Diagnosing The Problem: Step-by-step
Finding the source of your priming problem can be tricky. The process takes patience and a bit of detective work. Here’s a practical plan to help you track down the issue.
Step 1: Inspect The Water Level
Start with the simplest check: Is your pool water high enough to cover the skimmer opening? If not, add water and try again.
Step 2: Examine The Pump And Equipment Pad
Look closely at the pump, filter, and attached pipes for any visible cracks, drips, or wet spots. Even a small amount of moisture can indicate a leak.
Step 3: Check The Pump Lid And O-ring
Turn off the pump and open the lid. Remove the O-ring and inspect it for flat spots, cracks, or dirt. Clean and lubricate it with a silicone-based lubricant (never petroleum jelly). Replace if damaged.
Step 4: Inspect Drain Plugs And Fittings
Tighten all drain plugs by hand, and check for worn or missing gaskets. Examine unions and pipe connections for looseness or deterioration.
Step 5: Clear The Skimmer And Pump Baskets
Remove leaves, sticks, and debris from both baskets. Check for objects lodged in the pipes with a flexible rod or hose.
Step 6: Test For Suction Leaks
With the pump running, spray soapy water on suspected leak points (lid, unions, fittings). If you see bubbles getting sucked in, you’ve found an air leak.
Step 7: Listen And Look For Air
Watch for bubbles in the pump basket and listen for hissing sounds. These are sure signs of air entering the system.
Step 8: Check The Check Valve (if Present)
If your system has a check valve, make sure it moves freely and is not stuck open or closed. Replace if faulty.
Step 9: Inspect Valves And Multiport Valve
Look for cracks, worn seals, or leaks around your multiport or diverter valves. Even a small drip can cause air entry.
Step 10: Evaluate Equipment Location And Plumbing
If your pump sits above the pool water level, consider adding a check valve to prevent backflow. Inspect the plumbing for sharp bends or improper pipe sizing.
Advanced Tip: Use A Vacuum Gauge
A vacuum gauge can be temporarily installed at the pump to measure suction pressure. A dropping vacuum reading after shutdown points to an air leak on the suction side.
Credit: www.inyopools.com
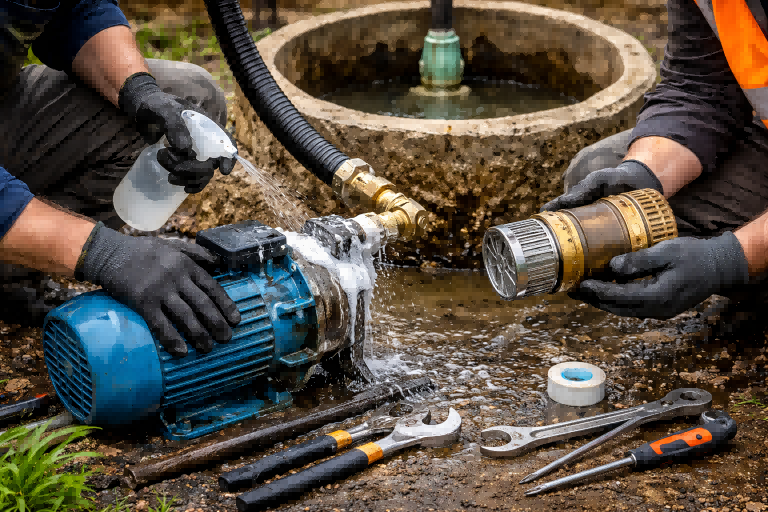
Fixing The Most Common Problems
Once you’ve identified the source, it’s time to fix it. Some solutions are quick DIY jobs; others may require professional help.
Repairing Or Replacing The Pump Lid O-ring
If the O-ring is flat, cracked, or too loose, replace it with a new one of the same size. Always clean the groove and apply a thin layer of silicone lubricant. Tighten the pump lid evenly—never force it.
Sealing Air Leaks At Fittings Or Joints
Loose or leaky unions can be reseated. Remove, clean, and reapply Teflon tape or pool-safe thread sealant to the threads. Tighten by hand, then give a quarter-turn with a wrench if needed—do not overtighten.
Fixing Drain Plug Leaks
Replace worn gaskets or O-rings on drain plugs. Hand-tighten only; overtightening can crack the pump housing.
Unclogging Pipes And Baskets
Use a garden hose to backflush debris through the skimmer line, or a plumbing snake for tough blockages. Always turn off the pump before attempting to clear lines.
Replacing A Faulty Check Valve
If your check valve is stuck or missing, install a new spring-loaded check valve on the suction line, as close to the pump as possible. Make sure it is rated for pool use.
Repairing Or Replacing Valves
Damaged valves should be repaired with new seals or replaced entirely. Multiport valves often have repair kits available—follow the manufacturer’s instructions.
Adjusting Equipment Placement
If your pump sits above water level, installing a check valve is the simplest fix. If that’s not possible, consider relocating the pump or re-routing the pipes to minimize elevation changes.
Repairing Underground Or Hard-to-find Leaks
These are best left to professionals, as they may require pressure testing or even digging. However, you can sometimes spot a wet patch or sinking ground near pipes.
Upgrading Old Or Damaged Pipes
Replace brittle, cracked, or undersized pipes with new Schedule 40 PVC (for most residential pools). Avoid flexible hoses, as they age quickly and can develop leaks.
Preventing Pool Pump Priming Problems
Prevention is always easier than repairs. Here are practical steps to keep your system primed and trouble-free:
- Check the pool water level weekly.
- Clean skimmer and pump baskets regularly.
- Inspect and lubricate the pump lid O-ring every few months.
- Tighten all fittings and check for leaks at the start of each season.
- Schedule annual professional inspection, especially for older pools.
- Keep landscaping and heavy objects away from underground plumbing lines.
- Add a check valve if your pump sits above water level.
- Use only pool-safe lubricants and sealants on O-rings and fittings.
Credit: www.rafsun.com
How Air Enters The System And Its Effects
You might be surprised at how easily air can get into your pool pump system. Even a pinhole or a small gap is enough to cause problems, especially when the system is off and no water pressure is holding everything tight.
Here’s what happens when air enters:
- Water drains back into the pool, leaving air pockets in the pipes and pump
- The pump struggles to create suction on restart, sometimes running dry
- Continuous air leaks allow the pump to suck in bubbles, reducing efficiency
- Over time, running dry or with air in the system causes pump seal damage, overheats the motor, and can lead to expensive repairs
Non-obvious insight: Even if your pump seems to “recover” and re-prime on its own, repeated air entry shortens the life of your equipment.
Real-world Example: Diagnosing A Stubborn Priming Issue
Consider this scenario: A pool owner notices their pump loses prime every night, but works fine during the day. After checking all above-ground equipment, nothing is found. The real cause? A tiny root had grown around an underground pipe joint, slowly pulling it loose. When the pump turned off, water would drain back, letting air in. Only a professional pressure test and careful digging revealed the issue.
Lesson: Don’t ignore small signs, and remember that leaks can be hidden underground, not just at the equipment pad.
Table: Common Leak Locations And Symptoms
To help you spot the problem faster, here’s a summary of where leaks usually occur and what signs to look for.
| Leak Location | Typical Symptom | Quick Check |
|---|---|---|
| Pump Lid O-ring | Bubbles in pump basket | Inspect and lubricate O-ring |
| Drain Plug | Moisture under pump | Tighten or replace plug/gasket |
| Pipe Unions | Drips at connections | Reseat or re-tape threads |
| Skimmer Line | Air bubbles, slow prime | Check for debris or cracks |
| Check Valve | Water drains back on shutdown | Test/replace check valve |
Pool Pump Above Or Below Water Level: Does It Matter?
Where your pump sits compared to your pool water level makes a big difference. Let’s compare the two situations:
| Pump Position | Priming Difficulty | Common Issues |
|---|---|---|
| Below Water Level | Easy to prime | Rarely loses prime unless there is a leak |
| Above Water Level | Harder to prime | Needs check valve; loses prime easily if any leak |
Tip: If you have a choice, always install the pump below water level for best reliability.
How To Prime Your Pool Pump Manually
Sometimes, after repairs or a major air entry, you need to prime the pump manually. Here’s a step-by-step guide:
- Turn off the pump at the circuit breaker.
- Remove the pump lid.
- Fill the pump basket with water (use a bucket or hose).
- Replace and secure the pump lid, ensuring the O-ring is in place and lubricated.
- Open any air relief valves on the filter.
- Turn on the pump.
- Watch for steady water flow; if not, repeat the process.
If the pump won’t hold prime, double-check for air leaks, low water level, or blockages.
Table: Diy Fixes Vs. When To Call A Professional
Not sure when to handle it yourself or call for help? Here’s a quick comparison.
| Issue | DIY Possible? | When to Call a Pro |
|---|---|---|
| Replacing O-rings | Yes | If leaks continue after replacement |
| Clearing debris from baskets | Yes | N/A |
| Finding underground leaks | No | Wet spots, losing water quickly |
| Installing check valve | Maybe (if handy) | Complex plumbing or glued pipes |
| Replacing multiport valve | Maybe (with kit) | Major valve or pipe replacement |
Advanced Insights Most Pool Owners Miss
Most beginners focus only on the pump itself, but often the real culprit is further away:
- Suction leaks can occur inside the skimmer throat—check for cracks or worn gaskets here, especially if the pool is older.
- Solar heating systems can introduce air if they are above ground level and have their own tiny leaks.
- Winterizing mistakes—leaving drain plugs out or not re-seating seals after winter can cause air leaks at the start of every season.
- Automatic pool cleaners attached to skimmer lines can sometimes pull in air if the hose connections are loose or floating.
By checking every part of your system, not just the pump, you can solve priming issues for good.
The Cost Of Ignoring Lost Prime
It might be tempting to just keep re-priming your pump and ignore the underlying issue. But the risks add up quickly:
- Pump motor overheating: Running dry destroys expensive motors and seals.
- Increased electricity bills: A struggling pump draws more power.
- Poor pool circulation: Leads to cloudy water and algae growth.
- Short equipment lifespan: Air in the system is hard on all components.
Investing time in a permanent fix saves much more money (and stress) than repeated short-term solutions.
When To Upgrade Your Equipment
Sometimes, persistent priming issues are a sign your system is outdated or worn beyond repair. Consider upgrading if:
- Your pump is over 10 years old and parts are hard to find.
- Pipes are brittle, cracking, or show repeated leaks.
- You want to add automation, variable speed, or energy-efficient features.
- Multiple leaks keep appearing even after repairs.
Modern pool pumps have better seals, quieter motors, and are much easier to prime. New check valves and plumbing parts are also more reliable. For more information on the latest pool equipment standards, visit the U.S. Department of Energy.
Frequently Asked Questions
Why Does My Pool Pump Lose Prime Only At Night?
This usually means there is a slow air leak that gets worse when the pump is off for a long time. Cooler temperatures at night can also make seals contract, opening tiny gaps. Check all O-rings, plugs, and pipe connections, and consider having a professional pressure test your system.
Can Running The Pump Without Water Damage It?
Yes. Running your pump dry even for a few minutes can overheat the seals and motor, leading to expensive repairs. Always ensure the pump basket is full of water before starting.
How Often Should I Replace The Pump Lid O-ring?
Inspect the O-ring every 3–6 months, or at the start of each season. Replace at the first sign of cracks, drying, or flattening. Lubricate with silicone grease to keep it soft and flexible.
Is A Check Valve Required For Every Pool Pump?
Not always, but a check valve is strongly recommended if your pump sits above pool water level or you have complex plumbing (like solar heaters or raised spas). It prevents water from draining back and losing prime.
What Is The Easiest Way To Find A Suction Side Air Leak?
The soapy water test is easiest: with the pump running, spray soapy water on all suspected leak points (lid, unions, fittings). If you see bubbles pulled in or sucked away, you’ve found an air entry point.
Maintaining a pool should be about enjoyment, not frustration. By understanding how your pool pump loses prime, you can take smart steps to diagnose, fix, and prevent the problem. A little attention today means more worry-free swimming tomorrow.