
If you have a Price Pfister shower handle with no visible set screw, removing it can feel like a puzzle. Many homeowners and even some professionals get stuck, searching for a hidden screw or prying at the wrong spot. This can lead to wasted time, scratched fixtures, or even broken handles. The truth is, Price Pfister has used several handle designs over the years, some with set screws, some with hidden clips, and others with clever snap-on systems. Knowing how to approach the specific “no set screw” model is key to avoiding damage and frustration.
This guide is your complete resource for understanding and tackling Price Pfister shower handle removal without a set screw. We’ll walk through the different handle types, the right tools, step-by-step instructions, troubleshooting, and essential safety tips. You’ll also learn how to avoid common mistakes and what to do if your handle refuses to budge. Whether you’re replacing a cartridge, updating your bathroom, or fixing a leak, this article will give you the confidence and know-how to get the job done safely and efficiently.
Understanding Price Pfister Shower Handle Designs
Before you try to remove your shower handle, it’s vital to know which type you have. Price Pfister has manufactured a range of handles over the decades, and not all follow the same removal process. Let’s break down the main types:
1. Handles With A Visible Set Screw
These have a small screw (often under the lever or a decorative cap) holding the handle in place. Since this article is about “no set screw” models, we won’t focus on these.
2. Handles With A Hidden Retaining Clip
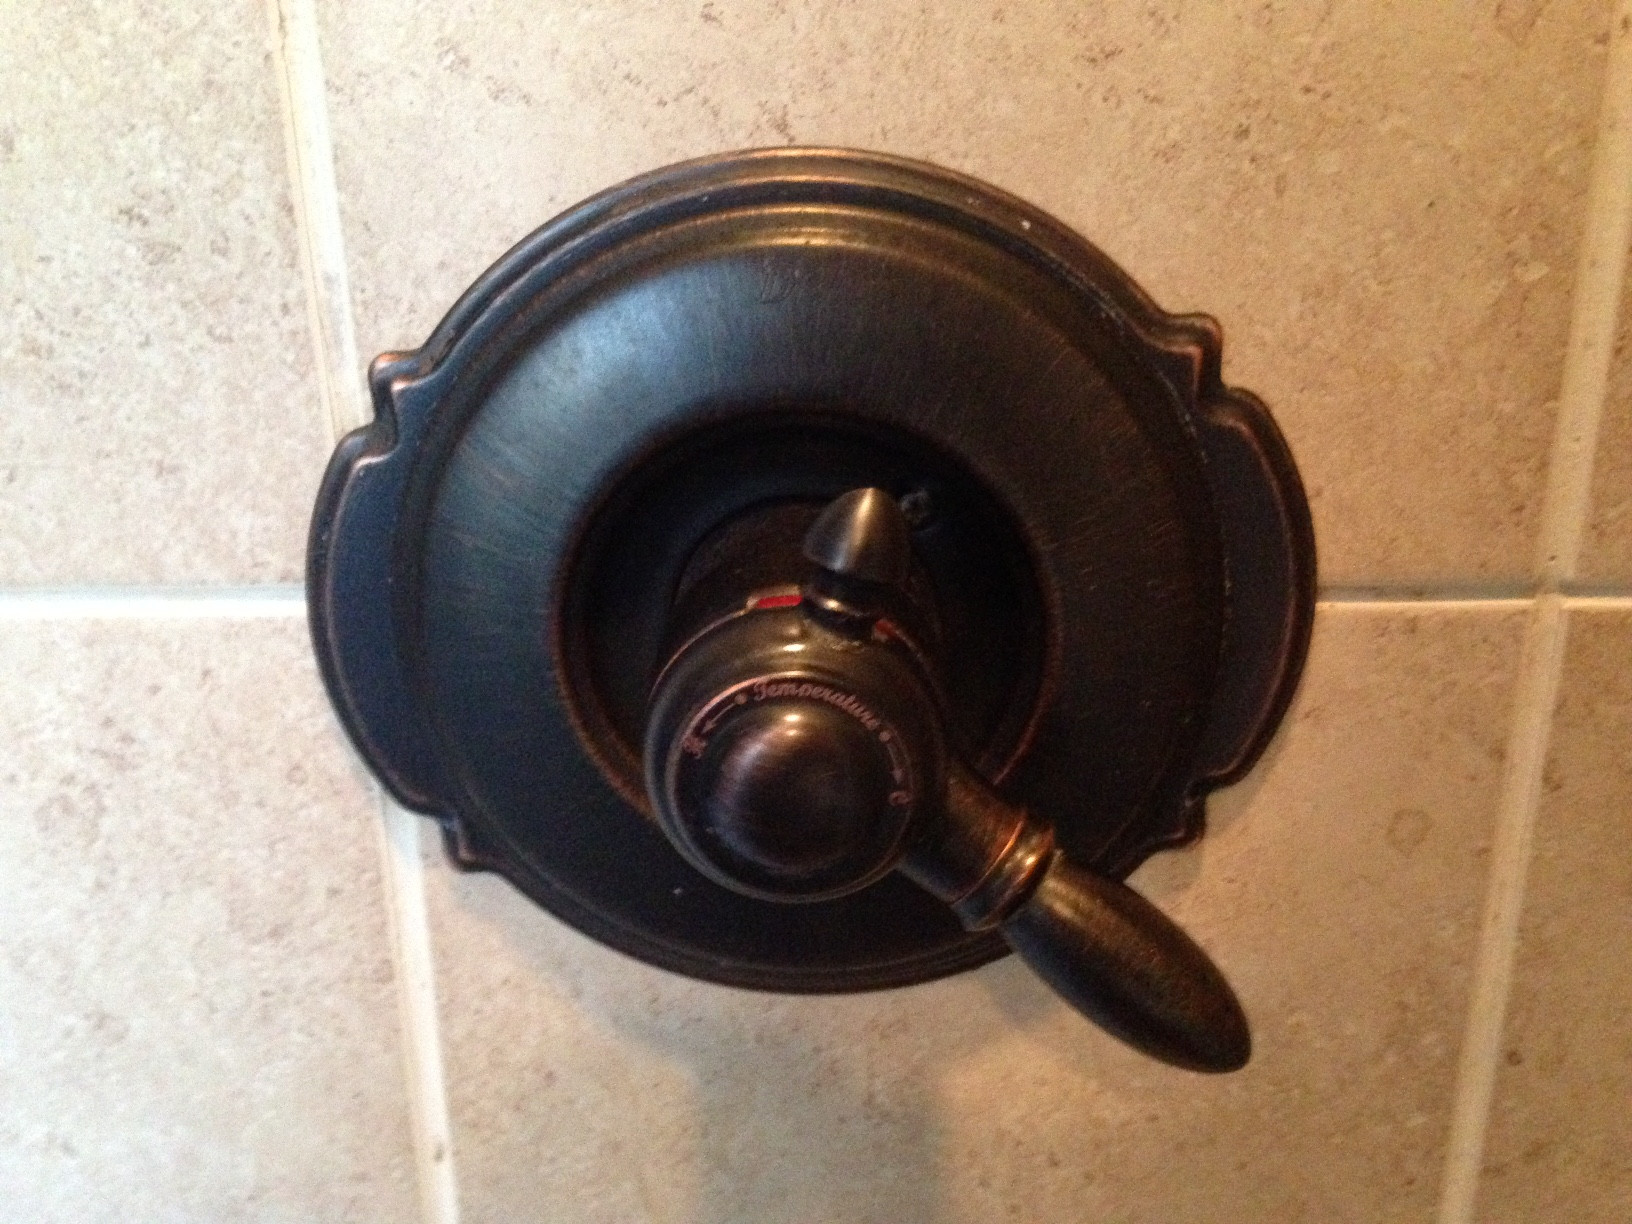
Many classic Price Pfister shower handles use a metal clip, hidden under the handle or escutcheon. There’s no screw visible.
3. Snap-on Or Push-fit Handles
These handles simply push onto the valve stem and are held by a tight friction fit or a hidden mechanism.
4. Handles With Concealed Screws Under Caps Or Buttons
Sometimes, the screw is hidden under a plastic or metal button on the front of the handle.
If you have checked your handle and see no set screw, you most likely have the hidden clip or snap-on style. Understanding this will guide your removal process and prevent accidental damage.
Why Remove A Shower Handle?
There are several reasons you might need to remove your Price Pfister shower handle:
- To fix a leaking or dripping faucet
- To replace a worn cartridge or valve
- To upgrade to a new style or finish
- To clean or remove hard water buildup
- To access and repair internal parts
Knowing your goal will help you choose the right steps and tools for the job.

Credit: diy.stackexchange.com
Tools You’ll Need
For most Price Pfister shower handles with no visible set screw, you’ll need a few basic and special tools. Gather these before you start:
- Flat-head screwdriver: For prying off caps or escutcheons
- Phillips screwdriver: Sometimes used for hidden screws or trim plates
- Allen wrench set: Rarely needed, but useful for certain models
- Needle-nose pliers: For removing retaining clips
- Handle puller tool: Optional, but helpful if the handle is stuck
- Utility knife or putty knife: For cutting caulk or prying without scratching
- Rag or masking tape: To protect surfaces from scratches
- Flashlight: To see inside dark or tight spots
Having the right tools ready makes the process smoother and reduces the risk of damaging your shower hardware.
Preparation And Safety Steps
Before you start, take a few minutes to prepare the work area and protect yourself:
1. Turn Off The Water Supply
Locate the water shut-off valve for your shower or the main water line. This prevents accidental leaks or sprays.
2. Cover The Drain
Place a towel or rag over the drain. Small screws or clips can easily fall in and get lost.
3. Protect The Tub And Tiles
Use masking tape or a towel to cover areas around the handle. This prevents scratches if your tool slips.
4. Take A Photo
Snap a quick photo of the handle and trim before removal. This makes reassembly easier.
5. Have A Helper Nearby
Some steps are easier with a second set of hands, especially if you’re unfamiliar with plumbing work.
Following these steps can save you time and avoid costly mistakes.
Step-by-step Guide To Removing A Price Pfister Shower Handle With No Set Screw
Let’s get into the details of how to remove the handle. While there are several handle types, the following process covers the most common “no set screw” models.
1. Inspect The Handle For Hidden Caps Or Buttons
Some handles hide their retention screw or clip under a decorative cap or button. Look closely at the front or top of the handle:
- If you see a small round button, gently pry it off with a flat-head screwdriver.
- If there’s no button, move to the next step.
Non-obvious insight:
Many people miss the small seam between the cap and handle. Use a flashlight and look for a fine line that shows the cap can be removed.
2. Check For A Retaining Clip
Most classic Price Pfister handles without a set screw are held by a retaining clip. Here’s how to find and remove it:
- Look behind the handle where it meets the wall or trim plate.
- If you see a thin metal clip in a groove, use needle-nose pliers to pull it straight out.
- Wiggle the handle gently while pulling the clip. The handle should loosen once the clip is removed.
Key tip:
Do not force the clip. If it feels stuck, spray a little penetrating oil and wait a few minutes.
3. Remove The Handle
Once the clip or button is removed, the handle should slide off the valve stem:
- Grasp the handle firmly and pull straight out.
- If it’s stuck due to mineral buildup or age, wiggle it gently or use a handle puller tool.
Important:
Avoid using excessive force. If the handle won’t budge, see the troubleshooting section below.
4. Remove The Escutcheon (trim Plate)
With the handle off, you may need to remove the trim plate to access the cartridge or valve:
- Unscrew any visible screws holding the escutcheon to the wall.
- If it’s caulked to the tile, score the caulk line with a utility knife before prying gently.
Practical example:
On some older Price Pfister models, the escutcheon may be stuck due to old caulk or mineral deposits. Work slowly and use a putty knife to avoid damaging the tile.
5. Access The Internal Parts
With the handle and trim plate removed, you can now reach the cartridge or valve for repair or replacement.
- Follow specific instructions for your model and part.
- Keep all small parts organized for reassembly.
By following these steps, you can safely and effectively remove your Price Pfister shower handle without damaging your plumbing or hardware.
Common Problems And Troubleshooting
Even with the right steps, you might run into challenges. Here’s how to handle the most frequent issues:
Handle Is Stuck And Won’t Come Off
This is a common problem, especially with older or corroded handles.
Solutions:
- Spray a small amount of penetrating oil where the handle meets the valve stem.
- Wait 10–15 minutes and try again.
- Use a handle puller tool if available.
- Tap the handle gently with a rubber mallet to break mineral deposits.
- Never pry with a screwdriver directly on the handle—this can crack the plastic or bend the metal.
Retaining Clip Is Difficult To Remove
Sometimes, the retaining clip is stuck due to rust or mineral buildup.
Solutions:
- Spray with penetrating oil.
- Use needle-nose pliers with a firm grip.
- Wiggle gently; do not twist or bend the clip.
Can’t Find The Clip Or Mechanism
If you’re not sure which type of handle you have:
- Search for your faucet’s model number (often printed on the trim plate or behind the escutcheon).
- Visit the Price Pfister website or call their support line with the model number.
- Look for diagrams or videos specific to your model.
Handle Broke During Removal
If the handle cracks or breaks:
- Purchase a replacement handle for your model.
- Use the remaining stub to pull off the rest.
- Avoid using glue or quick fixes, as these can fail and cause leaks.
Non-obvious insight:
Many users try to “fix” a broken handle with tape or glue. This rarely works and can cause more damage inside the valve.
When To Replace, Repair, Or Call A Professional
Not every shower handle problem can or should be fixed by a DIYer. Here’s a quick guide:
Replace If:
- The handle is cracked, stripped, or corroded
- You want a new style or finish
- The handle is loose and won’t tighten
Repair If:
- The handle is stuck but not damaged
- You have a leaking cartridge but the handle is in good shape
Call A Professional If:
- You can’t remove the handle after trying the steps above
- The valve or plumbing behind the handle is leaking or damaged
- You’re uncomfortable working with plumbing fixtures
Practical advice:
DIY handle removal usually takes 10–20 minutes, but if you’re stuck for over an hour, it’s time to call an expert.
Comparison: Price Pfister Handle Removal Vs. Other Brands
How does removing a Price Pfister shower handle compare to other popular brands? Here’s a quick comparison:
| Brand | Set Screw Location | Clip/Hidden Mechanism | Ease of Removal |
|---|---|---|---|
| Price Pfister | Often none | Retaining clip or snap-on | Moderate difficulty |
| Moen | Bottom or side | Some use clips | Easy to moderate |
| Delta | Usually under lever | Rarely uses clips | Easy |
| Kohler | Bottom or side | Some hidden screws | Moderate |
Key takeaway:
Price Pfister handles with no set screw can be trickier to remove than Moen or Delta, but with the right steps, most DIYers can handle the task.

Credit: www.youtube.com
Preventing Future Problems
Once you’ve removed and reinstalled your handle, there are steps you can take to make future maintenance easier:
1. Apply Plumber’s Grease
Coat the valve stem with a thin layer of plumber’s grease before reinstalling the handle. This prevents sticking due to mineral buildup.
2. Clean Regularly
Wipe the handle and surrounding area with a mild cleaner to prevent hard water stains and corrosion.
3. Check For Leaks
After reassembly, run the shower and check for drips or leaks. Tighten any loose parts as needed.
4. Keep A Record
Write down your faucet model and the steps you used. This helps if you need to do repairs in the future.
Handle Removal Methods: Clip Vs. Snap-on
To help clarify which method you might be dealing with, here’s a side-by-side look at clip and snap-on handle removal:
| Handle Type | How to Identify | Removal Method | Common Problems |
|---|---|---|---|
| Clip | See thin metal clip at base | Pull clip with pliers, slide off handle | Clip may rust or stick |
| Snap-On | No clip, handle fits tightly | Wiggle and pull straight out | Mineral buildup, handle stuck |
Understanding your handle type saves time and prevents damage.
Real-world Example: Removing A Price Pfister Shower Handle (step-by-step)
Let’s walk through a typical removal process for a snap-on Price Pfister handle:
- Turn off water supply.
- Cover the drain to catch any dropped parts.
- Examine the handle for any buttons, caps, or clips.
- Gently wiggle the handle while pulling straight out. If it doesn’t budge, spray a little penetrating oil at the base and wait 15 minutes.
- Use a handle puller tool if the handle remains stuck. Place the tool over the handle, tighten, and turn to apply steady pressure.
- Once the handle is off, remove the escutcheon by unscrewing any visible screws and prying it gently away from the wall.
- Access the internal cartridge or valve for repair.
Real insight:
Many people give up too soon when the handle feels stuck. Patience and the right tool make a big difference.
Cost And Time Considerations
How much will this project cost, and how long does it take?
| Task | Time Needed | Estimated Cost |
|---|---|---|
| Basic handle removal | 15–30 minutes | $0 (if you have tools) |
| Handle puller tool | Extra 10 minutes | $15–$25 |
| Replacement handle | 5–10 minutes to install | $20–$50 |
| Professional plumber | 30–60 minutes | $100–$200 (service call) |
Tip:
Buying a handle puller can save you a plumber’s fee if your handle is really stuck.
Safety And Careful Work: What To Watch Out For
Removing a shower handle is usually safe, but keep these important safety tips in mind:
- Turn off water before starting to avoid flooding.
- Use tools carefully to avoid scratching chrome or cracking plastic.
- Wear gloves if working with old or corroded parts.
- Don’t force parts—if something is stuck, use penetrating oil and try again later.
- Keep small parts organized so nothing gets lost.
Non-obvious safety insight:
If your home was built before 1986, plumbing parts could contain lead. Wash your hands after working with old pipes or valves.
Reinstalling The Handle: Key Steps
After you’ve finished repairs or replacements, it’s important to reinstall your handle correctly.
- Clean the valve stem and surrounding area.
- Apply plumber’s grease to the stem.
- Slide the handle back on the same way it came off.
- Reinstall the retaining clip or snap the handle back into place.
- Replace any caps or buttons.
- Turn on the water and test the handle for smooth movement and leaks.
Pro tip:
If your handle feels loose after reinstallation, check that the clip is seated properly and the handle is fully pressed onto the stem.
Where To Find Price Pfister Parts And Manuals
If you need replacement parts or a manual for your specific shower handle, check these sources:
- Official Price Pfister website
- Local hardware or plumbing supply stores
- Major home improvement stores (online and offline)
- Plumbing forums and DIY websites
For accurate identification, always use your faucet’s model number.
When To Upgrade Your Shower Handle
Sometimes, it makes sense to replace your old Price Pfister handle with a newer model:
- If your handle is more than 15 years old, newer models may offer better durability and style.
- Modern handles often use easier removal systems and are less prone to sticking.
- Upgrading can improve both appearance and function.
Practical tip:
When buying a new handle, check compatibility with your valve stem and trim. Not all Price Pfister parts fit all models.
Credit: diy.stackexchange.com
Helpful Resources
If you need more guidance, Price Pfister offers diagrams, manuals, and customer support on their official site. For visual learners, video tutorials on YouTube can be a big help—just make sure the video matches your handle model.
For general plumbing help, the Family Handyman website has step-by-step guides on faucet repair.
Frequently Asked Questions
How Do I Know If My Price Pfister Handle Has A Hidden Retaining Clip?
Look for a thin metal clip at the base of the handle where it meets the wall or trim plate. A flashlight helps spot it. If you see a small groove with a piece of metal, that’s the retaining clip.
Use needle-nose pliers to pull it out before removing the handle.
What If My Handle Has No Set Screw, No Clip, And Still Won’t Come Off?
It’s likely a snap-on handle stuck by mineral buildup. Spray penetrating oil at the base, wait 15 minutes, and try wiggling and pulling. If it doesn’t move, use a handle puller tool. Avoid prying with a screwdriver, which can damage the handle or stem.
Can I Remove The Handle Without Turning Off The Water?
It’s possible, but not recommended. If you accidentally loosen the cartridge or valve, water could spray out and cause a mess. Always turn off the water supply before starting work on your shower handle.
Will Removing The Handle Damage My Tile Or Shower Wall?
Not if you use the right tools and protect the area with tape or a towel. Work slowly and avoid using sharp metal tools directly on the tile. For stuck handles, use a handle puller, not a screwdriver.
Where Can I Find A Replacement Handle For My Price Pfister Shower?
Check the official Price Pfister website, local plumbing supply stores, or major home improvement retailers. Bring your old handle or the model number to ensure compatibility with your valve stem and trim.
—
Tackling a Price Pfister shower handle removal with no set screw can be confusing at first, but with the right information and tools, it’s a straightforward DIY project. Take your time, protect your surfaces, and don’t hesitate to call a professional if things get tough. By learning how these handles work, you’ll save money, avoid damage, and keep your shower running smoothly for years to come.