
If your Raypak pool heater suddenly stops working and shows a “Hi Limit 1 Fault” error, it can feel frustrating—especially if you just want to enjoy a warm swim. This error is common in many Raypak heaters, but it leaves many pool owners confused about what it means, why it happens, and how to fix it.
The good news is, once you understand the causes and solutions, you can often resolve the problem yourself without waiting days for a service call.
This guide explains everything you need to know about the Raypak Hi Limit 1 Fault. You’ll learn what triggers this error, how your heater’s safety system works, and step-by-step instructions to troubleshoot and resolve the issue. By the end, you’ll feel much more confident handling this common pool heater fault.
What Is A Raypak Hi Limit 1 Fault?
A Hi Limit 1 Fault is a safety feature in many Raypak gas pool heaters and boilers. This fault appears when the water inside your heater gets too hot—reaching a preset maximum temperature limit. When this happens, the heater shuts down automatically to prevent damage or a dangerous situation.
Raypak heaters have two high limit sensors: Hi Limit 1 and Hi Limit 2. The “1” sensor usually trips first, acting as the main safety cut-off. If this sensor detects water over the allowed temperature (usually around 135°F or 57°C), it opens the circuit and triggers the fault message on your heater’s display.
This automatic shutoff protects your heater’s internal parts from overheating. While it can be annoying, it’s essential for safety and to avoid expensive repairs.
How The Raypak High Limit Safety System Works
The high limit sensors are small, temperature-sensitive switches mounted on the water piping inside your heater. They measure the temperature of the water as it leaves the heat exchanger. If the water is too hot, the sensor “opens” (breaks) the circuit, sending a signal to the control board to shut everything down.
Here’s a quick look at how the system works:
- Normal Operation: Water flows through the heater, absorbs heat, and exits at a safe temperature.
- Overheating Detected: If flow is restricted or a part fails, water gets too hot.
- Sensor Trips: Hi Limit 1 sensor detects the high temperature and opens.
- Heater Shuts Down: The control board stops heating and displays the Hi Limit 1 Fault.
- Manual Reset Needed: The sensor resets automatically when it cools, but the cause must be fixed to prevent repeat faults.
Non-obvious insight: Sometimes, the sensor can trip even if your pool water feels cool. This happens because the water inside the heater gets much hotter than in your pool—especially if flow is poor or the heater is dirty.
Common Causes Of The Hi Limit 1 Fault
Understanding why the fault happens is the key to a quick fix. Here are the most common reasons you’ll see this error:
- Low Water Flow: The most frequent cause. If water isn’t moving quickly through the heater, it gets too hot. Causes include a dirty pool filter, clogged skimmer, blocked pump basket, or a valve closed by mistake.
- Dirty Heat Exchanger: Over time, minerals, debris, or scale can build up inside the heater’s heat exchanger. This blocks water flow and causes overheating.
- Air Lock in System: Air trapped in the pipes can reduce water flow, making the heater overheat.
- Faulty High Limit Sensor: Sometimes, the Hi Limit 1 sensor itself fails or becomes inaccurate, causing false trips.
- Bypass Valve Issues: If your system has a bypass valve and it’s not set correctly, not enough water may flow through the heater.
- Pump Problems: A failing or undersized pump may not push enough water through the heater.
- Obstructed Plumbing: Broken check valves, stuck diverter valves, or collapsed pipes can restrict flow.
- External Temperature or Weather: In rare cases, very high outdoor temperatures can make the water inside the heater hotter.
Practical tip: Most faults are caused by flow issues, not a defective heater. Always check for dirty filters or closed valves first.
How To Troubleshoot A Raypak Hi Limit 1 Fault
Fixing the Hi Limit 1 Fault doesn’t always require a service technician. You can safely check and solve many causes yourself by following a logical process.
1. Turn Off The Heater
Before starting, always turn off power to the heater at the breaker and let the unit cool. This protects you from burns and electrical shock.
2. Check Pool Pump Operation
Make sure your pool pump is running and water is flowing strongly through the returns. If the pump isn’t working, the heater will overheat.
- Listen for unusual pump noises.
- Check if the pump basket is full of debris.
3. Inspect And Clean The Pool Filter
A dirty or clogged filter is the number one cause of low flow.
- Backwash a sand or DE filter.
- Clean or replace a cartridge filter.
- Watch the pressure gauge: If pressure is high, the filter is probably dirty.
4. Check For Closed Or Misaligned Valves
Sometimes, a pool valve is closed or partly turned, blocking water.
- Inspect all valves around the pump and heater.
- Make sure water can flow freely through the heater.
5. Examine The Heater For Blockage Or Debris
Leaves, sticks, or even rodents can block the heater’s intake or pipes.
- Remove the heater panels and look for obstructions.
- Clean out any debris found inside.
6. Inspect The Heat Exchanger
A heat exchanger clogged by scale or dirt reduces water flow and causes overheating.
- Shine a flashlight through the tubes (with power off).
- If you see white, chalky buildup, you may need a professional cleaning.
7. Check For Air In The System
Air locks happen after draining or servicing the system.
- Open the air relief valve on your filter until water squirts out.
- Make sure all suction fittings are underwater.
8. Test The High Limit 1 Sensor
If you’ve checked water flow and the system is clean but the fault remains, the sensor may have failed.
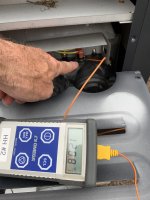
- With power off, unplug the Hi Limit 1 sensor and check for continuity with a multimeter.
- No continuity when cool means the sensor is bad and needs replacement.
9. Inspect Bypass And Check Valves
Incorrect bypass settings or stuck check valves can restrict flow.
- Set bypass valves per the heater manual.
- Replace or repair broken check valves.
10. Restart And Observe
Once you’ve made your checks, restart the system and see if the error returns.
- If the heater runs normally, the problem is fixed.
- If not, repeat the checks or consult a technician.
Tools And Parts Needed For Troubleshooting
You don’t need many special tools, but a few items can make the process easier:
- Screwdrivers (Phillips and flathead)
- Adjustable wrench or pliers
- Pool filter cleaning hose or backwash equipment
- Flashlight
- Multimeter (for sensor testing)
- Replacement Hi Limit 1 sensor (if needed)
Non-obvious insight: Keeping a spare Hi Limit sensor on hand can save you time, as they are inexpensive and easy to swap.
How To Replace The Hi Limit 1 Sensor
If you’ve confirmed the sensor is faulty, replacement is straightforward. Here’s a step-by-step guide:
- Turn Off Power: Always shut power at the breaker.
- Remove Heater Panel: Open the front or side panel to access the sensor.
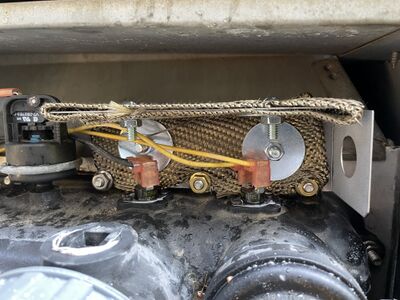
- Locate the Sensor: The Hi Limit 1 sensor is a small, round switch with two wires, usually mounted on the outlet water pipe.
- Unplug Wires: Take a photo for reference, then unplug the wires gently.
- Remove Sensor: Unscrew the sensor using a wrench or pliers.
- Install New Sensor: Screw in the new sensor. Do not overtighten.
- Reconnect Wires: Attach wires as before.
- Replace Panel and Restore Power: Restart the system and test.
Most sensors cost $15–$40 and are available at pool supply stores or online.
Credit: www.troublefreepool.com
How To Prevent Hi Limit 1 Faults
Prevention is better than repair. Here’s how to avoid this error in the future:
- Clean Filters Regularly: Set reminders to clean or backwash filters every few weeks.
- Keep Pump Baskets Clear: Empty leaves and debris from skimmer and pump baskets.
- Service Heater Annually: Have a professional clean the heat exchanger and check all parts yearly.
- Check Water Chemistry: High calcium or minerals can cause scaling and block the heat exchanger.
- Monitor Water Flow: If you notice weaker jets or returns, check for clogs right away.
- Protect Heater from Debris: Keep the area around the heater clear of leaves, dirt, and plants.
- Inspect Valves and Plumbing: Make sure nothing blocks or restricts water flow.
Consistent maintenance is the best way to keep your heater running smoothly.
When To Call A Professional
Some problems are too complex or risky to handle yourself. Call a certified pool technician if:
- You see multiple errors (not just Hi Limit 1)
- The heater leaks water or gas
- You can’t find or fix the cause after basic checks
- The heater’s warranty is still active (DIY repairs may void it)
- You are unsure about electrical safety
A technician can perform advanced diagnostics and repairs safely.
Real-world Examples Of Hi Limit 1 Faults
To understand this error better, here are three real situations:
Example 1: Dirty Filter After Storm
After a heavy rainstorm, a pool owner’s heater showed Hi Limit 1 Fault. The filter pressure was much higher than normal. Cleaning and backwashing the filter solved the issue immediately.
Example 2: Failed Sensor In An Older Heater
A six-year-old Raypak heater began showing Hi Limit 1 Fault every day, even after cleaning the filter and checking flow. Testing with a multimeter showed the sensor had failed. Replacing the sensor fixed the problem.
Example 3: Bypass Valve Set Incorrectly
A new pool owner adjusted the bypass valve for their spa, not realizing it sent less water through the heater. The Hi Limit 1 Fault appeared. Resetting the valve to the correct position allowed normal flow and ended the error.
These examples show that most faults are caused by simple, fixable issues—not major heater failures.
Data Table: Common Causes And Solutions
To help you diagnose quickly, here’s a summary table of main causes and what to check:
| Cause | What to Check | Solution |
|---|---|---|
| Dirty filter | Filter pressure, appearance | Clean or backwash filter |
| Low water flow | Pump running, strong returns | Clear pump basket, check valves |
| Clogged heat exchanger | Scaling, debris inside heater | Professional cleaning |
| Faulty sensor | Sensor continuity with multimeter | Replace sensor |
| Incorrect bypass setting | Bypass valve position | Adjust valve per manual |
| Air in system | Air relief, bubbles in returns | Bleed air from filter |

Credit: www.reddit.com
Data Table: Hi Limit Sensor Vs Other Heater Safety Devices
It helps to understand how the Hi Limit 1 sensor compares to other safety features in your Raypak heater:
| Device | Function | Typical Fault Message |
|---|---|---|
| Hi Limit 1 Sensor | Shuts off heater if water is too hot | Hi Limit 1 Fault |
| Hi Limit 2 Sensor | Backup shutoff if Hi Limit 1 fails | Hi Limit 2 Fault |
| Pressure Switch | Shuts off heater if water flow is too low | Water Pressure Fault |
| Thermostat | Controls set temperature | Not a safety shutdown, but sets target temp |
Data Table: Cost Of Common Repairs
Knowing repair costs helps you decide between DIY and hiring a pro.
| Repair Type | DIY Cost | Professional Cost | Time Required |
|---|---|---|---|
| Replace Hi Limit Sensor | $15–$40 | $120–$200 | 30 minutes |
| Filter Cleaning | $0–$20 | $60–$100 | 15–30 minutes |
| Heat Exchanger Cleaning | N/A | $250–$500 | 1–3 hours |
| Pump Basket Clearing | $0 | $60–$100 | 10 minutes |
Advanced Tips For Pool Owners
If you want to go further, consider these advanced tips:
- Install a flow meter on your heater line. This tells you exactly how much water is moving and helps spot problems early.
- Use a filter pressure log. Write down your filter pressure each week. A slow rise means it’s time to clean before a fault occurs.
- Check water chemistry monthly. High calcium or metals cause scale buildup inside the heater.
- Add a bypass kit if you use a variable speed pump. This ensures minimum flow for the heater even at low speeds.
These tips can prevent not just Hi Limit 1 Faults but many other pool equipment headaches.
Why The Hi Limit 1 Fault Is Important
Some pool owners are tempted to bypass or ignore this fault. This is dangerous. The Hi Limit 1 sensor protects you from:
- Heater damage: Overheating can crack or warp the heat exchanger ($1000+ repair).
- Safety hazards: A failed sensor could allow scalding water or even a fire risk.
- Shortened heater life: Constant overheating stresses parts.
Always fix the cause—never try to “trick” the sensor or bypass it.
Credit: www.troublefreepool.com
Key Takeaways
- The Raypak Hi Limit 1 Fault means your heater is overheating for safety reasons.
- Most causes are simple: Low flow, dirty filters, or a bad sensor.
- Check pumps, filters, valves, and sensors in a logical order.
- Prevent faults with regular cleaning and maintenance.
- When in doubt, call a professional for safe repairs.
If you want more technical details, the official Raypak manuals and guides are a valuable resource. For in-depth heater troubleshooting, see the Raypak Official Site.
Frequently Asked Questions
Why Does My Raypak Heater Keep Showing Hi Limit 1 Fault After Cleaning The Filter?
If the error returns after cleaning the filter, check for other flow issues: blocked pump basket, closed valves, or a failing pump. If water flow is good, the Hi Limit sensor itself might be faulty.
Can I Run My Heater With A Hi Limit 1 Fault?
No, you should not. The fault means the heater is overheating. Running it could damage your heater or create a safety hazard.
How Often Do Hi Limit Sensors Fail?
Hi Limit sensors are reliable and often last 5–10 years. They fail most often due to age, corrosion, or repeated overheating events.
Is A Hi Limit 1 Fault Dangerous?
The fault itself is not dangerous—it’s a safety feature. However, ignoring the cause could lead to heater damage or unsafe conditions.
Where Can I Buy A Replacement Hi Limit 1 Sensor?
Most pool supply stores and online retailers carry Raypak sensors. Be sure to use the exact model for your heater. If unsure, check your manual or the manufacturer’s website.
With the right knowledge and a little effort, you can keep your Raypak heater running safely and avoid unexpected Hi Limit 1 Faults in the future. Enjoy your pool with peace of mind!