
When you step into the shower, you expect a simple twist of the handle to bring refreshing water. But sometimes, things go wrong—the shower handle won’t turn all the way. This small problem can make your shower useless or even cause leaks and water waste. Many homeowners deal with this issue, but fixing it is easier when you know why it happens and what steps to take.
This article explains everything about a shower handle that won’t turn fully. You’ll learn why it happens, how to diagnose the problem, and the best ways to fix it. Whether you like DIY projects or just want to understand what a plumber will do, you’ll find practical advice here.
By the end, you’ll have the confidence to tackle this common bathroom headache or know when it’s time to call for help.
Understanding Your Shower Handle Mechanism
To fix the problem, you first need to know how a shower handle works. Most shower handles connect to a part inside the wall called a shower valve. This valve controls how much water and what temperature comes out of the shower.
Types Of Shower Handles
There are three main types of shower handles:
- Single-lever handles: One handle controls both water flow and temperature.
- Double-handle setups: Separate handles for hot and cold water.
- Thermostatic handles: These regulate temperature more precisely and often have a safety stop.
Each type has different internal mechanisms. If your handle won’t turn all the way, the cause may relate to the specific type you have.
How Shower Handles Work
A shower valve has moving parts inside. When you turn the handle, it rotates or pushes a cartridge or stem inside the valve. This opens the flow of water, mixes hot and cold, and lets you select your desired temperature. If something blocks or damages these parts, the handle might get stuck or only move part of the way.
Knowing your shower’s brand and model helps too. Many homes have popular brands like Moen, Delta, or Kohler. Each brand uses slightly different mechanisms and parts.
Common Reasons The Shower Handle Won’t Turn All The Way
When your shower handle gets stuck or won’t turn, it usually points to a problem inside the valve or handle assembly. Here are the most common reasons:
1. Mineral Buildup
Hard water can leave mineral deposits inside the valve. Over time, these minerals make it hard for the internal cartridge or stem to move freely. If you notice white or green buildup around your faucet, mineral deposits are likely the cause.
2. Worn Out Cartridge Or Stem
Inside your shower valve, a cartridge (for single-lever handles) or a stem (for double-handle setups) moves as you turn the handle. If this part wears out, breaks, or gets jammed, the handle may only turn a little or not at all.
3. Broken Or Misaligned Stopper
Many valves have stoppers or rotational limits to prevent scalding. These are safety features, but sometimes they become misaligned or break, making the handle stop too soon.
4. Corrosion
Metal parts inside the valve can rust or corrode, especially in older homes or where water sits in the pipes. Corrosion makes turning the handle difficult or impossible.
5. Loose Or Stripped Handle
If the handle itself is loose or the screw holding it is stripped, the handle might turn but not move the valve inside—or it may catch and stop turning before it should.
6. Debris Inside The Valve
Tiny pieces of dirt, sand, or old pipe material can get stuck inside the valve mechanism. This debris can stop the handle from turning smoothly.
7. Improper Installation
If the shower valve or handle wasn’t installed correctly, it might bind or hit the wall behind it, making full rotation impossible.
8. Pressure Balancing Problems
Some modern valves have pressure balancing features to prevent temperature shocks. If these parts fail, they can block the handle from moving fully.
9. Faulty Anti-scald Device
Some handles have a built-in anti-scald device that can get stuck or misadjusted, making it impossible to select a higher temperature.
10. Obstructions Behind The Wall
Rarely, something behind the wall—like a stud, screw, or pipe—can block the handle or valve body from moving as designed.
Diagnosing The Problem: Step-by-step
Before you fix anything, you need to know what’s wrong. Here’s how to diagnose why your shower handle won’t turn all the way.
Step 1: Identify The Handle Type
Check if your shower uses a single-lever, double-handle, or thermostatic control. This helps you know what parts to look for.
Step 2: Test The Handle
Try turning the handle gently in both directions. Does it stop suddenly, feel gritty, or move a little then stop? Note if it’s only stuck in one direction (hot or cold), or both.
Step 3: Check For Visible Damage
Look for cracks, missing screws, or loose handles. Sometimes the problem is outside, not inside.
Step 4: Listen And Feel
When you try to turn the handle, do you hear scraping or grinding? Does the handle feel loose or wobbly? These clues can tell you if the problem is with the handle or deeper inside.
Step 5: Inspect For Mineral Buildup
Check around the base of the handle for white, green, or chalky residue. This often means hard water buildup.
Step 6: Turn Off The Water Supply
Before going further, turn off the water to your shower. Usually, there are shut-off valves near the water heater or behind an access panel.
Step 7: Remove The Handle
Carefully unscrew and remove the handle. Look for corrosion, stripped screws, or damaged plastic. If the handle is fine, the problem is likely inside the valve.
Step 8: Check The Valve Cartridge Or Stem
With the handle off, you can see the cartridge or stem. Does it look dirty, worn, or stuck? Try to move it gently with pliers. If it doesn’t move, it may be jammed or damaged.
Step 9: Examine For Internal Obstructions
If you see debris, mineral deposits, or rust inside, these are likely causing the problem.
Step 10: Compare Symptoms
Use this quick comparison to match your symptoms to possible causes:
| Symptom | Likely Cause |
|---|---|
| Handle stops suddenly | Misaligned stopper or anti-scald device |
| Handle feels gritty or rough | Mineral buildup or debris |
| Handle turns but water doesn’t change | Stripped handle or worn cartridge/stem |
| Handle is very hard to turn | Corrosion or stuck cartridge |
If you cannot find the problem, it may be hidden deeper inside the plumbing or behind the wall.
How To Fix A Shower Handle That Won’t Turn All The Way
With your diagnosis complete, you’re ready to fix the problem. The steps below guide you through the most common repairs. Always make sure the water is off before working.
Replacing Or Cleaning The Cartridge (single-lever Handles)
- Remove the Handle: Unscrew the handle and pull it off.
- Take Out the Escutcheon Plate: This is the round or square plate behind the handle. Unscrew and remove it.
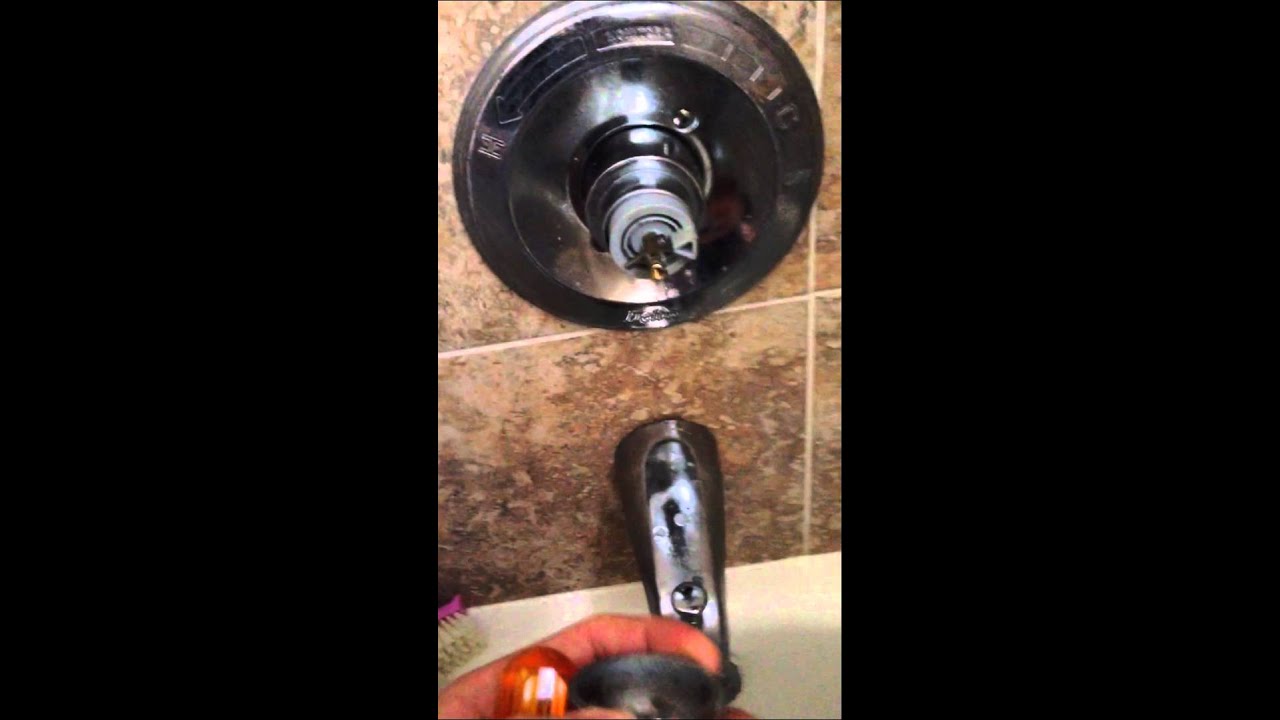
- Locate the Cartridge: You’ll see a cylinder with a stem sticking out.
- Remove the Cartridge: Some have a retaining clip; use pliers to pull it out. Gently wiggle and pull the cartridge straight out. If it’s stuck, use a special cartridge puller (available at hardware stores).
- Inspect the Cartridge: Look for cracks, debris, or mineral buildup.
- Clean or Replace: If there’s minor buildup, soak the cartridge in white vinegar for an hour and scrub off deposits. If damaged, buy a new cartridge matching your shower’s brand and model.
- Reinstall: Push the cartridge back in, replace the clip, escutcheon, and handle.
Replacing Or Cleaning The Stem (double-handle Showers)
- Remove the Handle: Unscrew and pull off.
- Unscrew the Bonnet Nut: This holds the stem in place.
- Pull Out the Stem: Use pliers if needed.
- Check for Wear or Buildup: Clean with vinegar or replace if worn.
- Reassemble: Insert stem, tighten bonnet nut, and reattach handle.
Adjusting Or Replacing The Stopper/rotational Limit
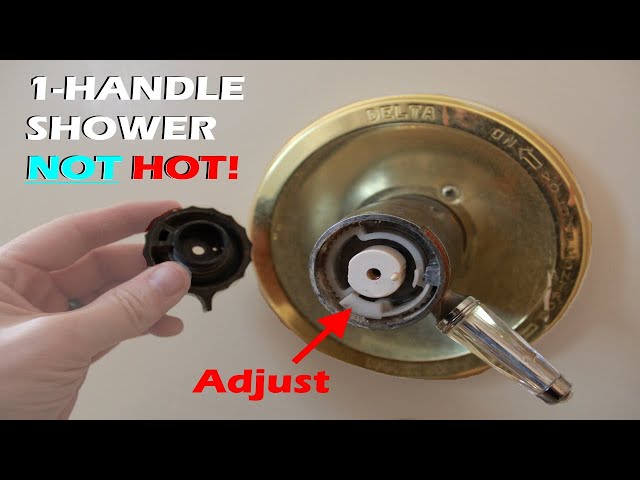
- Locate the Rotational Stop: Often a plastic piece on the cartridge.
- Adjust: Move it to allow more handle rotation (check your shower’s manual).
- Replace if Broken: If it’s cracked, order a new part from the manufacturer.
Removing Mineral Buildup
- Soak removable parts in white vinegar for 1-2 hours.
- Scrub with an old toothbrush.
- Rinse and dry before reinstalling.
Fixing A Loose Or Stripped Handle
- Tighten the set screw or replace it if stripped.
- If the handle itself is damaged, buy a new one matching your model.
Clearing Debris
- Use a flashlight to look inside the valve.
- Flush with water (with the cartridge/stem out and a bucket ready).
- Remove any visible debris with tweezers.
Dealing With Corrosion
- If metal parts are corroded, replacement is usually best.
- For light rust, clean with vinegar and a wire brush.
Checking For Obstructions Behind The Wall
- If you suspect something is blocking the valve from behind, you may need to open the wall. This is best left to professionals.
Pressure Balancing/anti-scald Device Issues
- Consult your shower’s manual for how to reset or adjust these features.
- If the device is broken, order a replacement from the manufacturer.
When To Call A Professional Plumber
Some problems are easy for confident DIYers, but others need a professional plumber. Call for help if:
- You can’t remove the cartridge or stem even with the right tools.
- The valve is leaking inside the wall (you see water stains or hear dripping).
- You find corrosion or damage in the pipes themselves.
- You’re unsure how to reassemble the parts safely.
A professional will have special tools and experience. They can also spot issues you might miss, like hidden leaks or installation mistakes.
Preventing Future Shower Handle Problems
Most shower handle issues are avoidable. Here’s how you can keep yours working smoothly:
1. Use A Water Softener
If you have hard water, install a water softener to reduce mineral deposits.
2. Clean Handles And Plates Regularly
Wipe down your shower handle and plate weekly. This removes early mineral buildup before it becomes a problem.
3. Turn Handles Gently
Don’t force the handle if it feels stuck. Forcing can break internal parts.
4. Inspect Annually
Once a year, remove the handle and check for buildup or wear. Clean or replace parts as needed.
5. Replace Parts Before They Fail
If you notice the handle getting harder to turn or feeling loose, replace the worn part early. This prevents bigger problems later.
6. Install Quality Parts
Buy cartridges, stems, and handles from trusted brands. Cheap parts wear out faster and cause more problems.
7. Watch For Leaks
A drip or slow leak can signal that your valve or handle needs attention. Fix leaks quickly to avoid damage and bigger repairs.
8. Keep Manufacturer Manuals
Save the manual for your shower. It has diagrams and part numbers that make repairs easier.

Credit: www.reddit.com
Real-world Examples: Common Scenarios And Fixes
Sometimes, seeing how others solved the problem helps. Here are three common situations:
Example 1: Handle Stuck Halfway – Mineral Buildup
A homeowner in Arizona found their shower handle would only turn halfway to hot. After removing the handle and cartridge, they saw thick white deposits. Soaking the cartridge in vinegar and scrubbing it clean fixed the issue. They also installed a water softener to stop it from happening again.
Example 2: Handle Spins Freely – Stripped Handle
A renter noticed their handle spun without changing the water flow. Removing the handle showed the plastic inside was stripped. Replacing the handle with a new metal one solved the problem. They also tightened the set screw to prevent future loosening.
Example 3: Sudden Stop At Lukewarm – Misaligned Anti-scald Device
A family had a new shower installed. The handle stopped at lukewarm and wouldn’t turn further. The plumber found the anti-scald stop was set too low. Adjusting it let the handle turn fully, allowing hot water.
These stories show that most fixes are simple once you know the cause.
Comparing Popular Shower Handle And Valve Brands
Some brands are easier to repair than others. Here’s a comparison of three major brands:
| Brand | Ease of Cartridge Replacement | Availability of Parts | Common Issues |
|---|---|---|---|
| Moen | Very Easy | Widely Available | Mineral Buildup |
| Delta | Moderate | Easy to Find | Cartridge Wear |
| Kohler | Easy to Moderate | Moderate | Rotational Limit Issues |
Always check your brand’s website for repair guides and part numbers.
Tools And Supplies You Might Need
Having the right tools makes the job easier. Here’s a list of what you might need for most repairs:
- Screwdriver (Phillips and flathead)
- Allen wrench (for set screws)
- Adjustable wrench or pliers
- Cartridge puller (for some models)
- White vinegar (for cleaning)
- Old toothbrush or small brush
- Towels or rags
- Replacement cartridge, stem, or handle
Optional but helpful:
- Flashlight
- Bucket (for catching water or soaking parts)
- Plumber’s grease
Common Mistakes To Avoid
Many DIYers make the same errors. Here’s what to watch out for:
- Forgetting to Turn Off Water: Always shut off water before removing the handle or valve.
- Using Too Much Force: Forcing stuck parts can break pipes or damage the valve.
- Mismatching Parts: Not all cartridges or handles are the same—even within brands. Bring your old part to the store to match it.
- Skipping Cleaning: If you replace the part but don’t clean out debris, the problem will return.
- Ignoring Instructions: Each brand and model is different. Read the manual or look up guides for your specific shower.
Practical Tips From Experienced Homeowners
People who have fixed their own showers share these non-obvious tips:
- Take Pictures as You Go: Before removing any parts, snap photos with your phone. This makes reassembly much easier.
- Label Screws and Small Parts: Use a cup or bag to keep tiny parts together.
- Keep the Shower Area Dry: Water on the floor or walls can make things slippery and dangerous.
- Try Gentle Tapping: If a cartridge is stuck, a light tap (not a hard hit) can help loosen it.
- Check Online Videos: Many brands offer step-by-step videos for repairs.
The Cost Of Repair Vs. Replacement
You might wonder if fixing your shower handle is worth it or if you should replace the whole valve. Here’s a cost comparison:
| Repair Option | DIY Cost | Professional Cost |
|---|---|---|
| Replace Cartridge/Stem | $15–$60 | $120–$250 |
| Replace Handle | $10–$40 | $75–$150 |
| Full Valve Replacement | $100–$250 (parts only) | $400–$900 |
Most problems are much cheaper to fix than to replace the whole valve. But if your valve is old, corroded, or leaking inside the wall, replacement may be the best option.
Extra Insight: What Beginners Often Miss
Many first-time DIYers overlook these details:
- Cartridge orientation matters: Install it backwards, and the handle may not turn as expected or may reverse hot and cold.
- Some valves need lubrication: Plumber’s grease on moving parts can make the handle last longer and move smoother.
- Handles can hide multiple screws: Check for screws under decorative caps or behind the handle itself.
These small details make the difference between a quick fix and repeat problems.
Frequently Asked Questions
Credit: www.youtube.com
What Should I Do If The Shower Handle Is Stuck And I Can’t Remove It?
If the handle is stuck, first spray a little penetrating oil around the base and let it sit for 10–15 minutes. Try wiggling the handle gently. If it still won’t budge, use a handle puller tool (sold at hardware stores). Avoid using too much force, as this can break the valve or damage the wall.
Can I Use Wd-40 To Loosen A Stiff Shower Handle?
WD-40 can help loosen mineral deposits or rust around the handle, but it’s not a long-term fix. Spray a small amount, let it sit, and wipe off before reinstalling. For inside the valve, use white vinegar or a dedicated cleaner instead.
Credit: www.youtube.com
How Do I Know If My Shower Cartridge Needs Replacement?
If the handle is hard to turn, only turns partway, or if you see leaks or temperature issues, the cartridge is likely worn out. Remove and inspect it for cracks, buildup, or damage. If cleaning doesn’t help, replace it with a new one that matches your shower brand and model.
Is It Safe To Adjust The Anti-scald Device Myself?
Most anti-scald devices are simple to adjust, but you should always follow the manufacturer’s instructions. Too high a setting can cause burn risk, especially for children or elderly users. If unsure, consult the manual or a professional.
Where Can I Find Official Repair Guides For My Shower Brand?
Most major brands like Moen, Delta, and Kohler provide repair guides and manuals on their official websites. You can also find helpful videos and diagrams. For reliable instructions, check the Family Handyman website.
A shower handle that won’t turn all the way can be frustrating, but with the right knowledge and tools, most repairs are within reach. Regular cleaning and careful use will keep your shower working smoothly for years. If you run into trouble, don’t hesitate to ask a plumber for help—better a quick fix now than a big repair later.