
A shower is a simple comfort in daily life—until something goes wrong. One common problem is when the shower handle won’t turn all the way. Maybe it’s stuck halfway, or you just can’t get enough hot or cold water. This issue can feel frustrating, especially if you’re in a hurry or worried about a bigger plumbing problem.
But don’t panic. Most of the time, the cause is something you can identify and even fix yourself. Understanding why your shower handle is stuck and what you can do about it saves you time, money, and stress. This guide will walk you through every detail, from how shower handles work to common causes, troubleshooting, repairs, and prevention.
How A Shower Handle Works
Before you try fixing anything, it helps to know the basics. The shower handle is more than just a piece of metal or plastic you turn. It connects to a valve inside the wall. When you turn the handle, you’re actually moving parts inside the valve that control the flow and temperature of water.
There are different types of shower handles:
- Single-handle: Controls both hot and cold water with one lever or knob.
- Double-handle: One for hot and one for cold water.
- Thermostatic controls: These keep water at a set temperature.
Most homes today use single-handle designs. Inside, the handle connects to a cartridge or ball valve. These parts open or close water lines as you turn the handle. Over time, these inner components can wear out, get clogged, or break.
Key Parts Involved
- Handle: The part you touch.
- Escutcheon plate: Decorative cover around the handle.
- Cartridge/Valve: The main part controlling water.
- Stem: Connects handle to cartridge.
- Screws and washers: Hold everything together.
If the handle won’t turn all the way, the problem is usually inside one of these parts.
Common Reasons A Shower Handle Won’t Turn All The Way
Let’s look at the most frequent causes. Knowing what’s likely wrong saves you time searching for solutions.
1. Mineral Buildup
Hard water contains minerals like calcium and magnesium. Over time, these minerals collect inside the valve. This buildup makes it harder for the handle to turn, or stops it before it opens fully.
2. Worn Or Broken Cartridge
The cartridge is a moving part. With use, it can wear out, crack, or break. If the cartridge is damaged, it might not move as far as it should. Sometimes, pieces inside the cartridge jam the movement.
3. Faulty Handle Or Stem
The handle itself can become stripped (the inside edges round off), making it lose grip on the stem. Or, the stem can break or bend. Either problem stops smooth movement.
4. Debris Inside The Valve
Tiny bits of sand, dirt, or pipe corrosion can get inside the valve. Even a small piece can block movement and prevent the handle from turning.
5. Incorrect Installation
If a new cartridge or handle was installed recently, it might not be aligned properly. A small mistake can limit how far the handle turns.
6. Broken Stops
Some valves have stops—small parts that prevent the handle from turning too far. If one of these breaks or shifts, it can block movement.
7. Swollen Rubber Parts
Washers and O-rings inside the valve can swell over time (especially with hot water). Swollen rubber makes it hard for the handle to move.
8. Rust Or Corrosion
Older pipes or valves made of metal can rust. Rust builds up and blocks movement inside the valve.
9. Temperature Limiter Set Too Low
Many modern valves have a temperature limiter—a safety feature to prevent scalding. If it’s set too low, the handle won’t turn to the hottest setting.
10. Faulty Pressure Balancing Mechanism
Some shower valves have a pressure balancing spool. If it gets stuck, it can limit how far the handle turns.

Credit: www.reddit.com
Diagnosing The Exact Problem
Fixing the problem is easier if you know exactly what’s wrong. Here’s how to figure it out:
Step 1: Observe The Symptoms
- Is the handle stuck in one position or does it stop partway?
- Does it move smoothly, or is it rough or squeaky?
- Can you get only hot or only cold water?
- Was there a recent plumbing repair?
Write down exactly what’s happening. These clues help pinpoint the issue.
Step 2: Turn Off Water Supply
Always turn off the main water supply before taking anything apart. You’ll avoid water damage and accidents.
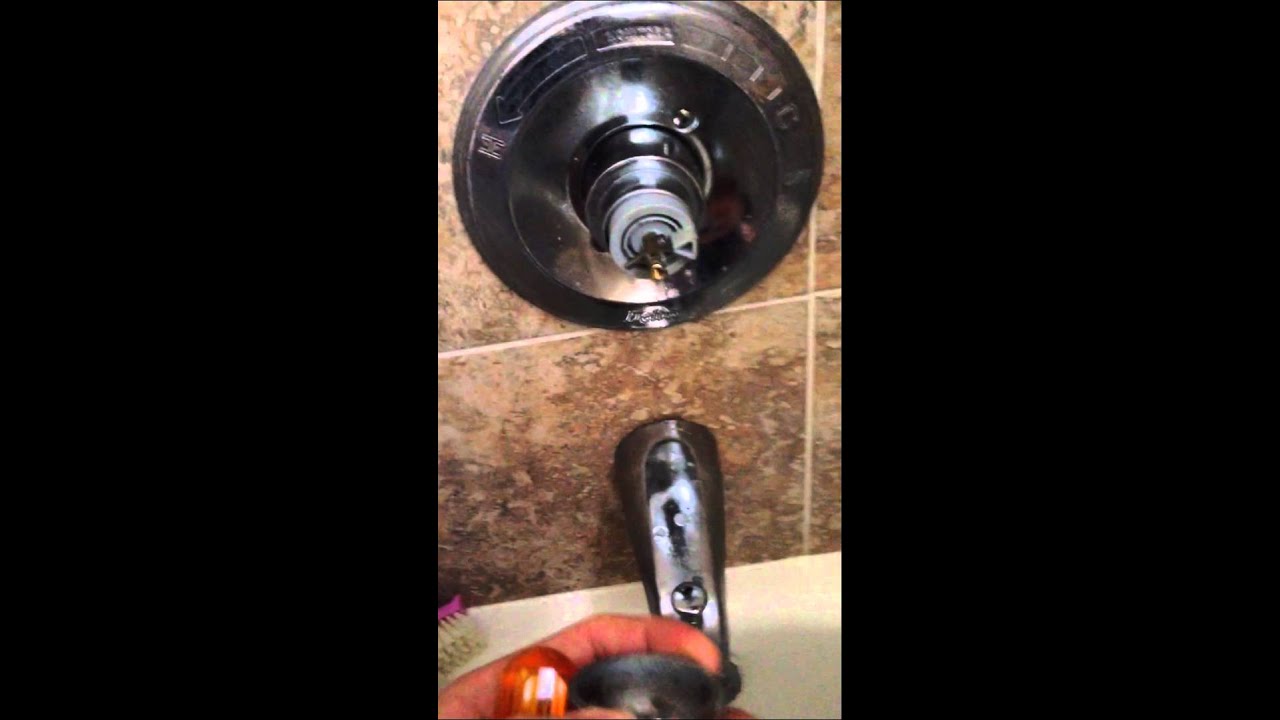
Step 3: Remove The Handle
Most handles are held by a screw (often under a cap or cover). Carefully remove the handle to see the stem and cartridge.
Step 4: Check For Damage
- Look for corrosion, mineral buildup, or broken pieces.
- Wiggle the stem—does it move freely, or is it stuck?
- Check the cartridge for cracks or swelling.
Step 5: Compare With Normal Operation
If you have another shower or faucet, compare how the handles feel. A working handle should move smoothly and fully.
Step 6: Test For Debris
Sometimes, simply removing and reinserting the cartridge or stem will reveal debris or buildup.
Step 7: Identify The Valve Brand/model
Look for a brand name or part number inside the escutcheon plate or on the cartridge. Knowing the brand helps you find the correct replacement parts.
Diy Solutions For A Shower Handle That Won’t Turn
Many shower handle problems are easy to fix at home. Here’s a practical step-by-step guide.
1. Clean Out Mineral Buildup
If you see white or green deposits, you likely have mineral buildup.
What You Need
- White vinegar
- Old toothbrush
- Small bowl
Steps
- Soak the removed cartridge or valve parts in white vinegar for 1–2 hours.
- Scrub gently with a toothbrush.
- Rinse and dry, then reassemble.
This often restores smooth movement.
2. Replace A Worn Cartridge
Cartridges wear out over time. Replacement is simple for most models.
What You Need
- Replacement cartridge (match your brand/model)
- Pliers or cartridge puller
- Lubricant (plumber’s grease)
Steps
- Remove old cartridge (some pull straight out, others twist).
- Clean the opening.
- Lubricate the new cartridge’s O-rings.
- Insert and align the new cartridge.
- Reattach handle and test.
Tip: Always match the cartridge exactly. Even small differences matter.
3. Fix A Stripped Or Broken Handle
If the handle spins but doesn’t move the valve, or feels loose, it may be stripped.
What You Need
- Replacement handle (same type/brand)
- Screwdriver
Steps
- Remove old handle.
- Check stem for damage (replace if bent or broken).
- Install new handle.
- Tighten screw firmly.
4. Remove Debris Or Rust
If you spot rust or debris, cleaning helps.
What You Need
- Needle-nose pliers
- Small brush
- Vacuum (optional)
Steps
- Pull out visible debris.
- Brush gently around the valve.
- Vacuum the opening if possible.
- Wipe all parts before reassembly.
5. Adjust Or Replace Stops
If a stop is blocking movement:
- Locate the stop (often a plastic or metal piece inside the valve).
- Adjust or remove it if it’s out of place.
- Replace if broken.
Caution: Some stops are safety features—don’t remove unless necessary.
6. Replace Swollen Washers Or O-rings
Rubber parts can swell, especially in hot water valves.
- Remove old washer or O-ring.
- Buy an exact replacement.
- Lubricate with plumber’s grease.
- Install and test.
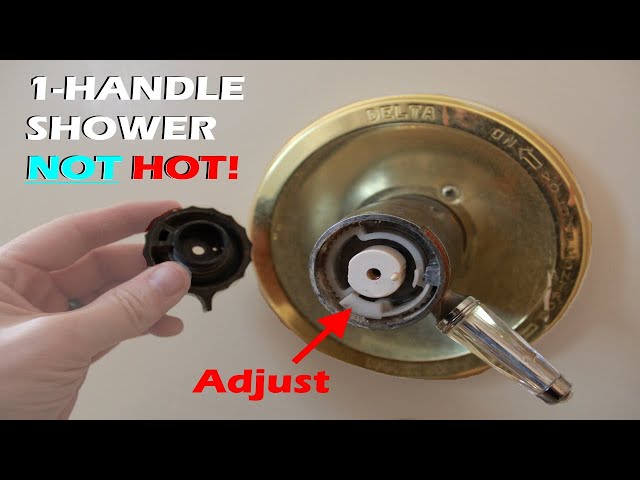
7. Adjust The Temperature Limiter
If the handle won’t turn to full hot or cold, check the limiter.
- Remove the handle.
- Locate the limiter (usually a small plastic piece on the cartridge).
- Adjust according to manufacturer’s instructions.
- Reassemble and test.
8. Lubricate Moving Parts
A little lubrication can restore smooth movement.
- Use silicone-based plumber’s grease (never petroleum jelly).
- Apply to cartridge, stem, and O-rings.
- Reassemble.
9. Replace The Pressure Balancing Spool
If you have a modern valve and the handle is stuck, the pressure balancing spool may be jammed.
- Remove the cartridge.
- Unscrew the spool (see manufacturer’s instructions).
- Clean or replace.
- Reassemble.
Note: Not all valves have this part.
10. Reinstall Handle Correctly
If the handle was installed incorrectly, it might hit the wall or escutcheon before turning fully.
- Remove handle.
- Align according to instructions.
- Check for any obstructions.
- Reinstall and test.
When To Call A Professional
Some problems are best left to a licensed plumber. Here are signs you need expert help:
- Water leaks inside the wall (dampness, stains, mold)
- Handle turns freely but no water comes out
- You can’t remove the cartridge or stem
- Rust or corrosion is severe
- The valve is very old (parts hard to find)
A professional has special tools and knows how to avoid damaging pipes or tiles.
Shower Valve Types And Their Common Issues
Different valve types have unique problems. Knowing your valve type helps you diagnose and fix issues faster.
Single-handle Cartridge Valves
- Common problems: Sticking due to mineral buildup, worn cartridges, temperature limiters set too low.
- Best fix: Cartridge replacement or cleaning.
Ball Valves
- Common problems: Worn seals, debris inside the ball, handle alignment issues.
- Best fix: Replace seals, lubricate, or realign handle.
Compression Valves (two Handles)
- Common problems: Worn washers, stripped stems, handle won’t turn fully.
- Best fix: Replace washers or stems.
Thermostatic Valves
- Common problems: Faulty thermostatic element, handle only turns partway.
- Best fix: Replace thermostatic cartridge, reset limiter.
Here’s a quick comparison:
| Valve Type | Common Problem | Typical Fix |
|---|---|---|
| Cartridge | Stuck, limited movement | Clean/replace cartridge |
| Ball | Handle hard to turn | Lubricate or replace seals |
| Compression | Handle won’t turn fully | Replace washer/stem |
| Thermostatic | Temperature limiter set wrong | Adjust/reset limiter |
Preventing Shower Handle Problems
Regular care extends your shower’s life and prevents costly repairs. Here’s how you can keep your handle working smoothly.
1. Clean Regularly
Wipe down the handle and escutcheon with a mild cleaner. This removes soap scum and slows mineral buildup.
2. Use Water Softeners
If you have hard water, a softener reduces mineral deposits. This keeps cartridges and valves working longer.
3. Don’t Force The Handle
If the handle feels stiff, don’t force it. Forcing can break internal parts. Investigate or call for help instead.
4. Lubricate Annually
Remove the handle and apply plumber’s grease to moving parts once a year.
5. Replace Parts Before They Fail
If your handle is getting harder to turn, replace washers or cartridges early.
6. Check For Leaks
A small drip can indicate a worn washer or cartridge. Fix leaks quickly to avoid bigger problems.
7. Check Manufacturer’s Instructions
Some valves need special care. Always check the instructions for your specific model.
Here’s a simple maintenance schedule:
| Task | Frequency | Purpose |
|---|---|---|
| Wipe handle/plate | Weekly | Prevent buildup |
| Lubricate moving parts | Yearly | Ensure smooth movement |
| Check for leaks | Monthly | Spot problems early |
| Replace cartridge | Every 5–7 years | Prevent failure |
Tools And Parts You May Need
If you plan to repair your shower handle yourself, having the right tools helps. Here’s what you may need:
- Screwdrivers (Phillips and flat)
- Allen wrench set
- Adjustable wrench
- Needle-nose pliers
- Cartridge puller (for some models)
- Plumber’s grease
- White vinegar
- Replacement cartridge, washers, or O-rings
Tip: Always shut off water before starting.
Credit: www.youtube.com
Real-world Example: Fixing A Stuck Shower Handle
Let’s walk through a common situation. Imagine you try to turn your shower handle and it stops before reaching hot water.
- You remove the handle and find white crust on the cartridge.
- Soak the cartridge in vinegar for two hours.
- Scrub gently and rinse.
- Lubricate with plumber’s grease and reinstall.
- The handle now turns fully and you get hot water again.
Non-obvious insight: Sometimes, just cleaning and lubricating solves the problem—no need for a new cartridge.
Cost Comparison: Diy Vs Professional Repair
Wondering if you should fix it yourself or call a plumber? Here’s a cost breakdown:
| Repair Type | DIY Cost | Professional Cost |
|---|---|---|
| Clean cartridge | $0–$10 (vinegar, brush) | $80–$150 |
| Replace cartridge | $15–$50 (parts) | $120–$250 |
| Replace handle | $10–$40 | $100–$200 |
| Major valve repair | $30–$100 (parts/tools) | $250–$500 |
Non-obvious insight: DIY repairs are much cheaper, but don’t risk it if you’re unsure—incorrect repairs can cause water damage.
Credit: www.youtube.com
Safety Tips For Diy Repairs
- Always turn off the water supply first.
- Wear gloves to protect your hands from sharp edges.
- Lay a towel in the tub to catch small parts.
- Take a photo of the assembly before disassembly to help you reassemble.
- If you feel stuck, call a professional.
What To Do If Nothing Works
Sometimes, the problem is hidden inside the wall or the valve is too old to fix. In these cases:
- Call a licensed plumber for advice.
- Consider replacing the entire shower valve if repairs keep failing.
- If your home has very old pipes, you may need a more extensive upgrade.
For more about plumbing valve types and maintenance, visit the Wikipedia page on plumbing valves.
Frequently Asked Questions
Why Does My Shower Handle Only Turn Halfway?
Usually, mineral buildup, a worn cartridge, or the temperature limiter set too low causes this. Check for deposits or a safety limiter behind the handle. Cleaning or adjusting these often solves the problem.
Can I Lubricate The Shower Handle To Fix It?
Yes, but use only plumber’s silicone grease. Remove the handle, clean the area, and apply a small amount to the stem and O-rings. Do not use petroleum jelly, as it damages rubber.
How Do I Know If The Cartridge Needs Replacing?
If cleaning and lubricating don’t help, or if water keeps dripping or the handle feels rough, it’s time to replace the cartridge. Look for visible cracks, swelling, or if the handle moves loosely.
Is It Safe To Force The Shower Handle?
No, forcing the handle can break internal parts or cause leaks. If it’s stuck, stop and investigate. Forcing may create a bigger repair problem.
Should I Replace The Whole Valve Or Just The Cartridge?
If your shower is less than 10–15 years old and the valve body is in good shape, replacing the cartridge is enough. Replace the whole valve if it’s very old, corroded, or you can’t find replacement parts.
A stuck shower handle can be annoying, but most causes are simple and fixable. With the right steps, you can restore your shower’s smooth operation and avoid costly repairs. Regular cleaning and gentle handling keep your shower working for years.
If you’re unsure or something feels wrong, professional help is always a safe choice.