
A shower is one of the most important features in a bathroom. When everything works as it should, it’s easy to take it for granted. But sometimes, you notice something off: the shower valve sticks out too far from the wall. This can make your shower look odd, make it harder to use, and even cause leaks or water damage over time. While this problem might seem small, it can be frustrating and is more common than many people realize. If you’re dealing with a shower valve that just doesn’t sit right, you are not alone. This article will help you understand why this happens, what it means for your bathroom, and what you can do to fix it.
A valve that sticks out isn’t just a cosmetic problem. It can affect how well the shower works and how long your bathroom lasts. Sometimes, it can even cause safety issues, especially if the valve becomes loose or hard to handle.
Many homeowners, especially those who do renovations themselves, come across this issue and wonder if they made a mistake or if it’s a deeper problem in the plumbing. The good news is, with the right information and tools, you can fix this issue yourself or know exactly what to ask a plumber.
Let’s look at why shower valves sometimes stick out too far, the problems this causes, and, step by step, how to fix it. Whether you’re planning a remodel, dealing with a newly installed shower, or facing an old valve that never sat right, this guide will give you all the answers.
What Is A Shower Valve And Why Its Position Matters
A shower valve is the part inside your wall that controls the water flow and temperature. When you turn the handle, the valve mixes hot and cold water before sending it to your showerhead. The valve also usually has a trim plate and handle that you see on the wall.
The position of the valve is very important for a few reasons:
- Aesthetics: If it sticks out too far, the handle and trim won’t sit flush with the wall, making your bathroom look unfinished.
- Functionality: It can make the handle harder to use or less stable.
- Waterproofing: Gaps between the trim and the wall can let water in, causing leaks or damage behind the wall.
- Safety: If the valve is loose or exposed, it may break more easily or cause sharp edges.
When a shower valve is installed correctly, the trim plate (escutcheon) sits flat against the wall, covering the hole and protecting the plumbing inside. The handle should feel solid and not wiggle or pull away from the wall when you use it.
Common Reasons A Shower Valve Sticks Out Too Far
If you notice your shower valve is protruding, there are several possible causes. Understanding these reasons can help you find the right fix.
1. Incorrect Valve Depth During Installation
This is the most common reason. The valve body must be installed at a specific depth inside the wall. Manufacturers provide a “finished wall” mark on the valve or in the instructions. If the valve is not set deep enough, it will stick out.
2. Wall Thickness Miscalculation
Sometimes, the wall is thicker than expected. For example, if extra tile, cement board, or backing material is added, it can change the finished wall depth. If the installer didn’t plan for this extra thickness, the valve may end up too far from the wall.
3. Wrong Valve Or Trim Kit
Not all valves and trim kits are compatible. If you mix brands or use the wrong trim, the handle and plate may not fit properly, causing them to stick out.
4. Old To New Renovations
When updating an old bathroom, the wall depth may change. New drywall, tile, or backer board can add inches. If the original valve is not moved, it will now sit too far forward.
5. Plumbing Movement Or Shifting
Over time, plumbing can shift slightly due to settling of the house or movement in the wall. This can cause the valve to move forward.
6. Poor Quality Workmanship
Sometimes, the problem is simply a rushed or careless installation. The plumber may not have measured carefully or followed the manufacturer’s instructions.
7. Unusual Wall Materials
If the wall uses non-standard materials, like thick stone or double layers of tile, the usual measurements may not work.
8. Retrofitting Without Proper Planning
Adding a new shower valve to an old wall without removing enough material can cause the valve to be set too far forward.
Each of these problems requires a different solution, so let’s look at how to diagnose and fix them.

Credit: diy.stackexchange.com
How To Diagnose Why Your Shower Valve Sticks Out
Before you can fix the problem, you need to figure out what caused it. Here’s how to diagnose the issue step by step:
- Check the Valve Brand and Model: Look for a name or code on the trim or behind the handle. This helps you find the correct installation guide.
- Measure the Protrusion: Use a ruler or tape measure. The valve body should usually sit about 1/4 to 1/2 inch behind the finished wall (check your manufacturer for exact numbers).
- Check the Wall Thickness: Measure from the valve to the wall surface. Compare with the original installation instructions.
- Look for Extra Wall Layers: Did you add tile or backing after the valve was set? Is there more material than when the valve was first installed?
- Check for Loose Plumbing: Gently push or pull the valve to see if it moves. Movement could mean loose supports or shifting pipes.
- Inspect the Trim Kit: Make sure you have the right trim for your valve. Look up the compatibility online.
- Check for Gaps or Water Damage: Look for mold, soft drywall, or signs of leaks. This can show if water is getting behind the trim.
If you’re not sure about any of these steps, take photos and contact the valve manufacturer or a professional plumber. It’s better to ask than to guess—using the wrong fix can make things worse.
Problems Caused By A Shower Valve That Sticks Out
A valve that sticks out isn’t just about looks. Here’s what can go wrong if it’s not fixed:
- Leaks and Water Damage: Gaps allow water to get behind the trim, leading to mold, mildew, and rot.
- Loose or Wobbly Handle: The handle may feel unstable or even break off if it’s not supported.
- Difficult Operation: The handle might be harder to turn or pull, making showering less comfortable.
- Reduced Lifespan: Water behind the wall can cause corrosion or damage to pipes, leading to bigger repairs.
- Lower Home Value: Poorly finished bathrooms can reduce property value and make buyers worry about hidden problems.
- Increased Repair Costs: The longer you wait, the worse the damage can become, leading to more expensive fixes.
Fixing the problem early is always the best choice.
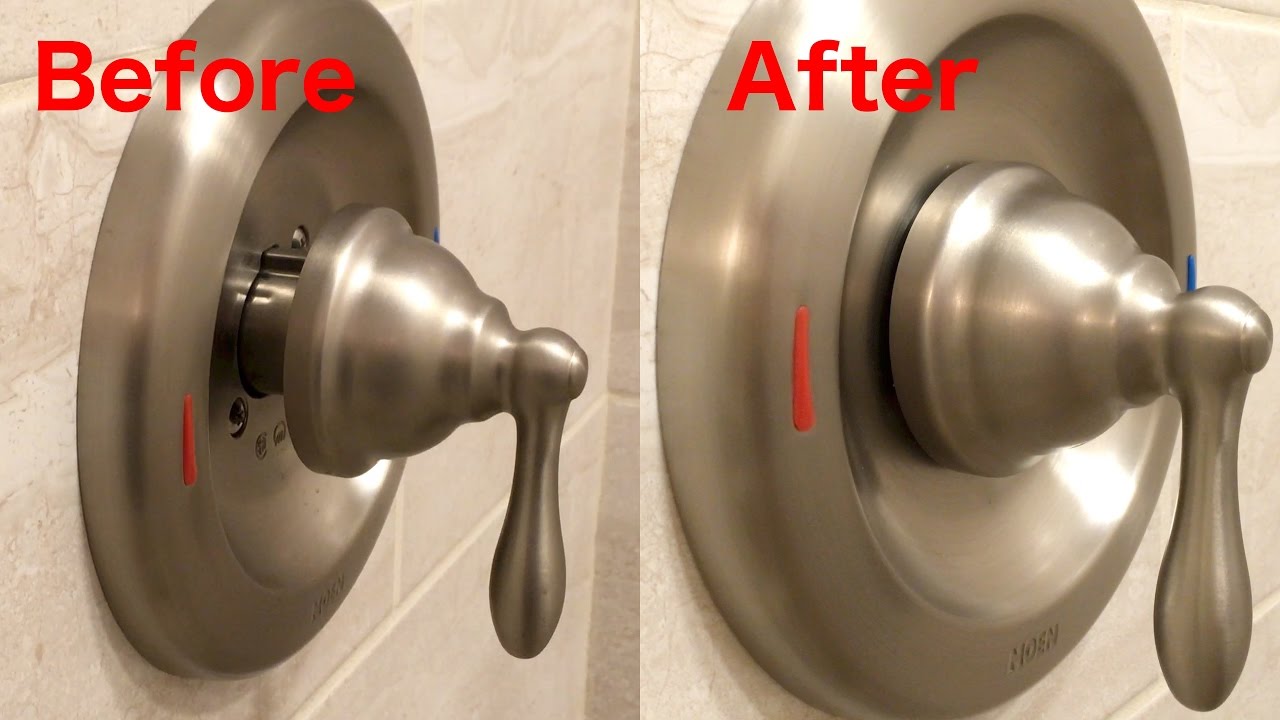
Credit: www.youtube.com
How To Fix A Shower Valve That Sticks Out Too Far
Depending on the cause, there are several ways to fix a shower valve that sticks out. Here are the main solutions, from easiest to most complex.
1. Adjust The Trim Kit Or Escutcheon Plate
If the valve only sticks out a little, and there are no leaks, you may be able to use a deeper trim kit or a thicker escutcheon plate. Some manufacturers offer “deep wall kits” or extension kits for this exact problem.
- Pros: Easy, no need to open the wall.
- Cons: Only works if the valve is slightly off, and only if your brand offers an extension kit.
2. Use A Handle Extension
Some brands make handle extension kits. These add extra length to the handle stem, letting the trim sit flush with the wall.
- Pros: Simple, no wall work needed.
- Cons: Only for small gaps, and not all models have extensions.
3. Recess The Wall Around The Valve
If you have tile or thick wallboard, you might be able to carefully remove some material around the valve. This allows the trim to sit closer to the wall.
- Pros: Can fix small-to-medium problems without moving plumbing.
- Cons: Risk of damaging tiles, may not look perfect if not done carefully.
4. Move The Valve Back Into The Wall
For bigger problems, the best fix is to move the valve deeper into the wall. This usually means:
- Shutting off the water.
- Cutting open the wall behind the valve (usually from the next room or closet).
- Disconnecting the valve from the pipes.
- Re-attaching the valve at the correct depth.
- Patching the wall and re-tiling if needed.
- Pros: Permanent, corrects the underlying issue.
- Cons: More work, may require a plumber, wall repair needed.
5. Replace The Valve Or Trim Kit
If you have an old or incompatible valve, you may need to replace it with a newer or correct model. This can also be a chance to upgrade your shower.
- Pros: Fixes compatibility problems, can upgrade features.
- Cons: Cost, time, and possible wall repairs.
6. Add A Custom Plate Or Spacer
In some cases, a custom plate or spacer can bridge the gap between the wall and the trim. This is a less common fix, but it can work in unique situations.
- Pros: Quick, no plumbing work.
- Cons: May look less professional, not always waterproof.
7. Call A Professional
If you’re not comfortable with plumbing or wall work, or if you suspect hidden water damage, it’s smart to call a licensed plumber. They can quickly diagnose the problem and recommend the best fix.
- Pros: Expertise, guaranteed work, peace of mind.
- Cons: Higher cost than a DIY fix.
Step-by-step Guide: Fixing A Shower Valve That Sticks Out
Let’s walk through a typical solution for a valve that sticks out too far due to being installed at the wrong depth. This guide covers the process for a homeowner with basic skills.
What You’ll Need
- Screwdriver
- Utility knife
- Measuring tape
- Plumber’s putty or silicone
- Deep trim kit or extension kit (if available)
- Drywall patching materials (if wall needs to be opened)
- Plumbing tools (if moving the valve)
- Safety glasses and gloves
Step 1: Turn Off The Water
Find the main water shut-off valve for your home and turn it off. Open a faucet to drain any water left in the pipes.
Step 2: Remove The Trim And Handle
Use the screwdriver to remove the handle and escutcheon plate. Set the parts aside.
Step 3: Measure The Valve Position
Measure how far the valve sticks out from the wall. Compare this with the manufacturer’s recommended depth.
Step 4: Check For Extension Kits
Look up your valve model online and see if there is a deep wall extension kit or handle extension kit available. If so, follow the instructions to install it.
Step 5: Consider Wall Adjustment
If the valve is only slightly out, you may be able to carefully shave a little bit of drywall or tile around the valve opening. Use a utility knife or a rotary tool for drywall. For tile, use a tile file or grinder.
Tip: Go slowly and check your fit often.
Step 6: Move The Valve (if Needed)
If the valve is far out of place, you’ll need to move it. This involves:
- Opening the wall behind the shower (often from a closet or hallway).
- Cutting the support brackets holding the valve.
- Re-attaching the valve at the correct depth.
- Reconnecting the pipes (this may need soldering for copper pipes or special fittings for PEX/CPVC).
- Testing for leaks before closing the wall.
Non-obvious insight: When moving the valve, always use new support brackets to prevent future shifting. Old supports may be loose or weak.
Step 7: Reinstall The Trim
Once the valve is at the correct depth, reinstall the escutcheon plate and handle. Use plumber’s putty or silicone behind the plate to create a waterproof seal.
Step 8: Turn The Water Back On
Slowly turn on the water and check for leaks. Test the handle to make sure it works smoothly.
Step 9: Patch The Wall
If you had to open the wall, patch the drywall and repaint or re-tile as needed.
Step 10: Final Check
After everything is put back, check again for gaps, leaks, or loose parts. It’s better to catch issues now than later.
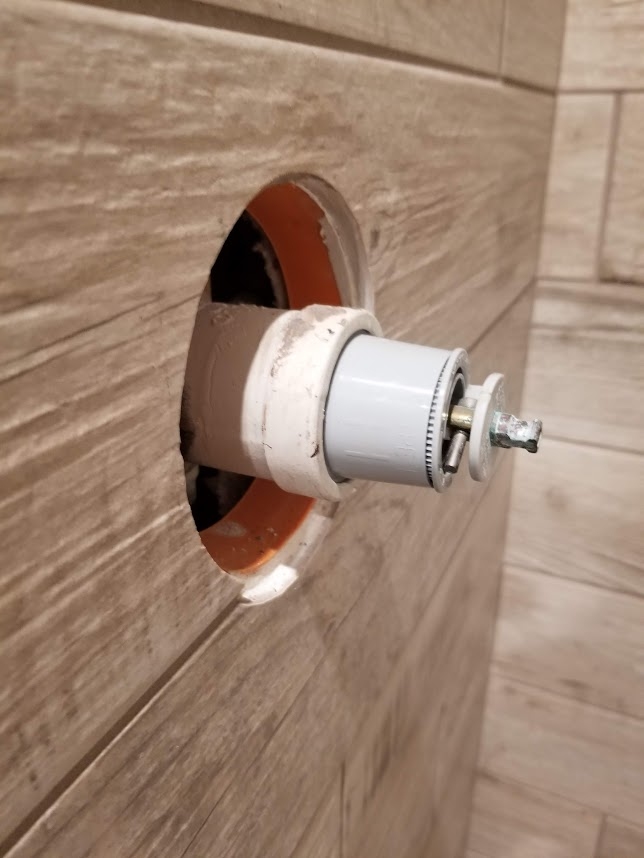
Credit: diy.stackexchange.com
Comparison: Diy Fix Vs. Professional Repair
Many people wonder if they should fix this issue themselves or hire a plumber. Here’s a quick comparison to help you decide:
| Factor | DIY Fix | Professional Repair |
|---|---|---|
| Cost | Low (just materials) | Moderate to high (labor + materials) |
| Time | Several hours to a weekend | 1-2 hours for a pro |
| Skill Needed | Basic to moderate DIY | Expertise included |
| Risk of Mistakes | Higher, especially with plumbing | Low, pro guarantees work |
| Result Quality | Varies, depends on DIY skill | Consistent, professional finish |
Tip: If you see signs of water damage, always call a professional. Delaying repairs can lead to much bigger problems.
How To Prevent Shower Valve Position Problems
The best fix is prevention. Here’s how to avoid this issue in new builds or renovations:
- Read Manufacturer’s Instructions: Every valve has a specific installation depth. Always follow these guides closely.
- Plan for Wall Thickness: Before installation, add up all wall layers—drywall, cement board, tile, etc.
- Mark the Finished Wall Line: Use a level and pencil to mark exactly where the finished wall will be.
- Test Fit the Trim: Before closing the wall, put the trim kit on temporarily to see how it fits.
- Secure the Valve Firmly: Use proper brackets and fasteners to prevent shifting as the house settles.
- Double-Check Before Tiling: Once tile is up, moving the valve is much harder. Measure twice, install once.
- Use Compatible Parts: Only use trim kits and handles designed for your valve model.
Non-obvious insight: If you’re unsure about future wall changes, install the valve slightly deeper than the minimum. It’s easier to use an extension kit to bring it forward than to move it back.
Real-world Examples
Let’s look at some real situations to show how this problem can happen and how it was fixed.
Example 1: Diy Tile Upgrade
A homeowner replaced old tile with thicker porcelain tile. They didn’t move the valve, and after tiling, the valve stuck out over an inch. Solution: They found a matching extension kit for their valve, allowing the trim to sit flush.
Example 2: New Construction Oversight
In a new house, the plumber forgot to include the thickness of the waterproofing membrane. The valve was set too far forward. The fix involved opening the wall and moving the valve back, which delayed the project.
Example 3: Mixed Trim Brands
A homeowner used a generic trim kit instead of the valve’s brand. The handle wouldn’t fit all the way on, causing it to stick out awkwardly. Solution: They switched to the correct brand’s trim kit, and the handle fit perfectly.
Example 4: Hidden Water Damage
A valve that stuck out for years allowed water to seep behind the wall, causing rot and mold. The repair included moving the valve, replacing damaged wood, and redoing the tile.
These examples show the importance of planning and using the right parts.
Typical Costs For Fixing A Shower Valve That Sticks Out
Many people want to know the costs before starting. Here’s a typical range:
| Fix Type | DIY Cost | Professional Cost |
|---|---|---|
| Extension Kit | $20 – $60 | $100 – $200 (with labor) |
| Moving Valve | $50 – $200 (materials only) | $300 – $800 (labor + materials) |
| Wall Repair | $20 – $100 | $100 – $500 (depends on finish) |
| Full Replacement | $100 – $300 | $500 – $1,200 |
These costs can vary by region and the specifics of your bathroom. Always get a quote from a professional if you’re unsure.
Choosing The Right Extension Kit Or Trim
If your valve only sticks out a little, an extension kit can be the easiest fix. Here’s what to look for:
- Brand and Model: Make sure the kit matches your valve exactly.
- Depth Added: Kits add different amounts of length—usually from 1/4 inch to over 1 inch.
- Material Quality: Choose solid brass or stainless steel for durability.
- Waterproofing: Ensure the kit includes proper seals or gaskets.
- Aesthetics: The finish should match your other bathroom fixtures.
If you can’t find a kit, contact the valve manufacturer. They often have solutions not listed in stores.
When To Replace Instead Of Repair
Sometimes, fixing an old or incompatible valve isn’t worth it. Here are signs you should replace:
- The valve is very old and parts are unavailable.
- You want to upgrade features (like adding a thermostatic valve).
- There is significant water damage or corrosion.
- The trim kit you want is not compatible.
While replacement costs more, it can add years of trouble-free service to your shower.
Safety Tips For Working With Shower Valves
Whenever you work with plumbing, keep these safety tips in mind:
- Always turn off the water before removing any plumbing parts.
- Wear safety glasses and gloves when cutting drywall or tile.
- Check for electrical wires in the wall before cutting.
- Use the right tools for each job.
- Test for leaks before closing the wall.
- Don’t force parts—if something doesn’t fit, double-check compatibility.
If you’re unsure, call a professional. Plumbing mistakes can lead to costly water damage.
Frequently Asked Questions
Why Does My Shower Valve Stick Out Too Far After Remodeling?
This usually happens when extra wall thickness is added (like tile, cement board, or waterproofing) after the valve was set. The original installation did not plan for the new, thicker wall.
Can I Fix A Sticking-out Valve Without Opening The Wall?
Yes, if the valve is only slightly out, you can often use an extension kit or a thicker trim plate. This is the simplest fix and doesn’t require major work.
What Happens If I Leave The Valve Sticking Out?
Leaving it can cause water leaks, mold, and rot behind the wall. The handle may also become loose or break over time. It’s best to fix the problem to avoid bigger repairs later.
Are All Extension Kits Universal?
No, extension kits must match the brand and model of your valve. Using the wrong kit can cause leaks or make the problem worse. Always check compatibility before buying.
How Can I Find The Right Depth For My Shower Valve?
Check the installation guide for your valve model. Most manufacturers have a “finished wall” line or measurement. If you can’t find it, visit the manufacturer’s website or see trusted sources like Family Handyman for general guidelines.
Dealing with a shower valve that sticks out too far can feel overwhelming, but with the right approach, it’s usually fixable. Careful planning, the right parts, and attention to detail will give you a leak-free, professional-looking shower that adds value and comfort to your home. Always double-check your work, and don’t hesitate to call a professional if you hit a snag. Your bathroom—and your peace of mind—are worth it.