
Water is a silent enemy in bathrooms. It finds small gaps, seeps into walls, and slowly damages what you cannot see. If you are building or renovating a shower, one of the most important but confusing steps is waterproofing between cement board and the shower pan. Many people believe a cement board is waterproof, but it is not. Even small mistakes can lead to mold, rot, and expensive repairs. This guide explains why that joint matters, the best materials, step-by-step methods, and tips to make your shower last for decades.
Why The Joint Between Cement Board And Shower Pan Matters
The place where the cement board meets the shower pan is a weak spot. Showers are exposed to water every day, and gravity pulls water down to this joint. If water sneaks behind the tile or grout, it can collect at the bottom. Over time, this moisture causes:
- Swelling or breakdown of the cement board
- Mold and mildew behind the walls
- Rotting of wood studs or subfloor
- Leaks to rooms below the bathroom
These problems are often hidden until they are severe. Fixing them usually means tearing out walls and floors, which costs much more than doing it right the first time.
Even small leaks at this joint can create a path for water to travel sideways, reaching areas you never expect. For example, water can move horizontally along a stud or subfloor and show up as a stain far from the original leak.
Over time, hidden moisture softens framing wood, rusts fasteners, and even attracts pests like termites.
Another risk is that wet areas stay damp for long periods, especially in showers that are used daily. Mold and bacteria thrive in these conditions, causing not only bad smells but also health problems for people with allergies or asthma.
This is why waterproofing at this joint is not just a building code requirement but a real health and safety measure.
Understanding Cement Board And Shower Pan
What Is Cement Board?
Cement board is a tile backer made from cement and reinforcing fibers. Popular brands include Durock, HardieBacker, and WonderBoard. It is strong, does not rot, and resists mold better than drywall. However, it is not waterproof. Water can pass through it, especially at seams and joints.
Some people confuse “water-resistant” with “waterproof. ” Cement board does not fall apart with moisture, but it also does not stop water. If you pour water on it, it will eventually soak through. This is why manufacturers always recommend a waterproofing layer on top before tiling in wet areas like showers.
Cement board also provides a stable surface for tile, which helps prevent cracking. But without proper joint treatment, even the best cement board will fail if exposed to constant moisture.
What Is A Shower Pan?
A shower pan is the waterproof floor of a shower. It collects water and sends it to the drain. Some pans are made of acrylic or fiberglass (ready-made). Others are built on-site with mortar and a liner. The pan is always lower than the shower floor to keep water from running out.
The shower pan is designed to handle the largest amount of water, but its connection to the wall is always a point of concern. Preformed pans have a built-in lip to help direct water away from the wall framing. Custom pans built with mortar and liners require extra care to make sure the liner wraps up the wall high enough to catch any leaking water.
Why The Gap Is Important
There is always a small gap (usually 1/4 inch) between the bottom edge of the cement board and the top of the shower pan. This gap prevents the cement board from wicking up water from the pan, which would cause damage. But if not sealed, water can leak through this gap.
Sometimes installers make the mistake of pushing the cement board tight against the pan or even letting it dip into the pan bottom. This can create a “wicking” effect, where the cement board soaks up water like a sponge. Over time, this leads to crumbling edges and leaks behind the wall.
The right gap, properly sealed, is a simple but important detail that keeps water away from vulnerable parts of the wall.
Common Waterproofing Mistakes At This Joint
Even experienced DIYers and some pros make mistakes when waterproofing the joint. Here are mistakes to avoid:
- Sealing with grout or thinset only: Grout is not waterproof. It cracks and lets water pass.
- Not using a waterproof membrane: Relying on cement board alone is risky.
- Covering the gap with caulk only: Silicone caulk can peel over time, especially with movement.
- Skipping mesh tape: Without tape, the joint is weak and cracks easily.
- Not overlapping waterproofing layers: Water finds the smallest opening.
- Bringing cement board inside the pan lip: This can wick water up the wall.
Another common mistake is failing to seal screw holes and corners. Water travels in unexpected directions, and even a pinhole can be enough to cause problems over time. Also, using the wrong type of caulk or not letting waterproofing layers cure completely before tiling can reduce the effectiveness of your work.
Example: A homeowner used regular joint compound and paper tape at the joint, thinking it would be strong enough. Within months, the paper tape failed, and water seeped through, causing black mold. If mesh tape and a waterproof membrane had been used, this would not have happened.
Understanding these errors helps you plan a better shower that will last.
Materials And Tools Needed For Proper Waterproofing
Before you start, gather all the materials and tools. Using the right products makes a big difference.
Essential Materials
- Cement board (Durock, HardieBacker, etc.)
- Shower pan (preformed or mortar bed with liner)
- Alkali-resistant fiberglass mesh tape
- Thinset mortar (for taping joints)
- Waterproofing membrane (sheet or liquid, e.g., RedGard, Schluter Kerdi)
- Waterproof sealant (100% silicone or urethane)
- Backer rod (for deep gaps)
- Waterproofing corners (preformed, for sheet membranes)
You might also need a primer if the membrane or sealant requires it, especially on very dry or dusty surfaces. Some liquid membranes have a primer to help them stick better to cement board.
Tools
- Utility knife
- Trowel or putty knife
- Paintbrush or roller (for liquid membranes)
- Caulk gun
- Measuring tape
- Level
- Sponge and bucket
If you’re using a sheet membrane, a small roller or smoothing tool helps press the membrane flat and remove air bubbles. Always keep a clean sponge handy to wipe away extra mortar or membrane before it dries.
Pro Tip: Always check manufacturer instructions for both the cement board and waterproofing products. Some require special primers or methods.
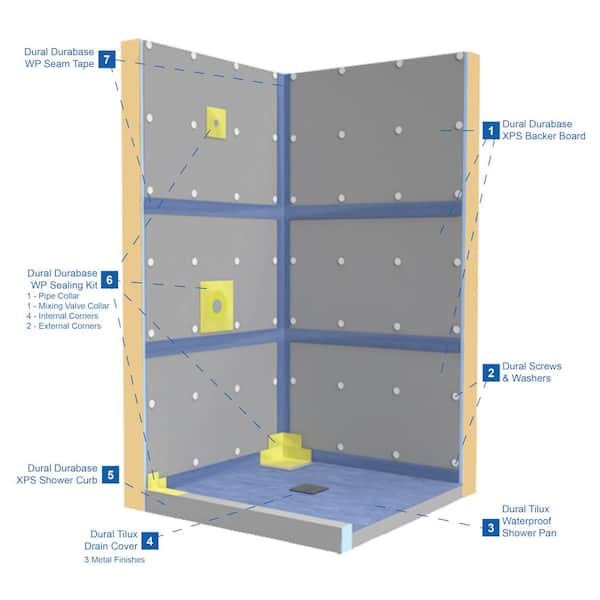
Credit: www.homedepot.com
Types Of Waterproofing Membranes
There are two main ways to waterproof the joint:
- Liquid-Applied Membranes: Brush or roll on a thick, rubbery layer. Example: RedGard.
- Sheet Membranes: Pre-cut sheets or strips of waterproof material (like Schluter Kerdi) that are glued or mortared to the wall.
Both methods work well if installed carefully. Some people combine them for extra protection.
Liquid membranes are popular for DIYers because they are easy to apply with standard tools. They can cover uneven surfaces and odd shapes. However, the key is to apply them at the recommended thickness, usually two or more coats. Too thin, and they may crack or let water through.
Sheet membranes offer the advantage of a consistent waterproof barrier. They are factory-made to a specific thickness and are highly resistant to water passage. The challenge is making sure all seams are overlapped correctly and corners are sealed tightly.
Comparison: Liquid Vs. Sheet Membranes
Here is a simple comparison:
| Feature | Liquid Membrane | Sheet Membrane |
|---|---|---|
| Ease of Use | Easy to apply on odd shapes | Precise, needs cutting and fitting |
| Dry Time | Needs hours between coats | Ready for tile immediately |
| Seam Strength | Can crack if too thin | Strong at seams if overlapped |
| Cost | Usually less expensive | More expensive per square foot |
| Repair | Easy to patch small areas | Requires new sheet for patches |
Insight: Sheet membranes are more predictable for beginners. Liquid membranes are easier for complex shapes.
Step-by-step Guide: Waterproofing The Joint
A careful process is key. Rushing or skipping steps leads to leaks. Here’s how to do it right.
1. Prepare The Surface
- Clean the shower pan edge and cement board with a damp sponge.
- Remove dust, dirt, and any old caulk or debris.
- Check the gap between the cement board and pan; it should be about 1/8 to 1/4 inch. If it’s bigger, insert a backer rod to fill space.
A clean, dry surface is essential for good adhesion. Even a small amount of dust or soap residue can prevent the membrane or sealant from sticking. If the pan or cement board has been exposed to moisture, let it dry completely before starting.
2. Tape The Joint
- Cut a strip of alkali-resistant fiberglass mesh tape to fit the length of the joint.
- Press the tape over the gap, halfway on the cement board and halfway over the pan upstand (the vertical lip of the pan).
- For corners, use preformed corner pieces or cut the tape at an angle.
Mesh tape reinforces the joint and prevents cracks from forming under tile. Never use paper tape, as it will fail in wet conditions. For longer joints, overlap the tape pieces by at least 2 inches for extra strength.
3. Apply Thinset Mortar
- Use a putty knife to spread a thin layer of thinset mortar over the tape. This step holds the tape in place and fills small cracks.
- Smooth the mortar flat. Remove excess. Let it dry fully—usually 24 hours.
Thinset mortar should be mixed according to the package instructions. It should be spread evenly, not too thick, to avoid bulges under the membrane. If you see air bubbles, press them out with your knife before the mortar dries.
4. Apply Waterproofing Membrane
There are two methods:
Method A: Liquid Membrane
- Use a brush or roller to apply the liquid waterproofing over the joint, extending at least 6 inches up the wall and 2-3 inches onto the pan upstand.
- Apply at least two coats, letting each dry completely.
- Cover all screw holes, seams, and corners.
Apply the first coat and let it dry to the touch before adding the next. If the surface still looks patchy or thin after two coats, add a third. Pay special attention to corners and where the wall meets the pan, as these are common leak points.
Method B: Sheet Membrane
- Cut the sheet membrane to fit the joint length. Most brands make special “band” strips for this purpose.
- Spread thinset mortar along the joint.
- Press the membrane into the mortar, smoothing out bubbles.
- Overlap corners with preformed pieces.
- Use a small roller to ensure full contact.
If the membrane does not stick well, check if your mortar is too dry or the surface is dusty. Always overlap seams by at least 2 inches. Some brands require a primer—read the directions before starting.
5. Seal The Bottom Edge
- After the membrane is dry, run a small bead of 100% silicone or urethane sealant along the bottom edge where the cement board meets the pan.
- Smooth with a wet finger or caulking tool.
- This step adds a final flexible layer that blocks water.
Let the sealant cure fully before exposing it to water or tile adhesive. Some fast-curing sealants are ready in a few hours, but others need a full day. Check the label to be sure.
6. Inspect And Test
- Before tiling, check the joint for gaps, bubbles, or missed spots.
- Spray water on the area and look for leaks after one hour.
- If any spot seems weak, add more membrane or sealant.
Insider Tip: Some installers do a “flood test” by plugging the drain and filling the pan with water overnight. This is smart for custom pans but less critical for preformed pans.
Testing at this stage can save you from costly repairs later. If you see water leaking out during the flood test, dry the area and repair immediately. Do not rush to tiling until you are confident your waterproofing is solid.

Credit: www.jacksonville.com
Special Situations And Adaptations
Preformed Shower Pans
Most acrylic or fiberglass pans have a vertical lip. The cement board should stop just above this lip, not inside the pan. The membrane should overlap the lip but not block the drain channel.
If you bring the cement board inside the pan lip, it can trap water, leading to swelling and mold. Always follow the shower pan manufacturer’s guidance on where to stop the backer board and how to seal the joint.
Mortar Bed And Liner Pans
Custom mortar pans use a vinyl or CPE liner under the mortar. The cement board should end above the liner. Do not screw the cement board into the liner below the curb height, as this can puncture the liner and cause leaks.
If you accidentally poke a hole in the liner, patch it with a compatible liner patch and adhesive before continuing. Leaks at this point are hard to fix later.
Curved Or Odd-shaped Showers
Use a liquid membrane for curves, as sheet membranes are hard to fit tightly around bends. Always overlap seams by at least 2 inches.
For large curves, cut sheet membrane into smaller strips and overlap each one. Take extra time to press out wrinkles and bubbles.
Steam Showers
Steam rooms need a vapor-proof membrane (not just waterproof). Use a product rated for steam, and seal all penetrations (pipes, valves) with gaskets or special sealant collars.
Also, use a higher-performance caulk or sealant rated for high temperature and moisture. Ordinary silicone may not last in this environment.
Comparing Waterproofing Products
The market offers many options. Here’s a direct comparison of popular products for this joint:
| Product | Type | Application | Best Feature | Drawback |
|---|---|---|---|---|
| RedGard | Liquid | Brush/Roller | Easy for DIY | Needs 2+ coats |
| Schluter Kerdi Band | Sheet | Thinset | Strong seams | More expensive |
| Mapei AquaDefense | Liquid | Brush/Roller | Dries fast | Needs careful thickness |
| Laticrete Hydro Ban Sheet | Sheet | Thinset | High flexibility | Harder to source |
Tip: Always use a system from one manufacturer if possible. Mixing brands can void warranties.
Also, buying all your materials from the same supplier helps if you need technical support or warranty help later. It’s easier for the company to stand behind their system if everything is compatible.
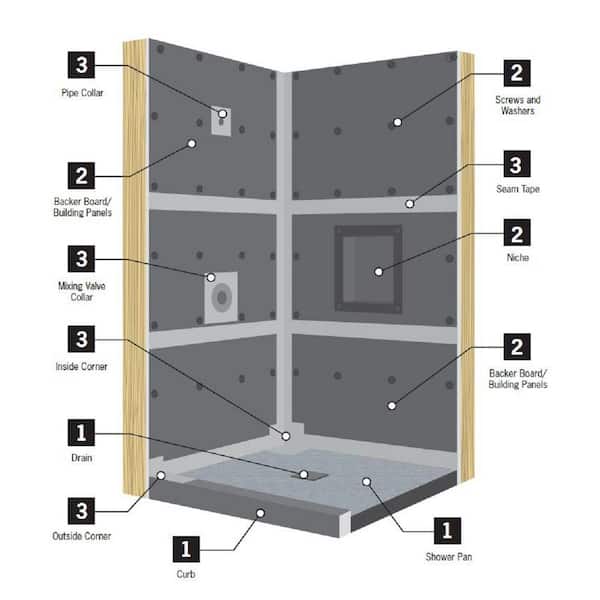
Credit: www.homedepot.com
Key Details Professionals Never Miss
Many waterproofing failures happen from small details. Here are two insights most beginners miss:
1. Overlap Is Everything
Every waterproof layer should overlap the next one below it, like shingles on a roof. This way, water always flows down and out, never into the wall. If you install the membrane or tape with a gap or reverse overlap, water will sneak in.
2. Movement Joints
Showers move a tiny bit as the house shifts. The joint between the cement board and shower pan is a “movement joint.” Always use flexible sealant (like silicone) as the final layer, not rigid grout. This lets the joint flex without cracking.
A third detail: professionals always check the corners and transitions twice. These are the most common places for pinhole leaks. Spend an extra few minutes reinforcing corners with special pre-formed pieces or extra membrane, even if the instructions don’t require it. This small effort can prevent major headaches later.
Maintenance And Long-term Care
Even the best waterproofing system needs care. Here’s how to keep your shower dry for years:
- Inspect caulk lines every year. Replace if cracked or peeling.
- Clean tile grout regularly. Mold grows in dirty grout and can hide leaks.
- Fix leaks quickly. If you see water stains, act fast to find the source.
- Do not use harsh chemicals on membranes or sealant. They can break down the material.
For extra protection, use a squeegee after each shower to remove standing water from the walls and floor. This reduces the amount of water that can seep through tiny cracks.
If you see mold, soft spots, or musty smells, do not ignore them. Early action is much cheaper than waiting.
How Long Will Waterproofing Last?
A well-installed system can last 20 years or more. Most leaks happen in the first few years due to installation errors. Over time, caulk and sealants may need reapplication, but the main membrane should last as long as the shower.
Fact: According to the Tile Council of North America, proper shower waterproofing should last the life of the installation if not damaged physically.
If you plan to remodel, always check the waterproofing before reusing the same tile or cement board. Old sealant and membranes may not bond well with new materials and should be replaced.
Real-world Example: A Costly Mistake
Consider this example: A homeowner in Texas skipped the waterproof membrane, thinking the cement board was enough. Two years later, paint bubbled on the living room ceiling below. Opening the wall showed black mold, rotten studs, and crumbling cement board. The repair cost $6,000—much more than the $150 spent on waterproofing would have been.
In another case, a small rental apartment had a shower leak that went unnoticed for months. By the time the owner found the problem, the entire bathroom floor had to be replaced, and tenants had to move out for repairs.
Small gaps and missed steps can turn into big bills.
Environmental And Health Benefits
Waterproofing is not just about structure. It also prevents mold and mildew, which can trigger allergies and asthma. A dry, mold-free shower is safer for families, especially children and older adults.
Keeping water out of the walls also helps your home’s energy efficiency. Wet insulation loses its power to keep your bathroom warm in winter and cool in summer. By preventing leaks, you also help protect the environment, since repairing water damage uses new wood, drywall, and energy.
Innovations And Future Trends
Modern waterproofing is getting smarter:
- Preformed foam shower pans with built-in waterproofing save time.
- Waterproofing mats with self-adhesive backing are becoming popular.
- Digital moisture sensors can be installed behind walls to warn you of leaks.
Manufacturers now offer longer warranties if you use their full system, giving more peace of mind.
Another trend is the rise of “green” waterproofing products that are low in VOCs (volatile organic compounds) and safer for indoor air quality. Some new products even change color to show when they are fully dry or if they have been damaged by water, making it easier to check your work.
Frequently Asked Questions
How Big Should The Gap Be Between Cement Board And The Shower Pan?
Keep a 1/8 to 1/4 inch gap. This stops water from wicking up, but is small enough for tape and sealant to bridge. Do not let the cement board touch the pan directly.
Should I Waterproof Behind The Cement Board Too?
Usually, you only need to waterproof in front of the cement board (surface-applied membrane). If your local code requires, you can also use a plastic sheet behind the board, but never both at the same time. Choose one method for best results.
What If The Cement Board Gets Wet Before Tiling?
Cement board can get damp, but it should dry fully before applying waterproofing. Water trapped under the membrane can cause mold. Use fans or a dehumidifier if needed.
Can I Use Regular Drywall Tape At The Joint?
No. Only alkali-resistant fiberglass mesh tape is safe. Regular tape breaks down in cement and moisture, leading to cracks and leaks.
How Do I Know If My Waterproofing Failed?
Look for soft walls, musty smells, or water stains outside the shower. These are signs of leaks. Fix the problem early to avoid major repairs.
—
Waterproofing the joint between cement board and the shower pan is not a step to skip or rush. A careful, layered approach protects your home from hidden water damage and gives you years of worry-free showers. Take time to use the right materials, follow each step, and check your work before tiling. For more technical details and product guides, visit the Schluter official website—a trusted resource for shower waterproofing solutions. Your future self (and your wallet) will thank you for a dry, mold-free bathroom.