
Setting the clock on your Aeg stove might seem like a small task, but it has a big impact on how your appliance works. Many modern stoves depend on the clock being set correctly to activate timers, auto-cooking features, and even allow the oven to heat up.
If the clock is wrong, your oven may not work at all. While it sounds simple, the process can be confusing—especially if you’ve lost the manual, moved into a new home, or your stove is a different model than you’re used to.
This guide will walk you through everything you need to know about how to change an Aeg stove clock, including step-by-step instructions for different models, troubleshooting tips, and practical advice that even beginners can follow.
Why Setting The Aeg Stove Clock Matters
The clock function on your Aeg stove is not just about keeping track of time. Many Aeg ovens and stoves will not turn on the oven or start certain functions unless the clock is set. If you have a power cut, move the appliance, or do a factory reset, the clock will often flash and need to be set again. Incorrect clock settings can disable auto-timers, delay cooking, or even make the oven look like it’s broken when it’s actually just waiting for you to set the time.
For models with advanced features like delayed start or programmable cooking, setting the clock is essential for those features to work. Some users don’t realize that a flashing or unset clock is the reason their oven won’t heat up—a common but easily fixed frustration.
Common Aeg Stove Models And Their Clock Interfaces
Aeg has produced many stove and oven models over the years, and the exact way to change the clock can vary. However, most models fall into a few main types:
| Model Series | Clock Type | Common Features |
|---|---|---|
| 6000 Series | Touch Control | Digital display, timer, auto-cook |
| 7000 Series | Rotary Knob + Buttons | Manual dial, programmable timer |
| 9000 Series | Full Touchscreen | Advanced settings, Wi-Fi options |
| Older Classic | Push Buttons Only | Simple digital clock, manual timer |
Knowing which type you have makes the process much easier. If you’re not sure, check the user manual or look up the model number online.
Tools And Preparation Before You Start
You don’t need any special tools to set the clock on an Aeg stove, but a few preparations make the process smoother:
- Model number: Find this, usually inside the oven door or on the back.
- Power source: Make sure the stove is plugged in and turned on.
- User manual: If you have it, keep it nearby. You can often download it from the Aeg website.
- Pen and paper: For jotting down steps or codes if troubleshooting.
Before starting, check if your clock is flashing or blank. If it’s flashing, it’s waiting to be set. If it’s blank, there may be a power issue or a faulty display.
Step-by-step: How To Change The Clock On Aeg Stoves
Touch Control Digital Clock (most Common)
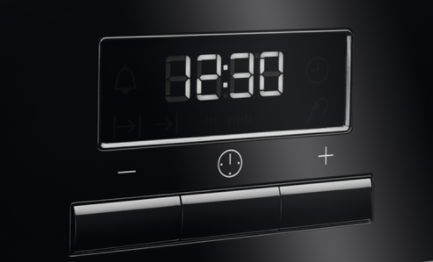
Many modern Aeg stoves use a digital display with touch-sensitive buttons. Here’s how to set the time:
- Locate the clock button: Look for a button with a clock symbol, usually on the control panel.
- Press and hold the clock button: Hold for 2–5 seconds until the clock numbers start flashing.
- Set the hour: Use the “+” or “-” buttons (sometimes marked as up/down arrows) to adjust the hour. Some models may require you to tap the clock button again to move to minutes.
- Set the minutes: After the hour is correct, use the “+” or “-” buttons to adjust the minutes.
- Confirm the time: Press the clock button again or simply wait a few seconds. The display should stop flashing, and the time is set.
Pro tip: On some models, if you don’t press a button for 5–10 seconds, the clock will automatically save your settings.
Rotary Knob And Button Combination
Some Aeg ovens and stoves use a rotary knob with additional buttons:
- Find the knob with the clock symbol: Turn the knob to the clock position.
- Press and hold: Push the knob in or press the “set” button, depending on your model, until the numbers flash.
- Adjust the hour and minutes: Turn the knob to set the hour, then push or press to move to minutes, and turn again.
- Confirm: Press the knob or “set” button to lock in your time.
Non-obvious insight: If you turn the knob too quickly, some models may skip numbers. Move slowly for accurate setting.
Full Touchscreen Models
For high-end Aeg stoves with a touchscreen:
- Access settings: Tap the settings or menu icon on the screen.
- Select ‘Clock’ or ‘Time’: Navigate through the menu to find the clock setting.
- Set the time: Use the on-screen arrows or keypad to enter the correct time.
- Save: Tap the confirm or checkmark button.
Some touchscreen models allow you to switch between 12-hour and 24-hour formats. Choose your preference before saving.
Classic Push Button Models
For older models with only push buttons:
- Press the ‘clock’ or ‘timer’ button: Hold until the display flashes.
- Use up/down or “+”/”-” buttons: Set the hour, then the minute.
- Confirm: Press the clock button again or wait for the display to stop flashing.
Tip for beginners: If your oven is not responding, make sure none of the timer functions (like auto or delayed start) are active. Clear these before setting the clock.
Detailed Troubleshooting: When The Clock Won’t Set
Even if you follow the steps, sometimes the clock just won’t set. Here are the most common issues and how to fix them:
Power Issues
If the display is blank or flickering, check that your stove is fully plugged in and switched on at the wall. Sometimes, a circuit breaker may have tripped. Resetting the breaker can restore power.
Button Not Responding
Control panel buttons can become unresponsive due to moisture, grease, or age. Try these steps:
- Wipe the panel gently with a dry cloth.
- Avoid pressing multiple buttons at once.
- If buttons still don’t work, turn off the stove at the wall for 10 minutes, then turn it back on.
Clock Keeps Resetting
If you set the time and it always returns to flashing or zero, you may have a faulty control board or a power supply issue. Repeated resets after power cuts often mean a backup battery (if present) has failed.
Oven Won’t Heat After Setting Clock
If your oven still won’t start after setting the time, check for:
- Active timer or delay-start settings
- Child lock or panel lock features (look for a key icon)
- Fault codes on the display (like F1, F2, etc.)
Refer to your manual or contact Aeg support if error codes appear.
How To Change The Clock After A Power Cut
Many people discover the need to reset their Aeg stove clock after a power outage. Here’s what to do:
- Wait for the clock to start flashing: This shows the oven is ready for a new time.
- Follow the standard setting steps for your model.
- Check all functions: After setting, test the oven and timer to make sure everything works.
Key insight: If your area has frequent power cuts, consider using a surge protector to help avoid repeated resets.

Credit: applianceworldonline.com
Special Features That Depend On The Clock
Setting the clock enables more than just the time display. Here are features that depend on having the correct time:
- Delayed Start: Automatically begins cooking at a set time.
- Auto-Off Timer: Turns the oven off after a set period.
- Programmable Cooking: Allows you to schedule meals even when you’re not home.
- Sabbath Mode: Some Aeg ovens include a mode for religious observance that requires the clock to be correct.
Incorrect clock settings can make these features fail or work unpredictably.
How To Switch Between 12-hour And 24-hour Formats
Some Aeg stoves allow you to select between 12-hour (AM/PM) and 24-hour (military) time. The steps are usually in the settings menu for touchscreen models, or by holding the clock button for longer on button models. If you’re unsure, check your user manual for “time format.”
Switching formats can help avoid confusion, especially if you often use delayed start or timer features.
What To Do If You Lost The User Manual
If you can’t find your manual, don’t panic. Aeg provides digital copies for most models on their official website. To find yours:
- Locate the model number: Usually inside the oven door or on the back panel.
- Visit the Aeg support site: Enter your model number to download the manual.
- Look for clock or time setting instructions in the contents.
If you can’t locate your manual online, try searching for your model number plus “manual” or “clock setting” in a search engine.
Common Mistakes To Avoid
Many people run into simple problems when setting their Aeg stove clock. Here are the most frequent mistakes:
- Not holding the clock button long enough: Most models need 2–5 seconds of holding before the display flashes.
- Accidentally setting a timer instead of the clock: Timers and clocks use similar buttons but work differently.
- Forgetting to confirm the setting: Always press the clock button again or wait for the display to stop flashing.
- Changing the time with the oven on: Some models require the oven to be off before you set the clock.
- Ignoring error codes or flashing symbols: These can mean there’s another issue that needs attention.
By avoiding these mistakes, you can save time and frustration.
Comparison: Aeg Clock Setting Vs Other Brands
How does changing the clock on an Aeg stove compare with other major brands?
| Brand | Clock Setting Method | Unique Features |
|---|---|---|
| Aeg | Touch, knob, or button | Timer lockout, auto-cook requires clock |
| Bosch | Touch or rotary | Quick-set timer, 24-hour only |
| Samsung | Touchscreen | Wi-Fi sync with phone clock |
| Siemens | Button and knob | Timer/clock combined display |
Aeg’s approach is user-friendly, but requires careful attention to the correct sequence of buttons or knob movements. Unlike some brands, Aeg often locks cooking functions until the clock is set, which is a common source of confusion.
Safety Tips When Setting The Clock
While changing the clock is a safe task, remember these points:
- Never try to set the clock with wet hands, especially on touch models.
- If the control panel is cracked or damaged, avoid pressing hard. This can make things worse.
- If you notice sparks, burning smells, or severe display issues, turn off the appliance and contact a technician.
Hidden insight: Regularly cleaning the control panel with a soft, dry cloth helps prevent button failure.
Advanced Settings: Using Timers, Alarms, And Auto-functions
Once your clock is set, you can use advanced features to make cooking easier.
Setting The Kitchen Timer
This function is separate from the clock. It allows you to set an alarm for boiling, baking, or reminders.
- Press the timer button (often a bell symbol).
- Set the desired time with “+” or “-”.
- Confirm with the timer button.
The timer will beep when done but won’t turn the oven off unless combined with auto-cook.
Using Auto-cook Or Delayed Start
If your model supports it:
- Set the clock first.
- Select the cooking function and temperature.
- Press the auto or delayed start button.
- Input start and end times using the clock controls.
- Confirm and wait: The oven will start and stop at the programmed times.
Child Lock
Some Aeg stoves have a child lock feature that locks the control panel. If you can’t set the clock, check if this is active (often a key symbol on the display). Hold the lock button for 3–5 seconds to unlock.
Maintenance Tips For The Clock And Control Panel
Keeping your Aeg stove’s clock and controls in good condition helps prevent problems.
- Wipe the panel gently after each use.
- Avoid using harsh chemicals or too much water.
- Protect the stove from power surges by using a surge protector.
- If your area has unstable electricity, consider a UPS (uninterruptible power supply) for added protection.
Pro insight: Dust and grease can cause long-term problems. Regular gentle cleaning helps extend the life of your stove’s electronics.

Credit: www.youtube.com
When To Call For Professional Help
If you have followed all instructions and the clock still will not set, it may be time to call a professional. Signs you need help:
- Display is completely dead, even after checking power.
- Buttons or touch sensors do not respond at all.
- Error codes that repeat after resets.
- Flashing symbols you cannot clear.
Certified technicians can diagnose control board problems, replace faulty panels, or update firmware if needed. Attempting to repair electrical parts yourself is dangerous and can void your warranty.
Real User Experiences: Common Problems And Solutions
Many users share similar stories when trying to set their Aeg stove clocks:
- Problem: “My oven won’t heat up after a power cut.”
Solution: The clock was flashing. Setting the time restored all functions.
- Problem: “Buttons seem stuck and the clock won’t change.”
Solution: Cleaning the panel and restarting the oven fixed the issue.
- Problem: “I keep setting the timer instead of the clock.”
Solution: Carefully read the button labels—clock and timer are often right next to each other.
- Problem: “The clock resets every time I unplug the oven.”
Solution: This is normal for most models; some newer ovens have a small backup battery, but most lose the time when unplugged.
These stories show that most clock problems are easy to fix with the right approach.
Credit: www.woolyyarn.com
Future Trends: Smart Ovens And Automatic Time Sync
As technology advances, more Aeg ovens are including smart features like Wi-Fi connectivity and automatic time sync. Some models can update their clock using your home network, just like a smartphone. This removes the need to set the clock manually after a power cut.
However, these models still require a basic setup the first time they’re used.
If you’re considering a new Aeg stove, look for models with smart connectivity for easier time management.
Environmental Factors That Affect Clock Settings
Few people consider that voltage fluctuations, frequent power outages, or using the oven on a generator can affect the clock’s memory. In such cases, the clock may lose time more often. Using a voltage regulator can help keep the clock accurate.
Unexpected tip: Even strong magnets near the control panel can sometimes cause interference, leading to display glitches.
Quick Reference: Setting The Clock For Popular Aeg Models
Here’s a quick guide for some of the most common Aeg stove models:
| Model | Clock Setting Method | Special Notes |
|---|---|---|
| BPE742320M | Touch control, hold clock button | Requires oven to be off |
| BSE782320M | Touchscreen, settings menu | Wi-Fi sync possible |
| BPB331021M | Button panel, clock button | Timer lockout feature |
| BSK999330T | Full touchscreen | Choose 12/24-hour format |
Always check your specific manual for detailed instructions, as button layouts can change between models.
Frequently Asked Questions
How Often Do I Need To Reset The Aeg Stove Clock?
Usually, you only need to reset the clock after a power outage, when moving the stove, or if you unplug it for cleaning. Some advanced models keep time even after short power losses.
What Should I Do If The Aeg Oven Clock Flashes But Won’t Set?
Check that you are pressing the correct sequence of buttons, and hold the clock button long enough. If the clock still won’t set, turn the oven off at the wall for 10 minutes, then try again. If problems persist, the control board may need servicing.
Can I Change The Aeg Stove Clock To A 24-hour Format?
Yes, many newer Aeg stoves allow you to choose between 12-hour and 24-hour formats. This setting is usually found in the main settings menu or by holding the clock button longer. Check your manual for details.
Why Won’t My Oven Work Even After Setting The Clock?
If the oven still won’t start, check for active timers, child lock, or error codes. Some features like auto-cook or delayed start need the clock to be set correctly. If issues continue, contact Aeg customer support.
Where Can I Find Official Instructions For My Specific Aeg Model?
Visit the official AEG Manuals and Documents page. Enter your model number to download the correct manual with detailed steps.
Getting the clock right on your Aeg stove is a simple task when you know how, but it unlocks all the features and ensures your cooking goes smoothly. With the steps and tips above, you can confidently set the time, avoid common mistakes, and keep your kitchen running efficiently.