Cleaning a deep fryer can seem like a tough task, especially if you use it often. Grease, burnt crumbs, and sticky oil can build up quickly. But there is a simple, safe, and effective way to keep your deep fryer fresh: using vinegar. Many people do not realize that vinegar is not just for salads—it is a powerful cleaning agent that can cut through oil and leave your fryer sparkling. If you want your fried food to taste great and your appliance to last longer, learning how to clean a deep fryer with vinegar is a must. Let’s dive deep into why vinegar works, how to clean step-by-step, and tips to avoid mistakes most beginners make.
Why Use Vinegar To Clean A Deep Fryer?
Vinegar is a popular choice for cleaning deep fryers for several reasons. First, vinegar is a natural acid that breaks down grease and removes tough stains. It is non-toxic, so you do not need to worry about harsh chemicals around your food. Vinegar also helps fight odors that can linger after frying.
Compared to special fryer cleaners, vinegar is inexpensive and easy to find. It works on both stainless steel and enamel surfaces. Even more, vinegar can reach into small corners where oil hides. For people who cook often, using vinegar keeps the fryer’s inside clean, helps the machine work better, and extends its lifespan.
Many restaurants trust vinegar as a safe, food-friendly solution.
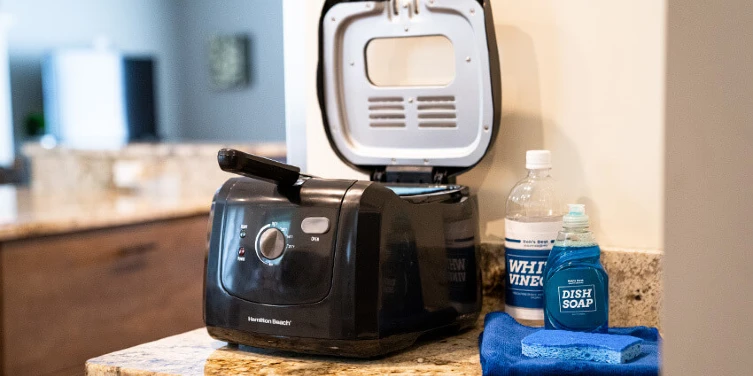
Supplies And Preparation
Before you start, gather everything you need. Cleaning a deep fryer is easier and safer when you are prepared.
What You Will Need
- White vinegar (about 2–4 cups, depending on fryer size)
- Warm water
- Dish soap
- Soft sponge or cloth
- Small soft brush (an old toothbrush works well)
- Paper towels or microfiber cloth
- Plastic or wooden spatula
- Container for old oil
- Rubber gloves (optional, protects your hands)
- Measuring cup
Safety First
Make sure the fryer is unplugged and completely cool before you begin. Hot oil can cause serious burns. Never pour water or vinegar into a fryer with hot oil—this can cause dangerous splattering.
Emptying The Fryer
Carefully pour the used oil into a container. Do not pour oil down the sink, as it can clog pipes and harm the environment. Many cities have recycling programs for cooking oil. If your fryer has a removable basket and lid, take them out for easier cleaning.

Credit: www.reddit.com
Step-by-step: How To Clean A Deep Fryer With Vinegar
Let’s break down the process into clear steps. Cleaning a deep fryer with vinegar is not hard, but doing it the right way makes a big difference.
1. Remove Oil And Loose Debris
After unplugging and cooling the fryer, pour out all the oil. Use a spatula to scrape out any crumbs or food bits stuck inside. Wipe the inside with a paper towel to remove as much grease as possible. This step helps the vinegar work better.
2. Disassemble Removable Parts
Take out the frying basket, lid, and any other parts that come out easily. Check your fryer’s manual if you are unsure. Wash these parts in warm soapy water while you clean the main unit.
3. Make The Vinegar Solution
Mix one part white vinegar with two parts warm water. For a medium-sized fryer, use 1 cup vinegar and 2 cups water. This solution is strong enough to break down grease, but gentle on surfaces.
4. Clean The Fryer Interior
Pour the vinegar solution into the fryer so that it covers the bottom and touches all greasy spots. Do not fill above the “max” line. Let it soak for 10–15 minutes. The vinegar will loosen stuck-on oil and stains.
After soaking, use a soft sponge or cloth to scrub the inside. For tough spots, use a soft brush or toothbrush. Move gently—do not use metal brushes, as they can scratch the surface.
5. Clean The Fryer Basket And Lid
While the vinegar works inside the fryer, wash the basket and lid in the sink with hot soapy water. If they are very greasy, let them soak in a vinegar-water mix for 15 minutes, then scrub with a sponge.
6. Rinse Thoroughly
Pour out the vinegar solution from the fryer. Wipe the inside with a clean wet cloth to remove any leftover vinegar and grease. Rinse two or three times to make sure no vinegar taste remains. Let all parts air dry or wipe with a clean cloth.
7. Clean The Heating Element (if Removable)
Some fryers have a removable heating element. If yours does, wipe it gently with a damp cloth. Do not soak it or get it too wet—this part is sensitive to water.
8. Exterior Cleaning
Wipe the outside of the fryer with a cloth dipped in vinegar-water solution. This removes fingerprints, sticky oil, and keeps the fryer looking new.
9. Reassemble And Final Checks
Once all parts are dry, put the fryer back together. Double-check that everything is clean and dry before plugging it in.
How Vinegar Removes Oil And Odors
Vinegar is more than just a cheap cleaner. Its acetic acid reacts with the fatty molecules in oil, breaking them into smaller pieces that can be wiped away. This is why vinegar works even on old, sticky grease.
Vinegar also neutralizes odors. After frying fish or spicy foods, you may notice a smell that won’t go away. Vinegar’s acid binds to these smelly molecules, making the fryer smell fresh again. This is something soap alone cannot do.
Credit: www.mrappliance.com
How Often Should You Clean Your Deep Fryer?
How often you clean your deep fryer depends on how much you use it. For home use, cleaning after every 2–3 uses is a good habit. If you use your fryer daily, clean it more often. Restaurants often clean fryers at the end of each day.
Leaving old oil and crumbs in the fryer can cause smoke, bad smells, and even machine problems. Regular cleaning keeps your food tasting great and your fryer working safely.
Comparing Cleaning Methods: Vinegar Vs. Other Options
Here’s a look at how vinegar compares to other popular fryer cleaning methods.
| Cleaning Method | Effectiveness on Grease | Odor Removal | Food Safety | Cost |
|---|---|---|---|---|
| Vinegar | High | Excellent | Very Safe | Low |
| Dish Soap | Medium | Good | Safe | Low |
| Commercial Cleaner | Very High | Good | Check Label | Medium/High |
| Baking Soda | Medium | Very Good | Safe | Low |
As you can see, vinegar scores high for grease removal, odor-fighting, safety, and low cost. Commercial cleaners may work faster, but they can leave chemical smells and are not always food-safe.
Common Mistakes To Avoid
Even though cleaning with vinegar is simple, there are some common mistakes that can cause problems.
1. Not Cooling The Fryer
Never clean a hot fryer. Hot oil can burn you, and adding vinegar to hot surfaces can cause dangerous splatter.
2. Forgetting To Rinse
If you do not rinse well, your next batch of food may taste like vinegar. Always rinse and dry all parts thoroughly.
3. Using Metal Scrubbers
Metal brushes or scouring pads can scratch the fryer’s coating. Always use soft sponges or brushes.
4. Getting The Heating Element Wet
If your fryer’s heating part is not removable, do not pour water or vinegar directly on it. Wipe it carefully with a damp cloth.
5. Mixing Vinegar With Bleach
Never mix vinegar with bleach—it creates harmful fumes. Vinegar alone is enough for cleaning.
How To Remove Burnt-on Grease With Vinegar
Sometimes, normal cleaning is not enough. If your fryer has burnt oil or dark stains, try this deep-cleaning method.
- Mix 1 cup vinegar with 1 cup water.
- Warm the solution in the microwave (not boiling).
- Pour into the fryer and let it soak for 30 minutes.
- Use a plastic spatula or old credit card to gently scrape off burnt spots.
- Scrub with a brush, rinse well, and dry.
If stains remain, sprinkle baking soda on the spot and scrub with a damp sponge.
Cleaning The Fryer Filter
Many deep fryers have a filter in the lid that traps oil vapors. Over time, these filters can get greasy and block airflow.
- If the filter is removable, take it out and soak in a vinegar-water mix for 15 minutes. Rinse and dry before returning it.
- If the filter is not removable, wipe it with a cloth dampened in vinegar. Never soak the lid if it has electrical parts.
How Long Does Cleaning Take?
A full cleaning usually takes about 30 to 45 minutes. Soaking helps loosen grease, but do not rush. For heavy buildup, allow extra soaking time.
Signs Your Deep Fryer Needs Cleaning
Watch for these signs:
- Strong oil smell, even when not frying
- Smoke or burning smell during use
- Food tastes odd or like old oil
- Sticky or blackened surfaces
Regular cleaning prevents these problems and keeps your food tasting fresh.
Can You Use Other Types Of Vinegar?
White vinegar is best for cleaning because it is clear and has a strong acid. Apple cider vinegar also works but may leave a smell. Avoid balsamic or flavored vinegars—they can stain and are less effective.
Vinegar Cleaning For Different Fryer Types
Not all deep fryers are the same. Here’s how vinegar works on different models.
| Fryer Type | Removable Parts | Best Cleaning Approach |
|---|---|---|
| Countertop Electric Fryer | Basket, lid, oil pan | Soak and wipe with vinegar solution |
| Stovetop Deep Fryer | All parts removable | Soak all parts, scrub, rinse |
| Commercial Deep Fryer | Removable basket, filter | Use large amounts of vinegar solution, soak overnight if needed |
| Air Fryer (with oil tray) | Basket, tray | Soak basket/tray, wipe inside with vinegar cloth |
Always check your appliance manual before cleaning, especially for commercial or air fryer models.
How To Keep Your Fryer Cleaner, Longer
Cleaning is easier if you prevent big messes. Here are some tips:
- Filter your oil after each use to remove crumbs. This keeps oil and fryer cleaner.
- Do not overfill the fryer with oil. Spills make cleaning harder.
- Wipe the outside after each use before oil dries.
- Change oil when it gets dark or smells bad.
- Use a splatter guard or lid to keep oil from escaping.
Real-life Example: Restaurant Cleaning Routine
Restaurants use deep fryers all day and must keep them clean for food safety. Most use vinegar because it is food-safe and effective. They follow these steps:
- Filter oil twice daily.
- Wipe down outside with vinegar solution after lunch and dinner.
- Deep clean with vinegar every night.
- Replace filters weekly.
Their secret: they soak baskets and pans in vinegar overnight for tough grease. This makes morning cleaning much faster.
What Beginners Usually Miss
Many people think wiping the fryer is enough, but hidden oil under the heating coil or in corners causes most smells and burnt flavors. Always reach into corners with a brush.
Another common mistake is not letting parts dry completely. Moisture can cause oil to splatter when frying. After cleaning, let all parts air dry fully before adding oil.
What If Vinegar Is Not Enough?
If your fryer is extra dirty, you can add a small amount of baking soda to the vinegar solution. Baking soda is a gentle abrasive that helps scrub away tough stains. For commercial fryers, consider soaking overnight with vinegar and water for the best results.
Environmental Impact: Why Vinegar Is Better
Vinegar is eco-friendly. It breaks down naturally and does not add chemicals to the water supply. Using vinegar instead of harsh cleaners is better for your family and the planet. Always dispose of old oil at a recycling center, not in the sink.
Cost Comparison: Vinegar Vs. Other Cleaners
Let’s see how much you can save with vinegar.
| Cleaner | Average Cost per Clean | Food Safe |
|---|---|---|
| White Vinegar | $0.25 | Yes |
| Commercial Fryer Cleaner | $2.00 | Check Label |
| Baking Soda | $0.15 | Yes |
| Dish Soap | $0.10 | Yes |
Over a year, using vinegar can save you money and reduce chemical use.
Troubleshooting: If Your Fryer Still Smells
If you followed all steps but notice a smell, try this trick:
- Fill the fryer with vinegar solution and let it sit overnight (unplugged, no heat).
- Next day, scrub and rinse well.
- For strong smells, add a few lemon slices to the vinegar.
This method removes most strong odors.
When To Replace Your Fryer
Cleaning helps a fryer last longer, but nothing lasts forever. Replace your fryer if:
- The nonstick coating peels off
- The heating element does not work well
- You see cracks or rust inside
A clean fryer cooks better and is safer.
Safety Tips For Cleaning With Vinegar
- Always work in a well-ventilated area.
- Wear gloves if you have sensitive skin.
- Never mix vinegar with other chemicals.
- Dry all parts completely before use.
Expert Tip: Make A Cleaning Calendar
To remember when to clean, make a calendar or set phone reminders. Regular, small cleanings are easier than waiting for a big mess.
Where To Learn More
For extra tips on cleaning kitchen appliances safely, check out the Consumer Reports kitchen cleaning guide.
:max_bytes(150000):strip_icc()/faw-toaster-ovens-air-fryers-test-chefman-3-7qt-turbofry-rkilgore-111-487d903950824b019a89d671ec68e254.jpg)
Credit: www.foodandwine.com
Frequently Asked Questions
How Much Vinegar Should I Use To Clean A Deep Fryer?
For most home fryers, 1 cup of white vinegar mixed with 2 cups of warm water is enough. If your fryer is larger, increase the amount but keep the same ratio.
Can I Use Apple Cider Vinegar Instead Of White Vinegar?
Apple cider vinegar works, but it may leave a slight smell and is less effective on tough grease. White vinegar is best for cleaning.
Is It Safe To Clean The Heating Element With Vinegar?
If your heating element is removable, wipe it gently with a damp cloth soaked in vinegar. Do not soak it or get it too wet. Always check your fryer’s manual first.
Why Does My Fryer Still Smell After Cleaning With Vinegar?
Sometimes, odors remain in filters or small corners. Try soaking overnight with vinegar solution or clean the filter separately. If the smell continues, check for burnt oil stuck in hard-to-reach places.
Can I Pour Vinegar Directly Into My Deep Fryer?
Yes, but only when the fryer is unplugged and empty of oil. Never pour vinegar into a fryer with hot oil or plugged in—it is unsafe.
Keeping your deep fryer clean with vinegar is easy, safe, and affordable. With these steps, you will enjoy better-tasting food, a longer-lasting appliance, and a safer kitchen. A little effort after each use saves time and trouble later. Happy frying!