
Making your own template for cabinet pulls might sound tricky, but it’s a smart way to get perfect results every time. Most cabinets need hardware like handles or knobs, and placing these evenly can be harder than it looks. If you drill a hole in the wrong spot, you might ruin the cabinet door or drawer front.
A template gives you a repeatable pattern, saving time and helping you avoid expensive mistakes.
Whether you’re updating kitchen cabinets, building new furniture, or just want all your handles to line up, a template is one of the best tools you can make. You don’t need expensive equipment—just a few basic materials and a little patience.
This guide will walk you step by step through making a template for cabinet pulls, so you get a professional look even if it’s your first time. You’ll also find tips, mistakes to avoid, and answers to common questions.
Why Use A Template For Cabinet Pulls?
Accuracy is one of the biggest reasons people make templates. Without a template, you might measure each cabinet door or drawer separately. This takes more time, and small errors add up. If you install twenty pulls and a few are crooked, your eyes will go straight to the mistakes.
Templates also:
- Speed up the process. You can drill multiple doors and drawers quickly.
- Prevent damage. Misplaced holes are hard to fix, especially on painted or stained wood.
- Give a uniform look. All handles line up perfectly, which is important in kitchens and bathrooms.
Even professional carpenters use templates for cabinet hardware. Once you make one, you can reuse it for years.
Tools And Materials You Will Need
You don’t need special tools, but having the right materials helps you make a good template. Here’s what you’ll need:
- Measuring tape or ruler — For measuring cabinet doors, drawers, and hardware spacing.
- Pencil and eraser — For marking holes and guidelines.
- Drill or awl — To make pilot holes in the template.
- Drill bits — Match the size to your cabinet pull screws.
- Template material — Options include thick cardboard, acrylic sheet, plywood, or metal.
- Clamps or tape — To hold the template in place during use.
- Cabinet pulls — Have one on hand for measuring hole spacing.
- Safety glasses — For eye protection when drilling.
If you’re making a template for a large project, consider using a clear acrylic sheet. This makes it easy to see markings on the cabinet. For small jobs, cardboard or thin plywood works well.
Understanding Cabinet Pull Placement
Before you start, it’s important to know where the pulls should go. Pulls on cabinet doors are usually placed vertically, while those on drawers are horizontal. Here are common guidelines:
- Cabinet doors: Place the pull vertically, 2.5 to 3 inches from the bottom corner (for upper cabinets) or top corner (for lower cabinets), and about 1 to 2 inches from the edge.
- Drawer pulls: Center horizontally and vertically on the drawer front, unless the drawer is extra-wide. For wide drawers, use two pulls spaced evenly.
You can adjust these measurements for your style, but consistency is key. Measure several times before you drill anything.
Choosing The Right Template Material
The material you use makes a difference. Here’s a quick comparison of popular template materials:
| Material | Pros | Cons | Best Use |
|---|---|---|---|
| Thick Cardboard | Cheap, easy to cut | Wears out quickly, not reusable for many jobs | One-time or small projects |
| Plywood (1/8″ to 1/4″) | Durable, reusable | Harder to see through, needs saw to cut | Medium to large projects |
| Acrylic Sheet | See-through, accurate | More expensive, harder to drill | Professional or frequent use |
| Metal | Very durable, precise | Expensive, needs special tools | Commercial shops |
For most DIYers, plywood or acrylic gives the best mix of durability and ease.
How To Measure For Cabinet Pull Placement
Getting the measurements right is critical. Follow these steps:
- Measure the pull’s hole-to-hole distance (also called the “center-to-center” measurement). Most common sizes are 3 inches (76mm), 4 inches (102mm), and 5 inches (128mm), but always check your hardware.
- Measure the door or drawer front. Write down the height and width.
- Mark the desired placement. For doors, measure from the edges where you want the pull. For drawers, find the center point or points.
- Double-check everything before making any holes.
A good tip: Make a test mark on masking tape before marking the actual template. This way, you can adjust without making permanent marks.
Step-by-step: Making A Template For Cabinet Pulls
Now let’s go through the process. These steps will help you make a template you can use over and over.
1. Cut The Template Material
Cut your material to a size that’s easy to handle—usually about 6 by 10 inches. Make sure the edges are straight and square. If using acrylic, remove any protective film.
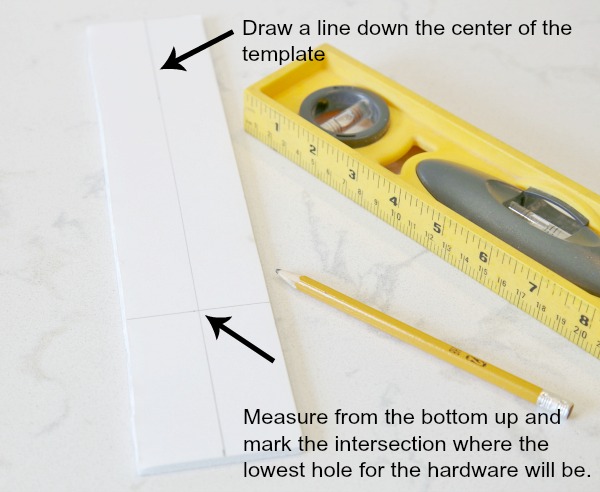
2. Mark Reference Edges
Pick two edges to use as your references—the bottom and side. These will always line up with the cabinet edge. Mark them clearly with a permanent marker.
3. Measure And Mark The Hole Positions
- Use your measuring tape or ruler to measure from the reference edges to the desired hole spots.
- Draw a small cross at each spot. For cabinet doors, use one hole; for pulls with two screws, mark both spots.
- If your cabinets or drawers have different sizes, you may need a separate template for each type.
4. Drill The Holes
- Put on safety glasses.
- Use an awl or small drill bit to make a pilot hole at each cross.
- Use the correct size drill bit to enlarge the hole just enough for a pencil or drill bit to pass through.
- Sand any rough edges to avoid scratches on your cabinets.
5. Test The Template
- Hold the template against a scrap piece of wood or cardboard.
- Mark through the holes.
- Drill the test piece and attach your hardware to see if the spacing is correct.
Testing first helps you catch mistakes before you drill your actual cabinets.
6. Label And Store The Template
Write on the template what it’s for (e. g. , “Kitchen Upper Door Pulls, 3-inch center”). Store it somewhere safe for future use.
Credit: www.sandandsisal.com
Using The Template On Cabinet Doors And Drawers
Once you have your template, using it is simple:
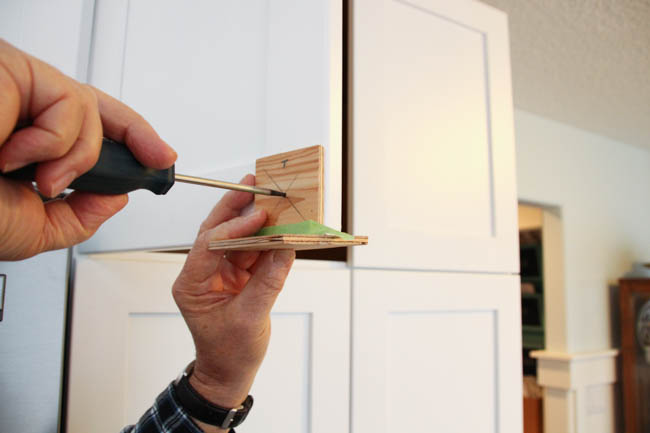
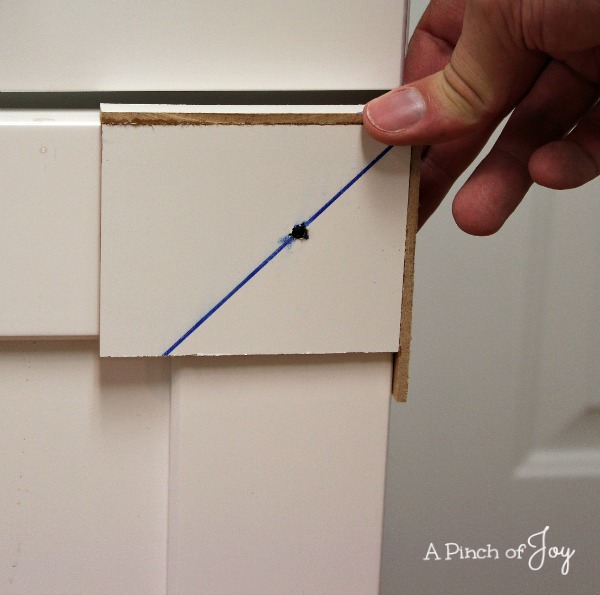
- Line up the reference edges of the template with the cabinet or drawer edge.
- Clamp or tape the template in place.
- Mark the drill points with a pencil through the template holes.
- Remove the template.
- Drill the holes carefully at your marks, holding the drill straight.
A common mistake is letting the template slip. Always hold it tight or use clamps if you have them.
For doors, make sure you’re using the correct reference edges for left- or right-opening doors. You may need to flip the template.
Adjusting For Different Cabinet Types
Not all cabinets are the same. Here’s how to adjust your template for different situations:
- Overlay doors: These sit over the cabinet frame. Measure from the edge of the door.
- Inset doors: These sit inside the frame. Measure from the edge of the frame, not the door.
- Wide drawers: You may want to use two pulls. Mark both sets of holes on your template or use two templates.
If you have a mix of sizes, make separate templates and label each one clearly.
Common Mistakes And How To Avoid Them
Some mistakes are easy to make, even for experienced DIYers. Here are the most common and how to avoid them:
- Measuring from the wrong edge: Always use the same reference edge for every door or drawer.
- Template slipping: Use clamps or strong tape to hold the template tight.
- Drilling too fast: Go slow to avoid splintering the cabinet surface.
- Using the wrong drill bit size: Always match the bit to your hardware screws.
- Not testing first: Practice on scrap wood before drilling your cabinets.
- Forgetting to flip the template for left/right doors: Mark your template so you know which way to use it.
Tips For Getting A Professional Finish
Small details make a big difference in the final look.
- Use masking tape on the cabinet surface where you’ll drill. This reduces splintering.
- Drill halfway from the front, then finish from the back if possible. This keeps the hole clean.
- Clean up holes with sandpaper or a countersink bit.
- Check hardware fit before fully tightening screws.
- Wipe away dust after drilling to avoid scratches.
When To Buy A Commercial Cabinet Pull Template
There are ready-made templates available at hardware stores. You might consider buying one if:
- You have a very large project (like a full kitchen remodel).
- You want a tool that adjusts for many pull sizes.
- You don’t want to make your own template.
Commercial templates are made from metal or heavy-duty plastic and often have sliding parts for adjusting hole spacing. However, making your own is cheaper, and you can customize it for your exact needs.
Example: Making A Template For A 3-inch Pull
Let’s walk through a real example.
Suppose your kitchen drawer pulls have a 3-inch center-to-center distance. Your drawer front is 6 inches high and 24 inches wide.
- Cut your template to 6 x 10 inches from 1/8-inch plywood.
- Mark the center of the template width (5 inches from the side).
- From the bottom edge, mark 3 inches up for the center line.
- On this center line, mark two points: 1.5 inches left and right of the center (for the 3-inch spacing).
- Drill holes at these two marks.
- Label the template “3-inch Drawer Pulls.”
- To use, align the template’s bottom with the drawer’s bottom edge, center it, clamp, and mark the holes.
This method works for any size pull—just adjust the measurements.
Credit: www.thehappyhousie.com
How A Template Saves Time In Large Projects
If you are updating a whole kitchen with 20 or more cabinets, a template can cut your work time in half. You don’t need to re-measure each door or drawer. Just place the template, mark, and drill. This also reduces stress—no worrying about crooked or uneven handles.
A study by a leading woodworking magazine showed that using a template reduced installation errors by over 80% compared to measuring each door individually. This is a huge time saver and helps your project look professional.
How To Maintain And Reuse Your Template
A good template can last for years. To keep it in good shape:
- Store it flat, away from moisture.
- Clean off any pencil or drill marks after each use.
- If the holes get worn or loose, make a new template.
- Keep it with your hardware or tool kit, labeled for easy finding.
Some people make a small hole in the template and hang it on a pegboard in their workshop.
Credit: www.apinchofjoy.com
Different Pull Styles And Template Adjustments
Not all pulls are the same. Here are some common styles and what to adjust:
- Bar pulls: Long, straight handles. Use the center-to-center distance for holes.
- Knobs: Only one hole needed. Template just marks the center.
- Cup pulls: Usually have two holes, but the pull shape covers them. Make sure the template matches the cup’s design.
If you switch hardware styles, make a new template. Never try to force old holes to fit new pulls—it can damage the cabinet.
Advanced Template Features
Experienced woodworkers sometimes add extra features to their templates:
- Adjustable holes: Slots that allow you to use different center-to-center distances.
- Multiple hole markings: For doors, drawers, and different pull sizes.
- Clear acrylic with grid lines: Makes centering and aligning even faster.
You can find inspiration for these on home improvement forums or by looking at commercial templates.
Safety Tips For Making And Using Templates
Safety is important, even for small DIY jobs.
- Always wear safety glasses when drilling.
- Keep your work area clean to avoid slipping.
- Clamp your template and cabinet before drilling.
- Check for wires or pipes behind the drill area, especially in kitchens and bathrooms.
- Use sharp drill bits for cleaner holes.
These simple tips prevent accidents and keep your cabinets in top shape.
Troubleshooting: Fixing Common Problems
Sometimes things go wrong. Here’s what to do:
- Hole drilled in the wrong spot: Fill with wood filler, sand smooth, touch up paint or stain, and drill again.
- Splintered wood: Use masking tape next time, and sand the area smooth.
- Template doesn’t fit all cabinets: Make separate templates for different sizes.
- Handle doesn’t sit flat: Check for sawdust in the hole or try a slightly larger drill bit.
Remember, even professionals make mistakes. The key is to fix them carefully and learn for next time.
Comparing Homemade And Commercial Templates
Let’s look at how homemade templates stack up against store-bought versions:
| Feature | Homemade Template | Commercial Template |
|---|---|---|
| Cost | Low (often free) | $10–$30 on average |
| Customization | Fully customizable | Limited to preset sizes |
| Durability | Depends on material | Very durable (metal/plastic) |
| Ease of Use | Simple for one type of pull | Quick for many types |
| Availability | Immediate (DIY) | Must purchase |
For most home users, a homemade template is the best choice. If you do many kitchens or want all-in-one adjustability, a commercial template might be worth it.
Real-world Example: Kitchen Cabinet Makeover
Sarah wanted to update her kitchen. She bought 24 new bar pulls, each with a 5-inch center-to-center distance. Instead of measuring each cabinet, she made a plywood template. In one afternoon, she drilled all holes and installed the hardware. Her cabinets looked professionally done, and she saved hours of work.
The key to her success? Careful measuring, making a sturdy template, and testing before drilling her real cabinets. She even made a second template for her wide drawers, showing that sometimes you need more than one.
Two Insights Most Beginners Miss
- Templates are not just for one project. If you plan to change hardware in the future, keeping your template can save you time and trouble. Many people throw away their template after one use, then wish they had it later.
- Door orientation matters. Left-opening and right-opening doors might need the template flipped or a separate template. Many beginners drill all doors the same, then realize the pulls look off.
Environmental Benefits Of Making Your Own Template
By making a reusable template from scrap plywood or plastic, you reduce waste. You avoid buying single-use plastic templates or making mistakes that lead to wasted cabinet doors. It’s a small step, but every bit helps the environment.
Where To Find More Inspiration
If you want to see creative template ideas, check out home improvement forums, YouTube tutorials, or websites like Family Handyman. Seeing real-life examples can give you new ideas for your own projects.
Frequently Asked Questions
What Is The Best Material For A Cabinet Pull Template?
For most people, 1/8-inch plywood or clear acrylic is best. These materials are sturdy, easy to drill, and reusable. For one-time use, thick cardboard is enough, but it won’t last as long.
Can I Use The Same Template For Both Doors And Drawers?
Sometimes, but not always. Drawer pulls are usually centered, while door pulls are near the edge. If your doors and drawers are different sizes or use different pulls, make separate templates for each.
How Do I Avoid Drilling Holes In The Wrong Place?
Always double-check measurements, test your template on scrap wood, and use clamps or tape to hold the template steady. Marking with a pencil first helps you see if the holes look right before drilling.
Is It Better To Buy A Commercial Template Or Make My Own?
If you need to install many different pull sizes or do lots of kitchens, a commercial template saves time. For most DIYers, making your own template is cheaper, customizable, and works just as well.
What Should I Do If I Make A Mistake And Drill The Hole In The Wrong Spot?
Don’t panic. Fill the hole with wood filler, let it dry, sand smooth, and touch up with paint or stain. Once dry, you can drill again in the correct spot. Take your time and the repair will be almost invisible.
Making a template for cabinet pulls is one of the smartest steps you can take for a professional look and lasting results. With careful measuring, the right materials, and a little patience, your cabinets will look their best for years to come.