
Raising kitchen cabinets is a project that can transform your cooking space, improving both function and style. Many homeowners find their cabinets too low, making it hard to use appliances or create more storage. If you want to fit a larger refrigerator, add a backsplash, or just achieve a modern look, learning how to raise kitchen cabinets can be a smart and affordable solution.
This guide walks you through every step, offering practical advice from planning to finishing touches, so you get a result you’re proud of.
Why Raise Kitchen Cabinets?
Older kitchens often have cabinets set lower than today’s standards. This can mean less counter space and more bending, which isn’t ideal for daily use. By raising cabinets, you:
- Create more workspace above the counters
- Improve accessibility for tall appliances like coffee makers or blenders
- Make the kitchen feel bigger by lifting sight lines
- Allow for a modern backsplash or under-cabinet lighting
- Prepare for new countertops or taller backsplashes
Not only does raising cabinets solve practical problems, but it can also give your kitchen a fresh, updated appearance without the high cost of a full remodel. For example, a kitchen with low cabinets often feels cramped, especially when multiple people are cooking or cleaning.
By lifting the cabinets, you increase both the physical and visual space, making the area more welcoming and easier to maintain. Some homeowners also notice that a higher cabinet placement can improve the lighting in the room, as more light reflects off the counters and walls.
A raised cabinet line also opens up design possibilities. If you’ve ever wanted to install a dramatic tile backsplash or under-cabinet lighting, you’ll have more room to work with. This is especially useful in older homes, where the original kitchen design didn’t account for today’s appliances and decor trends.
Planning Your Kitchen Cabinet Raise
Before you start, good planning is essential. Mistakes here can lead to misaligned cabinets, extra costs, or even damage. Take time to measure, research, and prepare.
Assessing Your Current Kitchen Layout
Begin by studying your kitchen:
- Cabinet height: Measure from the floor to the bottom and top of your wall cabinets.
- Countertop space: Check how much room you have between the counter and cabinets.
- Ceiling height: Standard ceilings are 8 feet, but some are taller or shorter.
- Cabinet structure: Are cabinets individual boxes or a connected unit?
- Appliance fit: Note if you have or plan to add a larger fridge, microwave, or range hood.
Look out for unusual features, like vents, outlets, or built-in microwaves, as these can affect how and where you move your cabinets. For example, if your cabinets are built as a single unit, you may need to separate them before raising.
If they are individual boxes, you’ll have more flexibility, but you’ll need to keep track of how each piece fits together.
Take photos of your kitchen before you start. These will be helpful if you need to reference the original layout or show a contractor any problem areas. Also, note any water or gas lines nearby, as moving cabinets too high or too low might interfere with these utilities.
Deciding How Much To Raise
The typical space between countertop and cabinet bottom is 18 inches, but modern kitchens may have 20-24 inches. Decide how high you want the cabinets based on:
- Appliance height (leave room for coffee makers, mixers, etc.)
- Personal comfort (can you reach the shelves easily?)
- Ceiling height (avoid cabinets too close to the ceiling)
If you’re tall, you might appreciate a little extra space. However, raising cabinets too high can make it difficult to reach upper shelves. If your ceilings are lower than standard, even raising them a few inches can make a big difference.
Many people find that a 20-inch gap is the sweet spot, balancing both accessibility and modern style.
Test your ideal height by stacking books or boxes on the counter to simulate the new cabinet line. This simple trick helps you visualize the change and check reachability before making permanent adjustments. Don’t forget to consider decorative elements, such as crown molding, which may look out of place if cabinets are raised too high.
Tools And Materials Checklist
Gather everything before you start. Here’s a list of essentials:
- Power drill and bits
- Screwdriver set
- Pry bar or crowbar
- Stud finder
- Level (preferably 4-foot)
- Tape measure
- Wood blocks or shims
- Screws (cabinet-grade)
- Safety gear (gloves, goggles)
- Pencil and masking tape
- Ladder or sturdy step stool
- Caulk, paint, or touch-up materials for finishing
A few extras, like a helper or cabinet jack, can make the job easier, especially for heavy cabinets. Even if you’re confident, having someone else to steady the cabinets or hand you tools can reduce mistakes and prevent injuries. Investing in a cabinet jack or temporary support pole is worth it if you plan to do similar projects in the future or if your cabinets are especially large.
Some homeowners make the mistake of starting the project and then realizing they’re missing a key tool, which leads to frustration and delays. Double-check your list and lay out all your tools before you begin. If you need to buy or borrow anything, do it in advance.
Step-by-step Guide: How To Raise Kitchen Cabinets
Raising cabinets isn’t just about lifting and screwing them back in place. Careful work keeps your cabinets safe, secure, and looking good.
1. Empty And Protect Your Kitchen
Start by clearing out every cabinet you plan to raise. Remove dishes, food, and anything else inside. Cover your counters, stove, and floor with drop cloths or old sheets to protect against dust and scratches.
This is also a good time to check for hidden spills or crumbs behind and under the cabinets. Cleaning these areas now makes your workspace safer and keeps your kitchen fresh.
2. Remove Molding And Trim
Carefully pry off any crown molding or trim pieces on top of the cabinets. Use a flat bar and gentle tapping to avoid splitting wood. Set these pieces aside if you plan to reuse them.
If the molding is painted in place, score the paint line with a utility knife before prying, which prevents the paint from peeling off the wall. Keep all nails or screws with the trim to make reinstallation easier.
3. Disconnect Cabinets From The Wall
Most cabinets are screwed into wall studs. Open the cabinet doors and locate the screws along the back rail. Use a power drill or screwdriver to remove all screws holding the cabinets to the wall. If cabinets are joined together, also remove connector screws between them.
Pro tip: Label each cabinet and screw bag so you remember where everything goes.
Save all screws, as they may be a specific length or type suitable for cabinets. Taking photos as you remove each section can also help you remember the original arrangement.
4. Detach Cabinets From Each Other
If your wall cabinets are attached together (which is common), unscrew the connecting bolts or screws. This step makes handling and lifting much easier.
In some cases, cabinets may be glued as well as screwed. If you find resistance after removing all visible screws, gently rock the cabinet back and forth to loosen it. Use caution to avoid damaging the wall or surrounding cabinets.
5. Prepare For Lifting
Check the wall for any damage or holes left by screws. Fill and sand these if needed. Use a stud finder to mark the wall studs, which are where you’ll reattach the cabinets later.
Marking the stud positions clearly will save time and reduce mistakes when you reinstall the cabinets. Use painter’s tape or a colored pencil so the marks are easy to see but simple to remove or paint over later.
6. Measure And Mark New Cabinet Position
Measure up from the countertop (or floor, if you plan to raise both wall and base cabinets) to your chosen new cabinet height. Mark the bottom of the cabinets with masking tape and a pencil line. Double-check the line is level using your spirit level.
If you are raising cabinets to fit a taller backsplash or appliance, confirm the new measurement gives enough space.
Take your time with this step. Even a small error in marking can result in uneven cabinets, which will be noticeable in the finished kitchen. If you have a laser level, use it for extra precision.
7. Pre-drill And Add Support Blocks
Install temporary wood blocks or a long ledger board along the wall at the new height line. This provides a “shelf” to rest the cabinets on while you screw them into place, making the process safer and more accurate.
If you’re working alone, consider adding extra supports along the wall to hold the cabinet weight. Test the supports by placing something heavy on them to ensure they don’t move or sag.
8. Lift And Reattach The Cabinets
With help, lift each cabinet onto the support blocks or ledger. Check they are level and adjust as needed with shims. Screw the cabinets back into wall studs using strong cabinet screws. If cabinets connect together, reattach the connector screws.
Safety tip: Wall cabinets can be heavy—never try to lift them alone.
If your cabinets are especially wide, attach the middle first, then work outward. Recheck for level after tightening each screw. If you find a gap between the cabinet and wall, use shims to fill it before securing completely.
9. Reinstall Moldings And Trim
After all cabinets are secure and level, reattach any crown molding, light rail, or trim. You may need to patch or cut pieces if the cabinet position has changed.
Check that the new molding fits snugly with the ceiling and cabinet tops. If there are small gaps, fill them with caulk and touch up with matching paint.
10. Touch Up And Clean
Fill any gaps with caulk or wood filler. Touch up paint or finish as needed. Clean dust and debris from the workspace. Return all items to your cabinets.
This is a great opportunity to update shelf liners or organize your kitchen items before putting them back. Check for any loose hinges or handles and tighten as needed.
Special Cases And Advanced Tips
Some kitchens have unique challenges. Here’s how to handle the most common ones:
Raising Cabinets With Soffits
A soffit is a boxy structure above cabinets, often hiding pipes or wires. If you want to raise cabinets but have a soffit, you’ll need to:
- Remove the soffit if it’s not structural (check for wiring or plumbing inside)
- Patch and finish the ceiling and wall afterward
- If the soffit can’t be removed, consider smaller cabinets or an open shelf above
Sometimes, soffits are filled with insulation or even house vents. If you discover these, it’s best to stop and consult a professional before cutting or removing anything further. If you choose to keep the soffit, painting it the same color as the wall can help it blend in and look less intrusive.
Raising Base Cabinets
Raising base cabinets is less common but possible. This involves:
- Removing the countertop
- Detaching the base cabinets from the wall and floor
- Building a new, taller platform or “toe kick” base
- Reinstalling cabinets and countertops at the new height
This process is more complex and may require plumbing or electrical adjustments.
One common reason to raise base cabinets is to make the kitchen more accessible for wheelchair users or to match the height of a new appliance. Always check that raising the cabinets won’t interfere with dishwasher or oven installation.
Cabinets With Undercabinet Lighting
If you have undercabinet lighting, disconnect all wiring before moving cabinets. After raising, you may need to extend wires and reattach fixtures.
Plan to label each wire and take photos of the wiring setup before disconnecting. This will help you reconnect everything correctly after the cabinets are reinstalled.
Dealing With Tile Backsplashes
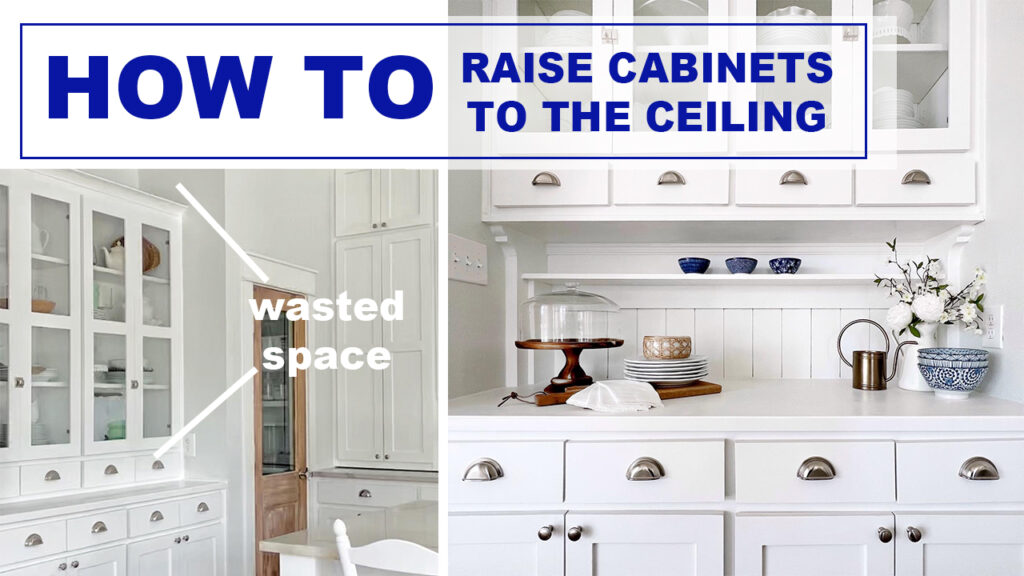
If you have a tile backsplash, raising cabinets will expose bare wall above the tile. Be ready to patch, paint, or install a new backsplash up to the higher cabinet line.
If you plan to install a new backsplash, choose a material that’s easy to cut and install, such as peel-and-stick tiles or mosaic sheets. These can be applied quickly and trimmed to fit unusual shapes.
Credit: oldbarncompany.com
Common Mistakes And How To Avoid Them
Even skilled DIYers can make mistakes during this process. Avoid these pitfalls:
- Not measuring carefully: Double-check all measurements before drilling or cutting.
- Skipping wall stud checks: Cabinets must be anchored to studs, not just drywall.
- Lifting alone: Always get help to prevent injury or damage.
- Ignoring wiring or plumbing: Check for wires or pipes before drilling or removing soffits.
- Forgetting the trim: Adjust or replace crown molding and light rails as needed.
Another common mistake is not checking for level at every stage. It’s much easier to fix a crooked cabinet before it’s fully attached. Also, some beginners underestimate the weight of even small cabinets—be cautious when lifting, and take breaks as needed.
When To Call A Professional
Some kitchen cabinet projects are best left to the pros, such as:
- Cabinets with complex electrical/plumbing behind them
- Structural soffits or bulkheads
- Extremely heavy or high-end cabinets
- Kitchens with fragile tile or stone backsplashes
If you’re unsure, consult a licensed contractor. They can handle unexpected issues and ensure your cabinets are safe.
Professionals may also have access to tools and hardware that make the job faster and safer. If you’re planning to raise a whole wall of cabinets or work in a kitchen with specialty finishes, professional help is often worth the investment.
Cost Breakdown: Diy Vs. Professional
How much does it cost to raise kitchen cabinets? Here’s a quick comparison:
| Option | Average Cost (USD) | What’s Included |
|---|---|---|
| DIY (Tools + Materials) | $100 – $400 | Screws, shims, paint, minor supplies |
| Professional Contractor | $500 – $2,000 | Labor, tools, touch-ups, minor repairs |
| Full Remodel (New Cabinets) | $5,000 – $15,000+ | All new cabinets, installation, finishing |
Doing it yourself saves money, but only if you have the tools and confidence. Hiring a pro costs more but brings peace of mind.
Don’t forget to budget for extras like paint, new hardware, or electrical work if needed. Some homeowners are surprised by the cost of small supplies, such as shims or touch-up paint, which can add up quickly. If you’re hiring a pro, ask for a detailed quote so there are no surprises.
Cabinet Heights: Old Vs. New Standards
Kitchen design has changed over the years. Here’s a quick look at typical cabinet heights:
| Type | Old Standard Height | Modern Standard Height |
|---|---|---|
| Base Cabinets | 34 inches | 36 inches |
| Wall Cabinets (bottom from floor) | 54 inches | 54-60 inches |
| Countertop to Wall Cabinet Gap | 16-18 inches | 18-24 inches |
Raising cabinets helps bring an older kitchen up to modern standards, which is especially useful if you’re planning to sell your home.
Some buyers look for kitchens that feel open and updated. If your cabinets sit very low, the kitchen may feel outdated, even if everything else is modern. By adjusting the cabinet height, you can make the whole space feel more current and appealing.
Extra Tips For A Professional Finish
A few expert tricks can make your project look even better:
- Use cabinet screws (not drywall screws) for maximum holding power
- Fill old screw holes with wood filler and sand smooth before painting
- Add matching trim or molding to hide any new gaps at the ceiling or walls
- Paint or touch up the wall above the cabinets before reinstalling them
- Check doors and drawers for alignment after reinstalling, and adjust hinges as needed
If you notice the cabinet doors don’t close smoothly after raising, adjust the hinges and check for any warping that may have occurred during the move. A small investment in soft-close hinges can make your kitchen feel brand new.
Another tip is to use painter’s tape to protect adjacent walls or ceilings when repainting or caulking. This gives you clean lines and a professional look.
Real-life Example: Raising Cabinets For A Modern Look
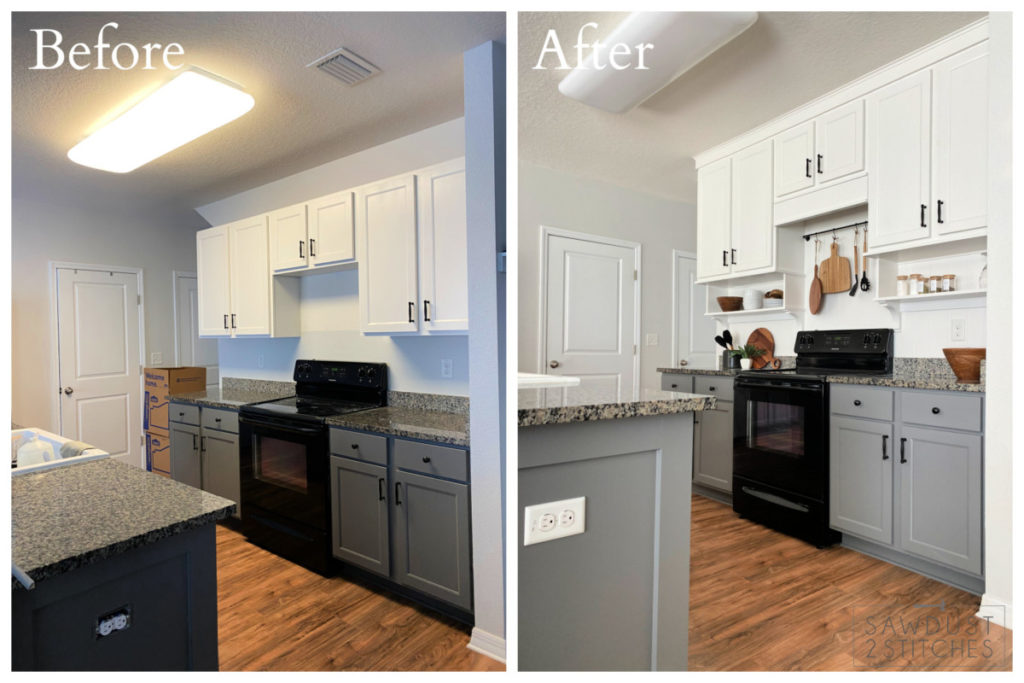
Consider a typical 1980s kitchen: wall cabinets are just 16 inches above the counter, leaving barely enough space for modern appliances. A homeowner decides to raise them by 4 inches. The process takes a weekend, with two people working together. After raising, the kitchen feels brighter, the counters are more usable, and a stylish glass tile backsplash is added. The project costs under $300 and adds real value to the home.
In another case, a homeowner wanted to install a tall espresso machine but couldn’t fit it beneath the cabinets. By raising the cabinets, they not only accommodated their new appliance but also created space for under-cabinet lighting, which made food prep much easier at night.
The improved function and style made the kitchen a favorite gathering place.
Credit: sawdust2stitches.com
Safety And Quality Control
Always put safety first:
- Wear gloves and eye protection when removing cabinets
- Make sure your ladder or step stool is stable
- Don’t overload wall cabinets after raising—test with a few items first
- Check for level and secure screws before using the cabinets again
Quality matters too. Take your time with measurements and finishing steps for the best results.
One often-missed tip: after reinstalling the cabinets, let them sit overnight before loading them with heavy items. This way, you can be sure everything is secure and nothing shifts due to settling or slight wall movement.
Environmental Impact: Reuse And Recycle
Raising cabinets is eco-friendly because it reuses existing materials. Instead of throwing away your old cabinets, you give them a new life. If you remove soffits or old materials, recycle wood and metal where possible. For more on recycling kitchen materials, visit EPA Sustainable Management.
Also, consider donating any trim or cabinet parts you don’t need to local reuse centers or Habitat for Humanity stores. This keeps materials out of landfills and helps others with their renovation projects.
What About Cabinet Hardware?
When raising cabinets, you may want to update the hardware—handles, knobs, or pulls. This is a great time to choose a modern style or finish. Measure hole spacing before buying new hardware to avoid extra drilling.
If your cabinets have old or mismatched hardware, swapping it out can make a big visual impact for little cost. Brushed nickel, matte black, or brass finishes are all popular options. If you want to reuse your current hardware, clean and polish it before reinstalling.
How Long Does It Take?
Most DIY cabinet raising projects take 1-2 days, depending on:
- Number of cabinets
- If you need to patch or paint
- Help available
- Complexity (soffits, lighting, etc.)
A small kitchen can be finished in a day, but plan for two days if this is your first time.
Set aside extra time for unexpected issues, such as finding hidden wires or needing a second trip to the hardware store. The project often goes faster if you have a checklist and lay out all tools and materials before you start.
Is Raising Cabinets Worth The Effort?
For most homeowners, the answer is yes. Raising cabinets delivers:
- Better function for tall appliances
- A more modern look
- Increased home value (especially before selling)
- Satisfaction from DIY improvements
Many beginners worry about damaging cabinets, but with careful planning and patience, the project is very manageable.
Another benefit is flexibility. If you decide to remodel your kitchen in the future, having cabinets at the right height will make it easier to upgrade appliances or change the layout without starting from scratch.
Frequently Asked Questions
How High Should Kitchen Cabinets Be Above The Countertop?
The standard distance is 18 inches, but many modern kitchens use 20-24 inches. This allows for more appliance space and a larger backsplash. Adjust the height to fit your needs and reach.
Can I Raise Cabinets Without Removing Them From The Wall?
In most cases, you must remove the cabinets to raise them. Trying to lift cabinets while attached can damage them or the wall. Removing allows for safer, more accurate installation.
What If My Kitchen Has A Soffit Above The Cabinets?
If the soffit is decorative, it can often be removed. If it hides pipes or wires, consider raising only as much as possible, or consult a contractor for safe removal and rerouting.
Do I Need Special Screws To Reattach Cabinets?
Yes, use cabinet screws or lag screws designed for heavy loads. These are stronger than regular drywall screws and ensure your cabinets stay secure.
Is It Better To Raise Cabinets Or Buy New Ones?
Raising cabinets is cheaper and less wasteful than buying new ones. If your cabinets are in good shape, raising them gives a modern look at a fraction of the price. Consider new cabinets only if the old ones are damaged or poorly designed.
Raising kitchen cabinets is a practical way to improve your kitchen without a full renovation. With good planning, the right tools, and attention to detail, you can achieve a more functional and stylish space. The sense of accomplishment—and the new look—are well worth the effort.
Credit: www.youtube.com