
Plumbing a kitchen sink with both a garbage disposal and a dishwasher might look challenging, especially for first-timers. But with the right guidance, tools, and a clear plan, you can finish the job with confidence and avoid expensive mistakes. This task combines several essential parts of kitchen plumbing, so understanding how everything connects is important. Whether you’re updating your kitchen, fixing a leak, or installing new appliances, learning the correct steps will help your kitchen run smoothly and safely.
This guide will walk you through every step, from gathering the tools to connecting the final drain line. You’ll learn not just what to do, but why each step matters. Along the way, you’ll find tips that even experienced DIYers sometimes overlook, plus practical advice for avoiding common errors.
By the end, you’ll know how to plumb a kitchen sink with both a disposal and a dishwasher—and you’ll be ready to tackle the project with confidence.
Understanding The Kitchen Sink Plumbing System
Before getting your hands dirty, it helps to see how the kitchen plumbing system works. Under the sink, several pipes and parts connect together:
- Sink drain – the main pathway for water to leave the basin.
- Garbage disposal – grinds food waste, attached to one side of a double sink.
- Dishwasher drain hose – sends water from the dishwasher to the plumbing.
- P-trap – a curved pipe that prevents sewer gases from entering your kitchen.
- Waste arm and branch drain – connects to the main household drain line.
Each part plays a key role. The garbage disposal must connect properly to the drain, and the dishwasher hose must drain either into the disposal or a special inlet on the drain pipe. If anything is installed incorrectly, you could end up with leaks, clogs, or even backflow.
Tools And Materials You’ll Need
Gathering everything you need before starting will make the job much easier. Here’s a checklist to help you prepare:
- Adjustable wrench – for tightening and loosening nuts.
- Pipe wrench – useful for stubborn connections.
- Screwdrivers – both flathead and Phillips.
- Plumber’s putty or silicone sealant – seals joints and prevents leaks.
- PVC pipe cutter or hacksaw – for trimming pipes.
- Tape measure – ensures correct pipe lengths.
- Channel lock pliers – for gripping and turning parts.
- Bucket and towels – to catch water and clean up.
- Teflon tape – seals threaded connections.
- P-trap assembly – usually comes as a kit.
- Disposal unit – if not already installed.
- Dishwasher drain hose – comes with most dishwashers.
- Air gap (if required by local code) – prevents dirty water from re-entering the dishwasher.
- Compression fittings and washers – for leak-free joints.
- Extension pipes or tailpieces – may be needed for a custom fit.
Having these tools and materials ready saves time and helps prevent last-minute trips to the store.
Planning The Layout And Connections
Every kitchen is a bit different, so start with a quick look under your sink. Make a simple drawing or take a photo of the area. Notice the following:
- Number of sink bowls (single or double)
- Garbage disposal placement (usually under the smaller bowl or right side)
- Location of the dishwasher (often to the right or left of the sink)
- Existing drain lines and wall connections
Proper planning helps you avoid awkward pipe angles or tight spaces, which can cause leaks or make future repairs difficult.
Typical Plumbing Layout
Most modern kitchens follow a similar setup:
| Component | Purpose | Connected To |
|---|---|---|
| Sink Drain | Main water exit | P-trap |
| Garbage Disposal | Grinds food waste | Sink drain, dishwasher hose, P-trap |
| Dishwasher Hose | Drains dishwasher water | Disposal or drain pipe |
| P-trap | Blocks sewer gases | Sink/disposal and waste arm |
| Waste Arm | Leads to main drain | P-trap and wall pipe |
Knowing where each part fits will keep your installation organized and efficient.
Step-by-step Guide To Plumbing The Sink, Disposal, And Dishwasher
Plumbing a kitchen sink with both a garbage disposal and a dishwasher takes patience and attention to detail. Let’s break down the process into clear, manageable steps.
1. Turn Off Water And Power
Before you begin, always shut off the water supply to the sink and the power to the garbage disposal circuit at the breaker box. This keeps you safe and prevents accidental flooding or shocks.
2. Remove Old Plumbing (if Applicable)
If you’re replacing old parts, carefully remove the existing pipes, P-trap, and any old disposal or dishwasher connections. Use a bucket to catch water left in the pipes. Keep an eye out for worn washers or corroded fittings.
Tip: Take photos as you disconnect old parts. This makes it easier to remember how everything was arranged.
3. Install The Sink Drain
If you have a double sink, choose which side will have the garbage disposal (usually the smaller bowl). Apply plumber’s putty around the drain flange and press it into the sink hole. From below, attach the mounting ring and tighten the screws evenly. Wipe away excess putty.
4. Mount The Garbage Disposal
Each disposal model is a bit different, but most use a standard mounting bracket:
- Connect the disposal to the sink flange and secure it with the mounting ring.
- Use a screwdriver to tighten the assembly until snug.
- If your dishwasher is present, remove the knockout plug inside the disposal inlet using a screwdriver and hammer (this allows dishwasher water to drain into the disposal).
Common Mistake: Forgetting to remove the knockout plug is a top reason for dishwasher drain water backing up.
5. Connect The Dishwasher Drain Hose
The dishwasher hose is usually a flexible, ribbed tube. There are two common ways to connect it:
- To the garbage disposal: Slip the hose onto the barbed inlet on the disposal, then secure with a hose clamp.
- To an air gap: In some regions, code requires an air gap device mounted on the sink or countertop. The hose runs from the dishwasher to the air gap, then another hose from the air gap to the disposal or drain.
Why use an air gap? It prevents dirty water from flowing back into your dishwasher. Check your local plumbing codes before skipping this step.
6. Install The Sink Tailpiece And Waste Arm
Under the other sink bowl (or the disposal, if single-bowl), attach the tailpiece (straight pipe) to the drain. Use a slip nut and washer for a tight seal. Connect the waste arm (horizontal pipe) from the tailpiece to the disposal’s outlet or directly to the P-trap, depending on your layout.
Tip: If pipes don’t line up perfectly, use a flexible extension or a slip-joint elbow.
7. Assemble And Attach The P-trap
The P-trap is a curved section of pipe that always holds a little water, blocking sewer gases. Attach the trap arm to the waste arm or disposal outlet, then connect the other end to the wall drain fitting. Tighten all slip nuts by hand, then use pliers for a final quarter-turn.
Important: The trap should be level and have a slight downward slope toward the wall drain—about 1/4 inch per foot. Too much slope can cause leaks or slow drainage.
8. Secure And Test All Connections
Once everything is assembled, go back and check each nut and fitting. Make sure:
- All slip nuts are snug (but not overtightened)
- Dishwasher hose is clamped securely
- The P-trap is in the correct position
Slowly turn on the water and check for leaks as you run the faucet. Run the dishwasher through a rinse cycle and test the disposal, listening for any unusual noises or vibrations.
9. Final Power Connection
If your disposal uses a plug, connect it to the outlet under the sink. If hardwired, make sure power is OFF, then connect the wiring following the manufacturer’s instructions. Restore power at the breaker box.
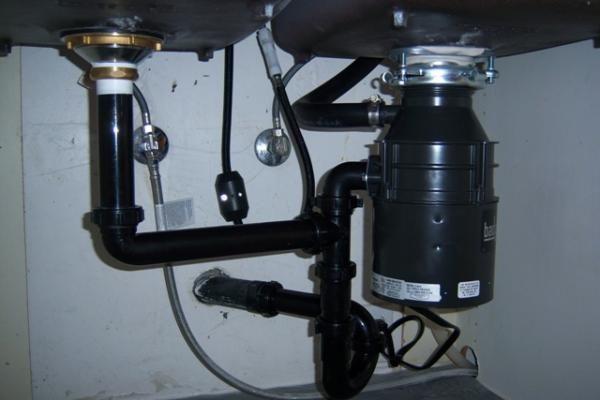
Credit: www.doityourself.com
Example Scenario: Double Sink With Disposal And Dishwasher
Let’s say you have a double-bowl sink, with the garbage disposal under the right bowl and the dishwasher to the right of the sink.
- The right bowl’s drain connects to the disposal.
- The left bowl’s drain uses a tailpiece and a tee fitting to connect to the disposal or waste arm.
- The disposal’s outlet connects to the P-trap.
- The P-trap connects to the wall drain.
- The dishwasher hose runs either to the air gap or directly to the disposal’s inlet.
This setup ensures all water and waste flow through the P-trap before entering the home’s main drain, preventing odors and backflow.
Common Mistakes And How To Avoid Them
Even careful DIYers can run into trouble. Here are mistakes beginners often make—and how to prevent them:
- Forgetting the dishwasher knockout plug – Always remove this plug before attaching the dishwasher hose.
- Overtightening slip nuts – Too much force can crack PVC fittings.
- Incorrect P-trap angle – A flat or uphill trap can cause slow drainage or leaks.
- Missing washers – Always use the right size washer at every slip joint.
- Loose dishwasher hose – Secure with a metal hose clamp to prevent leaks.
- Skipping the air gap where required – Check your local codes to avoid inspection problems.
- Not checking for leaks after installation – Run water and check every joint before finishing.
- Mixing up pipe sizes – Most kitchen drains use 1-1/2 inch PVC, but double-check all sizes before buying parts.
- Using the wrong sealant – Plumber’s putty is for non-plastic drains; use silicone on plastic or where putty isn’t allowed.

Credit: www.youtube.com
Understanding Codes And Best Practices
Plumbing codes exist for a reason: safety and sanitation. Some areas have strict rules about air gaps, trap sizes, and drain connections. If you’re not sure, check with your local building department or visit International Code Council for more details.
Non-obvious insight: In some older homes, the wall drain may be higher than the disposal outlet. In this case, you may need to lower the wall connection or use a different plumbing arrangement so water always flows downhill. Forcing a P-trap uphill is never acceptable and will cause clogs.
Comparing Common Plumbing Materials
Choosing the right materials can make your installation easier and longer-lasting. Here’s a quick comparison:
| Material | Pros | Cons | Typical Use |
|---|---|---|---|
| PVC (Plastic) | Inexpensive, easy to cut, won’t rust | Can crack if overtightened | Most modern kitchens |
| ABS (Plastic) | Very strong, easy to install | UV sensitive, less common now | Some older homes |
| Metal (Chrome, Brass) | Durable, looks good | Can corrode, harder to cut | Visible plumbing, older homes |
For most DIYers, PVC is the best choice for under-sink drains due to its low cost and ease of use.
Detailed Fitting And Pipe Connections
Getting the right fit is essential for leak-free plumbing. Here are some helpful tips:
- Measure twice, cut once. Even a small mistake can cause misalignment.
- Dry-fit all parts before tightening. This helps you see if adjustments are needed.
- Use Teflon tape only on threaded metal-to-metal joints, not on slip joints.
- Don’t mix materials (for example, ABS and PVC) unless you have the correct transition fittings.
Non-obvious insight: Most leaks happen at the P-trap or tailpiece slip joints. Hand-tightening is usually enough—using pliers to overtighten can actually make leaks worse.
When To Use An Air Gap For The Dishwasher
Many people are unsure about air gaps. An air gap is a small device mounted on top of the sink or countertop. It separates the dishwasher drain hose from the sink drain to prevent “cross-contamination.” This means dirty water from the sink can’t backflow into the dishwasher.
- Required in many states (like California and Washington)
- Highly recommended if your dishwasher is below the sink rim
To install, run the dishwasher drain hose to the bottom of the air gap, then another hose from the air gap to the disposal or drain. If your local codes do not require it, you may be able to use a “high loop”—a bend in the hose running up under the countertop.
Step-by-step: Connecting The Dishwasher Drain With Air Gap
If you need to install an air gap, follow these steps:
- Drill a hole in your sink or countertop if one isn’t already present.
- Insert the air gap and secure it from underneath.
- Attach the dishwasher hose to the smaller air gap inlet.
- Attach another hose from the larger air gap outlet to the disposal or drain.
- Secure all hoses with clamps.
Tip: Make sure both hoses slope downward from the air gap to prevent standing water.
Troubleshooting Leaks And Odors
Even after careful installation, leaks or bad smells can occur. Here’s how to troubleshoot:
- Leak at P-trap: Loosen, reposition, and retighten the slip nuts. Replace worn washers.
- Odor from sink: Check for food caught in the disposal or standing water in the drain. Run the disposal with cold water to clear debris.
- Dishwasher not draining: Confirm the knockout plug in the disposal is removed, and check for kinks in the hose.
- Slow drain: Clear clogs with a plunger or remove and clean the P-trap.
Pro tip: Always run cold water while using the disposal. This keeps grease solid, so it can be chopped and flushed away, rather than coating the pipes.
Maintaining Your Sink, Disposal, And Dishwasher Plumbing
Good maintenance keeps your system running for years. Here’s what to do:
- Run hot water through the sink weekly to clear grease and soap buildup.
- Clean the disposal by grinding ice cubes and citrus peels.
- Check for leaks under the sink every few months.
- Inspect hoses for cracks or leaks annually.
- Don’t pour grease or coffee grounds down the disposal—they can cause clogs.
Estimating Time And Cost
Most people can finish this project in 2 to 4 hours if all parts are on hand. Here’s a rough cost breakdown:
| Item | Cost Range (USD) |
|---|---|
| Garbage disposal | $75 – $250 |
| P-trap kit | $10 – $20 |
| Dishwasher hose | $8 – $20 |
| Air gap | $10 – $30 |
| Tools/supplies | $25 – $50 |
Total estimated cost: $130 to $370, depending on the quality of parts and whether you need to buy tools.
Safety Tips And Final Checks
- Never work on live electrical circuits. Always shut off the breaker.
- Use eye protection when cutting pipes or working under the sink.
- Keep the area dry to prevent slips and falls.
- Use a GFCI outlet for the disposal to prevent shocks.
After finishing, run both the faucet and dishwasher together. Watch closely under the sink for leaks. Test the garbage disposal and listen for smooth operation.
Frequently Asked Questions
What Size Pipe Should I Use Under The Kitchen Sink?
Most kitchen drains use 1-1/2 inch PVC pipe. Some older homes may use metal pipes of the same size. Always match new parts to your existing pipes for the best fit.
Can I Run The Dishwasher And Disposal At The Same Time?
Yes, you can. The disposal and dishwasher use separate motors but share a drain. Just make sure your pipes are clear and the dishwasher drain is properly connected to the disposal or drain line.
What If My Sink Drain Is Higher Than The Wall Drain?
If the sink or disposal outlet is higher than the wall drain, water won’t flow properly. You may need to lower the wall drain connection or use a deeper sink. Never force pipes to run uphill from the trap to the wall.
How Do I Get Rid Of Odors From The Disposal?
Grind a few ice cubes and lemon peels in the disposal, then flush with cold water. If odors persist, check for food stuck inside or buildup in the drain pipes.
Do I Need To Use Plumber’s Putty Or Silicone?
Use plumber’s putty for sealing metal drain flanges to the sink. For plastic flanges or where manufacturer instructions say, use silicone sealant instead. Never use putty on threaded plastic parts.
Plumbing a kitchen sink with a garbage disposal and dishwasher is a smart upgrade for modern kitchens. With careful planning, the right tools, and attention to detail, you can complete the project and enjoy a leak-free, efficient setup. Remember to check your work, follow local codes, and don’t rush the installation.
If you ever feel unsure, it’s always wise to consult a licensed plumber. Your kitchen will thank you for years to come.

Credit: www.reddit.com