If you’ve just changed the shower cartridge and suddenly discover there’s no cold water in the shower, you’re not alone. Many homeowners and DIY enthusiasts run into this problem and feel confused—especially if hot water works fine but cold water doesn’t. The shower worked before, so why has the cold water vanished after a simple cartridge replacement? This situation is frustrating, but it’s also a common issue with a clear set of causes and solutions.
This article will guide you through every aspect of this problem. We’ll explain why it happens, how to fix it step by step, common mistakes that make things worse, and practical tips to avoid the issue in the future. Whether you’re a first-time DIYer or have replaced a few cartridges before, you’ll find new insights here.
We’ll also cover what to do if the problem isn’t in the cartridge at all, plus when it’s time to call a plumber. By the end, you’ll know exactly how to get your cold water flowing again.
Why Does Replacing A Shower Cartridge Cause No Cold Water?
Changing a shower cartridge seems easy: turn off the water, swap the part, and put everything back. But the cartridge is more than a simple piece—it controls how hot and cold water mix. When no cold water comes after the change, several things could be wrong.
First, the cartridge might be the wrong type for your shower valve. Not all cartridges fit every brand or model. Some look similar but have different internal designs. If you install the wrong one, it can block the cold water path completely.
Second, during installation, debris or mineral deposits can get pushed into the cold water port. Even a small piece can block the flow. This is especially common if your pipes have hard water buildup.
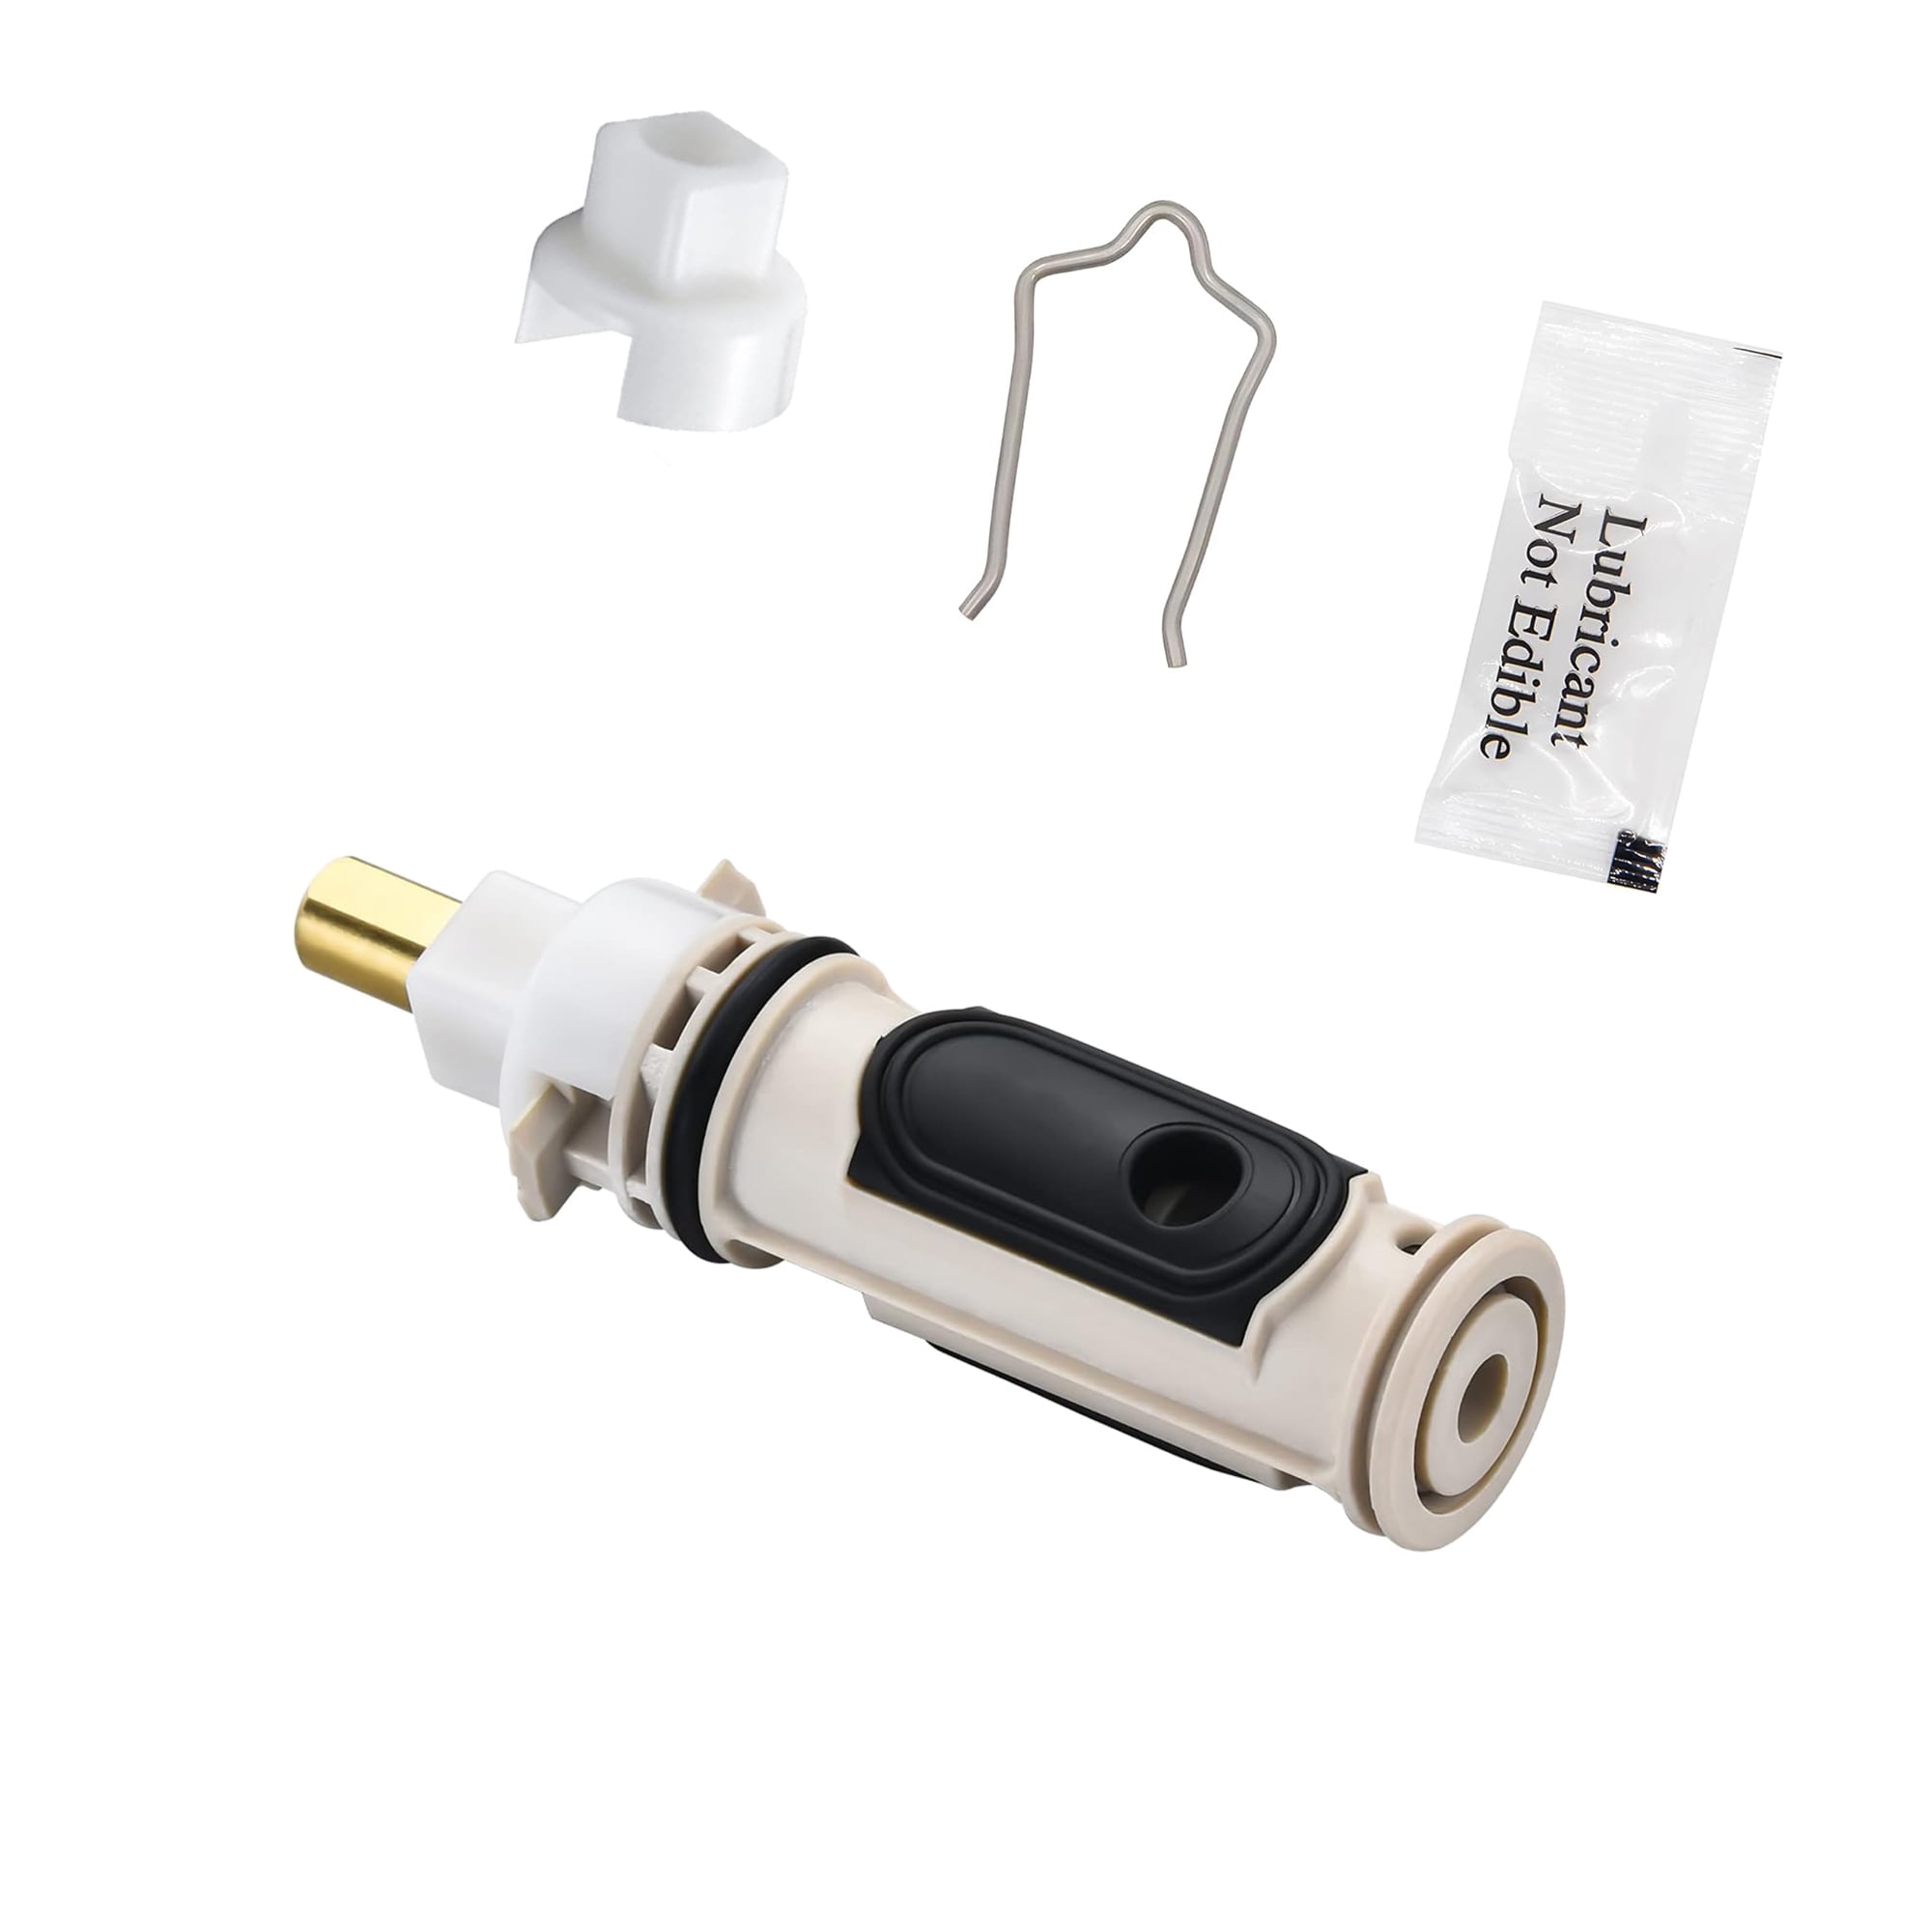
Third, the cartridge could be installed backwards or not seated properly. Even a small misalignment can stop cold water from reaching the mixing chamber. In some shower valves, the orientation of the cartridge is critical. If you accidentally rotate it or insert it upside down, the cold water side may be blocked.
Finally, internal problems like broken O-rings, missing washers, or a damaged cartridge during shipping or installation can lead to cold water not flowing.
How To Diagnose The Problem
Before fixing anything, you need to find out what’s causing the issue. A careful diagnosis saves time and prevents further damage. Here’s a step-by-step process:
- Check Other Faucets: Turn on the cold water at the sink or tub. If there’s no cold water anywhere, the problem is with your house plumbing, not the shower.
- Feel the Shower Handle: Sometimes, you think you’re turning to cold, but the handle is misaligned. See if the handle stops in a strange position or feels loose.
- Test for Water Flow: With the shower on, check if any water comes out at all. If there’s only hot water, but no water when turned to cold, it’s likely a blockage in the cartridge or its installation.
- Check Water Supply Valves: Make sure the cold water supply to the shower is open. Sometimes, people forget to turn it back on after repairs.
- Listen for Sounds: If you hear rushing water behind the wall but nothing comes out, that may mean a blockage or misaligned part.
- Inspect for Leaks: Check around the handle and wall for leaks. Leaking can mean a seal or O-ring is damaged or missing.
Common Causes Of No Cold Water After Cartridge Replacement
Let’s look in detail at each common cause, why it happens, and what to do about it.
1. Wrong Cartridge Type
Shower valves come in many designs. Major brands like Moen, Delta, Kohler, and Pfister all have multiple models and generations. It’s easy to accidentally buy a cartridge that looks right but is slightly different. Even a small change in size or shape can block the cold water port.
Example: A Moen 1222 cartridge fits the Posi-Temp valve, but not the Moen 1225, which goes in a different valve. The wrong cartridge will not let cold water flow.
Solution: Double-check your shower valve’s brand and model. Always compare the old cartridge with the new one, especially the size and location of inlet holes. If possible, bring the old part to the store.
2. Debris Or Mineral Blockage
When you remove the old cartridge, pieces of rubber, plastic, or mineral scale may fall into the valve body. If these get into the cold water port, they can block water flow completely.
Example: In older homes, hard water causes calcium buildup. When you pull out the old cartridge, flakes break loose and clog the new one.
Solution: Before inserting the new cartridge, flush the valve body. Turn on the water supply for a few seconds (with the cartridge out) to clear out debris. Hold a towel over the opening to direct water into the tub and prevent splashing.
3. Cartridge Installed Incorrectly
Many cartridges are directional. If you install them backwards, cold and hot water sides swap—or one side is blocked. In some cases, a misaligned cartridge blocks cold water but allows hot water to flow.
Example: Delta shower valves often have an alignment mark. If you miss the mark, the mixing chamber doesn’t line up, stopping cold water.
Solution: Read the installation guide for your cartridge. Look for alignment tabs or arrows. Make sure the cartridge sits fully in the valve body and is not rotated incorrectly.
4. Damaged O-rings Or Seals
A new cartridge includes O-rings and seals that keep water flowing in the right path. If you damage an O-ring during installation, or if one is missing, water may bypass the mixing area or get blocked completely.
Example: If an O-ring falls off as you insert the cartridge, cold water can leak behind the wall or never reach the shower head.
Solution: Inspect all seals before installing. Lubricate O-rings with plumber’s grease to prevent pinching. If you see a damaged or missing seal, get a replacement.
5. Broken Or Defective Cartridge
Sometimes, new cartridges are damaged during shipping or manufacturing. A cracked plastic body or misaligned internal parts can block cold water.
Example: You install a brand-new cartridge, but it’s defective inside, so only hot water flows.
Solution: Try reinstalling the old cartridge. If cold water returns, the new one is likely defective. Exchange for a new cartridge of the correct type.
6. Water Supply Valve Closed Or Partially Closed
While it seems obvious, people sometimes forget to turn the cold water supply valve back on after repairs. In other cases, an old shut-off valve under the house or behind a panel is stuck part-way closed.
Example: You shut off both hot and cold supplies for the job, but only turn the hot water back on.
Solution: Check all supply valves leading to the shower. Open fully. If a valve is stuck, it may need replacement.
7. Valve Body Damage Or Corrosion
If your shower valve body is old or corroded, internal passages can collapse or clog. Replacing the cartridge won’t solve the problem if the blockage is in the valve body itself.
Example: Homes with galvanized steel pipes often have rust buildup. When you remove the old cartridge, flakes block the cold water port.
Solution: If flushing the valve doesn’t help, and you see rust or corrosion, the valve body may need replacement by a plumber.
Step-by-step Fix: Restoring Cold Water After Cartridge Replacement
Once you have an idea of the cause, you can start fixing the problem. Here’s a clear, step-by-step process for most situations:
1. Gather Tools And Supplies
You’ll need:
- Flathead and Phillips screwdrivers
- Adjustable wrench or pliers
- Plumber’s grease
- Bucket or towel
- Replacement cartridge (correct model)
- Flashlight
2. Shut Off Water Supply
Turn off both hot and cold water at the main shut-off valve or the local shut-offs for the shower.
3. Remove The Handle And Trim
Unscrew the shower handle and any decorative plate. Set screws aside in a safe place.
4. Take Out The Cartridge
Use pliers or a cartridge puller to remove the cartridge. Pull straight out to avoid damaging the valve.
5. Inspect And Clean The Valve Body
Shine a flashlight into the valve opening. Look for debris, mineral flakes, or broken pieces. Wipe with a clean cloth. If you see a blockage, carefully remove it with tweezers.
6. Flush The Valve
Hold a towel over the valve opening. Briefly turn on the water supply to flush out any debris. Catch water in a bucket or direct into the tub.
7. Check The Cartridge
Compare the new cartridge with the old one. Check for differences in size, shape, or inlet holes. Inspect O-rings and seals.
8. Lubricate And Install The Cartridge
Apply plumber’s grease to O-rings. Carefully insert the cartridge, aligning any tabs or arrows as shown in the instructions. Press firmly into place.
9. Reassemble The Trim And Handle
Screw the trim and handle back in place.
10. Turn Water Back On And Test
Slowly turn the water supply back on. Test the shower. Turn the handle to cold. If cold water now flows, the problem is fixed.
11. Check For Leaks
Look around the handle and behind the wall (if possible) for any drips or leaks.

Credit: www.mrrooter.com
Advanced Troubleshooting: When The Problem Persists
If you’ve followed all the basic steps and still have no cold water in the shower, deeper issues may be involved.
Hidden Shut-off Valves
Some showers have local shut-off valves behind an access panel or under the tub. If these are closed or stuck, cold water won’t reach the valve.
Tip: Look for a panel on the wall behind the shower. Open and check for small shut-off valves. Turn both fully open.
Cross-connected Plumbing
In rare cases, especially in older homes, hot and cold pipes are cross-connected. This can cause cold water to disappear if a balancing valve is stuck.
Tip: If you notice unusual temperature changes in other faucets when using the shower, call a plumber. Cross-connections are complex to fix.
Pressure Balancing Valve Issues
Many modern showers use a pressure balancing valve to prevent scalding. If this part is stuck or broken, it may block cold water.
Tip: If you replaced the cartridge but didn’t touch the pressure balancing unit, it might be stuck with mineral deposits. Some units can be cleaned; others must be replaced.
Valve Body Damage
If you see visible corrosion, or if the shower valve is very old, the internal passages may be blocked beyond repair.
Tip: In this case, the entire valve needs replacement. This job usually requires opening the wall and should be done by a licensed plumber.
Practical Tips For A Successful Cartridge Replacement
It’s easy to make mistakes when replacing a shower cartridge, especially if it’s your first time. Here are some practical tips to avoid problems:
- Always verify the brand and model of your valve before buying a cartridge. Take a photo of the old cartridge and bring it to the store.
- Read all instructions that come with the new cartridge, even if you’ve done the job before. Manufacturers sometimes change designs.
- Keep a clean workspace. Lay out parts in the order you remove them to avoid confusion when reassembling.
- Lubricate O-rings with plumber’s grease. This helps the cartridge slide into place and prevents damage.
- Don’t force the cartridge. If it doesn’t fit easily, something may be misaligned or the wrong part.
- Flush the valve body before inserting the new cartridge. This removes debris that could cause blockages.
- If the handle feels loose or doesn’t stop in the correct position, double-check the cartridge orientation.
- If you’re unsure, consult the manufacturer’s website or customer service for guidance.
Common Mistakes To Avoid
Even experienced DIYers make mistakes that can lead to no cold water after a cartridge change. Here are common pitfalls:
- Mixing Up Hot and Cold Sides: Some cartridges can be installed in either direction, but only one way works. Always check alignment marks.
- Not Flushing the Valve Body: Skipping this step allows debris to clog the new cartridge.
- Reusing Old O-Rings or Seals: Old seals may not fit the new cartridge properly, leading to leaks or blockages.
- Using Excessive Force: Forcing a cartridge can break internal parts or damage the valve body.
- Ignoring Water Supply Valves: Forgetting to turn all valves back on leads to partial or no water flow.
- Buying Aftermarket Cartridges: Cheap, non-brand cartridges may not fit perfectly, even if labeled as compatible.
- Skipping Instructions: Each valve is different. Don’t assume you know the process without reading the guide.
How To Identify The Right Cartridge For Your Shower
Choosing the right cartridge is key to a successful repair. Here’s how you can be sure:
- Brand and Model Number: Look for the brand name on the trim plate or handle. Some valves have a model number stamped inside.
- Compare Old and New Parts: Check the length, width, and position of inlet holes.
- Manufacturer’s Website: Most brands have diagrams and photos online. You can match your part visually.
- Ask for Help: Take the old cartridge to a plumbing supply store. Staff can help you match it.
- Avoid Universal Cartridges: Unless your valve specifically calls for it, use original manufacturer parts.
Comparing Shower Cartridge Brands And Compatibility
When buying a new cartridge, it helps to know how leading brands differ in design and compatibility. Here’s a comparison of popular brands:
| Brand | Common Valve Types | Cartridge ID Example | Interchangeable? |
|---|---|---|---|
| Moen | Posi-Temp, Moentrol | 1222, 1225 | No |
| Delta | Monitor, MultiChoice | RP19804, RP46074 | No |
| Kohler | Rite-Temp, Pressure Balance | GP800820 | No |
| Pfister | Single Handle, Pressure Balance | 974-291 | No |
Note: Even within a brand, cartridges are not usually interchangeable between valve types.
Signs You Need To Call A Professional Plumber
While many cartridge replacements are simple, some situations require expert help:
- You cannot identify your valve brand or model.
- The valve body is visibly corroded or damaged.
- Flushing the valve does not restore cold water.
- You suspect a cross-connection or complex plumbing issue.
- The problem returns after several cartridge changes.
Professional plumbers can use special tools to diagnose hidden issues, and they know local plumbing codes. If your shower is your only bathing option, or if water leaks into the wall, call a plumber quickly to prevent further damage.
Credit: nilds.gov.ng
Real-world Example: Solving The No Cold Water Puzzle
Let’s look at a real case. Jane, a homeowner, replaced her Moen shower cartridge after her handle became stiff. After the swap, the shower only gave hot water, no cold. She double-checked the supply valves and reinstalled the cartridge three times—no luck.
Jane called a local plumber, who found the problem. A small piece of the old O-ring had broken off and lodged in the cold water port inside the valve. Flushing the valve body with the cartridge removed cleared the blockage.
The new cartridge worked perfectly after that.
Lesson: Even a tiny piece of debris can block cold water completely. Always flush the valve body after removing the old cartridge.
Preventing Future Problems
Once you’ve fixed the issue, you want to avoid it happening again. Here’s how:
- Use only genuine parts from the valve manufacturer.
- If you have hard water, install a whole-house water softener to reduce mineral buildup.
- Replace cartridges at the first sign of trouble (leaking, stiff handle, or temperature fluctuations).
- Keep a record of your shower valve brand and model for future repairs.
- Inspect and clean your shower head regularly to prevent blockages.
When It’s Not The Cartridge: Other Causes Of No Cold Water
If you’re sure the cartridge is correct and installed properly, but cold water is still missing, consider these other causes:
Broken Mixing Valve
Some showers have a separate mixing valve, which can break or stick, blocking cold water.
Blocked Or Frozen Pipe
In cold climates, pipes feeding the shower may freeze or become clogged with debris.
Faulty Pressure Balancing Unit
If this part sticks, it can stop cold water from mixing. Replacement may require a plumber.
Plumbing Retrofit Errors
If your home was remodeled, pipes may have been connected incorrectly, causing temperature problems.
Tip: If you notice problems in other fixtures, the issue may be with your home’s plumbing, not just the shower.
Cost Comparison: Diy Vs Professional Repair
Wondering if you should tackle the repair yourself or hire a plumber? Here’s a comparison:
| Repair Method | Typical Cost | Pros | Cons |
|---|---|---|---|
| DIY Cartridge Replacement | $20 – $60 (parts only) | Lower cost, learn new skill | Risk of mistakes, may need tools |
| Professional Plumber | $150 – $300 (labor + parts) | Expert diagnosis, warranty | Higher cost, may wait for appointment |
If you’re comfortable with basic tools and careful to follow instructions, DIY is a good option for most people. If you’re unsure, or if the problem is complex, a professional is a safer choice.
Two Insights Most Beginners Miss
- Even tiny debris, like a small piece of O-ring or mineral flake, can completely block cold water in the cartridge. Flushing the valve body is not optional—it’s essential for success.
- Cartridges may look similar, but small differences in design or orientation can stop cold water from flowing. Always match the part carefully and check alignment during installation.
External Resource For Further Reading
For more detailed plumbing diagrams and troubleshooting tips, check the official Family Handyman site.

Credit: www.reddit.com
Frequently Asked Questions
What Causes Cold Water To Stop After Replacing A Shower Cartridge?
The most common causes are installing the wrong cartridge, debris blocking the cold water port, a misaligned cartridge, or a closed cold water supply valve. Less common reasons include a defective cartridge or internal valve body damage.
Can I Use Any Cartridge If It Fits My Shower Valve?
No. Cartridges may look similar but have different internal designs. Always use the correct cartridge for your valve’s brand and model. Using the wrong cartridge can block water flow or cause leaks.
How Do I Know If My Shower Cartridge Is Installed Correctly?
The handle should turn smoothly and stop in the correct positions. Both hot and cold water should flow when turned to each side. If cold water is missing or the handle feels loose, recheck the installation and alignment.
Should I Always Flush The Valve Body Before Installing A New Cartridge?
Yes. Flushing removes debris and mineral buildup that can block water flow. Always flush the valve body (with the cartridge out) before inserting a new cartridge.
When Should I Call A Plumber For No Cold Water In The Shower?
Call a plumber if you cannot identify the valve type, see corrosion or damage, flushing does not help, or if the problem returns after replacing the cartridge. Also, call a professional if you suspect cross-connections or have leaks behind the wall.
Restoring cold water in the shower after replacing the cartridge can be simple with the right approach. Take your time, follow each step, and don’t hesitate to seek professional help for tricky issues. With these tips, your shower will be back to normal—and you’ll feel more confident about future repairs.