
Setting up a basement shower drain rough in is one of the most important steps when finishing a basement bathroom. Many homeowners decide to add a shower in their basement for convenience, extra value, or even as part of a full guest suite. But before you can enjoy a hot shower, the plumbing below the concrete must be done right. This process is complex, often messy, and mistakes can be expensive to fix later. If you are thinking about tackling this project yourself, or just want to understand what your plumber is doing, it pays to know the details of a proper basement shower drain rough in. This article walks you through every step, including planning, tools, measurements, common problems, code requirements, and expert tips that can save time and money.
Why The Basement Shower Drain Rough In Matters
When you add a shower on a basement level, the drain is lower than the rest of your home’s plumbing. Gravity is not as helpful as it is on upper floors. Everything you do during the rough in will affect how well your shower drains, how safe your bathroom is, and how much you pay for repairs later. A poorly installed drain can cause:
- Clogs from slow water flow or pipe bends
- Leaks under the concrete slab, leading to mold or structural damage
- Sewer gas odors if the trap or vent is not installed correctly
- Failed inspections if plumbing codes are not followed
Investing time to understand the rough in process ensures your basement shower will work well for years.
Key Concepts: Drain Rough In Explained
The phrase drain rough in means installing the pipes and fittings that connect your shower to the main drain line, before the floor or walls are finished. In a basement, this usually involves cutting into the concrete slab, laying new pipes, and connecting everything together. The rough in includes:
- The shower drain location and height
- The P-trap and its position
- The drain line slope for good water flow
- Proper venting to prevent sewer gases
- Connection to the main house drain
All of this happens before you install the shower base, tile, or walls. If mistakes are made, fixing them later may require breaking up concrete and starting over.
Planning Your Basement Shower Drain Rough In
Good planning is your best tool. Before starting any work, create a detailed plan that covers:
- Shower size and placement: Know exactly where your shower will go.
- Local plumbing codes: Each city may have different requirements for pipe sizes, venting, and drain materials.
- Location of main drain line: You need to know where your new shower drain will connect.
- Other fixtures: If you’re adding a toilet or sink, plan for those rough ins as well.
- Ceiling height: Make sure you have enough headroom after the shower is installed.
Take time to measure carefully and check your local building codes. Mistakes at this stage can be costly.
Example: Layout Planning Mistake
One common error is placing the shower drain too close to a wall or another fixture. This can make the shower uncomfortable to use or force you to make sharp bends in the drain line, increasing the risk of clogs.
Tools And Materials Needed
You’ll need several specialized tools and materials for a basement shower drain rough in. These include:
- Jackhammer or rotary hammer (for concrete removal)
- Shovel and buckets
- PVC or ABS pipes and fittings (usually 2-inch diameter for shower drains)
- P-trap
- Shower drain assembly
- Pipe cement and primer
- Measuring tape
- Level
- Pipe wrenches and saws
- Protective gear (gloves, safety glasses, dust mask)
- Gravel and sand (for refilling the trench)
- Pipe insulation (if required by code)
Having everything ready before you begin will save time and reduce frustration.
Marking And Cutting The Concrete
The first big step is breaking through the basement floor. This may sound intimidating, but with the right tools and care, most homeowners can handle it.
- Mark the drain location: Use your shower base or a template to mark exactly where the center of the drain will be.
- Draw the trench path: Mark the line from the shower to the main drain pipe. Make sure the path is as straight as possible.
- Score the concrete with a grinder or saw to control cracking.
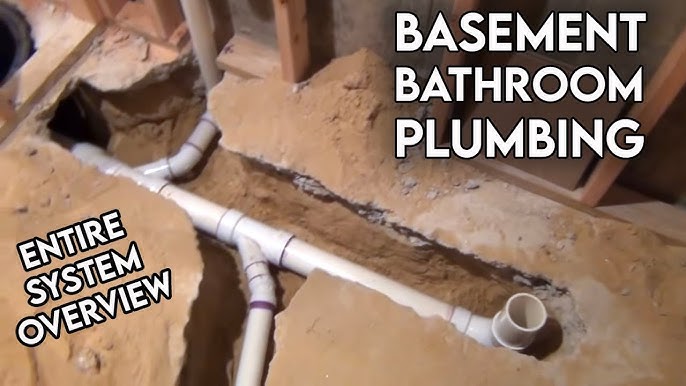
- Break up the concrete with a jackhammer or rotary hammer. Remove pieces and dig out the soil underneath to make space for the pipes.
Make the trench wide enough to work in, usually about 12 inches. Always wear safety gear, as dust and concrete chips can be hazardous.
Non-obvious Tip
If your home is newer, the concrete may be reinforced with rebar or mesh. Cutting through this takes more time and may require special tools.
Setting The Shower Drain Location And Height
Accuracy matters when placing the shower drain. Most standard shower bases have a centered drain, but custom showers may vary.
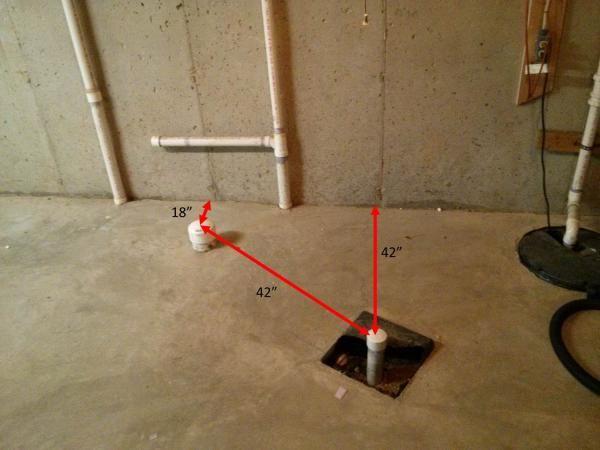
- Measure from walls: Double-check the distance to each wall and compare with your shower base.
- Check the height: The top of the drain assembly should be flush with the finished floor, not the subfloor. Factor in tile or other flooring thickness.
- Dry fit the drain and P-trap before gluing anything.
If the drain is off by even a half-inch, installing the shower base can become difficult or impossible.
Installing The P-trap
A P-trap is a U-shaped piece of pipe that holds water and blocks sewer gases from entering your bathroom. It is required by code.
- Position the P-trap directly under the shower drain. The center of the P-trap should line up with the center of the shower.
- Keep the trap accessible: Some codes require an access panel or a way to replace the trap if needed.
- Use the right material: In most cases, PVC or ABS is used for traps and drain lines.
The P-trap must be installed with care, as leaks here can be hard to detect and fix after the floor is replaced.
Sloping The Drain Pipe
Water needs to flow downhill, so the drain pipe must be sloped correctly. The standard is 1/4 inch per foot of pipe.
- Use a level to check the slope as you install the pipe.
- Slope towards the main drain: Never slope the pipe upwards or have flat sections, as water will pool and cause clogs.
- Support the pipe with gravel or sand as you work, so it does not move during concrete replacement.
Data Table: Minimum Slope Requirements
Here is a quick reference for standard drain sizes and slopes:
| Pipe Size (inches) | Minimum Slope (per foot) | Typical Use |
|---|---|---|
| 1.5″ | 1/4″ | Lavatory, Tub |
| 2″ | 1/4″ | Shower Drain |
| 3″ | 1/8″ | Toilet |
Too little slope means poor drainage, while too much can cause water to flow faster than solids, leading to build-up.
Connecting To The Main Drain Line
Most basement showers connect to a larger drain pipe, usually 3 or 4 inches in diameter, which leads to the main sewer or septic line.
- Find the connection point: This is often near the main stack or a cleanout.
- Use the correct fittings: Use a wye fitting, not a tee, for smoother water flow.
- Check for existing vent lines: If possible, tie your new vent into an existing vent stack.
- Test for leaks: Temporarily plug the end of the pipe and fill with water to check for leaks before closing the floor.
Connecting to the main line may require a permit and inspection, as mistakes here can affect the whole house.
Venting The Shower Drain
Proper venting is needed so water flows smoothly and sewer gases are blocked. A vent allows air into the drain line.
Types Of Vents
- Conventional vent: A vertical pipe that connects to the main vent stack.
- Air admittance valve (AAV): A mechanical valve that lets air in but not out (check with your code).
- Loop vent: Used when a direct connection to the main stack is not possible.
Check with your local code about which vent types are allowed in basements. Vents are usually 1. 5 or 2 inches in diameter.
Non-obvious Insight
Many DIYers forget to vent the shower drain or use a vent that is too small. This can cause slow draining, gurgling sounds, or sewer smells.
Inspection And Code Requirements
Every city or county has plumbing codes to ensure safety and function. Common requirements include:
- Pipe material: PVC, ABS, or cast iron
- Pipe size: Usually 2-inch for shower, 3-inch for toilet
- Slope and vent size: As described above
- Trap location and accessibility
- Inspection before closing: Most codes require an inspection before you pour concrete back
Check with your local building department before starting work. Getting permits and inspections may seem like a hassle, but they protect you from costly problems later.
Backfilling And Concrete Replacement
Once the pipes are in place and inspected, it’s time to close up the floor.
- Backfill the trench with sand or gravel to support the pipes. Avoid sharp rocks that could damage pipes.
- Compact the fill in layers to prevent future settling.
- Pour new concrete to match the existing slab. Trowel the surface smooth.
- Allow concrete to cure for several days before installing the shower base.
Do not rush this step. Poor backfilling can lead to cracked tiles or uneven floors later.

Credit: www.familyhandyman.com
Installing The Shower Base And Final Connections
After the concrete is cured, you can move on to installing the shower base and connecting the drain.
- Dry fit the base to check alignment with the drain.
- Install the drain assembly according to manufacturer’s instructions.
- Seal with plumber’s putty or silicone to prevent leaks.
- Test the drain by pouring several buckets of water into the shower before finishing walls or tile.
If everything works as expected, you are ready for the final bathroom build-out.
Common Mistakes To Avoid
Even experienced DIYers and plumbers sometimes make errors. Here are the most common:
- Poor drain alignment: Causes leaks or requires cutting the shower base.
- Insufficient slope: Leads to slow drains and clogs.
- No vent or undersized vent: Causes sewer smells and slow draining.
- Wrong pipe size: Can fail inspection or cause backups.
- Rushed concrete replacement: Leads to settling and cracks.
- Not testing for leaks: Water damage under the slab can go unnoticed for months.
Double-check every step before moving on. Fixing mistakes after the floor is finished is very expensive.
Cost Breakdown: Diy Vs. Professional
The cost for a basement shower drain rough in varies depending on your location, the complexity of the work, and whether you do it yourself or hire a plumber.
| Task | DIY Cost Range | Professional Cost Range |
|---|---|---|
| Tools & Supplies | $200–$500 | Included in labor |
| Concrete Cutting | $50–$200 | $300–$800 |
| Plumbing Rough In | $150–$350 | $800–$2,000 |
| Inspection/Permits | $50–$150 | $50–$150 |
| Total | $450–$1,200 | $1,150–$2,950 |
DIY can save money, but professional plumbers bring experience and guarantee code compliance.
Special Cases: Basement Shower Drain In Existing Homes
Older homes or homes with unusual layouts can complicate the rough in process.
- Slab thickness: Some basements have thicker or reinforced slabs.
- Obstructions: Heating ducts, wires, or old pipes may be in the way.
- High water tables: In wet areas, extra waterproofing may be needed.
- Shared venting: If the shower shares a drain line with other fixtures, sizing and venting must be checked carefully.
In these cases, consulting with a licensed plumber or engineer is a smart investment.
Upgrades And Modern Features
Homeowners today often add features to make their basement shower even better.
- Linear drains: Stylish and allow for larger tiles, but require precise rough in.
- Heated floors: Add comfort but must be planned before concrete is poured.
- Waterproofing membranes: Protect against leaks, especially important in basements.
- Backwater valves: Prevent sewer backups in areas prone to flooding.
These features add cost, but also improve comfort and home value.
Troubleshooting: What To Do If Things Go Wrong
Even with good planning, problems can happen. Here’s what to do:
- Slow draining water: Check the slope and vent. Snaking the line may help.
- Sewer smells: Make sure the P-trap is filled with water and the vent is open.
- Leaks: If leaks appear, you may have to break up concrete to repair the pipe.
- Standing water in the trench: Indicates a high water table or broken drain. Wait for water to recede before continuing.
Address issues immediately to avoid bigger problems later.
Credit: www.youtube.com
Non-obvious Insights For A Perfect Rough In
Beyond the basics, here are two advanced tips that most beginners miss:
- Test the drain with air before pouring concrete. Professional plumbers often use an air pressure test, which finds leaks that water testing can miss. Seal all pipe ends, pump up a small amount of pressure, and check for leaks.
- Plan for future access. Consider running a spare conduit or leaving a small access panel in the wall near the P-trap or vent. This will make future repairs much easier.
Small steps like these can save hours of work and hundreds of dollars in the future.
Code And Inspection Resources
Stay up to date with local plumbing codes. Many cities publish their requirements online, or you can refer to the International Residential Code (IRC). You can check more about plumbing codes at the International Code Council.
When To Hire A Professional
Some homeowners can handle a simple basement shower drain rough in, especially if they have basic plumbing experience. However, you should hire a professional if:
- You need to move or cut large sewer lines
- Your home has complex venting or drain layouts
- You are not comfortable with inspections or permits
- You want a warranty or guarantee on the work
Hiring a licensed plumber ensures the job is done right and meets all code requirements.
Frequently Asked Questions
What Is The Standard Shower Drain Rough In Height For A Basement?
The standard height is usually flush with the finished floor, accounting for any tile or flooring. Most shower drains are set so the top of the drain flange is level with the finished surface, not the subfloor or concrete. Check your shower base instructions for exact measurements.
Can You Install A Shower Drain Without Breaking Concrete?
In most cases, you must cut the concrete to install or move a shower drain in a basement. However, if you are replacing an old shower with the same drain location, you may be able to use the existing rough in.
For new locations, concrete removal is almost always required.
How Far Can A Shower Drain Be From A Vent?
Most codes require the vent to be within 5 to 6 feet of the shower drain, measured along the pipe. The exact distance depends on pipe size and local code. Always check with your local inspector for the rule in your area.
Do Basement Shower Drains Need A Trap Primer?
A trap primer is a device that keeps the P-trap filled with water to block sewer gases, especially in rarely used showers. While not always required by code, it is a good idea in basements where drains may dry out.
Some codes require them for basement or floor drains.
What Is The Minimum Pipe Size For A Basement Shower Drain?
Most plumbing codes require a 2-inch diameter pipe for a shower drain. Smaller sizes may not drain fast enough and are more likely to clog. Always use the size specified by your local code or inspector.
—
A well-planned and carefully executed basement shower drain rough in is the foundation of a comfortable, worry-free basement bathroom. Whether you’re a DIY enthusiast or working with a professional plumber, understanding every step will give you confidence and help you avoid costly mistakes. With the right knowledge, tools, and attention to detail, you can enjoy a basement shower that works as well as any in your home for years to come.
Credit: www.doityourself.com