
A shower is more than a place to get clean—it’s a space for comfort and function. When choosing the right base for your shower, you may have heard about the concrete shower pan with no tile. This is a modern, durable, and often stylish choice that skips the traditional tile layer on the floor. Instead, the concrete itself forms the finished walking surface.
Many homeowners and renovators are choosing this approach. Why? It offers a sleek look, easy maintenance, and strong durability. But it’s not as simple as pouring cement and calling it done. There are important details to get right, and some risks if you don’t understand the process.
If you’re considering a concrete shower pan with no tile, or want to learn more before making a decision, this guide will walk you through everything you need to know.
What Is A Concrete Shower Pan Without Tile?
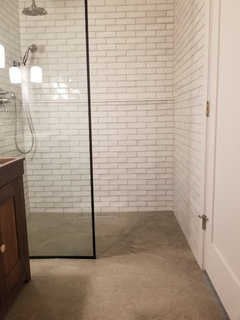
A concrete shower pan is the sloped base that directs water toward the drain. In traditional showers, the concrete pan is covered with tile and grout. In a “no tile” setup, the concrete is finished, sealed, and left exposed as the final surface. Sometimes, it’s called a finished concrete shower floor.
This design is popular in modern and industrial bathrooms. The look is simple and seamless, often with subtle color variations and a soft sheen. The surface can be smooth or textured for safety. Because there are no grout lines, cleaning is easier and there’s less risk of leaks through cracks.
Why Choose A Concrete Shower Pan With No Tile?
Homeowners, designers, and builders are shifting toward concrete shower pans without tile for several reasons:
- Minimalist style: The look is clean and uncluttered, which fits many modern bathrooms.
- Durability: Concrete is tough and resists chips, cracks, and dents better than most tile.
- Low maintenance: No grout means less scrubbing and fewer places for mold to grow.
- Custom shapes and sizes: Concrete can be formed to fit any space, including curved or angled designs.
- Slip-resistant options: Different finishes allow for safer wet surfaces.
- Lower long-term cost: While the initial install can be similar or more than tile, there’s less need for repair or replacement.
But these benefits come with certain requirements and considerations. Concrete must be properly sealed and maintained to prevent stains, cracks, and leaks.
How A Concrete Shower Pan Without Tile Is Built
A well-made concrete shower pan is more than just a flat piece of concrete. It involves careful construction and attention to waterproofing. Here’s an overview of the process:
1. Planning And Layout
First, the shower’s size and shape are measured. The pan must slope evenly (usually 1/4 inch per foot) toward the drain. This slope helps water flow out, preventing puddling.
2. Subfloor Preparation
The subfloor must be stable and clean. Sometimes, a layer of cement board or waterproof membrane is installed below the pan for extra support and moisture protection.
3. Waterproofing
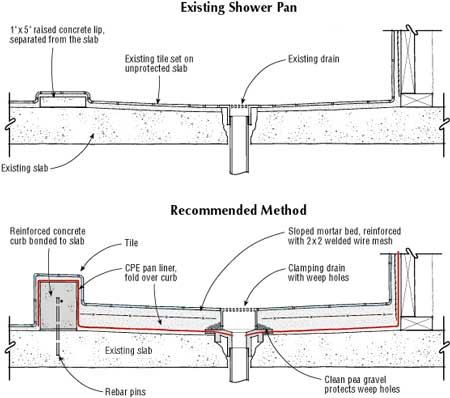
A key step is installing a waterproof membrane. This is usually a flexible sheet (like PVC or CPE) placed under the concrete. It acts as a barrier, so if water gets through the concrete, it won’t reach the wood or framing below.
4. Forming The Pan
Edges are built with forms (temporary barriers) to hold the wet concrete in place. The drain is set to the right height and location.
5. Pouring And Shaping
Special shower-grade concrete mix is poured and shaped to create the correct slope. Trowels and floats are used to smooth the surface.
6. Curing
Concrete must cure (harden) for several days to reach full strength. This process should not be rushed—quick drying can lead to cracks.
7. Finishing
The surface can be polished, lightly textured, or left with a natural finish. At this stage, color or stain may be added if desired.
8. Sealing
A high-quality sealer is applied to protect the concrete from water, soap, and stains. This is essential for any concrete shower pan with no tile.
9. Final Inspection
Before use, the pan is checked for proper slope, drain function, and waterproofing.
Types Of Concrete Finishes For Shower Pans
Concrete isn’t just gray and rough—many finishes are possible. Choosing the right finish is important for safety, style, and maintenance.
Polished Concrete
This finish is smooth, shiny, and modern. Polished concrete looks great but can be slippery when wet unless treated with a non-slip additive.
Textured Concrete
A broom or trowel can create a subtle texture for better grip. This is a popular choice for shower floors because it helps prevent slips.
Colored Or Stained Concrete
Pigments or stains can be added to the concrete for custom color. Soft grays, earth tones, or even bold colors are possible. Stained finishes often show natural variations, giving a unique look.
Exposed Aggregate
This finish reveals small stones on the surface for a decorative, non-slip effect. The texture is rougher but safe for bare feet.
Microtopping Or Overlay
A thin, decorative layer is applied over the concrete for a smooth, even look. This can also repair minor surface flaws or add a special color.
Key Advantages Of A No-tile Concrete Shower Pan
Why skip the tile? Here’s what you gain:
- Seamless design: There are no grout lines, so the space feels larger and cleaner.
- Easy cleaning: Soap scum and mildew can’t hide in cracks.
- Fewer repairs: Tiles can crack or loosen; concrete rarely does if installed well.
- Waterproofing: A properly sealed pan is just as waterproof as a tiled one.
- Allergy-friendly: No grout means less chance for mold or bacteria growth.
- Customization: Any shape, size, or color can be created, fitting unique bathrooms.
Common Challenges And How To Avoid Them
Despite its benefits, a concrete shower pan with no tile has some challenges. Here’s what to watch for and how to avoid issues.
Cracking
Concrete can crack if not mixed or cured correctly. To reduce risk:
- Use a high-quality mix designed for showers.
- Allow proper curing time (usually at least 3-5 days).
- Avoid quick-drying methods like heaters or fans.
- Install a flexible membrane under the pan.
Staining
Soap, shampoo, hard water, and even some cleaners can stain unsealed concrete. Solution:
- Apply a strong, water-resistant sealer before using the shower.
- Reseal every 1-2 years, depending on usage.
- Clean spills and soap quickly.
Slipperiness
A smooth surface can be dangerous when wet. To improve safety:
- Choose a textured finish or add a non-slip additive to the sealer.
- Avoid glossy sealers on the floor area.
Water Leaks
Poor waterproofing can lead to leaks and serious damage. Prevent problems by:
- Using a professional installer with experience in waterproof concrete pans.
- Testing the pan for leaks before finishing the walls.
Surface Wear
Heavy use can wear down the finish over time. To extend life:
- Clean with gentle, pH-neutral cleaners—avoid harsh chemicals.
- Reseal as needed.
Comparing Concrete Shower Pans To Other Options
How does a no-tile concrete pan stack up against other popular shower bases? Here’s a direct comparison:
| Feature | Concrete (No Tile) | Tiled Shower Pan | Acrylic/Fiberglass Base |
|---|---|---|---|
| Durability | Very high | Moderate (depends on tile) | Moderate |
| Maintenance | Low | High (grout cleaning) | Low |
| Customization | Unlimited | High | Limited (pre-molded) |
| Cost | Medium-High | Medium-High | Low-Medium |
| Installation | Professional needed | Skilled DIY or pro | DIY-friendly |
| Style | Modern, seamless | Classic, patterned | Basic, glossy |
Who Should Choose A Concrete Shower Pan With No Tile?
A concrete shower pan with no tile is best for people who:
- Want a modern, minimalist look
- Prefer easy cleaning and fewer repairs
- Have a custom-size or shaped shower
- Are willing to invest in professional installation and regular sealing
- Want a surface that ages well and develops character
It may not be the best choice if you:
- Prefer a classic, patterned look
- Want a “warm” surface underfoot (concrete can feel cool)
- Are on a very tight budget
Cost Breakdown: What To Expect
The price of a concrete shower pan without tile depends on size, finish, and location. Here’s a general estimate for a standard 3×5-foot shower:
- Materials: $300 – $600 (concrete mix, waterproofing, sealer)
- Labor: $700 – $2,000 (skilled labor is a must)
- Total: $1,000 – $2,600 on average
Custom shapes, premium finishes, or repairs to the subfloor can add to the cost. While this can be similar to a quality tiled pan, it’s usually more than a basic acrylic or fiberglass base.
Step-by-step: How To Build A Concrete Shower Pan With No Tile
If you’re curious about the installation process, here’s a step-by-step overview. This is not a DIY guide—concrete and waterproofing require skill. But knowing the steps helps you make informed choices.
1. Design And Prep
- Measure the shower space.
- Decide on the drain style (center, linear, etc. ).
- Clear the area, check for level subfloor.
2. Install Shower Liner
- Lay a waterproof membrane, wrapping up the wall edges.
- Seal corners and overlaps carefully.
3. Place The Drain
- Install the drain assembly.
- Ensure it’s flush with the planned concrete height.
4. Build Forms
- Use wood or plastic forms to shape the edges and curb.
5. Pour And Slope Concrete
- Mix shower-grade concrete (with fibers for extra strength).
- Pour into the area, slope toward the drain.
- Smooth with a trowel, checking the slope with a level.
6. Cure
- Cover and keep moist for 3–5 days.
7. Finish Surface
- Polish, stain, or texture as desired.
- Let it dry fully.
8. Seal
- Apply 2–3 coats of water-resistant sealer.
- Let each coat dry as directed.
9. Test And Use
- Pour water to check drainage and leaks.
- Finish walls and install fixtures.
Credit: www.houzz.com
Maintenance Tips For A Concrete Shower Pan With No Tile
Concrete is tough, but care keeps it looking great. Here’s how to maintain your pan:
- Clean regularly with a mild soap or pH-neutral cleaner.
- Avoid harsh chemicals—they can weaken the sealer.
- Wipe up soap and shampoo to prevent buildup.
- Check for dull spots or water soaking in—reseal if needed.
- Inspect for cracks or chips after heavy impacts.
With simple care, a concrete shower pan can last for decades.
Design Ideas For Concrete Shower Pans
Looking for inspiration? Concrete is more versatile than you might think.
- Monochrome Modern: Soft gray concrete with matte black fixtures.
- Warm Earth Tones: Brown or tan-stained concrete, wood accents, and leafy plants.
- Industrial Edge: Exposed pipes, rough concrete, and glass walls.
- Spa Retreat: Light polished concrete, pebble border, and rain shower head.
- Sculpted Curves: Custom shapes and rounded corners for a unique look.
Creative lighting and wall finishes (like stone, glass, or more concrete) can make your shower truly stand out.

Credit: www.reddit.com
Safety And Comfort: What To Know
Some people worry that concrete is cold or hard underfoot. Here’s the reality:
- Temperature: Concrete feels cool but not icy. Warm water quickly raises the surface temp. For extra comfort, radiant heating mats can be installed under the pan.
- Hardness: Concrete is solid. Consider a textured finish for grip, and a bath mat outside the shower for comfort.
- Accessibility: Concrete pans can be made “curbless” for easy wheelchair or walker access.
Pros And Cons Summary
It helps to see the main advantages and drawbacks side by side:
| Pros | Cons |
|---|---|
| – Seamless, modern look – Durable and long-lasting – Low maintenance – Custom shapes and sizes – No grout lines – Slip-resistant options | – Professional installation needed – Can feel cool underfoot – Requires sealing – Repairs are harder than with tile – Not the cheapest option |
Real-world Examples And Case Studies
Case 1: Modern Loft Renovation
A couple in Chicago renovated a 1920s loft. They chose a dark gray concrete shower pan with no tile for their master bath. The space feels open and industrial, matching the building’s exposed brick. After three years, the pan looks new, and cleaning is simple—no scrubbing grout or fixing cracked tiles.
Case 2: Small Bathroom, Big Impact
A designer in Seattle worked with a tiny bathroom (just 40 square feet). A light-colored concrete pan, curved to fit the space, made the shower feel bigger. No tile means less visual clutter. They added a slip-resistant finish for safety.
Case 3: Accessible Shower
For an elderly homeowner, a custom concrete pan with a zero-threshold (no curb) was installed. The sloped entry lets a walker roll in easily. The surface is textured for grip, and radiant heat was added underneath for warmth.
Sustainability And Eco-friendliness
Concrete is sometimes seen as less green than other materials. However, there are ways to make a concrete shower pan more eco-friendly:
- Use recycled aggregates: Some mixes use recycled glass, stone, or concrete.
- Choose low-VOC sealers: These reduce harmful fumes.
- Longevity reduces waste: A pan that lasts 30+ years means fewer replacements.
- Local materials: Using local concrete reduces transport emissions.
If sustainability matters to you, ask your installer about greener options.
Credit: www.jlconline.com
Mistakes To Avoid When Choosing Or Installing A Concrete Shower Pan
Even experienced builders can make mistakes with concrete shower pans. Here are common errors and how to avoid them:
- Skipping the waterproof membrane: This leads to leaks and costly repairs. Always use a membrane under the pan.
- Not checking the slope: A flat or uneven pan will cause puddles. Check the slope before the concrete sets.
- Using the wrong sealer: Some sealers aren’t made for constant water contact. Use only waterproof, shower-grade sealers.
- Rushing the curing process: Quick drying causes cracks. Let the concrete cure slowly.
- DIY without experience: Small mistakes can lead to big problems. Hire a pro unless you have concrete and waterproofing experience.
How To Choose An Installer
Installing a concrete shower pan with no tile is not for beginners. When hiring a contractor, ask:
- Do you have experience with no-tile concrete shower pans?
- Can you show photos of previous work?
- What type of waterproofing do you use?
- Which sealer do you recommend?
- How do you handle repairs if something goes wrong?
A good installer will answer confidently and provide references.
When To Reseal Your Concrete Shower Pan
Sealing is the most important maintenance step. How often should you do it?
- Light use (1-2 showers/day): Every 2 years
- Heavy use (family or rental): Every 12-18 months
- Signs you need resealing: Water does not bead on the surface, or stains appear.
Resealing is usually quick and inexpensive compared to repairs.
Can You Retrofit A Concrete Pan Into An Existing Shower?
It’s possible, but not always easy. The old base (tile, acrylic, or fiberglass) must be removed. The subfloor may need repair. Then, the process is similar to new construction—waterproofing, forming, pouring, and sealing. Costs are often higher for retrofits due to demolition and possible repairs.
Concrete Shower Pan And Bathroom Style Trends
Concrete fits into many design trends:
- Industrial: Exposed pipes, concrete walls, and open showers.
- Modern Minimalist: Simple lines, glass, and neutral colors.
- Rustic Urban: Concrete with wood or stone accents.
- Eco-friendly: Recycled materials and long-lasting finishes.
Whatever your style, concrete can be tailored to match.
Comparing Concrete To Epoxy And Other Non-tile Options
Some people consider epoxy shower pans or other alternatives. How do they compare?
| Feature | Concrete | Epoxy | Acrylic |
|---|---|---|---|
| Durability | Very high | High | Moderate |
| Custom shapes | Yes | Yes | No |
| Style | Natural, modern | Glossy, colorful | Basic |
| Maintenance | Low | Low | Low |
| Cost | Medium-High | Medium | Low-Medium |
| Repairability | Challenging | Easy (recoat) | Replace if damaged |
Epoxy is less common but allows for bright colors and a super-smooth finish. Acrylic is budget-friendly but less stylish.
Non-obvious Insights For Homeowners
- Thermal mass can help: Concrete holds heat well. If you pre-warm the bathroom or use radiant heat, the floor stays comfortable longer—great for cool climates.
- Surface “patina” is natural: Over time, a sealed concrete pan can develop a soft sheen or subtle color changes. This adds character and is not a flaw—unless water is soaking in, which means it’s time to reseal.
Final Thoughts
A concrete shower pan with no tile is a statement of style, durability, and smart design. It fits modern bathrooms and those who want something different from the usual tile. While it needs skilled installation and regular sealing, the benefits—easy cleaning, custom shapes, and a seamless look—make it a favorite for many. If you invest in quality materials and professional work, your shower pan can last a lifetime. And with so many finish and color options, you don’t have to settle for boring gray.
For further reading on bathroom waterproofing standards, see the Wikipedia page on waterproofing.
Frequently Asked Questions
Is A Concrete Shower Pan Without Tile Slippery?
It depends on the finish. Polished concrete can be slippery, but a textured finish or non-slip sealer makes the surface safe for showers.
How Long Does A Concrete Shower Pan Last?
With proper installation and regular sealing, it can last 30 years or more. Most problems come from water leaks or lack of maintenance, not the concrete itself.
Can I Install A Concrete Shower Pan Myself?
It’s possible, but not recommended unless you have experience with concrete and waterproofing. Mistakes can lead to leaks and expensive repairs.
How Do I Clean A Concrete Shower Pan With No Tile?
Use a mild, pH-neutral cleaner and a soft brush or cloth. Avoid harsh chemicals, which can damage the sealer. Wipe up spills quickly.
Does Concrete Stain Easily?
Unsealed concrete stains easily, but a good sealer protects against most stains. Reseal regularly to keep the surface looking new. If stains do occur, gentle scrubbing with a baking soda paste can help.
With the right care, a concrete shower pan without tile can be the star of your bathroom—strong, stylish, and uniquely yours.