
Thinking about adding extra storage in your kitchen, but not sure how to do it? Many people look up and see empty space above their kitchen cabinets. This is often wasted space, but it can be transformed into useful storage with the right approach.
Adding cabinets above existing cabinets can give your kitchen a custom look and help you keep things organized. It can even make your kitchen feel taller and more elegant. This project may sound difficult, but with careful planning and some basic tools, it’s possible for many homeowners to do themselves.
This guide will walk you through everything you need to know about adding cabinets above existing cabinets. You’ll learn how to measure, choose the right cabinets, prepare your space, and install them safely. You’ll also discover tips to avoid common mistakes and ways to get a professional finish.
Whether you are looking for a DIY challenge or want to work with a contractor, this article gives you all the information you need to make the right decisions and get great results.
Why Add Cabinets Above Existing Cabinets?
When kitchens were designed in the past, the space above cabinets was often left open. People used to put plants, baskets, or decorations there. Today, storage space is more important than ever, especially in smaller homes or apartments. Here are some benefits of adding cabinets above your current ones:
- Extra storage: Perfect for items you don’t use every day, like holiday dishes or small appliances.
- Cleaner look: Closes off gaps where dust and grease can collect.
- Custom style: Makes your kitchen look more built-in and high-end.
- Better use of space: Maximizes every inch in your kitchen, which is valuable in small homes.
Some people worry that adding cabinets will make their kitchen feel crowded. In reality, tall cabinets can draw the eye upward, making the ceiling look higher. This can actually make the room feel larger if done right.
Can You Add Cabinets Above Existing Cabinets?
Before you start, you need to know if this project is possible in your kitchen. Not all kitchens are the same. Here’s what you should check:
- Ceiling height: You’ll need at least 12-18 inches between your current cabinets and the ceiling to add another cabinet.
- Cabinet structure: Your current cabinets need to be strong and attached to the wall studs. This is because the extra cabinets will add weight.
- Wall type: Drywall is easier to work with, but if you have concrete or brick, installation will be harder.
- Obstacles: Look for vents, pipes, or wires in the wall above your cabinets.
- Aesthetics: Consider whether the extra cabinets will look balanced in your kitchen.
If you are unsure, take photos of your kitchen and show them to a carpenter or kitchen designer for advice.
Planning Your Project
A successful cabinet addition starts with careful planning. Rushing can lead to costly mistakes. Here’s how to set yourself up for success.
Measure Your Space
Use a tape measure to get the following:
- Distance from the top of your existing cabinets to the ceiling.
- Width of each cabinet section.
- Depth of your current cabinets (most standard kitchen cabinets are 12-24 inches deep).
Write these measurements down. Measure twice to be sure.
Decide On Cabinet Height
Most people add cabinets that are 12-18 inches tall. Taller cabinets are harder to reach and may look odd unless you have a very high ceiling.
Choose The Right Style
You want the new cabinets to look like they belong. Choose:
- Matching doors: Use the same style and color as your current cabinets.
- Simple designs: If you can’t find a perfect match, use glass doors or open shelves for contrast.
- Trim: Adding crown molding at the top creates a finished look.
Stock Vs. Custom Cabinets
There are two main choices:
- Stock cabinets: Cheaper and available at big box stores, but sizes may not fit perfectly.
- Custom cabinets: Made to fit your space, but cost more and take longer to order.
Here’s a simple comparison:
| Type | Pros | Cons |
|---|---|---|
| Stock Cabinets | Affordable, Fast delivery | Limited sizes, May not match perfectly |
| Custom Cabinets | Perfect fit, Any style or finish | Expensive, Takes time to make |
Budgeting
Expect to spend $200-$600 per cabinet for stock options, and $500-$1200 for custom. Don’t forget to include costs for trim, paint, tools, and possible help from a carpenter.
Tools And Materials You Will Need
It’s important to gather everything before you start. Here’s what you’ll likely need:
- Measuring tape
- Level
- Stud finder
- Drill and bits
- Screwdriver
- Wood screws (2-3 inches)
- Shims (small wooden wedges)
- Construction adhesive (optional)
- Paint or stain (if needed)
- Caulk or wood filler
- Ladder or sturdy step stool
- Safety glasses and gloves
If you plan to paint the cabinets, buy primer and paint that matches your current finish.
Tip: Buy all hardware (handles, hinges) together to ensure they match your existing cabinets.
Preparing Your Kitchen
Preparation is key to a smooth project. Take these steps before you start installing:
Empty The Cabinets
Remove everything from your upper cabinets. This keeps items safe and prevents dust from getting inside.
Protect Counters And Floors
Lay down drop cloths or old sheets to protect your counters and floors from dust, debris, and dropped tools.
Mark Stud Locations
Use a stud finder to mark the wall studs above your cabinets with a pencil. Cabinets must be screwed into studs for safety.
Remove Existing Molding
If there is any molding or trim on top of your cabinets, carefully remove it with a pry bar. You may be able to reuse it later.
Clean The Area
Dust and grease can make it hard for cabinets to attach well. Wipe down the wall and the top of your existing cabinets with soap and water.
How To Add Cabinets Above Existing Cabinets: Step-by-step
Here’s the main part of the project. Take your time with each step for the best results.
Step 1: Pre-assemble Cabinets (if Needed)
If you buy flat-pack cabinets, assemble them on the floor before installation. Attach doors and hardware later to make them lighter.
Step 2: Mark Cabinet Locations
Hold the new cabinet up (with help if possible) and mark the bottom on the wall with a pencil. Use a level to draw a straight line for the bottom edge.
Step 3: Install Support Cleats
For easier installation, screw a temporary wooden cleat (a strip of wood) into the wall under your line. This will hold the cabinet as you fasten it.
Step 4: Drill Pilot Holes
Drill small holes in the back of the new cabinet where screws will go into the wall studs. This prevents the wood from splitting.
Step 5: Attach Cabinets To Wall
Lift the cabinet onto the cleat. Drive 2-3 inch screws through the pilot holes into the wall studs. Use shims between the cabinet and wall if needed to keep it level.
Step 6: Connect Cabinets Together
If you are installing more than one cabinet, clamp them together and drive screws through the side walls to keep the faces aligned.
Step 7: Attach To Existing Cabinets
Use short screws to fasten the new cabinet down into the top of the existing cabinet. Be careful not to use screws that are too long (they could go through the bottom).
Step 8: Remove Cleats And Adjust
Take off any temporary cleats. Check that the cabinets are level and make small adjustments if needed.
Step 9: Add Trim And Molding
Install crown molding or other trim across the top to cover any gaps and give a finished look. Fill any small gaps with caulk or wood filler.
Step 10: Paint Or Stain
Paint or stain the new cabinets and trim to match your existing cabinets. Let everything dry completely before using.
Step 11: Reinstall Hardware
Attach handles or knobs and put the doors back on if you removed them earlier.
Step 12: Clean Up
Vacuum dust, remove drop cloths, and return items to your cabinets.

Credit: penniesforafortune.com
Safety Tips And Common Mistakes
Most accidents happen when people rush or skip steps. Here’s how to stay safe and avoid problems:
- Always use a sturdy ladder and have someone help lift heavy cabinets.
- Double-check the location of electrical wires or pipes in the wall before drilling.
- Don’t try to install cabinets alone if you are not confident. Cabinets are heavy and can fall.
- Make sure all screws go into wall studs, not just drywall.
- Use shims to keep cabinets level. Even a small tilt will look worse as you add more cabinets.
Common mistakes to avoid:
- Using the wrong size screws (too short won’t hold, too long could poke through)
- Not aligning new cabinet doors with old ones
- Forgetting to match paint or stain before installation
- Not checking for obstacles above the old cabinets (like vent pipes)
Finishing Touches For A Professional Look
Details make a big difference in how your new cabinets look. Try these tips:
- Use matching crown molding for an elegant finish.
- Add undercabinet lighting below the new cabinets for a modern touch.
- Paint the wall space between the cabinets and the ceiling a similar color to blend everything together.
- Store rarely used items up high (like holiday platters), and label them for easy finding.
If your ceiling is uneven, scribe the top trim to follow the ceiling line for a seamless look.
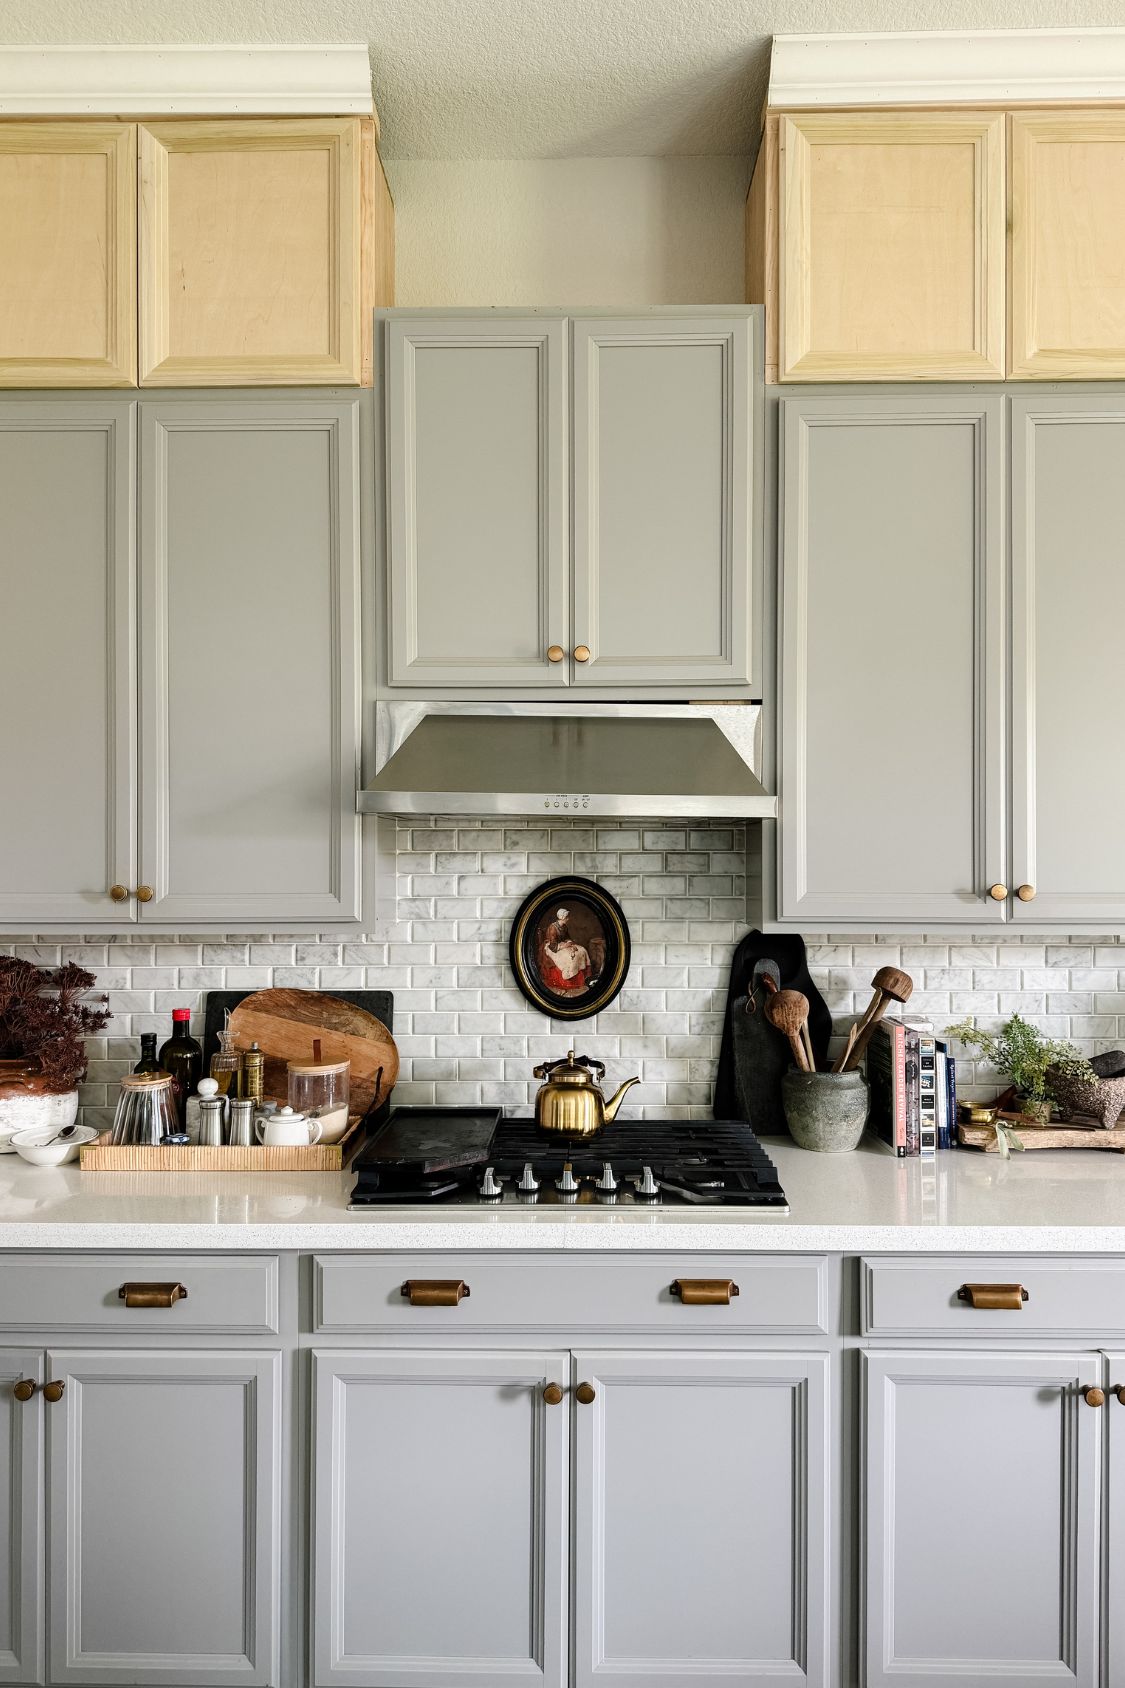
Credit: penniesforafortune.com
Examples: When Extra Cabinets Make Sense
Adding cabinets above existing cabinets works best in certain situations. For example:
- In a small condo kitchen with little storage, adding even one row of 12-inch cabinets gives space for seasonal dishes.
- In a tall, traditional kitchen, extra cabinets with glass doors can display collectibles and make the room feel grand.
- In homes with 9-foot ceilings, double-stacked cabinets look custom and expensive.
But it’s not just for kitchens! This idea can also be used in laundry rooms, home offices, or even bathrooms with tall ceilings.
Cost, Time, And Skill Level
Before starting, it helps to know what you’re getting into. Here’s a quick comparison:
| Factor | DIY (Self-Install) | Professional Install |
|---|---|---|
| Cost (per cabinet) | $200-$600 (stock), $500-$1200 (custom) | $350-$900 plus labor ($50-$100/hr) |
| Time Needed | 4-8 hours per cabinet | 2-4 hours per cabinet |
| Skill Level | Moderate to High | Low (just supervise) |
If you’re comfortable with basic carpentry and have a helper, this project is very possible as a DIY. If not, hiring a pro can save time and stress.
Mistakes To Avoid When Adding Cabinets Above Existing Cabinets
Some problems only show up after installation. Here’s what to watch for:
- Mismatched Cabinets: Slight differences in color, wood grain, or door style can look cheap. Bring a cabinet door to the store to find the best match.
- Ignoring Ceiling Level: Ceilings are often not perfectly flat. This can create gaps. Always measure the highest and lowest points before ordering cabinets.
- Skipping Wall Studs: Fastening cabinets only to drywall is unsafe. Use a stud finder and secure into studs every 16-24 inches.
- Forgetting Ventilation Needs: If your kitchen has a vent pipe or HVAC, make sure new cabinets won’t block airflow.
- Overloading Upper Cabinets: Only store lightweight, rarely used items above your main cabinets.
Storage Ideas For Extra Cabinets
What should you store in these new cabinets? Here are some smart ideas:
- Seasonal dishes (Thanksgiving platters, holiday mugs)
- Large serving bowls or trays
- Special occasion glassware
- Small appliances (slow cooker, ice cream maker)
- Cleaning supplies (if not near food)
- Kids’ craft supplies or extra napkins
Tip: Add shelf risers inside for better organization. Use clear bins or labels to make finding things easier.
Updating The Look: Paint, Trim, And Lighting
You can go beyond just adding cabinets. Here are some ways to make your kitchen look even better:
Paint
If your old cabinets look faded, paint everything (including new and old cabinets) for a fresh, unified look. Use kitchen-safe paint for durability.
Trim
Adding crown molding at the ceiling or a small trim strip between the old and new cabinets hides any small gaps and makes the job look professional.
Lighting
Install LED strip lights under the new cabinets to brighten your workspace and make the kitchen feel modern.
Pro tip: If you want a two-tone look, paint the uppermost cabinets a lighter shade than the rest.
Should You Hire A Pro Or Diy?
Many handy homeowners can install upper cabinets, but consider these points:
- DIY if you have basic carpentry skills, tools, and a helper.
- Hire a professional if your walls or ceiling are uneven, or you want a flawless finish.
A good middle ground: install the cabinets yourself, then hire a pro to add and paint the trim.
How To Find The Right Cabinets
Finding cabinets that match your existing ones can be tricky. Here’s how:
- Check the inside of your current cabinets for a brand or model number. Search online for the same line.
- Visit local kitchen showrooms. Many offer custom color matching.
- Consider semi-custom options: Some companies will make a small run of cabinets in your chosen finish.
- If you can’t find an exact match, choose a style that’s close but adds a new feature, like glass doors or open shelving.
What If You Can’t Find A Perfect Match?
If you can’t match the old cabinets exactly, don’t worry. Some design tricks:
- Use glass-front cabinets above to break up the look.
- Paint all cabinets the same color for a unified feel.
- Use open shelves above for cookbooks or decor.
Sometimes a little contrast looks more “designer” than trying to match perfectly.
Real-world Example
Let’s look at a typical kitchen upgrade. Jane has a 1980s kitchen with eight feet between the floor and ceiling. Her cabinets are 30 inches tall, leaving 18 inches above. She adds 15-inch stock cabinets above, with crown molding at the ceiling.
The total cost (cabinets, trim, paint, and labor) is around $1,500. Now, she has storage for platters and serving dishes, and her kitchen looks modern and custom-built.
Comparing Other Storage Solutions
How does adding cabinets compare to other kitchen storage ideas? Here’s a quick look:
| Solution | Pros | Cons |
|---|---|---|
| Extra Cabinets | Permanent, tidy, adds home value | Higher cost, needs installation |
| Open Shelves | Cheap, easy to install | Shows clutter, collects dust |
| Hanging Racks | Good for pots/pans, flexible | Not suitable for all items |
| Pantry Cabinet | Large storage, easy access | Takes up floor space |
While open shelves and racks are quick fixes, adding cabinets is a lasting solution that also increases your home’s value.
When Not To Add Cabinets Above Existing Cabinets
There are times when adding cabinets is not the best idea:
- Very low ceilings: If you have less than 12 inches above your cabinets, the space is too small.
- Historic homes: Some old homes look better with open space and original design.
- Uneven ceilings: Large gaps can be hard to hide, unless you use custom trim.
- Budget constraints: If cost is a concern, consider open shelves or paint instead.
Eco-friendly Tips
If you’re eco-conscious, think about these:
- Reuse existing cabinet doors if possible.
- Buy cabinets made from sustainable wood or with low-VOC finishes.
- Paint with eco-friendly, water-based paints.
- Donate any removed molding or old cabinets to a local building charity.
Where To Learn More
For a deeper dive, you can check out installation guides and kitchen design inspirations from sources like This Old House.
Frequently Asked Questions
What Is The Minimum Space Needed Above Cabinets To Add Another Cabinet?
You need at least 12 inches of space between the top of your existing cabinets and the ceiling. Less than this will not allow for standard cabinet sizes.
Can I Install Cabinets Above Cabinets By Myself?
You can, but it’s easier and safer with help. Cabinets are heavy, and two people make installation smoother and safer.
What If My Cabinets And New Ones Don’t Match Exactly?
It’s common for matches to be off by a little. Use trim or paint to help blend them. Glass doors or open shelving above can also create a nice contrast.
Is It Expensive To Add Cabinets Above Existing Ones?
Costs range from $200 to $1200 per cabinet, depending on stock or custom options. Adding trim, paint, or hiring a pro increases the price.
Will Adding Upper Cabinets Increase My Home’s Value?
Yes, more storage and a custom look can raise your home’s value, especially in small kitchens. Buyers often like built-in storage solutions.
Adding cabinets above existing cabinets is a smart way to make the most of your kitchen. With careful planning and attention to detail, you can create a beautiful, functional space that looks custom-made. Whether you do it yourself or hire a pro, this upgrade is one that pays off for years to come.

Credit: www.thriftydecorchick.com