
Many people love cooking with a gas stove. The reason is simple: you get instant heat, fast changes in temperature, and a feeling of control that electric stoves often lack. But if the flame is too high, too low, or uneven, it can make cooking hard and sometimes unsafe. Learning how to adjust the flame on a gas stove is not just about better food—it’s also about safety, saving gas, and keeping your stove in good shape for years.
Many home cooks don’t realize that you can—and should—adjust the flame to fit your needs. Maybe your stove is new, or maybe it’s been in your kitchen for years but never worked quite right. Sometimes the flame is yellow and weak; sometimes it’s too strong and makes your pots black. There’s more to fixing these problems than just turning the knobs. This guide will walk you through everything you need to know, from understanding how your stove works to making careful adjustments, troubleshooting, and even when to call a pro.
You’ll learn what a healthy flame looks like, why the right flame matters, and how to adjust it safely step by step. You’ll also find out about common mistakes and how to avoid them. If you want your gas stove to cook evenly, save money, and last longer, keep reading.
Why The Right Flame Matters
The flame on a gas stove does more than just cook your food—it affects cooking quality, safety, and even your energy bills. Most people think a bigger flame is better, but that’s not true. The right flame can make your cooking easier and safer.
- Cooking Performance: A steady, blue flame heats pans quickly and evenly. A yellow or orange flame can burn food, cook unevenly, or take longer to boil water.
- Safety: An improper flame can produce carbon monoxide, a dangerous gas with no smell or color. A correct flame reduces this risk.
- Energy Use: A well-adjusted flame uses less gas, saving money over time. Too much flame wastes fuel and increases your bills.
- Stove Lifespan: If the flame is too high or dirty, it can damage your burners and other parts, leading to costly repairs.
Most stoves are set at the factory, but gas pressure in homes is not always the same. Even high-end stoves sometimes need adjustments to fit your kitchen.
Understanding How A Gas Stove Works
Before you adjust anything, it helps to know the basics. A gas stove works by mixing air with gas before burning. Here’s how it all comes together:
- Gas Supply: When you turn the knob, gas flows from the supply line to the burner.
- Air Mixer (Venturi Tube): Air mixes with the gas in a small tube. This mix is important for a clean, blue flame.
- Burner: The gas-air mix comes out through small holes (ports) in the burner, where it’s lit by a spark or pilot light.
- Flame: The mix burns, creating heat.
The color, shape, and size of the flame tell you if the mix is right.
What A Healthy Flame Looks Like
- Color: Bright blue with a small yellow tip at most.
- Shape: Even, steady, and cone-shaped.
- Height: About 1 to 1.5 inches (2.5 to 4 cm) above the burner.
A yellow, orange, or flickering flame means the mix of gas and air is not right.
Tools You Need For Flame Adjustment
Adjusting your gas stove is simple, but you need the right tools. Most people already have these at home:
- Screwdriver: Usually a small flathead for adjusting screws.
- Needle-nose pliers: Sometimes needed for hard-to-reach screws.
- Flashlight: Helps you see under the burner.
- Cleaning brush: For removing dirt or food around the burner.
- Soapy water in a spray bottle: To check for gas leaks (never skip this step).
- Protective gloves: To avoid burns or scratches.
Having these ready makes the job smoother.
Safety First: What You Must Know
Before you touch your gas stove, safety comes first. Gas is flammable and can be dangerous if you’re not careful. Take these steps every time:
- Turn Off the Gas Supply: Find the main valve near your stove and turn it off.
- Unplug the Stove: If your stove has an electric ignition, unplug it.
- Ventilate the Room: Open windows or doors to avoid gas build-up.
- Wait for Burners to Cool: Never touch hot parts.
- Keep a Fire Extinguisher Nearby: Just in case.
Never adjust a stove if you smell gas. Leave the house and call your gas company right away.
How To Identify Flame Problems
Not all flame problems are the same. Here are common signs and what they mean:
- Yellow or Orange Flame: Not enough air in the mix; could be dirty burners or blocked air vents.
- Very High Flame: Too much gas; can waste fuel or damage cookware.
- Very Low Flame: Not enough gas or blocked burner holes.
- Uneven Flame: Burner ports are clogged or the burner is not seated properly.
- Noisy Flame: Too much air in the mix; makes a hissing sound.
If you see any of these, your stove needs adjustment.
Step-by-step: Adjusting The Flame On A Gas Stove
Now, let’s get practical. Here is a clear process you can follow. Every stove is a little different, so check your user manual if you have it.
1. Remove Burner Grates And Caps
Wait until your stove is cool. Lift off the metal grates and burner caps. This exposes the burner and adjustment screws.
2. Clean The Burner
Wipe away any food, grease, or dirt. Use a brush or toothpick to clean the burner holes. Even a little dirt can change the flame size and color.
3. Find The Adjustment Screw
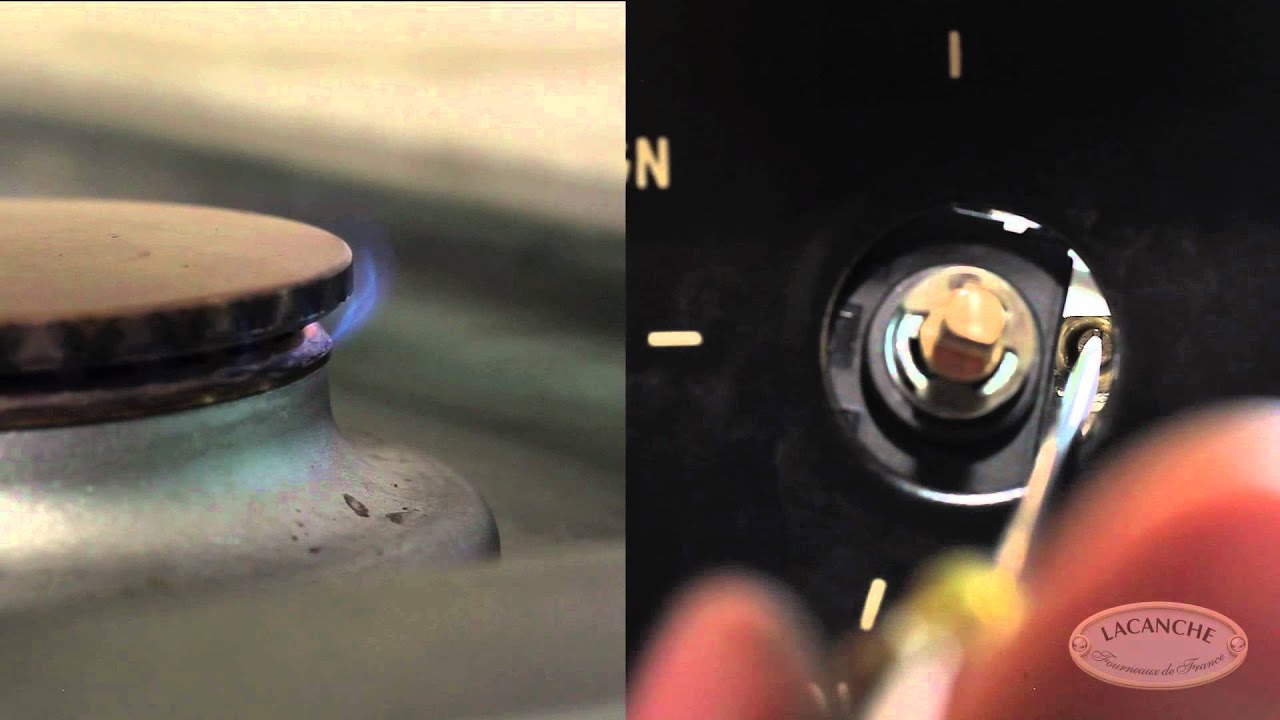
Most modern stoves have a flame adjustment screw near the knob or under the control panel. It’s often inside the shaft where the knob fits. You may need to pull off the knob to see it. Some older stoves put the screw under the cooktop.
- If you can’t find the screw, check your manual or search for your stove’s model online.
4. Turn On The Burner
Turn the gas back on. Light the burner you want to adjust. Use a flashlight to see the flame clearly.
5. Adjust The Flame
- Increase Flame: Turn the screw counterclockwise with a flathead screwdriver.
- Decrease Flame: Turn the screw clockwise.
Make small turns—one-eighth of a turn at a time. Wait a few seconds after each change to see the result.
6. Check The Flame
Look for a steady, blue flame about 1 to 1. 5 inches high. If you see yellow or orange, or if the flame is too tall or low, keep adjusting.
7. Test All Burners
Repeat the process for each burner. Not all burners are set the same, especially on older stoves.
8. Reassemble The Stove
Once the flame looks good, turn off the burners. Replace the burner caps and grates.
9. Final Safety Check
Spray soapy water around the gas connections and valves. If you see bubbles, there is a leak—turn off the gas and call a pro.

Credit: www.searshomeservices.com
Fine-tuning The Air-gas Mix
Sometimes, turning the adjustment screw is not enough. You may need to fine-tune the air-gas mix using the air shutter or venturi.
What Is The Air Shutter?
The air shutter is a small metal plate near the base of each burner. It slides open or closed to let in more or less air.
How To Adjust The Air Shutter
- Locate the Shutter: Usually under the cooktop or near the burner base.
- Loosen the Lock Screw: Use a screwdriver to loosen it.
- Adjust the Plate: Slide it open for more air (bluer flame), closed for less air (less noise, less yellow).
- Tighten the Screw: Once the flame is blue and steady, tighten the lock screw.
This step is more common for older stoves or if you switch from natural gas to propane.
Comparing Gas Stove Flame Types
To help you understand the difference, here is a comparison of common flame colors and what they mean.
| Flame Color | What It Means | What To Do |
|---|---|---|
| Blue | Correct air-gas mix, efficient burning | No adjustment needed |
| Yellow/Orange | Too little air, incomplete combustion | Clean burner, adjust air shutter |
| Red | Possible dust or contamination | Clean burner thoroughly |
| Flickering | Unstable gas supply or wind | Check for leaks, adjust room airflow |
Common Mistakes And How To Avoid Them
Even careful people make mistakes. Here are the most common errors—and how to stay safe:
- Skipping Cleaning: Dirt in the burner holes leads to bad flame, even after adjustment.
- Turning the Screw Too Much: Small changes work best. Big turns can make things worse or damage the screw.
- Not Checking All Burners: Each one can be different; always test each burner.
- Ignoring Safety Checks: Always check for gas leaks after making adjustments.
- Forgetting About Airflow: Kitchen fans, open windows, or a strong draft can affect the flame. Adjust in a stable room.
A less obvious mistake is not checking the gas type. Natural gas and propane require different settings. If you move into a new home or change gas supply, check if your stove needs a conversion kit.
When To Call A Professional
Most people can handle basic flame adjustments, but sometimes you should call an expert:
- Persistent Yellow or Orange Flame: If cleaning and adjusting do not fix the flame.
- Gas Smell: If you ever smell gas, leave the house and call for help.
- Strange Noises: Whistling or roaring means a bigger problem.
- Damaged Parts: Cracked burners, broken knobs, or missing pieces need expert repair.
- Switching Gas Types: Changing from natural gas to propane, or vice versa, is a job for a pro.
Professional help can save time, keep your home safe, and extend the life of your stove.
Adjusting For Different Cooking Needs
Not all cooking is the same. Sometimes you want a high flame for boiling water, and other times you want a low flame for simmering sauces. Here’s how to make your stove fit your style:
- High Heat (Boiling, Searing): Use the largest burner and adjust for a strong, steady blue flame.
- Medium Heat (Frying, Sauteing): Use a mid-sized burner. Adjust until the flame just touches the bottom of your pan.
- Low Heat (Simmering, Melting): Use the smallest burner. If the flame goes out easily, turn the screw to increase the minimum flame just enough to stay lit.
If your stove has a simmer setting, make sure it works. Many people ignore this, but it helps for delicate sauces or melting chocolate.
How To Maintain A Healthy Flame
Adjusting the flame once is not enough. Gas stoves need regular care. Follow these steps to keep your stove working well:
- Clean Burners Monthly: Remove caps and brush out the holes.
- Check Flame Color: Look at the flame every week. Any change means it’s time for cleaning or adjustment.
- Check Gas Hoses Yearly: Look for cracks or leaks. Replace old hoses.
- Have a Pro Check the Stove: Every 2-3 years, ask a technician to inspect and service your stove.
A well-cared-for stove is safer and more fun to cook with.
Credit: www.youtube.com
Data: Gas Consumption And Flame Adjustment
Proper adjustment can save money on gas bills. Here’s a rough comparison of gas use:
| Flame Setting | Average Gas Use (per hour) | Monthly Cost (estimate) |
|---|---|---|
| High (unadjusted) | 0.12 cubic meters | $14 |
| Medium (well-adjusted) | 0.08 cubic meters | $9 |
| Low (simmer, adjusted) | 0.04 cubic meters | $5 |
With proper adjustment, you can save up to 30% on your gas bill.
Signs You Need To Adjust The Flame
Some problems develop slowly. Watch for these signs that your stove needs attention:
- Takes Longer to Boil Water: If boiling water takes much longer than before, the flame may be too low.
- Soot on Pans: Black marks mean incomplete burning—usually a yellow flame.
- Burner Pops or Goes Out: If the flame blows out easily, it’s too weak or too much air in the mix.
- Uneven Cooking: Hot spots or cold spots in your pan mean the flame is not even.
Catching these early prevents bigger problems later.

Credit: www.lg.com
Special Cases: Propane Vs. Natural Gas Stoves
There are two main types of gas: natural gas (from the city supply) and propane (from tanks). Each needs different settings.
- Propane burns hotter, so the flames are usually smaller.
- Natural Gas needs more air in the mix.
If you switch from one type to the other, ask a pro to install a conversion kit and adjust the stove. Using the wrong settings can be unsafe.
How To Adjust The Flame On Sealed Burner Stoves
Modern stoves often have sealed burners. These are harder to clean and adjust, but the process is similar:
- Remove the burner cap.
- Find the adjustment screw (often under the knob).
- Adjust with a small flathead screwdriver.
- Clean ports with a brush or pin.
- Reassemble and test.
If you can’t find the screw, check your manual or call the manufacturer.
Troubleshooting: Common Problems After Adjustment
Sometimes, you make an adjustment and something still goes wrong. Here’s how to fix it:
- Flame is Blue but Uneven: Burner cap may not be seated correctly. Remove and realign.
- Flame Goes Out at Low Setting: Minimum flame is too low. Turn screw counterclockwise slightly.
- Flame Pops or Flickers: Too much air or kitchen draft. Adjust the air shutter or close nearby windows.
- Knob is Hard to Turn: Knob shaft may be dirty. Clean with a cloth and a little oil.
Most problems have simple solutions if you know what to look for.
Comparing Gas Stove Brands: Ease Of Flame Adjustment
Some brands make it easier to adjust the flame than others. Here’s a quick comparison:
| Brand | Adjustment Location | Ease of Access |
|---|---|---|
| GE | Under the knob | Easy |
| Samsung | Under the cooktop | Medium |
| Whirlpool | Under the knob | Easy |
| LG | Under the knob | Easy |
| Bosch | Under the cooktop | Medium |
Check your manual for your specific model.
Advanced Tips For Perfect Flame Adjustment
If you want your stove to perform like a pro kitchen, try these advanced tips:
- Use a Flame Height Gauge: Some hardware stores sell simple tools to measure flame height for perfect adjustment.
- Cook with the Right Pan Size: Too small a pan on a large burner wastes heat and can cause soot.
- Check for Proper Ventilation: Good airflow in your kitchen helps combustion and safety.
- Test with Real Cooking: After adjusting, cook something simple like eggs or pancakes. Watch for even cooking and adjust again if needed.
- Log Your Settings: Write down screw positions and settings if you have multiple stoves or move often.
Even small changes can make a big difference.
Environmental Impact Of Proper Flame Adjustment
Many people don’t realize that proper flame adjustment is good for the planet. Here’s how:
- Less Gas Waste: A blue flame uses gas efficiently, reducing emissions.
- Lower Carbon Monoxide: Correct air-gas mix cuts down dangerous gases.
- Longer Appliance Life: Fewer repairs mean less waste in landfills.
By taking care of your stove, you help the environment and your wallet.
Frequently Asked Questions
How Often Should I Adjust The Flame On My Gas Stove?
Most stoves only need adjustment when you notice a problem—like a yellow flame or uneven cooking. For best results, check the flame color every month and adjust if needed.
Is It Safe To Adjust The Flame Myself, Or Should I Call A Professional?
Basic flame adjustment is safe if you follow instructions and check for leaks. But if you smell gas, see persistent yellow flames, or have other concerns, call a professional.
What Should I Do If The Flame Turns Yellow After Adjustment?
A yellow flame means not enough air or a dirty burner. Clean the burner holes and adjust the air shutter. If the problem remains, ask a technician for help.
Can Improper Flame Adjustment Damage My Cookware?
Yes. Too high or sooty flames can blacken pots and even warp thin pans. Always aim for a steady blue flame just touching the pan’s bottom.
Where Can I Find More Detailed Instructions For My Specific Stove Brand?
Your stove’s user manual is the best source. Many companies post manuals online. For more details, visit Consumer Reports for expert advice.
A well-adjusted gas stove brings better cooking, safer meals, and savings for years to come. By understanding your stove, making careful adjustments, and maintaining it, you can enjoy the best that gas cooking offers.