
Attaching a stove pipe to a wood stove may sound simple, but it is one of the most important steps for safe and efficient wood stove operation. If you connect the stove pipe incorrectly, smoke may leak into your home, fires can start, and your wood stove might not work properly.
Many homeowners feel nervous about this task, but with the right knowledge and tools, you can do it confidently and safely. This guide will walk you through everything you need to know—from choosing the right materials, step-by-step installation, to troubleshooting common issues.
Even if you are new to wood stoves, you will finish with a clear understanding and the skills to complete the job.
Understanding The Basics: What Is A Stove Pipe And Why Is It Important?
A stove pipe is a metal tube that connects your wood stove to the chimney. Its main job is to guide smoke and dangerous gases safely out of your home. If the pipe is not attached well, smoke can escape into the room, which is dangerous for your health and can damage your home. The stove pipe also affects how well your wood stove works. If the pipe is the wrong size or not sealed, your stove won’t burn wood efficiently and may be hard to control.
There are two main types of stove pipes:
- Single-wall stove pipe: Made of one layer of metal, usually black steel. It is cheaper and easy to install but gets very hot on the outside.
- Double-wall stove pipe: Has two layers of metal with insulation in between. It stays cooler on the outside, which is safer, and keeps the smoke hotter inside for better draft.
Knowing which type you have is the first step before starting your project.
Essential Tools And Materials Needed
Before you begin, gather all the tools and materials so you don’t have to stop mid-job. Here’s what you’ll need:
- Stove pipe sections (single-wall or double-wall, in the right diameter for your stove)
- Stove pipe elbow (if your setup is not a straight line)
- Stove pipe adapter (if your stove or chimney collar is a different size than your pipe)
- Sheet metal screws (self-tapping for easy work)
- High-temperature stove pipe sealant (sometimes called furnace cement or silicone)
- Screwdriver or drill
- Tape measure
- Tin snips (for cutting pipe if needed)
- Work gloves
- Protective goggles
- Heat-resistant tape (optional, for extra sealing)
It’s also wise to have a sturdy ladder and a drop cloth to protect your floor from metal shavings or sealant drips.
Safety Precautions Before Starting
Working with stove pipes involves sharp metal edges and sometimes heights. It’s important to protect yourself and your home:
- Always wear work gloves and goggles to avoid cuts and debris in your eyes.
- Make sure the wood stove is completely cold before starting. Never work on a hot stove.
- Keep children and pets out of the area.
- Check your local building codes. Some places require a professional to do this work or to inspect your installation.
- Make sure your smoke detectors are working before using the stove after installation.
How To Choose The Right Stove Pipe For Your Wood Stove
Choosing the correct pipe is critical. Pipes come in different diameters, lengths, and materials. Here’s how to make the right choice:
Match The Diameter
Your stove’s manual will list the correct pipe diameter—most common are 6 or 8 inches. Never use a smaller pipe than the stove’s outlet, as this can cause smoke to back up into your home.
Choose The Right Material
- Use single-wall pipe only for the room where the stove sits. Never run it through walls or ceilings.
- Use double-wall or insulated pipe for any sections passing through walls, ceilings, or attics. This prevents fire risk.
Length And Layout
Measure the distance from your stove to the chimney. Try to keep the pipe run as short and straight as possible. Each turn or elbow reduces draft and increases creosote buildup.
Example Stove Pipe Sizes
Here’s a quick reference for common wood stove sizes and their typical pipe diameters:
| Stove Heat Output | Typical Pipe Diameter | Best Pipe Type |
|---|---|---|
| Small (Up to 30,000 BTU) | 6 inches | Single-wall |
| Medium (30,000–60,000 BTU) | 6 or 8 inches | Single or double-wall |
| Large (Above 60,000 BTU) | 8 inches | Double-wall |
If you are unsure, check your stove’s manual or ask the manufacturer.

Credit: diy.stackexchange.com
Preparing The Stove And Pipe For Installation
A smooth installation starts with careful preparation. Follow these steps:
- Clear the area: Move any furniture or flammable items away from the stove.
- Clean the stove outlet: Remove any ash or debris from the collar where the pipe will attach.
- Inspect the pipe: Check for dents, rust, or manufacturing defects in your pipe sections.
- Dry-fit the pieces: Without securing, assemble the pipe on the floor. Make sure all sections fit together properly.
- Measure and cut: If your pipe is too long, use tin snips to cut it. Wear gloves—the edges are very sharp.
This preparation will save you time and reduce mistakes when you attach the pipe.
Step-by-step Guide: How To Attach Stove Pipe To Wood Stove
Now let’s walk through each step, from start to finish, for a basic single-wall stove pipe installation.
Step 1: Attach The First Pipe Section To The Stove
- Find the stove collar (the round opening on top or back of the stove).
- Some stoves need a special adapter if the collar is not the same size as your pipe. Slide the adapter in place if needed.
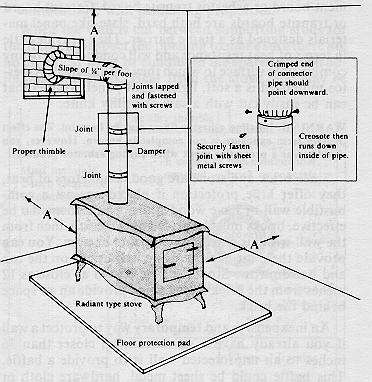
- Insert the crimped end of the first pipe section into the stove collar. The crimped (narrower) end always points towards the stove. This helps smoke and creosote flow down into the stove, not out through the joints.
Step 2: Secure The Connection
- Use at least three sheet metal screws to connect the pipe to the collar. Place them evenly around the pipe for a tight fit.
- If using an adapter, screw the adapter to the stove first, then the pipe to the adapter.
Step 3: Add Additional Sections
- Continue attaching pipe sections, always inserting the crimped end towards the stove.
- Secure each connection with three screws.
- If you need to use an elbow to change direction, make sure it is tight and does not restrict the airflow too much.
- Try to keep the number of turns to a minimum for better draft.
Step 4: Seal The Joints
- Use a high-temperature stove pipe sealant on each joint. Apply a thin bead around the joint and smooth it with your finger (wear gloves).
- Some people use heat-resistant tape for extra sealing, but sealant is usually enough for most homes.
Step 5: Connect To The Chimney
- The last section of the stove pipe should connect to the chimney thimble (the opening in the wall or ceiling that leads to your chimney).
- If the thimble is a different size, use a reducer or adapter.
- Secure the connection with screws and sealant.
Step 6: Check For Leaks And Stability
- Wiggle each section gently. Everything should feel solid.
- Double-check all screws and seals.
- Look for gaps where smoke could escape.
Step 7: Final Inspection
- Clean up any metal shavings or spills.
- Make sure the pipe has at least 18 inches of clearance from walls, ceilings, and anything flammable (unless using double-wall pipe, which needs less clearance).
- If your setup goes through a wall or ceiling, check local codes—they may require a firestop or special insulated pipe.
Special Cases: Elbows, Adapters, And Unusual Setups
Not all stoves and rooms are the same. Here’s how to handle some common challenges:
Using Elbows
- Elbows are used to change direction, usually 45 or 90 degrees.
- Too many elbows reduce draft and increase creosote buildup.
- If you must use elbows, keep the total number under three.
Different Size Pipes
- If your stove collar and chimney thimble are different sizes, use a stove pipe reducer or expander.
- Always put the larger end over the smaller end, with the crimped edge pointing towards the stove.
Rear-venting Stoves
- Some stoves vent from the back, not the top.
- You will need an elbow right at the stove outlet.
- Make sure the upward section is vertical for at least 2 feet before any turns.
Double-wall Pipe
- Double-wall pipes have specific connectors and require less clearance to walls.
- Never mix and match single-wall and double-wall in the same section without the proper transition adapter.
Common Mistakes And How To Avoid Them
Even experienced DIYers sometimes make errors. Here’s what to watch out for:
- Crimped ends facing the wrong way: Always point crimped ends toward the stove, so smoke stays inside the pipe.
- Loose connections: Failing to use enough screws can let pipes come apart and leak smoke.
- Too many elbows: Each elbow reduces draft. Plan your pipe path for as few turns as possible.
- Mixing pipe types: Never connect single-wall pipe to double-wall without the correct adapter.
- Not sealing joints: Gaps may not be obvious at first, but will leak smoke when the stove is in use.
- Not following clearance rules: Single-wall pipes need at least 18 inches of space from anything flammable.
- Skipping local codes: Some areas require a professional inspection or special materials.
How To Check Your Work After Installation
After you attach the stove pipe, you need to make sure everything is working properly before you light a fire.
Visual Inspection
- Look at every joint and screw. Everything should be tight.
- Make sure there are no gaps or loose sections.
Smoke Test
- Place a small piece of paper in the stove and light it.
- Close the stove door and watch the pipe. No smoke should escape from the joints.
- If you see smoke, turn off the fire, let everything cool, and check the seals again.
Heat Test
- After your first small fire, check the pipe for leaks and feel for hot spots.
- If the pipe moves or makes noises, let it cool and check the screws.
Professional Inspection
- For peace of mind, consider having a certified chimney sweep or inspector check your work.
Maintenance Tips For Safe And Efficient Operation
A well-installed pipe still needs care. Here’s how to keep your stove pipe in top shape:
- Clean the pipe every year: Creosote builds up inside and can cause chimney fires.
- Check for rust or damage: Replace any damaged sections immediately.
- Re-seal joints if needed: Over time, sealant can crack from heat. Inspect and reapply as needed.
- Watch for smoke leaks: If you ever see smoke outside the pipe, stop using the stove and repair the joint.
- Keep the area clear: Don’t let furniture or curtains get close to the pipe.
When To Call A Professional
While many people can attach a stove pipe themselves, you should call a pro if:
- You are not sure about the right materials or methods.
- Your installation goes through walls, ceilings, or floors.
- The pipe or stove is old or damaged.
- You have any doubts about safety.
Professional installers have special tools and know local codes. It’s always better to be safe than sorry.
Example: Comparing Single-wall And Double-wall Pipe Installations
To help you understand which pipe to choose, here’s a side-by-side comparison:
| Feature | Single-Wall Pipe | Double-Wall Pipe |
|---|---|---|
| Cost | Lower | Higher |
| Required Clearance | 18 inches | 6-8 inches |
| Heat Retention | Poor | Good |
| Safety | Gets very hot | Safer to touch |
| Best For | Short, simple runs | Long runs, close to walls |
Stove Pipe Codes And Regulations
Building codes are not just suggestions—they are there for your safety. Here are some common rules:
- Clearances: Pipes must be a certain distance from walls and ceilings.
- Materials: Only use listed and approved pipe materials.
- Firestops: Needed when passing through walls or ceilings.
- Inspections: Some areas require a professional sign-off.
Always check your local rules before starting. For more, see the NFPA’s wood stove safety page.
Troubleshooting Common Problems
Even after careful work, you might run into problems. Here’s how to solve the most common ones:
Poor Draft
- Symptoms: Fire won’t stay lit, smoke backs up.
- Causes: Too many elbows, pipe too long or too short, outside air is too cold.
- Fix: Straighten the pipe if possible, add a draft inducer, or insulate the pipe.
Smoke Leaks
- Symptoms: Smoke visible at pipe joints or in the room.
- Causes: Loose screws, poor sealant, wrong pipe size.
- Fix: Tighten screws, re-seal joints, check for correct pipe diameter.
Creosote Buildup
- Symptoms: Black, sticky residue inside pipe.
- Causes: Burning wet wood, poor draft, pipe too cool.
- Fix: Clean pipe more often, burn only dry wood, consider double-wall pipe.
Rattling Or Moving Pipe
- Symptoms: Pipe shakes or makes noise.
- Causes: Not enough screws, pipe sections too loose.
- Fix: Add more screws, check all connections.
Rust Or Corrosion
- Symptoms: Flakes of rust or holes in pipe.
- Causes: Moisture, old age, leaks.
- Fix: Replace damaged sections, keep pipe dry, check seals regularly.

Credit: www.tinywoodstove.com
Example Layouts: Straight And Elbowed Stove Pipe Runs
Here are two common setups to help you visualize:
| Layout Type | Description | Best Used When |
|---|---|---|
| Straight Run | Pipe goes directly up from stove to chimney with no turns. | Stove is directly below chimney thimble. |
| Elbowed Run | Pipe uses one or more elbows to reach chimney thimble. | Stove is offset from chimney, or vent is rear-exit. |
A straight run is always best for draft and safety, but elbows are sometimes necessary in real homes.
Upgrading Or Replacing An Existing Stove Pipe
If you already have a stove pipe but it’s old or damaged, you can replace it:
- Remove old pipe carefully. Wear gloves—old sealant and soot can be messy.
- Inspect the stove collar and chimney thimble for damage.
- Install new pipe using the same steps as above.
- Check for proper fit—never force a pipe that doesn’t fit well.
Upgrading to a double-wall pipe can improve safety, especially if your old pipe was too close to walls.
Final Checklist Before Lighting Your Stove
After everything is installed:
- All screws are tight (three per joint minimum).
- All joints are sealed with high-temperature sealant.
- Pipe is the correct diameter and material.
- Proper clearance from walls and ceiling.
- No smoke leaks during test fire.
- Smoke and carbon monoxide detectors are working.
- Fire extinguisher is nearby.
Frequently Asked Questions
What Size Stove Pipe Do I Need For My Wood Stove?
You need to match the stove pipe diameter to your stove’s collar. Most wood stoves use a 6-inch or 8-inch pipe. Check your stove’s manual for the exact size. Never use a pipe smaller than your stove’s outlet, as this can cause dangerous smoke leaks.
Can I Use Single-wall Stove Pipe Through A Wall Or Ceiling?
No, you should never use single-wall stove pipe through a wall, ceiling, or attic. These areas require double-wall or insulated pipe to prevent fire risk. Always follow local building codes for safe installation.
How Do I Know If My Stove Pipe Is Leaking Smoke?
Signs include a smoky smell in the room, visible smoke escaping from pipe joints, or soot marks around connections. If you see any of these, stop using your stove and check all screws and seals right away.
How Often Should I Clean My Stove Pipe?
You should clean your stove pipe at least once a year, or more often if you use your wood stove every day. Regular cleaning removes creosote, which can cause dangerous chimney fires.
Do I Need A Professional To Install My Stove Pipe?
In many cases, you can install the stove pipe yourself if you follow safety guidelines and local codes. However, if your setup is complex, goes through walls or ceilings, or you have any doubts, hiring a professional is the safest choice.
Connecting a stove pipe to a wood stove is a job that rewards careful planning and attention to detail. By following these steps, using the right materials, and checking your work, you can enjoy a warm, safe, and efficient wood stove all winter long. For more information on wood stove safety, visit the CDC’s heating safety page.
Credit: cookstoves.net