
Building your own kitchen cabinets can feel like a big job, but it’s also one of the most rewarding DIY projects for your home. If you want to save money and add a personal touch to your kitchen, using free plans to build your kitchen cabinets is a smart move. But where do you start? How do you make sure your cabinets are strong, beautiful, and fit your space perfectly? This guide will walk you through every step, from finding the right plans to finishing your cabinets. You’ll learn what tools you need, how to measure, cut, assemble, and install each piece, and tips to avoid mistakes that beginners often make. With a little patience and the right guidance, you can create cabinets that look professional—even if you’ve never built furniture before.
Why Build Kitchen Cabinets Yourself?
Making your own kitchen cabinets brings many benefits. First, you can save a lot of money compared to buying custom cabinets from a store or hiring a carpenter. Store-bought cabinets often cost thousands of dollars, while building them with quality plywood and hardware might only cost a few hundred. Second, you have full control over the style, size, and materials. This means your cabinets will fit your kitchen perfectly, both in size and in look.
Another big advantage is personal satisfaction. Every time you walk into your kitchen, you’ll see something you made with your own hands. It’s also a great way to learn woodworking skills. If you use free plans, you don’t have to pay for expensive blueprints or design work. Many plans are created by experts and tested by other DIYers, so you know you’re following steps that work.
Understanding Free Kitchen Cabinet Plans
Free kitchen cabinet plans are detailed guides that show you how to build cabinets. They usually include cut lists, diagrams, step-by-step instructions, and sometimes even 3D models or videos. Most plans are available as PDFs or web pages, and you can find them from woodworking blogs, home improvement websites, or even manufacturers. Good plans should be easy to follow, include all measurements, and show you both the big picture and small details.
There are several types of plans:
- Base cabinet plans (cabinets that sit on the floor)
- Wall cabinet plans (cabinets mounted above the counter)
- Tall/pantry cabinet plans
- Specialty cabinet plans (for things like garbage pull-outs, lazy Susans, or spice racks)
Some plans are for simple frameless cabinets (European style), while others are for face frame cabinets (traditional American style). Frameless cabinets are easier for beginners because there are fewer parts, but face frame cabinets are often stronger and more forgiving if your cuts aren’t perfect.
What To Consider Before You Start
Before you start building, think about your kitchen space, your skill level, your tools, and your budget. Here are some key things to consider:
- Space and Layout: Measure your kitchen carefully. How much room do you have for base and wall cabinets? Will you need custom sizes to fit your space, or can you use standard sizes?
- Style: Do you want modern, traditional, or something in between? Look for plans that match your taste.
- Materials: Plywood is the most common material for DIY cabinets, but you can also use MDF, melamine, or solid wood. Each has pros and cons for cost, durability, and appearance.
- Tools: You’ll need basic woodworking tools: a saw, drill, sander, clamps, and measuring tools. Some plans may require special tools like a pocket hole jig or router.
- Time: Building cabinets takes time. Plan for at least a few weekends to finish a full set of cabinets.
- Budget: Estimate how much wood, hardware, and finishing supplies will cost. Free plans save you money, but materials and tools still add up.
Gathering Tools And Materials
You don’t need a professional workshop to build kitchen cabinets, but having the right tools makes the job easier and your results better. Here’s what you’ll need for most free kitchen cabinet plans:
Essential Tools
- Circular saw or table saw: For straight, accurate cuts in plywood and boards.
- Drill/driver: For making holes and driving screws.
- Measuring tape and square: For accurate measurements and layout.
- Clamps: To hold pieces together while you work.
- Sander or sanding block: For smoothing edges and surfaces.
- Level: To make sure your cabinets are straight during installation.
- Pocket hole jig: Helpful for strong, hidden joints (many plans use pocket screws).
- Screwdriver, hammer, chisel: For small adjustments.
Optional Tools
- Miter saw: For quick, accurate crosscuts.
- Router: For making decorative edges or grooves.
- Jigsaw: For cutting curves or notches.
- Nail gun: Speeds up attaching face frames or trims.
Materials
Most cabinets are made from 3/4-inch plywood for the box (sides, top, bottom, and shelves). Face frames and doors are often made from solid wood like poplar or maple. You’ll also need:
- Wood glue
- 1 1/4-inch or 1 1/2-inch wood screws
- Pocket hole screws (if using a pocket hole jig)
- Hinges and drawer slides
- Cabinet knobs or pulls
- Paint or stain and sealer
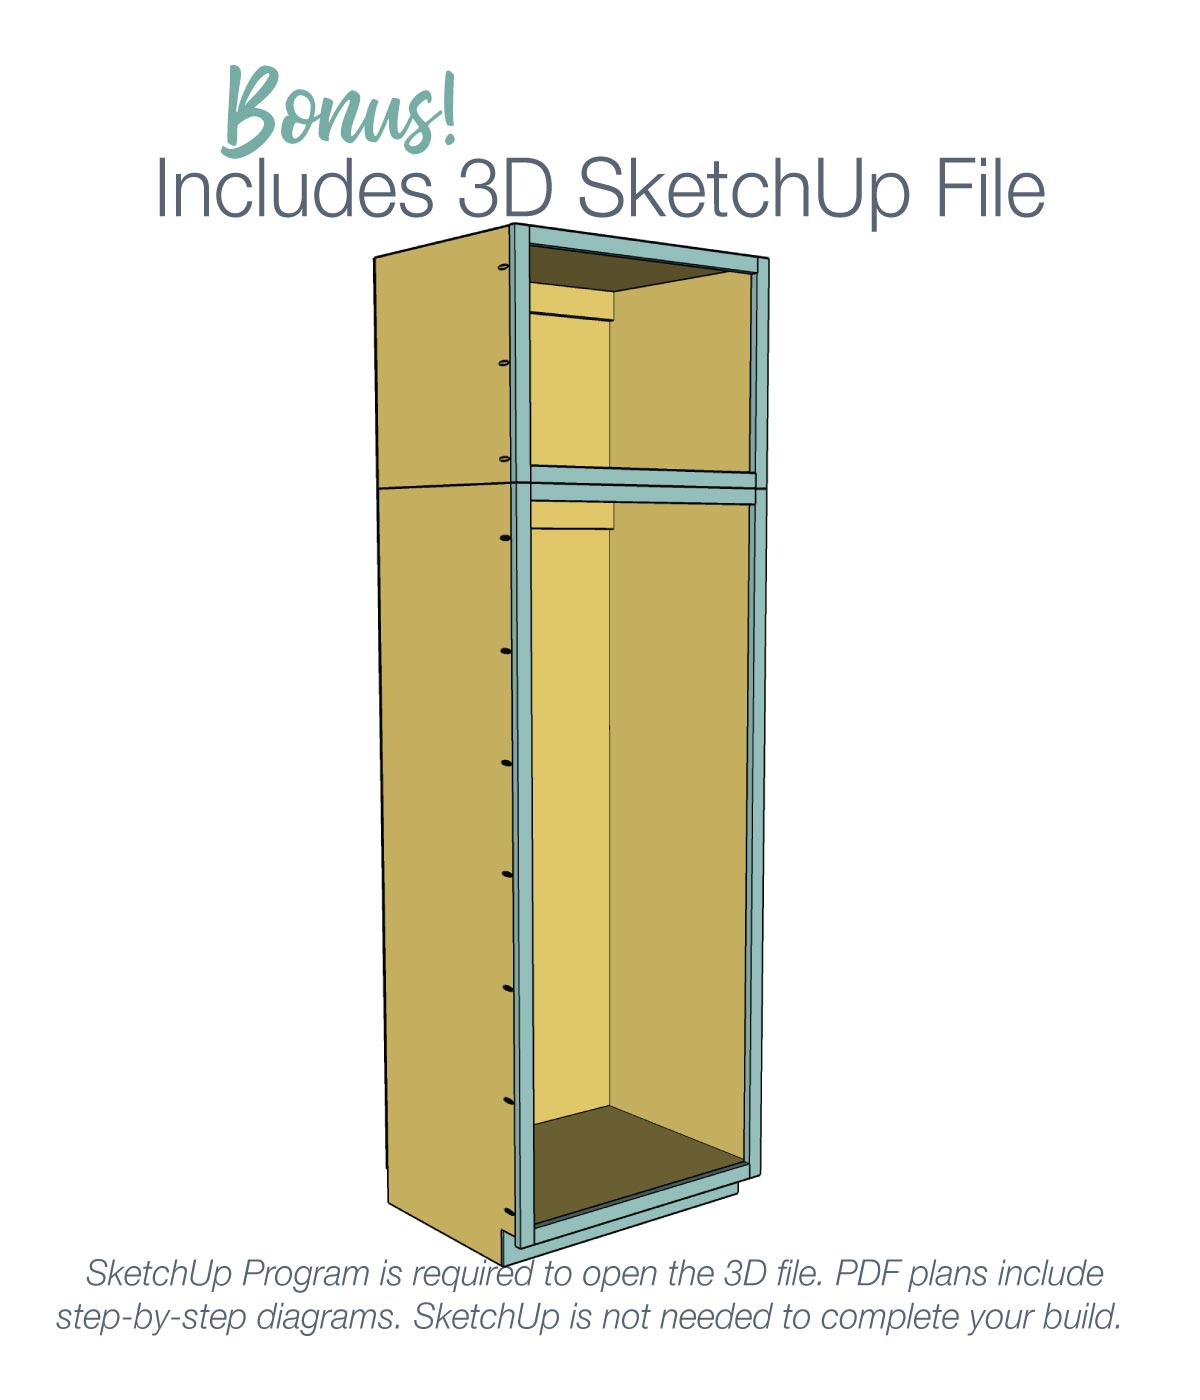
Many free plans include a cut list showing how to get all your pieces from standard plywood sheets (4’x8’). Cutting all your pieces before assembly saves time and mistakes.
Credit: housefulofhandmadeshop.com
Choosing The Right Free Kitchen Cabinet Plan
Not all free plans are created equal. Some are very detailed and beginner-friendly, while others expect you to have experience. Here’s how to choose the best plan for your project:
- Check for Complete Instructions: Good plans include diagrams, a cut list, and assembly steps. Avoid plans that are just a sketch or a list of sizes with no guidance.
- Read Reviews and Comments: If the plan is from a website or forum, look for feedback from other DIYers. Did they find mistakes? Was the plan easy to follow?
- Match Your Skill Level: If you’re new to woodworking, start with a basic frameless cabinet. Avoid complicated plans with many drawers or curved pieces.
- Look for 3D Models or Photos: Plans with real photos or 3D drawings make it easier to understand each step.
- Check the Measurements: Make sure the plan’s cabinet sizes fit your kitchen. Standard base cabinets are usually 24 inches deep and 34.5 inches high, but your space may need something different.
Here’s a comparison of two popular styles you might find in free plans:
| Feature | Frameless Cabinets | Face Frame Cabinets |
|---|---|---|
| Difficulty | Easier for beginners | More advanced skills needed |
| Appearance | Sleek, modern look | Traditional, classic look |
| Strength | Good, but edges can chip | Very strong and forgiving |
| Hardware | European-style hinges | Traditional hinges |
Measuring And Planning Your Kitchen
Before you cut any wood, spend time planning and measuring your kitchen. Mistakes here can mean wasted materials and frustration later.
- Measure Your Space: Use a tape measure to get the exact width, height, and depth for each cabinet space. Note the location of windows, doors, appliances, and plumbing.
- Sketch a Layout: Draw your kitchen on paper or use free online tools. Place each cabinet, making sure drawers and doors have room to open.
- Plan for Appliances: Leave enough space for your stove, fridge, dishwasher, and sink. Base cabinets usually go around or under these appliances.
- Adjust for Walls and Floors: Few kitchens have perfectly square walls or level floors. Measure at the floor, middle, and top. Use the smallest measurement for your cabinets, and fill gaps with trim if needed.
- Decide on Cabinet Types: Do you want mostly drawers, mostly doors, or a mix? Drawers are great for pots and pans, while doors are easier for large items.
A common mistake is forgetting to check if doors and drawers will hit each other or other objects. Always check clearances before starting.

Credit: www.bibliotecaoscura.com
Step-by-step: Building Kitchen Cabinets With Free Plans
Building cabinets is a series of small steps. Each one is simple, but together they make a strong, beautiful cabinet. Here is a step-by-step overview that fits most free plans:
1. Cutting The Cabinet Parts
Start by cutting the sides, top, bottom, and shelves from plywood sheets. Use your cut list and double-check each measurement. If you have access to a table saw, it’s easier to keep cuts straight and smooth, but a circular saw with a straight edge guide works well too.
Pro tip: Label each piece with a pencil as you cut it. It’s easy to mix up parts once you have a big stack.
2. Drilling Pocket Holes (if Needed)
Many free plans use pocket holes for strong, hidden joints. Use a pocket hole jig to drill holes in the side panels and other joining parts. Position the holes where they won’t be seen after assembly.
Non-obvious insight: Sometimes pocket holes are placed on the top or bottom edges, where they’ll be covered by countertops or toe kicks.
3. Assembling The Cabinet Box
Lay out your side, top, and bottom panels. Attach them with wood glue and screws (usually through pocket holes). Make sure everything is square and flat. If you’re adding shelves, install them at this stage. For adjustable shelves, drill shelf pin holes using a template.
If you’re building face frame cabinets, you’ll attach the face frame (made from 1×2 solid wood) to the front of the box. Use glue and clamps or pocket screws.
4. Adding The Back Panel
Cut a thin sheet of plywood (usually 1/4-inch) for the back. Attach it with glue and brad nails or screws. The back adds strength and helps keep the cabinet square.
5. Building And Attaching Doors And Drawers
Cabinet doors can be simple flat panels (slab doors) or have a frame and panel look (Shaker style). Many free plans show both types. Measure carefully so your doors cover the opening with a small gap (usually 1/8 inch all around).
Drawers need slides to open smoothly. Most plans use side-mount or under-mount slides. Building strong drawers takes patience—cut parts carefully and use glue and screws for all joints.
Here’s a quick comparison of popular drawer slide types:
| Slide Type | Installation | Weight Limit | Cost |
|---|---|---|---|
| Side-mount | Easy | 75 lbs | $$ |
| Under-mount | Trickier | 100 lbs | $$$ |
| Center-mount | Simple | 35 lbs | $ |
6. Sanding And Finishing
Sand all surfaces smooth, starting with 120-grit and finishing with 220-grit sandpaper. Pay extra attention to edges and corners. Wipe away dust before finishing.
You can paint, stain, or clear coat your cabinets. Paint hides wood grain and flaws, while stain shows off the wood’s natural beauty. Use a primer if you’re painting, and finish with a tough topcoat (like polyurethane) to resist kitchen wear and tear.
7. Installing Hardware
Attach hinges to the doors and mount them to the cabinet box. Install drawer slides, then fit the drawers. Adjust everything so doors and drawers open and close smoothly. Add knobs or pulls for a finished look.
Small detail: Always pre-drill holes for hardware. This prevents splitting and keeps everything neat.
8. Installing The Cabinets In Your Kitchen
Find the highest spot on your floor and start there. Shim the cabinets so they’re level and screw them to the wall studs. Attach base cabinets first, then wall cabinets above. Connect cabinets to each other with screws through the side panels.
If there are gaps between the cabinets and the walls, cover them with filler strips or trim.
Tips For Success And Avoiding Common Mistakes
Building cabinets is a big job, but you can succeed with careful planning and patience. Here are some extra tips:
- Don’t Rush: Take your time to measure, cut, and assemble. Rushing leads to mistakes and wasted wood.
- Double-Check Your Tools: Dull blades and bits make rough cuts and split wood. Sharpen or replace as needed.
- Dry Fit First: Before you glue or screw anything, assemble the pieces without fasteners. This lets you see if everything fits.
- Ask for Help: Cabinets are heavy and awkward. Having a helper makes assembly and installation safer.
- Practice on Scrap Wood: If you’re new to pocket holes or drawer slides, try on a scrap piece first.
- Use Quality Materials: Cheap plywood can warp or split. Spend a little more for good plywood—it’s worth it.
- Label Everything: Mark each part and its orientation. This prevents mix-ups later.
Non-obvious insight: Don’t forget to allow for toekick space (usually 4 inches high and 3 inches deep) at the bottom of base cabinets. This makes standing at the counter more comfortable.
Customizing Your Cabinets
Free plans are a great start, but you can make your cabinets unique by customizing:
- Add extra shelves or pull-out trays for more storage.
- Use glass panels in some doors for a lighter look.
- Install soft-close hinges and slides for a higher-end feel.
- Paint with bold colors or two-tone finishes for style.
- Add crown molding or decorative trim for a custom look.
You can also adjust cabinet sizes to fit appliances or unusual spaces. Don’t be afraid to combine ideas from different plans.
Where To Find The Best Free Kitchen Cabinet Plans
Many websites offer free cabinet plans, but quality and detail vary. Here are a few trusted sources:
- Ana White (ana-white.com): Simple, beginner-friendly plans with photos.
- Woodworking for Mere Mortals (wwmm.net): Videos and step-by-step guides.
- Family Handyman (familyhandyman.com): Professional tips and PDF downloads.
- Fine Woodworking (finewoodworking.com): Advanced plans with detailed diagrams.
Always review the plan before starting. Print out the instructions, diagrams, and cut list. Some plans also have YouTube tutorials for extra help.
If you want to see a wide variety of plans, Family Handyman has a great collection.
Real-life Example: Building A Simple Base Cabinet
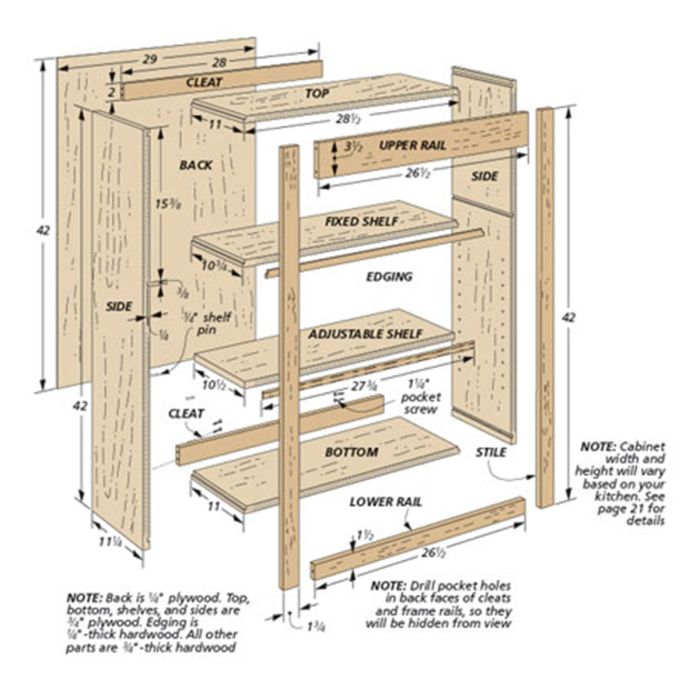
Let’s walk through a basic example using a common free plan—a single-door base cabinet, 24 inches wide, 34. 5 inches high, and 24 inches deep.
- Cut List:
- 2 sides: 34.5” x 24”
- 1 bottom: 22.5” x 23”
- 1 top stretchers: 3” x 23”
- 1 back: 34” x 23”
- 1 shelf: 22.5” x 22”
- 1 face frame: 1×2 wood, cut to fit
- 1 door: 23.5” x 29” (adjust for overlay)
- Assembly:
- Drill pocket holes in the bottom and top stretchers.
- Attach sides to bottom and top with glue and screws.
- Add shelf supports and shelf.
- Attach back with nails or screws.
- Build and attach the face frame.
- Sand, prime, and paint or stain.
- Install door with hinges and knob.
This cabinet can be repeated and adjusted for other sizes. Add drawers, change the door style, or combine with other cabinets for a complete kitchen.
Cost And Time Estimates
Building your own cabinets can save 50–75% compared to buying pre-made cabinets. Here’s a rough comparison:
| Option | Estimated Cost (10 cabinets) | Time Needed | Quality |
|---|---|---|---|
| DIY with free plans | $700 – $1200 | 40–80 hours | Custom, solid |
| Big box store cabinets | $2500 – $5000 | 2–4 hours to install | Standard, decent |
| Custom shop cabinets | $8000 – $20,000+ | Installed by pros | Custom, high-end |
Actual costs depend on material prices in your area, the size of your kitchen, and the finish you choose.
Credit: www.woodpeck.com
Finishing Touches And Maintenance
Once your cabinets are built and installed, take time with the finishing touches. Caulk any gaps between cabinets and walls. Touch up paint or stain as needed. Install trim or molding for a polished look. Clean up your workspace and celebrate your hard work.
To keep your cabinets looking great:
- Wipe up spills quickly to prevent stains.
- Use gentle cleaners and soft cloths.
- Tighten loose screws and hinges every few months.
- Avoid hanging heavy items on doors or drawers.
With good care, your DIY cabinets can last for decades.
Frequently Asked Questions
How Hard Is It To Build Kitchen Cabinets Using Free Plans?
Building kitchen cabinets is a challenging project, but free plans make it easier by giving you step-by-step instructions. If you can use basic tools and measure carefully, you can build strong, attractive cabinets. Start with simple designs if you’re new to woodworking.
What Wood Is Best For Diy Kitchen Cabinets?
3/4-inch plywood is the most popular choice for DIY cabinet boxes. It’s strong, stable, and holds screws well. Use hardwood for face frames and doors if you want a more polished look. Avoid particle board—it’s cheaper but not as durable.
Can I Customize Free Plans To Fit My Kitchen?
Yes, most free plans can be adjusted for width, depth, and height. Measure your space and change the cut list to fit. If you’re not sure how to adjust a plan, look for online forums or ask other DIYers for help.
How Do I Get Smooth, Professional-looking Cabinet Doors?
Sand all surfaces well before finishing. Use a good primer and paint for a smooth look, or a high-quality wood stain and clear coat for natural wood. Use a brush, roller, or sprayer—whichever gives you the best finish. Install doors carefully and adjust hinges so they hang straight.
Where Can I Find More Resources Or Help?
Check out woodworking forums, YouTube channels, and home improvement websites. Sites like Family Handyman offer extra tips and troubleshooting advice. Local hardware stores often have classes or experts who can answer questions.
Building your own kitchen cabinets with free plans takes time and effort, but the results are worth it. You’ll save money, learn valuable skills, and enjoy a kitchen built by you, for you. With the right plan, tools, and attitude, you can create beautiful cabinets that last for years.