
When you wake up in the morning, you expect your coffee maker to deliver a fresh, hot cup of coffee. But over time, you may notice your coffee tastes bitter, or your machine takes longer to brew. Often, the reason is calcium buildup inside your coffee maker. This mineral deposit, also known as limescale, comes from hard water and can cause many problems if not cleaned regularly.
Learning how to clean calcium buildup in your coffee maker not only improves the taste of your coffee but also extends the life of your machine. Many people try to ignore the white crusty deposits or wait for the machine to break down, but this leads to costly repairs or replacements.
With the right approach and a bit of patience, anyone can tackle this problem at home.
This guide explains every step you need to take, from recognizing the signs of calcium buildup to choosing the best cleaning methods. You’ll also find common mistakes, prevention tips, and answers to questions most people have. By the end, you’ll be confident in keeping your coffee maker clean, safe, and running smoothly.
What Is Calcium Buildup And Why Does It Matter?
Calcium buildup, or limescale, is a hard, chalky layer that forms when water with high mineral content passes through your coffee maker. Hard water contains extra calcium and magnesium. When heated, these minerals separate from the water and stick to surfaces inside your machine.
Limescale does not just look bad; it causes real problems:
- Slower brewing times as water paths get blocked
- Less heat transfer, so your coffee is not as hot
- Bitter or strange taste in your coffee
- Higher energy use because the machine works harder
- Shorter machine life due to clogging and corrosion
Even if your water tastes fine, limescale can build up without you seeing it. Regular cleaning is the only way to stop these problems before they start.
Signs Your Coffee Maker Has Calcium Buildup
Many people miss the early warning signs. Here’s what to look for:
- White or chalky residue inside the water reservoir or around metal parts.
- Slower brewing speed—it takes longer than usual to finish a pot.
- Unusual noises such as gurgling or sputtering during brewing.
- Weaker coffee flavor or a sour/bitter taste.
- Less steam or lower coffee temperature.
- Frequent need to refill water due to reduced capacity.
If you notice one or more of these, it’s time to clean your coffee maker.
How Often Should You Clean Calcium Buildup?
How often you need to clean depends on your water quality and how much coffee you make. Here are basic guidelines:
- Soft water (low minerals): Every 3–6 months
- Hard water (high minerals): Every 1–2 months
- High usage (3+ times daily): Every month
If you’re not sure about your water hardness, check with your local water provider or use a test strip. Cleaning more often is better than not enough—limescale can build up faster than you think.
Cleaning Methods: What Works Best?
There are several ways to remove calcium buildup from a coffee maker. Some use natural products, while others use commercial solutions. Each method has pros and cons.
1. White Vinegar Solution
White vinegar is the most popular method. It’s cheap, safe, and effective at dissolving limescale.
How to use vinegar:
- Mix equal parts white vinegar and water.
- Pour into the water reservoir until full.
- Start a brew cycle (without coffee) and let it run halfway.
- Pause the cycle and let the solution sit for 30–60 minutes to break down deposits.
- Resume and finish the cycle.
- Run 2–3 cycles with clean water to rinse out the vinegar smell.
Pros:
- Readily available
- Inexpensive
- Non-toxic
Cons:
- Strong smell (temporary)
- May need extra rinsing
2. Lemon Juice Solution
Lemon juice is another natural acid that fights limescale.
How to use lemon juice:
- Mix 1 part lemon juice with 2 parts water.
- Fill the reservoir and run a brew cycle.
- Let sit for 10–20 minutes.
- Complete the cycle, then run 2 cycles with clean water to rinse.
Pros:
- Pleasant smell
- Natural and safe
Cons:
- Slightly less powerful than vinegar
- Can be sticky if not rinsed well
3. Commercial Descaling Solutions
Manufacturers often sell descaling products made for coffee makers. These are specially formulated to dissolve limescale.
How to use descaler:
- Follow instructions on the product label (usually mixing with water).
- Run through brew cycle as with vinegar.
- Rinse with clean water.
Pros:
- Designed for coffee makers
- No strong smell
- Fast and effective
Cons:
- Cost more than natural methods
- Must store separately
4. Baking Soda Solution
Baking soda is less effective on heavy calcium deposits but useful for regular cleaning and mild buildup.
How to use baking soda:
- Dissolve 1–2 tablespoons of baking soda in a full reservoir of warm water.
- Run a brew cycle and let sit for 15 minutes.
- Rinse thoroughly.
Pros:
- Gentle on machine parts
- Odorless
Cons:
- Not strong enough for thick limescale
5. Citric Acid Solution
Citric acid is a powder available in grocery stores or online. It’s effective and leaves no smell.
How to use citric acid:
- Dissolve 1–2 tablespoons citric acid in a full reservoir of water.
- Run a brew cycle as usual.
- Rinse with clean water 2–3 times.
Pros:
- No odor
- Very effective on limescale
Cons:
- Harder to find than vinegar or lemon juice
Here’s a quick comparison of the most popular cleaning agents:
| Method | Effectiveness | Cost | Smell | Ease of Use |
|---|---|---|---|---|
| White Vinegar | High | Low | Strong | Easy |
| Lemon Juice | Medium | Medium | Pleasant | Easy |
| Commercial Descaler | Very High | High | None | Very Easy |
| Baking Soda | Low | Low | None | Easy |
| Citric Acid | High | Medium | None | Medium |
Step-by-step Guide: Cleaning Calcium Buildup In A Coffee Maker
Let’s walk through the process using the most common method—white vinegar. The steps are similar for other cleaning agents.
What You Need
- White vinegar (or alternative cleaning agent)
- Fresh water
- Soft cloth or sponge
- Clean container or carafe
- (Optional) Old toothbrush for scrubbing
Detailed Steps
- Unplug and Cool Down
- Always unplug your coffee maker and let it cool before cleaning.
- Empty and Rinse
- Remove any coffee grounds, filters, and leftover water.
- Prepare Cleaning Solution
- Mix equal parts white vinegar and water (about 4 cups each for a standard machine).
- Fill the Reservoir
- Pour the solution into the water reservoir.
- Start the Brew Cycle
- Begin brewing as if making coffee, but do not add grounds or filters.
- Pause for Soaking
- Once half the solution has brewed, pause the cycle. Let it sit for 30–60 minutes. This gives the acid time to break down tough calcium deposits.
- Finish Brewing
- Resume and finish the brew cycle. Discard the solution.
- Rinse Thoroughly
- Fill the reservoir with clean water and run a full cycle. Repeat this 2–3 times to remove any vinegar smell or taste.
- Wipe and Inspect
- Use a cloth or sponge to clean the reservoir and exterior. For stubborn areas, gently scrub with an old toothbrush.
- Reassemble and Test
- Put all parts back together. Run a small test brew with water to confirm the taste and function.
For Pod Or Single-serve Machines
Machines like Keurig or Nespresso have smaller, more complex parts. Always check the user manual before cleaning. Most brands recommend descaling every 3 months.
- Remove pods and filters.
- Use the same cleaning solution.
- Run the cycle without a pod.
- Rinse with water at least twice.
- Clean the pod holder and needle area with a brush or paperclip if needed.
For Espresso Machines
Espresso machines often have a “descale” mode and more removable parts.
- Use manufacturer-approved descaler for best results.
- Follow the step-by-step instructions in your manual.
- Clean steam wand and portafilter separately.
Common Mistakes To Avoid
Cleaning a coffee maker may sound simple, but some common mistakes can damage your machine or leave it dirty.
- Skipping Regular Cleaning
- Only cleaning when the machine stops working allows heavy buildup.
- Using Bleach or Harsh Chemicals
- These can damage plastic and metal, or leave harmful residues.
- Not Rinsing Enough
- Always run multiple water cycles to remove cleaning agents.
- Forgetting Removable Parts
- Carafes, lids, and filters collect calcium too. Wash them separately.
- Ignoring the Manual
- Some machines have special cleaning needs or recommended products.
- Using Hot Water with Vinegar
- Adding vinegar to hot water can release strong fumes. Use room temperature liquids.
- Not Letting Solution Soak
- Soaking time is key for heavy deposits. Don’t rush the process.
- Overfilling the Reservoir
- Too much liquid can cause spills or leaks.
- Using Abrasive Tools
- Metal scouring pads can scratch surfaces and create spots for more buildup.
- Storing Machine Wet
- Dry all parts before storing to prevent new mineral spots.
Credit: nuvoh2o.com
Extra Tips To Prevent Future Calcium Buildup
A little prevention goes a long way. Here’s how to keep your coffee maker cleaner for longer:
- Use Filtered or Softened Water
- This reduces mineral content and slows down limescale.
- Empty Water Reservoir Daily
- Don’t leave water sitting overnight; it can deposit more minerals.
- Wipe Down After Each Use
- A quick wipe keeps surfaces free of spots.
- Deep Clean Regularly
- Follow the cleaning schedule for your water hardness and usage.
- Replace Water Filters
- If your machine has a filter, replace it as recommended.
- Leave the Lid Open
- Air drying the reservoir discourages mineral growth.
- Check for Buildup in Hard-to-See Areas
- Use a flashlight to inspect corners and under removable parts.
- Descale Before Vacation
- If you’ll be away for a while, clean before you leave.
- Don’t Ignore Slowdowns
- Slower brewing is a sign—clean before it stops working.
- Keep a Cleaning Calendar
- Mark cleaning dates to stay consistent.
How Calcium Buildup Affects Different Coffee Maker Types
Not all coffee makers are built the same. The impact of calcium buildup varies by machine.
Drip Coffee Makers
- Most common in homes and offices.
- Limescale blocks water lines and heating elements.
- Easy to clean with vinegar or descaler.
Single-serve Pod Machines
- Small water paths and needles clog easily.
- Sensitive to blockages—clean more often.
- Use a paperclip to clear pod holder holes if clogged.
Espresso Machines
- High pressure and temperature.
- Limescale affects steam wands and boiler.
- Use only recommended descalers.
Percolators
- Classic style with metal tubes.
- Limescale coats inside tubes, slowing water flow.
- Scrub tubes with pipe cleaner after soaking.
French Press
- No internal water lines, so limescale is less of a problem.
- Clean glass and metal parts to remove any buildup.
Here’s a quick look at how often to clean different types:
| Coffee Maker Type | Recommended Cleaning Frequency | Special Concerns |
|---|---|---|
| Drip | Every 1-3 months | Heating element and water lines |
| Single-Serve Pod | Every 1-2 months | Pod holder, needle, water lines |
| Espresso | Every 1-2 months | Boiler, steam wand |
| Percolator | Every 2-3 months | Metal tubes |
| French Press | After each use | Glass, mesh, metal only |
Credit: www.quill.com
The Science Behind Limescale And Coffee Makers
Limescale forms when water is heated above 60°C (140°F). Calcium and magnesium ions react, forming calcium carbonate—the white, hard substance you see. This process is faster with higher temperatures and “harder” water.
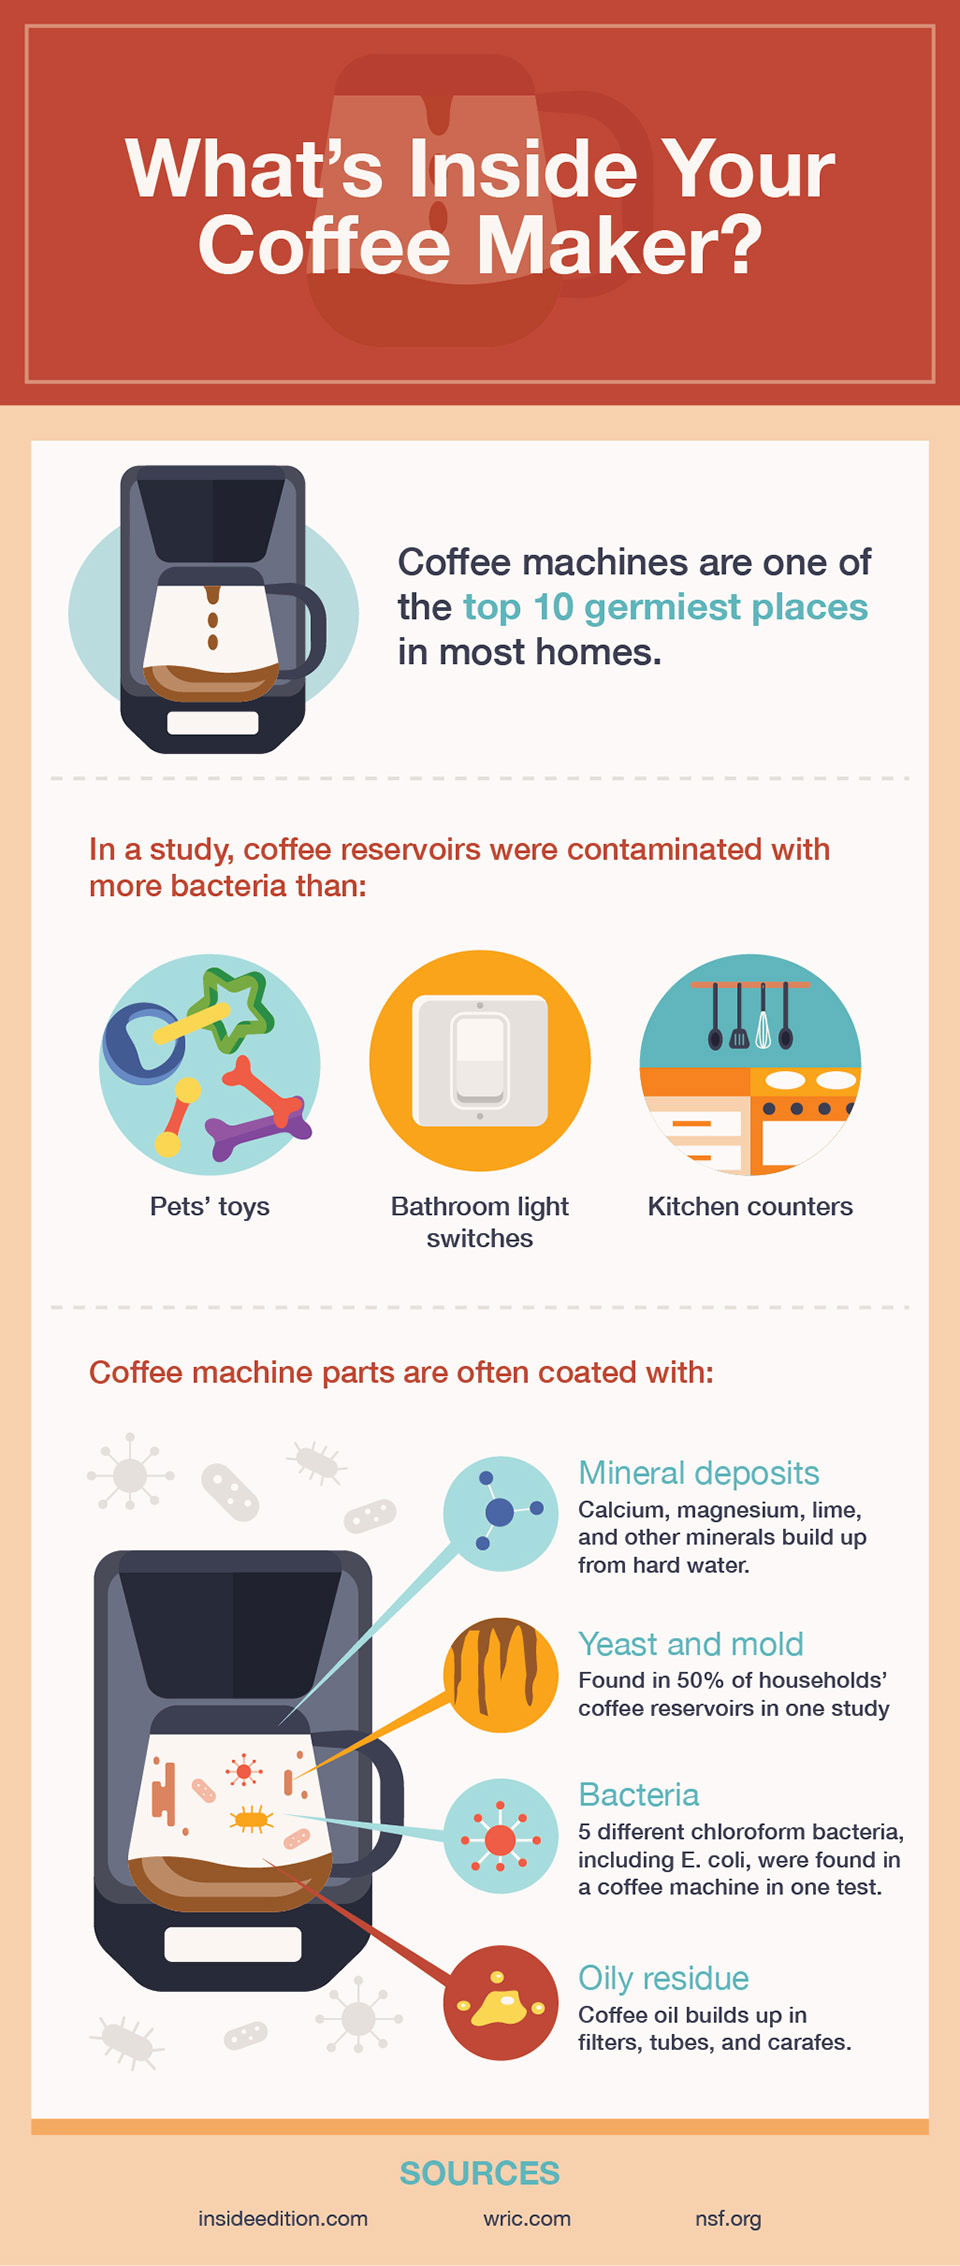
You may not know that even filtered water can cause limescale if not changed often. Also, mineral buildup can trap bacteria, leading to health risks if left uncleaned for long periods.
Some coffee makers have special coatings or self-cleaning modes, but these are not perfect. Manual cleaning is still needed to remove buildup from all areas.
Why Regular Cleaning Saves You Money
Ignoring calcium buildup leads to:
- More repairs: Clogged parts need professional service.
- Shorter machine life: Heating elements break down.
- Worse coffee flavor: You may buy new coffee thinking the beans are the problem.
- Higher energy costs: Machines use more electricity to heat water.
A study by the National Coffee Association found that regular descaling can extend a machine’s life by up to 30%. That could mean several extra years of good coffee from your device.
What To Do If Calcium Buildup Is Severe
If you haven’t cleaned your coffee maker in a long time, you may see thick, crusty deposits. Here’s what to do:
- Run several cycles of vinegar or commercial descaler (allow soaking time).
- Scrub removable parts with a brush or sponge.
- For stubborn buildup, soak parts overnight in vinegar.
- If the machine still doesn’t work, consider professional servicing.
- In some cases, replacement is cheaper if the damage is too severe.
Remember: prevention is always easier (and cheaper) than fixing a broken machine.
Environmental Impact Of Cleaning Methods
Some people worry about the environmental effects of descaling agents. Here’s what to know:
- White vinegar and lemon juice are biodegradable and safe for most home drains.
- Commercial descalers may contain stronger acids. Check labels for safe disposal instructions.
- Avoid pouring large amounts of baking soda down the drain, as it can react with other cleaners.
- Always rinse machines well to prevent residue in your coffee.
For more on water hardness and limescale, see this Wikipedia guide.

Credit: us.amazon.com
Frequently Asked Questions
How Do I Know If My Coffee Maker Needs Descaling?
If you notice slow brewing, a strange taste, or white residue in the water reservoir, it’s time to descale. Some machines also have a warning light or indicator.
Can I Use Apple Cider Vinegar Instead Of White Vinegar?
While you can use apple cider vinegar, it has a stronger smell and can leave a taste in your machine. White vinegar is preferred because it’s odorless after rinsing.
Is It Safe To Use Bleach To Clean My Coffee Maker?
Never use bleach or harsh chemicals inside your coffee maker. They can damage the machine and leave dangerous residues. Stick to vinegar, lemon juice, or approved descalers.
How Long Does The Cleaning Process Take?
A full cleaning (including soaking and rinsing) takes about 1–2 hours. Most of this time is waiting for the solution to soak. The actual work is only 10–15 minutes.
Does Cleaning Remove Bacteria As Well As Limescale?
Yes, regular cleaning with vinegar or descaler helps remove bacteria and mold as well as limescale. However, if you see black spots or smell mold, wash with soap and water first before descaling.
Keeping your coffee maker free from calcium buildup is simple if you follow the right steps. Not only will your coffee taste better, but your machine will last longer and run more efficiently. Don’t wait for problems—make cleaning a habit, and every cup will be as good as the first.