
Cleaning a wood stove is not just about keeping it looking good. It’s about safety, efficiency, and making sure your home stays warm without risk. One of the biggest dangers with wood stoves is creosote, a sticky, flammable substance that builds up inside the stove and chimney. If left unchecked, creosote can cause chimney fires and reduce the efficiency of your stove. Many homeowners don’t realize how quickly creosote can accumulate, or how important regular cleaning is. This guide explains, step by step, how to clean creosote from your wood stove, what tools you need, common mistakes to avoid, and how to keep your stove working safely all winter.
What Is Creosote And Why Does It Matter?
Creosote is a tar-like substance that forms when wood burns. When smoke goes up the chimney, it cools and leaves behind sticky deposits. Over time, these deposits build up and harden. There are three main stages of creosote:
- Stage 1: Flaky, dusty soot that’s easy to brush away.
- Stage 2: Crunchy, tar-like flakes that are harder to remove.
- Stage 3: Hard, shiny glaze that’s almost like glass and very tough to clean.
The higher the stage, the more dangerous it is. Stage 3 creosote can catch fire at temperatures as low as 451°F (233°C), which is about the same as paper. Even a small chimney fire can cause severe damage and put your family at risk.
How Creosote Affects Your Wood Stove
A build-up of creosote makes your wood stove less efficient. The smoke doesn’t flow freely, so less heat gets into your home. You might notice more smoke inside, or that the stove is harder to light. Over time, this can damage the stove and chimney, costing you more in repairs or replacements.
Many people think that burning wood automatically keeps the chimney clean. In reality, all wood-burning stoves create some creosote. Even “clean” burning doesn’t prevent it. Regular cleaning is essential.
Tools And Supplies You’ll Need
Before you start, gather the right equipment. Using the right tools makes cleaning safer and more effective.
- Stiff chimney brush: The brush should fit the size of your chimney and stove pipe.
- Flexible rods: These attach to the brush for reaching up the chimney.
- Scraper: For stubborn creosote spots.
- Shop vacuum (HEPA filter preferred): To clean up ash and debris.
- Metal bucket: For removing ashes and hot debris safely.
- Protective gloves: Keeps your hands safe from sharp edges and chemicals.
- Safety goggles and mask: Protects your eyes and lungs from dust and soot.
- Drop cloths or old sheets: To cover the area and keep your home clean.
- Flashlight or headlamp: For seeing inside the stove and chimney.
Some jobs may need special creosote remover powder or liquid, which can help break down tough deposits. Avoid homemade “tricks” like burning potato peels or using salt—they’re not effective.
Preparing Your Wood Stove For Cleaning
Proper preparation is key. Cleaning creosote is a dirty job, but a few smart steps can save you hours of cleanup later.
- Let the stove cool completely. Never clean a hot stove. Wait at least 12 hours after the last fire.
- Clear the area. Move furniture and valuables away. Lay down drop cloths or old sheets to catch falling soot.
- Wear protective gear. Gloves, goggles, and a mask are a must. Soot and creosote can be irritating or even harmful if inhaled.
- Empty the firebox. Scoop out all ashes and unburned wood into the metal bucket. Use the shop vacuum to remove fine ash.
- Check for damage. Look for cracks, warped metal, or loose bricks inside the stove. Don’t clean if you notice serious problems—repair them first.
Many beginners forget to protect the area around the stove. Soot and creosote can permanently stain carpets and walls. Take time to seal off nearby doors and vents if possible.
Step-by-step Guide To Cleaning Creosote From A Wood Stove
Cleaning The Firebox
Start with the inside of the wood stove, called the firebox.
- Scrape off loose creosote. Use the scraper to gently remove flaky or chunky deposits from the walls, ceiling, and floor. Be gentle—some fireboxes are lined with delicate firebricks.
- Brush down soot and ash. Use a smaller wire brush to scrub areas where creosote is stuck. Pay special attention to corners and seams.
- Vacuum the debris. Use a shop vacuum to pick up all dust, soot, and loose creosote. Never use a regular household vacuum, as the fine particles can damage the motor and spread dust.
Cleaning The Stove Pipe
Most creosote builds up in the stove pipe—the metal tube connecting your stove to the chimney. This section is critical for safety.
- Remove the pipe if possible. Some pipes detach easily; others require unscrewing clamps or bolts. Removing the pipe lets you clean it more thoroughly.
- Insert the chimney brush. Attach the brush to the rods and push it through the pipe, scrubbing the sides. Pull back and forth several times.
- Tap out loose creosote. Gently tap the pipe to loosen stubborn deposits. Be careful not to dent or damage the metal.
- Vacuum the pipe. After brushing, vacuum out remaining debris.
- Wipe with a damp cloth. This removes fine soot and makes inspection easier.
If you can’t remove the pipe, clean it in place using flexible rods and a brush. Be prepared for falling soot—always cover the area below.
Cleaning The Chimney
Chimney cleaning is the messiest and most important part. Creosote here poses the highest fire risk.
- Access the chimney. For most homes, this means working from the roof. Use a sturdy ladder and always have someone nearby for safety.
- Insert the chimney brush. Feed the brush down the chimney, adding rods as needed. Scrub up and down several times.
- Check progress with a flashlight. Shine a light up the flue to see if creosote remains. Repeat brushing if needed.
- Clean out the base. Many chimneys have a clean-out door at the bottom. Remove all debris with a vacuum or scoop.
- Inspect the chimney cap. Make sure it’s free of blockages like bird nests or leaves.
If you’re not comfortable working on the roof, hire a professional. Chimney falls are a leading cause of home maintenance injuries.
Cleaning Glass And Door Gaskets
Creosote often builds up on the stove’s glass door and around the gasket—the seal that keeps smoke inside.
- Clean the glass. Use a special stove glass cleaner or a vinegar-water mix. Avoid scraping, as this can scratch the glass.
- Inspect the gasket. Gently brush away creosote. If the gasket looks worn or cracked, replace it. A poor seal lets smoke escape and reduces efficiency.
Many people ignore the gasket, but it’s crucial for safe operation. Even a small leak can let dangerous gases into your home.
Using Chemical Creosote Removers
For tough, stage 2 or 3 creosote, mechanical cleaning may not be enough. Chemical creosote removers can help.
- These products come as powders, sprays, or logs. When burned or applied, they break down hard creosote into ash.
- Follow the instructions carefully. Overuse can damage your stove or chimney liner.
- Chemical removers are best for maintenance, not for replacing physical cleaning.
Don’t rely only on chemical removers. They’re a useful tool, but regular brushing and scraping are still required.
How Often Should You Clean Creosote?
Cleaning frequency depends on how much you use your stove and what you burn.
- Light use (occasional fires): Clean at least once a year, before the heating season.
- Moderate use (daily in winter): Clean every 2-3 months.
- Heavy use (primary heat source): Clean monthly, or after every cord (128 cubic feet) of wood burned.
Always inspect the stove and chimney if you notice more smoke, poor draft, or strange smells.
Comparing Methods: Diy Vs Professional Cleaning
Some homeowners clean their wood stoves themselves, while others hire professionals. Here’s a quick comparison:
| Method | Cost | Effectiveness | Risks |
|---|---|---|---|
| DIY Cleaning | Low (tools only) | Good (for light to moderate creosote) | Personal injury, incomplete cleaning |
| Professional Cleaning | Medium to high ($100-$300/year) | Excellent (all stages of creosote) | None if certified |
DIY cleaning saves money but can be risky if you’re not experienced. Professionals use special tools and cameras to check for hidden problems.

Credit: www.iamcountryside.com
Preventing Creosote Build-up
Prevention is always easier than cleaning heavy creosote. Here’s how to reduce build-up:
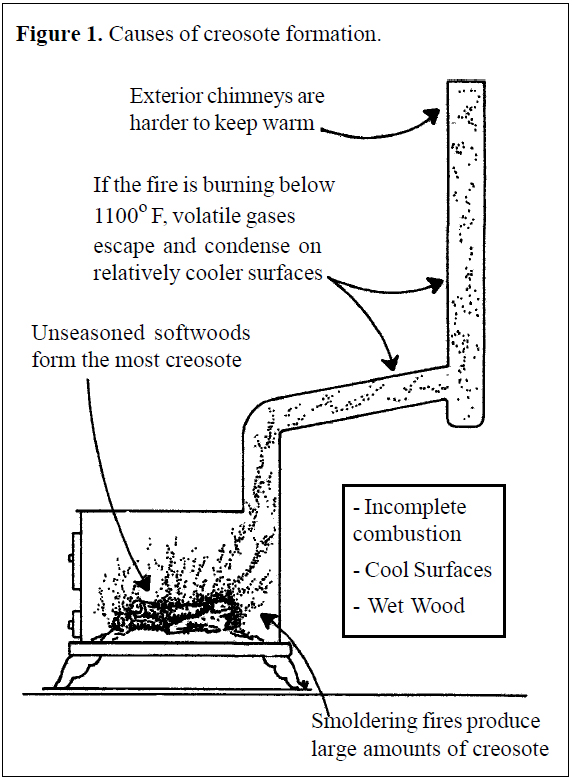
- Burn only seasoned wood. Wood should be split and dried for at least 6-12 months. Moisture content should be below 20%. Wet wood creates more smoke and creosote.
- Keep fires hot. Smoldering fires and low heat produce more creosote. Let the stove burn hot for at least 30 minutes daily.
- Use smaller pieces of wood. They burn hotter and more completely.
- Check your draft. A weak draft means smoke lingers and deposits more creosote.
- Clean regularly. Frequent cleaning prevents hard-to-remove build-up.
Many people think burning “green” wood is fine, but it’s the biggest cause of creosote. Invest in a moisture meter to check your firewood.
Signs You Have Too Much Creosote
Watch for these warning signs:
- Thick, shiny black deposits in the stove or chimney
- Reduced heat output
- More smoke in the room when lighting fires
- Strange smells, especially a tar or asphalt odor
- Hard starts or slow-burning fires
If you notice any of these, stop using the stove and clean it before the next fire.
Common Mistakes And How To Avoid Them
Even experienced wood stove users make mistakes. Here are some to avoid:
- Not wearing safety gear. Creosote is an irritant. Always use gloves and a mask.
- Trying to burn off creosote. This is extremely dangerous. Controlled cleaning is the only safe way.
- Ignoring the stove pipe. Many focus on the firebox, but the pipe collects the most creosote.
- Using water to clean hot creosote. This can damage the stove and create steam burns.
- Skipping inspections. Clean, but also check for cracks, rust, or missing pieces.
A surprising fact: even a small creosote fire can crack your chimney liner, making future fires more likely.
Costs Of Not Cleaning Creosote
Neglecting cleaning isn’t just a safety risk—it can be expensive.
- Chimney fire damage: Repairs can cost $5,000 or more.
- Reduced efficiency: You’ll burn more wood for less heat, increasing your costs.
- Insurance issues: Many insurers won’t cover fire damage if the chimney wasn’t maintained.
- Shorter stove lifespan: Corrosion and heat damage can ruin your stove.
A few hours of cleaning each year can save thousands of dollars and prevent disaster.
How To Choose The Right Chimney Brush Size
Using the wrong size brush is a common mistake. Too small, and it leaves creosote behind. Too big, and it gets stuck or damages the chimney.
- Measure the inside diameter of your stove pipe or chimney liner.
- Choose a brush that matches this size exactly.
- For square or rectangular chimneys, select a brush that matches the width and height.
If you’re unsure, bring measurements to a hardware store. Many stores have sizing charts or can special-order brushes.
Safety Tips For Cleaning Creosote
Cleaning isn’t just dirty—it can be dangerous if done carelessly.
- Never clean a hot stove. Wait until it’s completely cool.
- Work with a partner. If you’re on the roof, someone should be nearby to help.
- Use sturdy ladders and safety harnesses for high chimneys.
- Keep a fire extinguisher nearby, just in case.
- Dispose of creosote properly. Place debris in a metal bucket and store it outside until trash day.
If you feel dizzy, lightheaded, or have trouble breathing while cleaning, step outside for fresh air immediately.
When To Call A Professional
Some jobs are better left to experts. Call a certified chimney sweep if:
- You see stage 3 (glazed) creosote
- The chimney is hard to reach or extremely tall
- You don’t have the right tools
- There are signs of damage or leaks
- You’re uncomfortable working at heights
Certified sweeps have special vacuums, cameras, and tools for tough jobs. Look for professionals certified by organizations like the Chimney Safety Institute of America.
Real-world Example: Cleaning A Wood Stove After A Long Winter
Let’s say you used your wood stove daily through the winter. When spring arrives, you notice a strong smoky smell and the fire is harder to start.
- First, let the stove cool and remove all ashes.
- Next, scrape off thick black creosote from the firebox and stove pipe.
- You find shiny, hard deposits in the pipe—stage 3 creosote. Chemical remover is applied, then left for a week.
- After treatment, you brush and vacuum the pipe, removing the softened glaze.
- The glass door is cleaned with vinegar and all gaskets are checked.
- The stove now draws better, burns hotter, and the smoke smell disappears.
This example shows why waiting too long between cleanings makes the job harder, and why regular attention pays off.
Comparing Creosote Removal Products
There are many creosote removal products on the market. Here’s a quick look at how they compare:
| Product Type | How It Works | Best For | Cost (approx.) |
|---|---|---|---|
| Chemical Logs | Burn in stove to loosen creosote | Light to moderate deposits | $15-$30 per log |
| Sprays/Powders | Apply directly to creosote | Thick, stubborn areas | $10-$25 per bottle |
| Wire Brushes | Manual scrubbing | All types, especially flaky creosote | $20-$40 per set |
No single method works for all situations. Often, a combination gives the best results.
Tips For Staying Ahead Of Creosote Buildup
- Install a stove thermometer. Keep your fire in the “safe zone” (usually 300–500°F).
- Check the chimney cap monthly. Blockages cause smoke to slow down, increasing creosote.
- Split wood small. Pieces 3–6 inches across burn hotter and cleaner.
- Don’t overload the stove. Cramming in too much wood smothers the fire and cools the flue.
- Keep a regular cleaning schedule. Mark your calendar after every few cords of wood.
Many homeowners only think about cleaning when there’s a problem. Make it part of your routine to keep your stove running safely.
Trouble Signs After Cleaning
Sometimes, problems appear after cleaning. Watch for:
- Sooty smell in the house: Indicates a poor seal or draft.
- Difficulty starting fires: May mean the chimney is still blocked.
- White, powdery residue: This is fly ash, not creosote. It’s less dangerous, but should still be removed.
If any issues persist, double-check your cleaning or consult a professional.
Comparing Different Types Of Chimneys
The type of chimney affects how creosote forms and how often you need to clean.
| Chimney Type | Creosote Risk | Cleaning Frequency | Notes |
|---|---|---|---|
| Masonry (brick/stone) | High | Every 1-2 months | Rough surfaces trap creosote |
| Metal Liner | Medium | Every 2-3 months | Smoother, but can corrode |
| Insulated Pipe | Lower | 2-3 times/year | Retains heat, less creosote forms |
| Unlined Chimney | Very High | Monthly | Should be lined for safety |
Knowing your chimney type helps you plan the right cleaning schedule.
Credit: www.reddit.com
How Weather Affects Creosote
Cold, damp weather makes creosote worse. When the outside air is cold, smoke cools quickly, and more creosote sticks to the chimney. Windy days can also reverse the draft, blowing soot back inside. In spring and fall, when fires are small and slow, creosote can build up faster than during peak winter burns.
Plan extra cleanings during these seasons, especially if you notice more smoke inside or on the roof.
Is Creosote Dangerous For Health?
Breathing in creosote dust is bad for your lungs and skin. It can cause coughing, irritation, and long-term health problems. Always wear a mask and gloves when cleaning. Keep children and pets out of the area. Wash your hands and clothes after cleaning, and never store creosote debris inside the house.
Additional Resources
For more in-depth information, check the recommendations from the Centers for Disease Control and Prevention (CDC). They provide safety guidelines for handling creosote and maintaining wood-burning appliances.
Frequently Asked Questions
How Do I Know If I Have Creosote Buildup In My Wood Stove?
You can spot creosote buildup by looking for thick, shiny black deposits inside the stove, stove pipe, or chimney. If you notice more smoke inside, poor fire performance, or a tar-like smell, you probably have creosote.
Can I Burn Something To Remove Creosote?
No, you should never try to “burn off” creosote. This is very dangerous and can cause chimney fires. Use proper cleaning methods and, if needed, chemical removers designed for stoves and chimneys.
How Long Does It Take To Clean A Wood Stove And Chimney?
A full cleaning usually takes 2 to 4 hours, depending on the amount of buildup and the size of your system. Heavily used stoves or those with stage 3 creosote may take longer.
What Type Of Wood Produces The Least Creosote?
Seasoned hardwoods like oak, maple, and ash produce less creosote than softwoods or green (wet) wood. Always use wood that has been dried for at least 6-12 months and check that moisture content is below 20%.
Do I Need To Clean My Stove If I Use It Only Occasionally?
Yes, even light use creates some creosote. Clean at least once a year to prevent dangerous buildup, even if you only use the stove a few times each season.
Keeping your wood stove free of creosote is one of the smartest things you can do for your home and family. Regular cleaning means a safer, warmer, and more efficient stove. With the right tools, some basic knowledge, and a little effort, you can prevent fires and keep your stove burning bright for years to come.
Credit: cookstoves.net