
Keeping your dishwasher in top shape is not as simple as pressing the start button. Over time, even the best dishwashers can lose cleaning power. One of the most common reasons is clogged or dirty spray arms. These hidden parts are the “showerheads” of your dishwasher, spraying water to clean every plate, glass, and fork.
If they get blocked, your dishwasher leaves behind food bits, cloudy glasses, and even a bad smell. The good news? You can fix and prevent these problems with a bit of know-how and regular cleaning.
Learning how to clean dishwasher spray arms is a skill every home cook or busy parent should have. Many people ignore this task because the spray arms seem hard to reach, or they don’t know what signs to look for. Others may think that running hot water or a cleaning cycle is enough. But stubborn grease, limescale, and trapped food need a more hands-on approach.
This guide covers everything you need to restore your dishwasher’s cleaning power. You’ll learn how to spot spray arm problems, take them out safely, deep clean every tiny hole, and put them back so they work like new. We’ll also cover the tools and cleaners you need, how often to do this, and tips to avoid common mistakes.
By the end, you’ll have the confidence to keep your dishwasher working efficiently and your dishes sparkling clean.
Why Dishwasher Spray Arms Need Cleaning
Most people do not realize how much work the spray arms do. Every wash cycle, they spin and shoot water at high pressure, making sure all items get rinsed and scrubbed. Over time, bits of food, minerals from hard water, and grease build up inside the small holes. When this happens, less water comes out, or the spray pattern is uneven.
A blocked spray arm means:
- Dirty dishes after a full cycle
- White spots or streaks on glasses and plates
- Unpleasant odors inside the dishwasher
- Possible damage to the pump or other parts
Ignoring these signs can lead to bigger problems, like expensive repairs or having to replace your dishwasher early. Cleaning the spray arms is a simple, low-cost way to avoid these headaches.
Signs Your Spray Arms Need Cleaning
It’s easy to miss the early warning signs of a dirty spray arm. Sometimes, it’s not obvious until the dishwasher is barely cleaning. Here are clear signals to check for:
- Dishes come out dirty even after a full cycle, especially on the top rack.
- Water spots or chalky residue appears on glassware.
- You hear strange noises, like rattling or humming, during the wash.
- There’s a bad smell even after cleaning the filter and door seal.
- Food bits are stuck in the holes of the spray arms (visible on close inspection).
- The spray arms do not spin freely when moved by hand.
If you notice one or more of these, it’s time to clean your spray arms.
Tools And Supplies You’ll Need
Cleaning the spray arms does not require special skills or expensive equipment. Most items are already in your home. Here’s what you need:
- Soft brush (old toothbrush works)
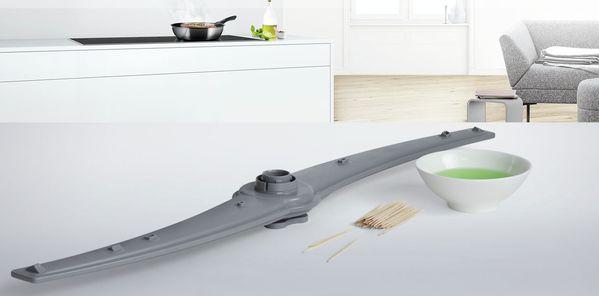
- Toothpicks or straightened paper clips
- White vinegar
- Baking soda (optional but useful for tough buildup)
- Mild dish soap
- Clean, soft cloth
- Small bowl or bucket
- Screwdriver (only for some dishwasher models)
- Towel (to catch drips and protect your floor)
A key insight: Do not use sharp metal objects like knives or needles. They can widen the spray holes or scratch the plastic, causing leaks and more blockages.
How To Remove Dishwasher Spray Arms
Not all spray arms are removed the same way. Most dishwashers have two or three spray arms—one at the bottom, one under the top rack, and sometimes one at the very top. Here’s a step-by-step method that works for most models:
- Unplug or turn off the dishwasher. This is important for safety.
- Slide out the bottom rack to get clear access to the lower spray arm.
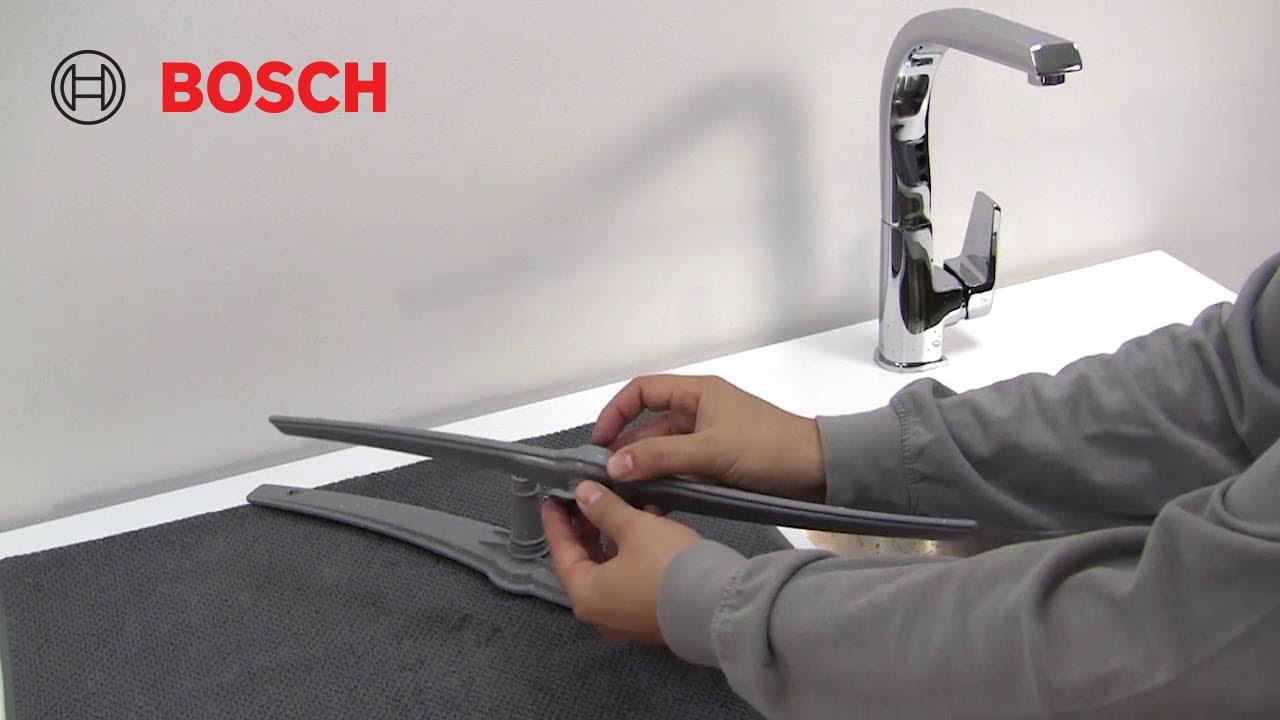
- For the bottom spray arm, gently lift or twist it. Some models have a central nut or clip—unscrew or unclip this part.
- For the top spray arm, you may need to remove the top rack. Look for a plastic nut, clip, or screw in the center. Support the arm as you remove it.
- If there’s a third spray arm on the ceiling, check your manual. Usually, it twists off or has a small clip.
Set all removed parts on a towel. If you feel resistance, do not force any part. Check your dishwasher’s user guide or look up your model online for exact instructions.
Comparing Spray Arm Removal Methods
Here’s a quick comparison of common spray arm mounting styles:
| Mounting Type | How to Remove | Tools Needed |
|---|---|---|
| Twist-Lock | Turn counterclockwise and pull down | None |
| Central Nut | Unscrew the nut, lift the arm | Screwdriver or by hand |
| Clip-On | Press clip and slide arm out | None |
| Screw Mount | Unscrew with a tool | Screwdriver |
Most people are surprised that spray arms are designed for easy removal. If it feels stuck, check for hidden clips or consult your manual.
Step-by-step: How To Clean Dishwasher Spray Arms
Once you have the spray arms out, it’s time to clean them thoroughly. Follow these steps for best results:
1. Pre-rinse The Spray Arms
Hold the spray arms under running warm water. Use your fingers to rub off any loose debris. This makes the next steps easier and prevents pushing food bits deeper inside.
2. Unclog The Spray Holes
Check each small hole. Use a toothpick or straightened paper clip to gently poke out food particles, limescale, or grease. Do this for every hole, both on the sides and ends. For arms with many tiny holes, a soft brush (like an old toothbrush) works well to scrub the outside.
Non-obvious tip: Always push debris out, not in. Insert the toothpick from the inside of the arm (if possible) and push toward the outside. This prevents clogs from getting trapped deeper.
3. Soak In Vinegar Solution
Fill a bowl or bucket with equal parts white vinegar and warm water. Soak the spray arms for 30–60 minutes. This helps dissolve mineral deposits and stubborn grease.
For very dirty spray arms, sprinkle baking soda on them before soaking. The fizzing action with vinegar helps loosen tough buildup.
4. Scrub And Rinse Again
After soaking, use a soft brush to scrub each hole and surface. Rinse under running water to wash away loosened residue. Repeat poking with a toothpick if any holes are still blocked.
5. Check For Free Movement
Hold the spray arm and spin it in your hand. Water should flow freely out of every hole. If it feels heavy or you hear water sloshing inside, shake gently to remove trapped water.
6. Dry And Inspect
Pat the spray arms dry with a clean cloth. Check all holes once more. If any are blocked, repeat the cleaning steps.
7. Clean The Mounting Area
Before putting the spray arms back, wipe the area where they attach. Remove any food bits or grime that could block movement or cause leaks.
8. Reinstall The Spray Arms
Line up the spray arm with its mount. Twist, clip, or screw it back in place, depending on your model. Make sure it spins freely and does not wobble.
9. Test The Dishwasher
Run a short rinse cycle without dishes. Listen for smooth spinning and check that water sprays properly. If you notice a problem, double-check that the arms are installed correctly.
How Often Should You Clean Spray Arms?
A good rule: clean your spray arms every 3–6 months. If you have hard water, a big family, or wash lots of greasy dishes, do it more often—every 1–2 months.
A common beginner mistake is waiting until the dishwasher is obviously failing. By then, the buildup is much harder to remove. Set a reminder on your phone or calendar to stay ahead.
Credit: www.bosch-home.com
What Causes Spray Arm Clogs?
Knowing the causes helps prevent future problems. Here are the main culprits:
- Food debris: Small bits get through the filter and block holes.
- Hard water minerals: Limescale from calcium and magnesium builds up.
- Grease or fat: Cooking oil or butter can stick inside spray holes.
- Dishwasher detergent residue: Using too much or the wrong type leaves a sticky film.
- Broken glass or plastic: Small chips can get caught in spray arms.
Non-obvious insight: Some dishwasher tablets contain fillers that do not dissolve well, especially in eco or short cycles. These fillers can add to spray arm blockages. Choose a high-quality detergent and run a monthly hot cycle with vinegar to reduce buildup.
Preventing Spray Arm Blockages
It’s easier to prevent clogs than to fix them. Here’s how:
- Scrape, don’t rinse: Remove large food bits from plates before loading, but don’t pre-rinse everything. Modern dishwashers work better with some food soil.
- Clean the filter regularly: Most dishwashers have a removable filter at the bottom. Clean it every week or two.
- Use the right detergent: Pick a detergent that matches your water type. For hard water, use a dishwasher salt if your model allows.
- Run hot cycles: Use the hottest setting at least once a month to melt grease and dissolve minerals.
- Don’t overload racks: Give space between dishes so water can reach everything.
- Check spray arms: Give them a spin by hand every few weeks to see if they move freely.

Credit: www.youtube.com
When To Replace Dishwasher Spray Arms
Spray arms are made to last, but they can get damaged. If you notice:
- Cracks, holes, or splits in the plastic
- Warped or bent shape
- Missing or broken nozzles
…it’s time to replace the spray arm. Replacement parts are available online or from the manufacturer. Always use the correct part number for your dishwasher model.
A damaged spray arm can leak, reduce cleaning power, or even scratch your dishes. If you’re not sure, take a photo and compare with images on the manufacturer’s site.
Cleaning Spray Arms In Different Dishwasher Types
Not all dishwashers are built the same. Here’s how cleaning can differ:
Standard Home Dishwashers
Most home models have two spray arms. The process above works well.
Drawer Dishwashers
These have smaller, sometimes hidden spray arms. Check for clips or screws in harder-to-see spots. Arms are often at the top and bottom of each drawer.
Compact Or Countertop Models
Spray arms are usually smaller and easier to remove, but the holes may be tiny. Use extra care when unclogging to avoid damage.
Commercial Dishwashers
These machines (used in restaurants) often have larger, metal spray arms. The cleaning process is similar, but arms are heavier and sometimes require a wrench.
| Dishwasher Type | Number of Spray Arms | Removal Difficulty | Cleaning Frequency |
|---|---|---|---|
| Standard Home | 2–3 | Easy | 3–6 months |
| Drawer | 2 per drawer | Medium | 3 months |
| Compact/Countertop | 1–2 | Easy | 2–4 months |
| Commercial | 2–4 | Medium-Hard | 1–2 months |
Always check your specific model’s manual for details.
The Role Of Water Quality In Spray Arm Maintenance
Water quality affects how often you need to clean the spray arms. Hard water (high in minerals) leads to faster limescale buildup, which blocks the tiny holes. If you see white chalky deposits on your glasses, you likely have hard water.
Soft water (low minerals) is less likely to cause blockages but can sometimes leave a soapy film if you use too much detergent.
If you’re not sure about your water, check with your local utility provider or use a simple test kit.
Solutions For Hard Water
- Install a dishwasher salt system if your model supports it.
- Run a monthly cleaning cycle with white vinegar.
- Use a rinse aid to prevent spots and film.
- Pick a detergent designed for hard water.
Taking these steps reduces how often you need to deep clean the spray arms.
Advanced Cleaning: Dealing With Stubborn Buildup
Sometimes, regular cleaning is not enough. If your spray arms are still blocked after soaking and scrubbing, try this:
- Soak in a stronger solution: Mix 1 part vinegar, 1 part hot water, and a tablespoon of baking soda per liter. Let the arms soak for 2–3 hours.
- Use a pipe cleaner: For arms with larger holes, a soft pipe cleaner can remove buildup inside the arm itself.
- Flush with water: Hold the spray arm under a running tap. Block one end with your hand and force water through the other; repeat from both directions.
Never use bleach or harsh chemicals, as these can damage plastic and rubber parts.
Common Cleaning Mistakes To Avoid
Many people try to clean their spray arms but make mistakes that cause more harm than good. Here are the top pitfalls:
- Using metal picks or knives: These scratch the holes, making future blockages more likely.
- Skipping the soak: Dry scrubbing alone won’t dissolve limescale or grease.
- Forcing the spray arm: If it’s stuck, do not use excessive force. Check for hidden clips or screws.
- Not cleaning the mounting area: Grime here can stop the spray arm from spinning.
- Reinstalling upside down: Some models only work if the spray arm is in the correct position.
If you’re unsure, take pictures before removal. This makes reassembly easier.
How Spray Arms Affect Dishwasher Performance
Clean spray arms are not just about clean dishes. They also help your dishwasher:
- Use less water and energy
- Wash faster and more quietly
- Last longer with fewer repairs
A study by Consumer Reports found that dishwashers with blocked spray arms used up to 20% more water and left 40% more residue on test dishes compared to clean machines.
| Spray Arm Condition | Water Usage | Cleaning Effectiveness | Noise Level |
|---|---|---|---|
| Clean | Normal | High | Low |
| Partially Blocked | +10% | Medium | Medium |
| Severely Blocked | +20% | Low | High |
This shows why regular maintenance is worth the small effort.
Credit: www.bosch-home.co.uk
Professional Cleaning Vs. Diy
If you’re not comfortable removing or cleaning the spray arms, or if they are badly blocked, you can hire a professional. Most appliance repair services offer a full dishwasher cleaning.
DIY cleaning is usually enough, but professional service can:
- Deep-clean hard-to-reach parts
- Check for hidden leaks or damage
- Advise on water quality solutions
Professional cleaning costs $50–$150, depending on location and dishwasher type. For most people, regular DIY cleaning keeps the dishwasher running smoothly.
Eco-friendly Cleaning Options
If you prefer natural cleaning products, stick with white vinegar and baking soda. These are safe, non-toxic, and effective for dissolving most buildup.
Avoid using bleach, ammonia, or strong acids. Not only can these harm your dishwasher, but they also pollute water systems.
You can also use plant-based dish soaps for scrubbing. Just rinse thoroughly to avoid soap residue.
Maintaining Spray Arms For The Long Term
Regular maintenance takes only a few minutes but adds years to your dishwasher’s life. Here’s a simple routine:
- Check spray arms every month—spin them and look for blockages.
- Clean the filter every 2 weeks.
- Run the hottest cycle with vinegar every month.
- Deep clean spray arms every 3–6 months, or more often if needed.
By following these steps, you’ll save money on repairs, avoid dirty dishes, and enjoy a fresher kitchen.
Frequently Asked Questions
What If My Spray Arms Are Still Blocked After Cleaning?
If you’ve cleaned as described and still find blockages, soak the arms longer (2–3 hours with vinegar and baking soda). Use a pipe cleaner to reach inside. If that fails, the blockage may be deep inside or the arm may be damaged—consider replacing it.
Can I Clean Spray Arms Without Removing Them?
You can flush the spray arms with vinegar using a dishwasher cleaning cycle, but this will not clear solid blockages. For best results, remove the arms and clean by hand. Leaving them in place only cleans the outside.
Is It Safe To Use Bleach Or Commercial Cleaners?
Bleach can damage plastic and metal parts inside your dishwasher. Stick with vinegar and baking soda. Some commercial cleaners are safe, but always check your dishwasher manual for approved products. For more details, see this Consumer Reports guide.
How Do I Know If My Spray Arms Are Working Correctly?
After cleaning, run a rinse cycle. The spray arms should spin freely and water should come out of every hole. Place a light plastic cup upright on the top rack—if it fills with water, your top spray arm is working.
Will Cleaning Spray Arms Void My Dishwasher Warranty?
No. In fact, regular cleaning is part of normal maintenance. Just avoid using sharp tools or harsh chemicals that could damage the parts. Always follow your manufacturer’s recommendations.
Keeping your dishwasher spray arms clean is a small task with big rewards. With these easy steps and smart tips, you can keep your dishes spotless, your machine running quietly, and your kitchen free from odors. Make this a regular habit, and your dishwasher will serve you well for years to come.