When you open your freezer, expecting clean, fresh ice, the last thing you want to see is mold. Mold in your ice maker is not just unpleasant—it can be unhealthy and make your drinks taste odd. Many people never think about cleaning their ice maker until mold becomes visible or ice starts to smell bad. But cleaning your ice maker is crucial for safe, great-tasting ice and for extending the life of your appliance.
Cleaning mold from an ice maker is not as hard as it sounds, but you need the right steps and a careful approach. Mold can build up in hidden parts, like trays and water lines, making it tricky to remove completely.
If you rush or skip steps, mold can return quickly and even damage your ice maker over time. This guide will take you through everything you need to know, from why mold grows to how to clean every part, how often to clean, and how to keep mold from coming back.
Many ice makers have different designs, but the basics of cleaning mold are similar for most home machines. You’ll find tips for both refrigerator ice makers and countertop or portable units. Whether you’re a first-time cleaner or you’ve tried before and still see black spots, you’ll learn simple methods, common mistakes to avoid, and even some expert tricks that most people miss.
Why Mold Grows In Ice Makers
Most people assume ice makers stay clean because they are cold. But mold can still grow inside, even at low temperatures. Mold needs three main things: moisture, organic matter, and darkness. Ice makers provide all three.
After each ice-making cycle, small water droplets remain inside the trays, bins, or water lines. Over time, dust, food particles, and minerals from water give mold something to feed on. The dark, enclosed space of the ice maker is perfect for mold to grow unseen.
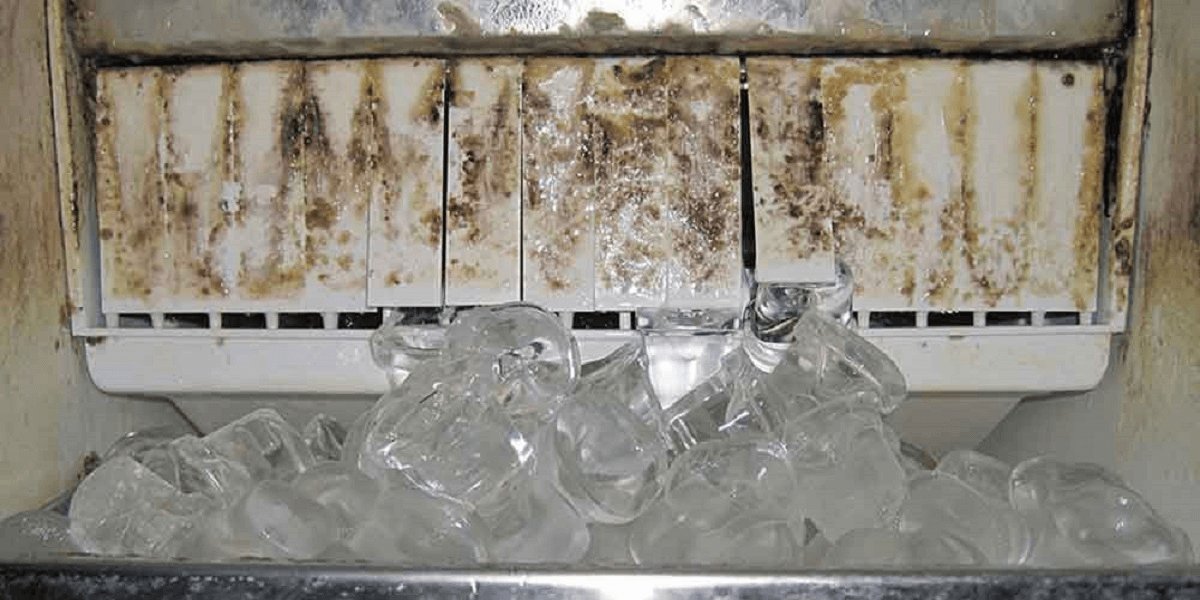
Some studies show that mold spores can survive and grow at temperatures just above freezing, especially in areas where the ice melts and refreezes. If your ice tastes musty or you see black, green, or pink patches, mold is likely present.
Dangers Of Mold In Ice Makers
Mold in your ice maker is not just about bad taste or smell. It can cause:
- Allergic reactions: Sneezing, itchy eyes, or coughing, especially in sensitive people.
- Stomach upset: Swallowing moldy ice can lead to nausea or diarrhea.
- Respiratory issues: Mold spores can enter the air when you open the freezer.
The risk is higher for children, elderly people, and those with weak immune systems. Mold can also clog water lines and damage your ice maker, leading to expensive repairs.
Signs Your Ice Maker Has Mold
You may not see mold right away, but there are clear warning signs:
- Ice smells bad: A musty, earthy, or “old freezer” smell.
- Strange taste: Ice tastes different, bitter, or stale.
- Discolored ice: Ice is cloudy, pink, green, or has black spots.
- Visible patches: Black, green, or pink slime inside trays or bins.
- Slow ice production: Mold can block parts and slow down ice making.
If you notice any of these, it’s time to clean your ice maker.
What You Need Before Cleaning
Gathering the right supplies makes the job faster and safer. Here’s what you’ll need:
- Gloves: Protect your hands from mold and cleaners.
- Face mask: Mold spores can irritate your lungs.
- Screwdriver: For removing parts in some ice makers.
- Soft brush or toothbrush: To scrub small spaces.
- Microfiber cloths: For wiping surfaces.
- White vinegar: Natural mold killer and deodorizer.
- Baking soda: Removes odors and boosts cleaning.
- Mild dish soap: Cuts through grease and grime.
- Spray bottle: For applying cleaning solutions.
- Bucket or large bowl: For soaking parts.
- Clean water: For rinsing everything.
- Optional: Commercial ice maker cleaner: For tough jobs.
Step-by-step Guide: How To Clean Mold From Ice Maker
Let’s walk through each step for a deep clean. These instructions work for most home ice makers, but always check your owner’s manual for special steps.
1. Unplug And Empty The Ice Maker
Safety first. Unplug the fridge or ice maker, or turn off the ice-making function. Remove all ice and put it in the sink or trash. Mold spores can spread, so avoid using the ice.
2. Take Out Removable Parts
Most ice makers have parts you can remove, such as:
- Ice bin or bucket
- Trays or ice molds
- Water filter (if present)
Take these out carefully. If you’re unsure how, check your manual or search for a video for your model.
3. Pre-clean With Warm Soapy Water
Fill a bucket with warm water and a few drops of dish soap. Soak removable parts for 10–15 minutes. Scrub with a brush, especially corners and seams where mold hides.
Rinse under running water. Dry with a clean cloth or let air dry.
4. Clean The Inside Of The Ice Maker
Mix equal parts white vinegar and water in a spray bottle. Spray all inside surfaces—walls, ceiling, and moving parts. Let sit for 5–10 minutes. Vinegar kills mold and dissolves mineral deposits.
Wipe with a microfiber cloth or sponge. For stubborn spots, sprinkle baking soda on your brush and scrub gently.
5. Clean Water Lines And Dispensers
Mold can grow in water lines and ice dispensers. If possible, disconnect water lines and flush with a vinegar-water mix. Some ice makers let you run a cleaning solution through the system—follow your manual.
Wipe the ice chute or dispenser area with vinegar and a brush.
6. Clean Non-removable Parts
Some parts cannot be removed. Use a small brush or cloth to reach hidden areas. Don’t use sharp objects—they can damage plastic.
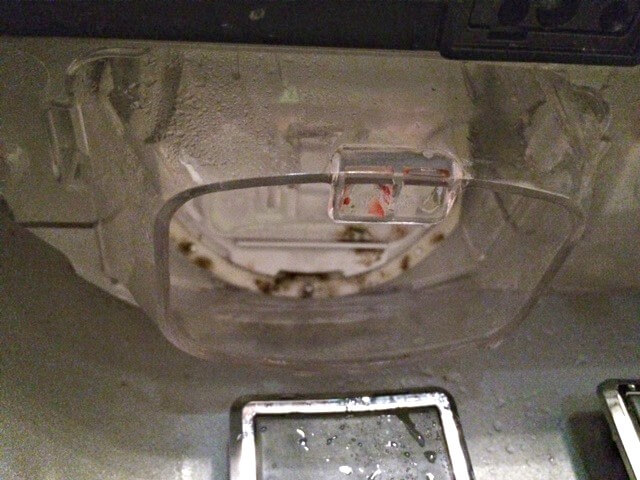
Look for gaskets, corners, and under the ice maker arm—these areas often trap mold.
7. Final Rinse
Wipe all surfaces with a clean, damp cloth to remove vinegar and baking soda residue. Dry with a fresh towel.
8. Reassemble And Run A Cleaning Cycle
Put all parts back in place. Plug in the ice maker or turn it back on. If your ice maker has a “clean” cycle, run it now. Discard the first batch of ice—this flushes out leftover cleaner and mold.
9. Replace The Water Filter
If your ice maker has a filter, replace it after cleaning. Old filters can trap mold and bacteria.
10. Regular Maintenance
Clean your ice maker every 3–6 months, or more often if you see mold. Wipe the exterior weekly to stop dust and grime from entering.
Cleaning Countertop And Portable Ice Makers
These units are popular in offices, parties, or small kitchens. Their design is different, but cleaning steps are similar.
- Unplug and drain all water.
- Remove ice bin and trays.
- Clean with vinegar-water mix and a soft brush.
- Rinse thoroughly.
- Run a cleaning cycle with vinegar (if your model allows).
- Discard the first few batches of ice.
Some portable ice makers can be turned upside down to drain, but check your manual before doing this.
Cleaning Refrigerator Ice Makers
Refrigerator ice makers are built into the freezer. Cleaning them needs more care:
- Turn off ice maker and unplug fridge.
- Remove ice bin, trays, and any covers.
- Clean inside freezer compartment (not just the ice maker).
- Use a hair dryer on low to melt stubborn ice, but don’t overheat plastic.
- Scrub all parts with vinegar and baking soda.
- Check and clean the water line connection at the back of the fridge.
Special Cases: Commercial Ice Makers
Restaurants and bars use larger, more complex machines. For these:
- Always follow manufacturer’s instructions.
- Use commercial ice maker cleaner.
- Clean water filters and lines more often.
- Schedule professional service yearly.
Homeowners with large, under-counter ice makers should treat them like small commercial units.

Credit: www.reddit.com
Comparing Cleaning Methods
There are different ways to clean mold from ice makers. Here’s how they compare:
| Method | Effectiveness | Safety | Cost | Time |
|---|---|---|---|---|
| Vinegar & Baking Soda | High (for light to moderate mold) | Very Safe | Low | 30–45 mins |
| Commercial Cleaners | Very High (for tough mold) | Safe if used properly | Medium–High | 30–60 mins |
| Bleach Solution | Very High | Harsh (strong fumes) | Low | 30 mins |
| Just Soap & Water | Low (may not kill mold) | Very Safe | Low | 20–30 mins |
Vinegar and baking soda are safest for most people. Bleach works well but can damage parts and is not food-safe unless rinsed perfectly. Commercial cleaners are powerful—choose those made for ice makers.
Common Mistakes When Cleaning Ice Makers
Even careful people make mistakes that let mold return. Avoid these:
- Skipping hidden parts: Mold loves corners and under trays.
- Not rinsing well: Leftover cleaner can taste bad and harm health.
- Not cleaning water lines: Mold can hide here and return fast.
- Using harsh chemicals: Strong cleaners like bleach can damage plastic and seals.
- Ignoring the water filter: Old filters spread mold and bacteria.
- Not drying parts fully: Moisture encourages mold to regrow.
- Forgetting to clean the ice bin: The bin often gets the worst mold.
How Often Should You Clean Your Ice Maker?
Regular cleaning keeps your ice safe and fresh. The best schedule is:
- Every 3 months: For homes with soft water and low use.
- Every month: In hot, humid climates, or if you use the ice maker daily.
- After illness: If someone in the home has been sick, clean to remove germs.
Some brands recommend cleaning every 6 months, but this is often too long, especially if you see mold.
Preventing Mold In Ice Makers
Keeping mold away is easier than cleaning it. Here’s how to prevent mold:
- Use clean water: Install a good water filter. This removes minerals and bacteria that feed mold.
- Keep freezer cold: Set below 0°F (-18°C) to slow mold growth.
- Dry parts after cleaning: Let bins and trays air dry before reassembling.
- Wipe spills quickly: Food and drink spills in the freezer can lead to mold.
- Leave the door closed: Warm air increases moisture and mold risk.
- Regular maintenance: Clean inside and outside every few months.
- Replace filters on time: Old filters add bacteria and mold spores.
Credit: www.vevor.com
When To Call A Professional
Sometimes, home cleaning is not enough. Call a service technician if:
- Mold keeps coming back soon after cleaning.
- Ice maker stops working or makes loud noises.
- Water lines are blocked and you can’t clean them.
- You see rust, corrosion, or broken parts.
Professionals can deep clean, replace parts, or check for bigger problems like leaks.
The Science Behind Mold In Ice Makers
Most people don’t realize that mold spores are everywhere—in your kitchen air, on your hands, and even in tap water. When spores land in a damp, dark place, they can start growing in just a few days. Ice makers, especially those with old water lines or rarely cleaned bins, are perfect breeding grounds.
A study by the National Sanitation Foundation found that many home ice makers have more bacteria than toilet seats, mainly due to ignored cleaning. Mold can also produce mycotoxins—chemicals that cause health problems if swallowed or inhaled. While rare, this risk is highest in machines left uncleaned for months.
Safe Cleaning Solutions For Ice Makers
Some people worry about using vinegar or baking soda in appliances. These are safe for most ice makers, but always rinse well. For those who prefer commercial cleaners, choose products labeled “food-safe” and follow directions exactly.
Never mix cleaning solutions (like bleach and vinegar) together—this can create dangerous gases.
Here’s a quick comparison of common cleaning agents:
| Cleaning Solution | Effectiveness Against Mold | Odor Left Behind | Food-Safe? |
|---|---|---|---|
| White Vinegar | High | Mild, fades quickly | Yes |
| Baking Soda | Medium | None | Yes |
| Bleach | Very High | Strong, needs rinsing | Only with thorough rinse |
| Commercial Ice Maker Cleaner | Very High | Varies | Check label |
Real-world Example: Cleaning A Moldy Ice Maker
Let’s look at a real scenario. Anna, a homeowner, noticed her ice tasted weird and found pink mold inside her ice bin. She:
- Unplugged her fridge and wore gloves.
- Removed the ice bin, trays, and water filter.
- Soaked all removable parts in vinegar water.
- Scrubbed stubborn mold with baking soda and a brush.
- Sprayed vinegar inside the ice compartment and wiped it down.
- Flushed the water line with vinegar, then clear water.
- Dried all parts and reassembled.
- Threw away the first two batches of ice.
After cleaning, Anna’s ice tasted fresh again, and there was no mold for months. She set a calendar reminder to clean the ice maker every three months.
Tips For Hard-to-reach Areas
Some ice makers have spots you can’t reach easily. Here’s how to handle them:
- Use a flexible bottle brush for deep corners.
- Wrap a thin cloth around a stick for tight spaces.
- Use a turkey baster to flush lines with vinegar.
- For stubborn mold, let vinegar sit overnight.
Never force sharp objects inside—this can damage sensors and parts.
How To Clean Mold From Water Lines
Water lines often get missed, but mold can grow inside and keep coming back. To clean:
- Turn off the water supply.
- Disconnect the line (check your manual).
- Fill with vinegar and let sit 15–30 minutes.
- Flush with clean water until the smell is gone.
- Reconnect and run the ice maker, discarding the first few ice batches.
If lines are very dirty, you may need to replace them.
How To Know If Your Ice Is Safe Again
After cleaning, check:
- No visible mold inside the ice bin, trays, or lines.
- Ice is clear, with no odor or strange taste.
- Ice maker works normally and makes ice at the usual speed.
If you still notice odor or taste after cleaning, repeat the process or check for missed spots.
Extra Insights Most People Miss
- Humidity matters: If your kitchen is humid, mold grows faster. Use a dehumidifier or keep freezer doors closed as much as possible.
- Don’t ignore “clean” lights: Some ice makers have cleaning reminders. Don’t reset them without actually cleaning.
Troubleshooting: What If Mold Keeps Coming Back?
If you clean well but mold returns, try these steps:
- Change your water filter more often.
- Check for leaks in water lines.
- Move the fridge if it’s in a warm, damp area.
- Clean the freezer’s air vents—blocked vents cause moisture.
Sometimes, older ice makers have worn parts that are hard to clean. In these cases, replacing the unit may be the best option.
Additional Resources
For more details on safe cleaning products and mold risks, see the CDC’s mold cleaning guidelines.
Credit: moldfreeliving.com
Frequently Asked Questions
How Often Should I Clean My Ice Maker To Prevent Mold?
Clean your ice maker at least every three months. If you live in a humid area or use your ice maker daily, clean it monthly for best results.
Can I Use Bleach To Clean Mold From My Ice Maker?
Bleach is effective but must be used carefully. It can damage plastic and leave strong odors. If you use bleach, rinse all parts with lots of clean water and discard the first several batches of ice.
What Are The Best Natural Cleaners For Mold In Ice Makers?
White vinegar and baking soda are safe, food-friendly, and kill most mold. They are easy to use, but always rinse well to prevent taste or odor in your ice.
Why Does My Ice Still Taste Bad After Cleaning?
If your ice tastes strange, you may have missed a spot, or the water filter needs changing. Clean water lines, replace the filter, and discard the first few batches of ice after cleaning.
Is Mold In My Ice Maker Dangerous?
Mold can be harmful, especially for people with allergies or weak immune systems. It can cause stomach upset and respiratory problems. Always clean mold as soon as you notice it.
Cleaning mold from your ice maker keeps your ice fresh, your drinks safe, and your appliance running smoothly. With simple tools and a bit of time, you’ll enjoy clear, odor-free ice all year long.