
When you rely on a well for your water, keeping your system clean is essential for health and everyday use. Over time, well water lines can develop problems like mineral buildup, biofilm, bacteria, or even sediment clogs. These issues can affect water quality, reduce water pressure, and damage your equipment. Knowing how to clean your water lines safely and effectively will help you avoid expensive repairs and keep your water fresh and safe.
Many well owners underestimate how quickly problems can grow inside pipes. Even if your water looks clear, hidden issues can spread throughout your system. Cleaning your water lines is not just about taste or smell—it’s also about protecting your health and your home’s plumbing.
This guide will help you understand exactly how to clean water lines from a well, what tools and materials you’ll need, and how to avoid common mistakes. You’ll get practical steps, expert tips, and real insights that most beginners miss.
Why Cleaning Well Water Lines Matters
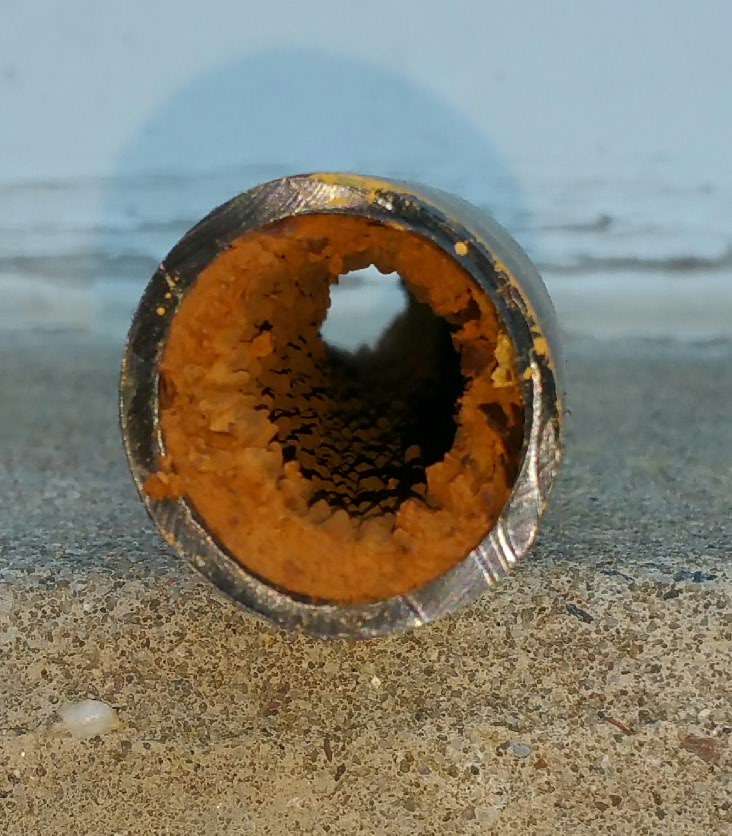
Well water often contains minerals, like calcium and magnesium, that can create hard water. Over time, these minerals form scale inside your pipes, reducing flow and making your pump work harder. Bacteria and algae can also grow if the system is not properly maintained. If you notice changes in water taste, color, or pressure, your lines might already have buildup.
Ignoring cleaning can lead to:
- Lower water pressure
- Strange tastes or odors
- Cloudy or discolored water
- Shorter pump and appliance lifespan
- Health risks from bacteria
Regular cleaning keeps your water safe and your system running efficiently.
Common Signs Your Well Water Lines Need Cleaning
Understanding when to clean your water lines is key. Look for these signs:
- Drop in Water Pressure: If faucets are weaker than usual, buildup or clogs may be the reason.
- Unusual Odors or Tastes: Rotten egg smell or metallic taste often means bacteria or minerals are present.
- Staining: Red, brown, or green stains on sinks or clothes point to iron, copper, or other minerals.
- Cloudy Water: Particles in your water often mean sediment or biofilm in pipes.
- Frequent Filter Clogs: If your filters fill up quickly, your lines might be dirty.
- Noisy Plumbing: Gurgling or banging sounds sometimes happen when pressure drops or air gets trapped.
Pro tip: If you have a history of coliform bacteria or iron bacteria in your well, clean your lines more often—at least once a year.
Credit: terrylove.com
Tools And Materials Needed
Before starting, gather everything you need. The right tools make the job easier and safer.
- Protective gloves and goggles
- Household bleach (unscented, 5-6% sodium hypochlorite)
- Wrench set
- Bucket
- Garden hose
- Funnel
- Pipe brush or flexible cleaning brush
- Clean cloths or sponges
- Water test kit
- Well system schematic (if available)
- Replacement filters (if you use them)
- Bacterial shock chlorinator (optional for heavy contamination)
Non-obvious insight: Always check your well cap and seals for cracks before starting. Broken seals let surface water—and more contaminants—into your system.
Step-by-step Guide To Cleaning Well Water Lines
1. Turn Off Power And Water Supply
Safety first. Turn off your well pump at the electrical panel. Shut off the main water supply to prevent accidental leaks.
2. Open Faucets And Drain The System
Open all indoor and outdoor faucets. Let water drain until the flow stops. This removes pressure and empties much of the water from your pipes.
Tip: Start with the lowest faucet in your home (like a basement sink), then work upwards. This helps air enter the system and speeds up draining.
3. Remove And Clean Faucet Aerators And Screens
Unscrew faucet aerators and screens. Rinse these small parts under clean water, using a brush if needed. Mineral buildup here can be severe.
Place them in a bowl of vinegar for 30 minutes to dissolve stubborn deposits.
4. Mix And Add Cleaning Solution
Use a chlorine bleach solution for most well systems. Mix 1 quart (about 1 liter) of household bleach with 10 gallons (about 38 liters) of clean water. This ratio is strong enough to disinfect but not damage pipes.
Pour the solution into your well using a funnel. If your system has a designated port or plug, use that for easier access.
Common mistake: Pouring bleach directly into the well without dilution can corrode parts and harm water quality.
5. Recirculate The Solution
Turn on your pump briefly (for 5-10 minutes) to circulate the bleach solution through the pipes. Open each faucet, one at a time, until you smell chlorine. Close the faucet and move to the next.
Repeat until all faucets, including outside spigots, have chlorinated water.
6. Let The Solution Sit
Leave the bleach solution in the pipes for at least 8 to 12 hours. Overnight is best. This contact time kills bacteria and dissolves biofilm.
Non-obvious insight: Run your dishwasher and washing machine (empty) for a minute during this time. It cleans their water lines too.
7. Flush The System
After waiting, open all faucets and let water run until you no longer smell chlorine. This may take 30-60 minutes. Use an outdoor hose if possible to avoid flooding your drain system.
Flush toilets, run showers, and use all water-using appliances to make sure the bleach is fully gone.
8. Clean Or Replace Filters
If your system uses sediment or carbon filters, replace them after flushing. Old filters can hold bacteria and debris, undoing your cleaning.
9. Test Water Quality
Use a water test kit to check for chlorine, bacteria, and pH. The water should be clear, odor-free, and safe for use. If the chlorine level is still high, flush more.
For best results, send a sample to a certified lab once a year to check for coliform bacteria and other contaminants.
10. Restore Power And Check For Leaks
Turn the well pump power back on. Check all fittings, joints, and fixtures for leaks or dripping water. Tighten connections as needed.
Wait a few hours, then recheck water pressure and taste.
Cleaning Water Lines With Shock Chlorination
Sometimes, a basic bleach flush isn’t enough—especially if you have persistent bacteria or heavy iron. In these cases, shock chlorination is the answer.
What Is Shock Chlorination?
Shock chlorination uses a higher concentration of chlorine to kill tough bacteria and remove iron, manganese, and sulfur. It’s a powerful tool but must be used carefully.
How To Perform Shock Chlorination
- Calculate Well Volume: Estimate how many gallons your well holds. Most home wells are 100-400 feet deep and 4-6 inches wide.
- Mix Solution: Use 3 pints (about 1.4 liters) of bleach per 100 gallons of water for shock treatment.
- Add Bleach: Pour the solution directly into the well.
- Recirculate: Attach a garden hose to a faucet and run water back into the well casing for at least 30 minutes. This mixes chlorine throughout the system.
- Flush: After 12-24 hours, flush all lines until the chlorine smell is gone.
Warning: Do not use water for drinking, cooking, or bathing during shock chlorination. High chlorine can irritate skin and lungs.
For more on shock chlorination, see the CDC Well Disinfection Guide.
Mechanical Cleaning Methods
If you have severe buildup or clogs, mechanical cleaning may be needed. This involves using tools to physically scrub or flush your pipes.
Types Of Mechanical Cleaning
- Pipe Brushes: Long, flexible brushes can remove thick scale from exposed pipes or lines under sinks.
- Air Scouring: Some professionals use compressed air to blast out sediment and debris.
- High-Pressure Water Jetting: Specialized machines force water through pipes to clean out hard deposits.
When To Use Mechanical Cleaning
- Water pressure drops suddenly
- Bleach or chemical cleaning doesn’t help
- You see visible debris in water
Note: Mechanical cleaning is best for metal or PVC pipes. Older or brittle pipes can crack, so check your system’s age and material first.

Credit: www.youtube.com
Preventing Future Buildup
Cleaning is important, but prevention saves time and money. Simple habits and upgrades can keep your well water lines clean for years.
Regular Maintenance
- Flush your system every 6-12 months, even if water seems fine.
- Inspect your well cap and casing for cracks or damage after heavy storms.
- Test water quality at least once a year for bacteria, iron, and hardness.
Install Water Treatment Systems
Consider adding:
- Sediment filters: Trap sand, rust, and dirt before they reach pipes.
- Water softeners: Remove calcium and magnesium to stop scale.
- UV sterilizers: Kill bacteria and viruses without chemicals.
Control Water Usage
Avoid sudden, heavy water use that stirs up sediment. Stagger laundry, showers, and outdoor watering.
Watch For Early Warning Signs
Teach your family to notice changes in water taste, color, or pressure. Early action prevents bigger problems.
Comparing Cleaning Methods
Different cleaning methods work for different problems. Here’s a quick look at their pros and cons:
| Method | Best For | Pros | Cons |
|---|---|---|---|
| Bleach Flush | Light bacteria, minor scale | Easy, low cost | May miss deep clogs |
| Shock Chlorination | Serious bacteria, iron, sulfur | Kills most germs, deep clean | Strong smell, needs waiting time |
| Mechanical Cleaning | Heavy sediment, hard scale | Removes tough buildup | May require a pro, more costly |

Credit: www.youtube.com
Safety Tips When Cleaning Well Water Lines
Cleaning well water lines means handling chemicals, electricity, and sometimes heavy tools. Protect yourself and your system with these tips:
- Always turn off power before touching the pump or pipes.
- Wear gloves and goggles when working with bleach or cleaning agents.
- Never mix bleach with other cleaners—dangerous fumes can form.
- Keep children and pets away during cleaning and flushing.
- Ventilate the area—chlorine fumes can irritate eyes and lungs.
- Label all containers clearly to avoid accidents.
- If you use a professional, check that they are licensed and insured.
Pro insight: After a major flood or well repair, always clean and disinfect your water lines before use.
When To Call A Professional
Some problems need expert help. Call a qualified well contractor or plumber if:
- Water stays cloudy or smelly after cleaning
- Pressure does not return to normal
- You find oil, fuel, or chemical smells
- Pipes are old, corroded, or leaking
- You are unsure about your well’s layout
Professionals have cameras, jetting equipment, and lab tests that can spot hidden problems. They can also repair or replace damaged pipes safely.
Data: How Often Should You Clean Well Water Lines?
Most homes need a full clean every 1 to 2 years, but the right frequency depends on your water and system.
| Home Type | Recommended Cleaning | Reason |
|---|---|---|
| Single-family, no issues | Every 2 years | Low risk, regular use |
| Older home (over 30 years) | Every 1 year | Older pipes, higher buildup risk |
| High iron, hard water | Every 6-12 months | Faster scale, bacteria growth |
| After repairs or floods | Immediately | Contamination risk |
Expert advice: If your water test shows coliform bacteria, clean and disinfect immediately, then retest before drinking.
Real-world Example: Cleaning A Residential Well Water System
Maria lives in a rural area and noticed her water pressure had dropped and her dishes were coming out stained. She followed these steps:
- Turned off the power to her well pump.
- Opened all faucets and let water drain.
- Removed and soaked her faucet aerators in vinegar.
- Mixed 1 quart of bleach with 10 gallons of water, poured it into her well, and recirculated.
- Let the solution sit overnight.
- Flushed the system until there was no chlorine smell.
- Replaced her sediment filter.
- Tested her water with a home kit—bacteria was gone.
Her pressure improved, and stains disappeared. The process took most of a weekend but saved her from calling a plumber.
What Most Beginners Miss
- Hidden filters: Many homes have small, hidden filters near the well tank or under sinks. Don’t forget to clean or replace these.
- Well cap maintenance: Cleaning the lines won’t help if the well cap or seals are cracked. Check for bugs, dirt, or water sitting on top.
- Shocking the pressure tank: Bacteria can hide in the pressure tank. Run the bleach solution through this tank to clean it, too.
- Testing more than once: Always test water again a few days after cleaning. Some bacteria can regrow if not fully removed.
Quick Troubleshooting Tips
If your water lines still seem dirty after cleaning:
- Run water longer: Sometimes, trapped bleach or debris takes extra time to flush.
- Check all faucets: Forgotten outdoor or basement taps can hold old water.
- Inspect wellhead: Cracks or damaged seals let in surface contamination.
- Use stronger shock: Repeat with a higher bleach concentration if bacteria remain.
- Call a pro: Persistent problems may mean deeper issues in the well or aquifer.
Frequently Asked Questions
How Do I Know If My Well Water Lines Are Really Clean?
The best signs are clear water, normal taste, and steady pressure. After cleaning, use a water test kit to check for chlorine, bacteria, and pH. For full safety, send a sample to a certified lab.
Is It Safe To Use Bleach In My Well Water System?
Yes, when used correctly. Dilute bleach with water and follow recommended amounts. Always flush lines until there is no smell before drinking or using water. Never mix bleach with other chemicals.
How Long After Cleaning Can I Use My Well Water?
Usually, you can use water safely once the chlorine smell is gone, which takes 30-60 minutes of flushing. For shock treatments, wait 12-24 hours and test for chlorine before use.
Can I Clean My Well Water Lines Without Turning Off The Pump?
No, always turn off the power before starting. This prevents electric shock and damage to your pump during cleaning and draining.
What If My Water Stays Cloudy After Cleaning?
Flush the system longer, check all filters, and test water for contaminants. If the problem continues, call a professional—there could be deeper issues in your well or pipes.
Cleaning water lines from a well is a key part of home maintenance. With the right steps, tools, and regular care, you can enjoy clean, safe, and reliable well water for years to come. Remember to test your water often, act quickly when problems appear, and don’t hesitate to call for help if needed.