
If you want to keep vegetables fresh for months, save money, and add healthy snacks to your diet, learning how to dehydrate vegetables in the oven is a practical skill. Many people think you need expensive dehydrators, but your regular oven can do a great job.
Oven drying is easy, needs no special gadgets, and works for almost any vegetable in your kitchen.
Dehydrated vegetables are light, last for months, and keep most of their nutrients. You can carry them on hikes, add them to soups, or use them as crunchy snacks. But, if you are new to this, you might worry about losing flavor or making mistakes.
Don’t worry. With clear steps, some tips, and a bit of patience, you’ll get great results every time.
Let’s explore how to dehydrate vegetables in your oven, what you need, the best methods, and how to store your dried veggies for the longest shelf life.
Why Dehydrate Vegetables?
Dehydrating vegetables is one of the oldest food preservation methods. It removes most of the water, making it hard for bacteria and mold to grow. This means your food can last for months, sometimes even years, without a fridge or freezer.
Here are more reasons why people choose to dehydrate:
- Save money: Buy veggies in bulk when they are cheap and preserve them for later.
- Reduce waste: Drying lets you use up vegetables before they spoil.
- Portable: Dried veggies are light and don’t need refrigeration—perfect for camping or emergencies.
- Healthy snacks: Dehydrated vegetables keep most nutrients and have no added chemicals.
- Easy meal prep: Toss dried veggies into soups, stews, noodles, and rice for quick meals.
Many people are surprised that oven drying is just as effective as fancy dehydrators, especially for beginners.
What You Need To Start
You don’t need a lot of special equipment to dehydrate vegetables in the oven. Here’s what is required:
- Oven: Most home ovens work well, but convection ovens give the most even drying.
- Baking sheets: Flat, rimmed trays hold vegetables and fit neatly in the oven.
- Wire racks or cooling racks: These allow air to circulate under the vegetables for more even drying.
- Parchment paper or silicone mats: This prevents sticking, especially for juicy vegetables.
- Sharp knife or mandoline: Uniform slices dry faster and more evenly.
- Large bowl: For washing and soaking vegetables.
- Clean kitchen towels or salad spinner: Used for drying off washed veggies.
- Storage containers: Use glass jars, vacuum bags, or zip-top bags for dried vegetables.
If you have a fan in your oven, use it. Circulating air dries food faster and helps prevent uneven results.
Choosing The Right Vegetables
Not all vegetables dry the same way. Some are perfect for oven dehydration, while others may not give the results you want. Here are the best vegetables for oven drying:
- Carrots
- Zucchini
- Bell peppers
- Tomatoes
- Green beans
- Broccoli
- Spinach
- Onions
- Kale
- Mushrooms
- Corn
- Peas
- Beets
- Sweet potatoes
- Pumpkin
Vegetables with high water content, like cucumbers or lettuce, are less suitable. They often shrink too much and lose texture.
Pro Tip
Don’t mix vegetables with very different drying times on the same tray. For example, tomatoes take longer to dry than spinach. This can lead to burnt or unevenly dried food.
Preparing Vegetables For Dehydration
Proper preparation makes a big difference. It helps vegetables dry evenly, taste better, and last longer.
Washing And Peeling
Always wash vegetables well to remove dirt, pesticides, and bacteria. For root vegetables like carrots and beets, peeling gives smoother, cleaner results, but it’s not always required.
Slicing
Slice vegetables into uniform pieces—usually 1/8 to 1/4 inch thick. Thinner slices dry faster but may become too crisp or brittle. Thicker slices take longer and can dry unevenly.
- Use a mandoline for perfectly even slices.
- Aim for pieces of the same size so everything dries at the same rate.
Blanching
Some vegetables benefit from blanching before drying. Blanching means boiling vegetables briefly, then plunging them into ice water. This step:
- Preserves color
- Improves texture
- Kills bacteria
- Reduces drying time
Vegetables that benefit from blanching include:
- Carrots
- Green beans
- Broccoli
- Peas
- Cauliflower
- Corn
To blanch:
- Boil water in a large pot.
- Add vegetables for 1-3 minutes (depending on size and type).
- Remove quickly and place in ice water for the same amount of time.
- Drain and dry before dehydrating.
Pat Dry
After washing or blanching, dry vegetables thoroughly with a towel or salad spinner. Excess water slows down dehydration and can lead to steaming instead of drying.
Setting Up The Oven For Dehydration
Your oven won’t act exactly like a commercial dehydrator, but with a few small changes, you’ll get great results.
Temperature
Set your oven to the lowest temperature, usually between 120°F and 170°F (50°C to 75°C). Most vegetables dry best around 140°F (60°C).
If your oven only goes as low as 170°F, keep the door slightly open to allow moisture to escape and lower the internal temperature.
Air Circulation
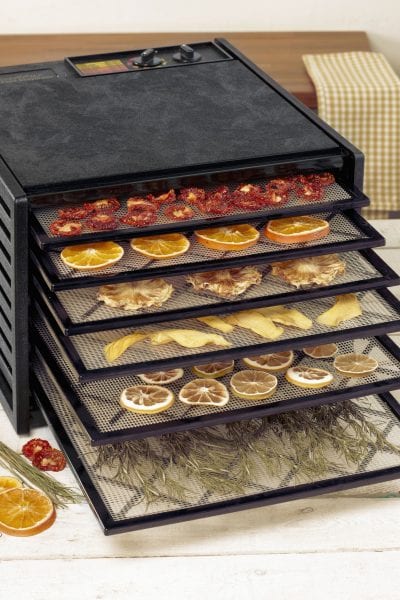
Airflow is key. Place trays on racks, not the oven floor. If possible, use wire racks inside baking sheets to lift vegetables off the tray. This lets hot air surround each piece.
Prop the oven door open with a wooden spoon or heat-proof object. This helps moisture escape and prevents vegetables from cooking instead of drying.
Tray Placement
Don’t overcrowd trays. Lay slices in a single layer, with space between them. Stack trays with at least 2 inches of space between each one for good airflow.
Step-by-step: How To Dehydrate Vegetables In The Oven
Follow these steps for reliable results:
- Preheat oven: Set to the lowest temperature (ideally 140°F/60°C).
- Prepare vegetables: Wash, peel, slice, and blanch as needed. Dry them well.
- Arrange on trays: Lay slices in a single layer on parchment-lined baking sheets or wire racks.
- Place in oven: Put trays in the oven, leaving space for air to circulate.
- Prop oven door: Use a spoon or folded towel to keep the door open about 1 inch.
- Rotate trays: Every hour, move trays around and flip vegetables for even drying.
- Check for dryness: Drying takes 4–12 hours, depending on vegetable and thickness.
- Cool and test: Let vegetables cool for 10–15 minutes. Test for dryness (see below).
- Store: Put completely dried vegetables in airtight containers.
How Long Does It Take?
Drying time depends on:
- Type of vegetable
- Slice thickness
- Oven temperature
- Humidity in your kitchen
Here’s a comparison of drying times for common vegetables:
| Vegetable | Approximate Drying Time (Oven) | Blanching Needed? |
|---|---|---|
| Carrots | 6–10 hours | Yes |
| Tomatoes | 8–12 hours | No |
| Bell Peppers | 6–10 hours | No |
| Broccoli | 6–8 hours | Yes |
| Kale | 2–4 hours | No |
| Green Beans | 6–10 hours | Yes |
| Mushrooms | 4–8 hours | No |
Thicker pieces or higher moisture vegetables (like tomatoes) take longer. Very thin leaves (like kale or spinach) can crisp up in just 2–4 hours.
How To Tell When Vegetables Are Done
Many beginners over-dry or under-dry vegetables. Here’s how to check for perfect dryness:
- Carrots/Beets: Should be dry, leathery, and slightly bendable, not sticky or wet.
- Tomatoes: Should not feel sticky; leathery with no wet spots.
- Greens (Kale, Spinach): Crisp and crumbly; no moisture inside.
- Mushrooms: Brittle and snap easily.
- Peas/Corn: Hard and dry; not squishy.
Let the vegetables cool for at least 10 minutes before testing. Warm vegetables can feel softer than they really are.
Two Non-obvious Insights
- Conditioning Is Key: After drying, place vegetables in loosely filled jars for 5–7 days. Shake daily to spread moisture. If condensation appears, return to the oven to dry more. This step helps prevent mold.
- Don’t Rely on Color Alone: Some vegetables darken during drying, even when fully dehydrated. Always check texture and moisture, not just color.
Storing Dehydrated Vegetables
Proper storage keeps your vegetables fresh for months. Here’s what to do:
- Let vegetables cool completely before storing.
- Use airtight containers—glass jars, vacuum seal bags, or Mylar bags are best.
- Store in a dark, cool, dry place. Light and heat speed up spoilage.
- Label containers with the vegetable and date.
If you’re storing for longer than a few months, add a food-safe oxygen absorber to each jar or bag. This reduces the risk of mold and keeps colors bright.
Shelf Life
Most oven-dried vegetables last 6–12 months if kept cool and dry. Some, like onions and garlic, can last longer. If you see any signs of moisture, mold, or off smells, throw them away.
Comparing Storage Methods
Here’s a look at how common storage options affect shelf life:
| Storage Method | Typical Shelf Life | Best For |
|---|---|---|
| Glass Jar (Pantry) | 6–12 months | Daily use |
| Vacuum Seal Bag | 1–2 years | Long-term storage |
| Mylar Bag + Oxygen Absorber | 2+ years | Emergency supplies |

Credit: www.seedtopantry.com
Using Dehydrated Vegetables
Dehydrated vegetables are versatile. Here are some smart ways to use them:
- Snacking: Crunchy carrot or beet chips are healthy alternatives to potato chips.
- Soups and stews: Toss dried veggies into boiling water—they rehydrate quickly.
- Camping or hiking: Lightweight, space-saving meals for travel.
- Smoothies: Powder dried greens for a nutrient boost.
- Baking: Add dried tomatoes or peppers to bread or muffins.
To rehydrate, soak vegetables in hot water for 10–30 minutes. For most recipes, you can add dried vegetables directly—just add extra liquid to your dish.
Two More Practical Insights
- Make Your Own Vegetable Powder: Blend dried vegetables into a powder. Use in soups, sauces, or as a seasoning.
- Combine Vegetables Before Storing: Mix several types for ready-to-use soup or meal mixes.
Troubleshooting Common Problems
Even with care, things can go wrong. Here’s what to watch for:
Uneven Drying
If some pieces dry faster than others:
- Make sure slices are the same thickness.
- Rotate trays and move vegetables around.
- Don’t overcrowd trays.
Burnt Or Overly Crispy Vegetables
If vegetables burn or become too crisp:
- Oven temperature may be too high. Use an oven thermometer for accuracy.
- Check more often near the end of drying.
- Thin leaves (like kale) dry faster—remove them early.
Mold Or Off Smells
If you find mold or musty smells:
- The vegetables were not fully dried.
- Always cool and “condition” vegetables before long-term storage.
Not Drying At All
If vegetables remain soft or sticky after hours:
- Oven may be too cool (below 120°F).
- Humidity in the kitchen may be high. Try drying on a less humid day.
Credit: gardening.usask.ca
Safety And Nutrition
Many people ask about nutrition loss during oven drying. The good news: most vitamins and minerals are preserved, especially if you use low heat and don’t over-dry.
A few tips for the healthiest results:
- Blanch briefly: Too much blanching can cause nutrient loss.
- Low and slow: Keep the oven at the lowest possible temperature.
- Store in the dark: Light destroys some vitamins.
Dried vegetables are still high in fiber, vitamins, and minerals. They are a smart way to add nutrition to your diet year-round.
When Not To Use Oven Drying
While oven dehydration works for most vegetables, there are a few exceptions:
- Very juicy vegetables: Cucumbers, celery, and lettuce shrink too much and lose all texture.
- Oily vegetables: Avocado and olives do not dry well and can spoil quickly.
- Very thick vegetables: Large pieces (like whole potatoes) won’t dry evenly.
For these, it’s better to use pickling, freezing, or other methods.
Oven Vs. Dehydrator Vs. Sun Drying
If you wonder how oven drying compares to other methods, here’s a quick comparison:
| Method | Pros | Cons |
|---|---|---|
| Oven Drying | Convenient, no extra equipment, works in any weather | Uses more energy, less precise temperature control |
| Dehydrator | Even drying, energy efficient, best for large batches | Requires buying a dehydrator |
| Sun Drying | Free energy, traditional method | Depends on weather, risk of pests/contamination, slowest |
Tips For Best Results
Here are some expert tips for better oven-dried vegetables:
- Test your oven’s lowest temperature before starting. Some ovens run hotter than the dial says.
- Check humidity in your kitchen. High humidity slows drying—try on a dry day.
- Use convection if possible. If your oven has a fan, turn it on.
- Slice evenly. Consistent size means consistent drying.
- Condition before storing. Always let vegetables sit in jars for a week before sealing tightly.
- Label everything. It’s easy to forget what’s inside a jar after a few months.
- Try small batches first. Practice with one tray before drying large amounts.
Saving Energy And Time
Oven drying uses more energy than a dehydrator. Here are ways to be efficient:
- Dry several trays at once.
- Dehydrate vegetables when you are home for the day—don’t leave the oven on overnight.
- Use oven heat for other tasks (like baking bread) while drying.
Cleaning Up
After drying, clean trays, racks, and the oven. Vegetable juices can stick and burn, making the next batch taste odd. Wash with warm, soapy water and let everything dry well before storing.
Final Thoughts
Dehydrating vegetables in the oven is simple, cost-effective, and rewarding. You don’t need special skills or equipment—just some patience and attention to detail. Once you’ve tried oven drying, you’ll have healthy snacks and cooking ingredients ready for months. With experience, you’ll learn which vegetables you like best and develop your own favorite mixes.
If you want to learn more about the science of dehydration and food safety, check out this resource from the National Center for Home Food Preservation.
Happy drying—and enjoy your homemade, healthy, and long-lasting vegetables.
Frequently Asked Questions
How Do I Know If My Dried Vegetables Are Safe To Eat?
Check for dryness—vegetables should be crisp or leathery with no wet spots. Store in airtight containers. If you see mold, moisture, or smell anything odd, don’t eat them.
Can I Dehydrate Vegetables In A Gas Oven?
Yes. Gas ovens work, but monitor the temperature closely. Gas ovens can have hot spots, so rotate trays often and keep the door slightly open for airflow.
Do I Need To Blanch All Vegetables Before Drying?
No. Only some vegetables, like carrots, green beans, and broccoli, need blanching to keep color and texture. Others, like mushrooms and peppers, can be dried raw.
How Do I Rehydrate Dried Vegetables For Cooking?
Soak dried vegetables in hot water for 10–30 minutes, or add them directly to soups and stews with extra liquid. For powder, stir directly into sauces or smoothies.
How Long Will Oven-dried Vegetables Last?
With proper storage—cool, dark, and airtight—most oven-dried vegetables last 6–12 months. For the longest life, use vacuum-sealed bags or Mylar with oxygen absorbers.
Credit: www.aces.edu