
If your Oster oven stops working or does not cook food as it should, it can be frustrating. Many people think they need to buy a new oven when problems start. But in reality, most common issues with Oster ovens can be fixed at home. You do not need to be an expert or have special tools. With a little patience and the right steps, you can bring your oven back to life, save money, and avoid the hassle of shopping for a new appliance.
This detailed guide will walk you through all the important steps to fix an Oster oven. You will learn how to troubleshoot different problems, repair or replace faulty parts, clean and maintain your oven, and know when it is time to call a professional.
By the end, you will have the confidence and knowledge to handle almost any Oster oven problem.
Understanding Your Oster Oven
Before you start fixing, it helps to know some basics about your Oster oven. Oster ovens come in several models, such as toaster ovens, convection ovens, and air fry ovens. Most of these ovens use electricity to heat up, and they have similar components:
- Heating elements: These are metal coils that get hot when electricity passes through them.
- Thermostat: This controls the oven temperature.
- Timer and controls: These let you set how long and how hot the oven should cook.
- Door and seals: Keep the heat inside.
- Fan (for convection models): Circulates hot air for even cooking.
Understanding these parts makes troubleshooting much easier. If you are not sure about your model, check the sticker or plate on the back or bottom of the oven. The user manual is also helpful. You can often find a digital copy on Oster’s official website.
Safety First: What You Must Know
Working on any electric appliance has risks. Before you open your Oster oven or try any repairs, always:
- Unplug the oven from the wall. Never work on an appliance that is still connected to power.
- Let the oven cool down. Some parts stay hot for a long time.
- Use dry hands and tools. Water and electricity are dangerous together.
- Wear safety gloves if you need to handle sharp or hot parts.
If you see burnt wires, smell burning, or see smoke, stop and call a professional. Some problems, like exposed wires, can cause fires or electric shocks.
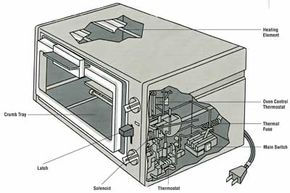
Credit: home.howstuffworks.com
Diagnosing Common Oster Oven Problems
Most Oster oven issues fall into a few common categories. Here are the main problems and how to recognize them:
1. Oven Does Not Turn On
- No lights, no heat, and no sound.
- The oven stays completely “dead” even after plugging in.
2. Oven Does Not Heat Up
- Controls work, light turns on, but no heat is produced.
- Food stays cold or only slightly warm.
3. Uneven Cooking
- Food is burnt on one side and raw on the other.
- Some areas are hotter or colder inside the oven.
4. Timer Or Controls Not Working
- Buttons do not respond.
- Timer does not count down or gets stuck.
5. Door Issues
- Door will not close tightly.
- Heat escapes or the oven does not start because of the door.
6. Strange Noises Or Smells
- Humming, buzzing, or clicking sounds.
- Burning, plastic, or chemical smells.
Correctly diagnosing the problem is the first step in fixing your Oster oven. Always start by describing the symptoms clearly.
Quick Fixes: Try These First
Sometimes the solution is simple. Before you take the oven apart, try these easy steps:
- Check the power source: Plug another device into the same outlet to see if it works.
- Inspect the power cord: Look for cuts, cracks, or damage. A broken cord is a safety risk.
- Reset the oven: Some Oster models have a reset button. Press it and see if the oven works.
- Clean the oven: Built-up crumbs and grease can block sensors or heating elements.
- Check the door: Make sure it closes fully. Many ovens will not start if the door is open or not sealed.
If your oven still does not work after these steps, you will need to dig deeper.
Fixing Power Problems
If your Oster oven does not turn on, the problem is usually with the power supply, cord, or internal fuse.
Checking The Power Cord And Plug
- Unplug the oven and inspect the cord for any visible damage.
- Wiggle the cord gently near the plug. If the oven turns on and off, the cord is faulty.
- If you see any burn marks or melted plastic, do not use the oven until you replace the cord.
Replacing The Power Cord
Replacing a power cord is not very difficult. You need a screwdriver and a replacement cord (available online or at hardware stores).
Steps:
- Unplug the oven.
- Unscrew the back panel to access the cord connection inside.
- Carefully disconnect the old cord (take a photo to remember where each wire connects).
- Attach the new cord in the same way, screw the panel back on, and test.
Tip: Always use a cord rated for the same voltage and wattage as your oven.
Checking And Replacing The Internal Fuse
Some Oster ovens have a thermal fuse inside. This fuse breaks if the oven overheats, cutting off all power.
- To check the fuse, open the back panel and locate the fuse (it looks like a small tube or disc).
- Use a multimeter to test for continuity. If there is no continuity, the fuse is blown.
- Replace with a fuse of the same rating.
Non-obvious insight: Many people overlook the fuse because it is hidden inside. If your oven is totally dead but the cord is fine, check the fuse before replacing the whole oven.
Fixing Heating Problems
If your Oster oven turns on but does not get hot, the heating element is the likely cause. In some cases, it could also be the thermostat or control board.
Inspecting Heating Elements
- Open the oven door and look at the metal rods (usually two: Top and bottom).
- If one element stays cool while the other gets hot, that element is faulty.
- Sometimes, a broken element will have a visible crack or dark spot.
Replacing A Heating Element
You can order a replacement heating element for most Oster models. The process is usually:
- Unplug the oven and let it cool.
- Remove any trays or racks.
- Unscrew the cover plate inside (usually at the ends of the heating element).
- Gently pull out the faulty element and disconnect the wires.
- Connect the new element, secure it, and reassemble.
Practical tip: Take clear photos during disassembly so you remember how everything fits together.
Checking The Thermostat
The thermostat controls the oven’s temperature. If it fails, the oven might not heat at all, or it could get too hot.
- Use a multimeter to check if the thermostat has continuity (electricity can pass through).
- If not, replace it with the same type.
Non-obvious insight: Sometimes a failing thermostat will work sometimes and fail at other times. If your oven heats up only occasionally, suspect the thermostat.
Fixing Uneven Cooking
Uneven cooking is a frequent complaint with toaster and convection ovens. The causes are usually:
- Faulty or dirty heating elements
- Broken convection fan (for models with a fan)
- Blocked air vents
Cleaning The Oven Thoroughly
- Grease and crumbs can block heat or airflow.
- Remove all racks and trays.
- Use a soft brush and damp cloth to clean heating elements (do not use water directly).
- Wipe the inside walls and door seals.
Checking The Convection Fan
- Listen for a gentle fan noise when the oven is on.
- If the fan does not spin, unplug the oven and open the back panel.
- Check for loose wires or objects blocking the fan.
- Replace the fan if it is burned out.
Data Table: Common Causes of Uneven Cooking
| Cause | How to Identify | Solution |
|---|---|---|
| Dirty heating element | Food residue, visible grime | Clean element gently |
| Broken convection fan | No fan noise, uneven browning | Repair or replace fan |
| Blocked air vents | Poor airflow, hot spots | Clear vents, remove obstructions |
Pro tip: Always place food in the center of the rack and avoid blocking vents with large pans.
Fixing Timer And Control Problems
Digital controls and timers can fail due to moisture, dirt, or wear.
Resetting The Controls
- Unplug the oven for at least one minute.
- Plug it back in and try the controls again.
- This “soft reset” clears minor glitches.
Cleaning The Control Panel
- Dampen a cloth with a little vinegar and water (never spray directly).
- Wipe buttons and dials to remove grease and grime.
- For sticky buttons, use a cotton swab.
Replacing The Control Board
If buttons or the display still do not work, the control board may be faulty.
- Order the correct board for your Oster model.
- Remove the back panel and carefully unplug the wires from the old board.
- Attach the new board and reassemble.
Common mistake: Not labeling wires before removing them. Always mark or photograph each connection.
Fixing Door And Seal Issues
If your oven door will not close, or heat escapes, you will not get good results. Most door issues come from:
- Worn or broken door gasket (the rubber seal around the door)
- Bent or misaligned door hinges
Replacing The Door Gasket
- Gently pull out the old gasket.
- Clean the gasket groove.
- Press the new gasket into place, making sure there are no gaps.
Fixing Door Hinges
- Open the oven and check for loose or bent hinges.
- Tighten screws or gently bend the hinge back if possible.
- If the hinge is broken, order a replacement.
Non-obvious insight: Even a small gap in the gasket can lose a lot of heat. Always check the seal if your oven is not getting hot.
Dealing With Strange Noises Or Smells
New noises or smells are warning signs.
Common Noises
- Buzzing: May mean a loose wire or failing fan.
- Clicking: Some clicking is normal as the thermostat turns on and off, but loud or fast clicks may mean a problem.
- Grinding: Usually a fan motor with debris or worn bearings.
Common Smells
- Burning: Could be food residue or a failing electrical part.
- Chemical or plastic: May be plastic touching a hot element or damaged wiring.
What to do:
- Unplug the oven and let it cool.
- Inspect for visible debris or melted plastic.
- If you smell burning plastic, do not use the oven until you fix the issue.
Pro tip: Running the oven empty at 350°F (180°C) for 10 minutes after cleaning can burn off leftover smells.
Replacing Parts: Where To Find And How To Choose
When you need to replace a part, always:
- Use the exact model number from your oven.
- Order from official or trusted suppliers. Oster’s website lists official parts.
- If using a third-party part, check reviews and ratings.
Comparison Table: Official vs. Third-Party Oster Oven Parts
| Source | Price Range | Warranty | Reliability |
|---|---|---|---|
| Official Oster Parts | Higher | Yes | High |
| Third-Party Parts | Lower | Sometimes | Varies |
Tip: For critical parts like thermostats and heating elements, official parts are safer.
Cleaning And Maintenance Tips
Regular cleaning and care can prevent most Oster oven problems.
Daily And Weekly Tasks
- Wipe down the exterior and control panel.
- Remove crumbs from the bottom tray.
- Clean the door glass with a non-abrasive cleaner.
Monthly Tasks
- Remove and soak racks and trays in warm, soapy water.
- Check the door gasket for cracks.
- Inspect the power cord and plug.
Every 6 Months
- Deep-clean the inside of the oven.
- Check for loose screws or parts.
- Run the oven empty to burn off any residue.
Maintenance Table: Cleaning Frequency Guide
| Task | Frequency |
|---|---|
| Wipe exterior | Weekly |
| Clean crumb tray | After each use |
| Deep clean interior | Every 6 months |
| Check gasket and cord | Monthly |
Non-obvious insight: Many heating issues are caused by dirty crumb trays, which can block heat or even cause smoke.

Credit: www.reddit.com
When To Call A Professional
Some oven problems are best left to experts:
- If you see burnt wires, melted plastic, or scorch marks inside the oven.
- If the control board is badly damaged or has visible cracks.
- If you smell gas (for models with a gas option, rare in Oster ovens).
- If you are not comfortable working with electricity.
Professional repair may cost $50–$150, but it is safer than risking injury or fire.
Preventing Future Problems
Taking care of your Oster oven will help it last longer and work better.
- Do not overload the oven. Too much food can block heat and airflow.
- Avoid using metal utensils inside, which can damage the interior.
- Do not use harsh chemicals for cleaning—mild soap and water are best.
- Let the oven cool before cleaning or moving.
- Store the oven in a dry place to prevent rust and electrical issues.
Non-obvious insight: Placing the oven on a stable, level surface prevents vibration and extends the life of moving parts like fans and hinges.
Oster Oven Troubleshooting At A Glance
Here is a quick reference for the most common problems and solutions:
- No power: Check power cord, outlet, fuse.
- No heat: Inspect heating elements, thermostat.
- Uneven cooking: Clean oven, check fan.
- Timer/control issues: Clean panel, reset, replace board.
- Door problems: Replace gasket, adjust hinges.
- Strange noises/smells: Clean oven, check for debris, inspect wires.
If these steps do not fix the problem, contact Oster customer service or a professional repair person.
Frequently Asked Questions
What Should I Do If My Oster Oven Keeps Shutting Off?
If your oven turns off by itself, first check the power cord and plug for any damage. Make sure the outlet is working. Sometimes, a faulty thermostat or overheating sensor can cause the oven to shut down. Clean the vents and make sure nothing is blocking airflow. If the problem continues, the internal fuse or control board may need replacement.
How Can I Find The Model Number For My Oster Oven?
The model number is usually found on a sticker or metal plate on the back or bottom of the oven. It will look like a series of numbers and letters. If you cannot find it, check your user manual or visit the official Oster website for help.
Why Does My Oster Oven Make A Loud Buzzing Noise?
A loud buzzing noise often means there is a loose wire, a failing fan, or a problem with the heating element. Unplug the oven and check for any loose parts or debris inside. If the noise continues, the fan or another internal part may need replacement.
Is It Safe To Use My Oster Oven If The Door Does Not Close Tightly?
No, it is not safe. A loose door lets heat escape, which can cause the oven to overheat or cook unevenly. It can also be a fire risk. Replace the door gasket or fix the hinges before using the oven again.
Where Can I Find Replacement Parts For My Oster Oven?
You can buy official parts from the Oster website or from trusted appliance part stores. Always use the exact model number to find the correct part. Some third-party suppliers also offer compatible parts, but make sure to check reviews and ratings before buying. For more information, check this Oster official support page.
Fixing an Oster oven does not have to be difficult or expensive. Most common problems can be solved at home with simple tools and a little patience. By understanding your oven, following safety steps, and using the tips in this guide, you can keep your Oster oven working well for years. Always remember: if you feel unsure or see signs of serious damage, it is best to call a professional. Your safety—and your great cooking—come first.

Credit: www.youtube.com