
If you’ve just finished a construction or renovation project, you probably notice a stubborn problem—construction dust. This fine dust seems to hang in the air, settle everywhere, and make your room feel dirty and unhealthy. Many people think sweeping or mopping is enough, but construction dust is much harder to remove. It can affect your breathing, irritate your skin, and even damage electronics. Getting rid of construction dust in the air requires more than just basic cleaning. In this guide, you’ll learn practical, proven steps to clear your room’s air and make it safe again. We’ll cover why dust is a problem, how to clean, what tools to use, and mistakes to avoid. If you follow these steps, your room will feel fresh, comfortable, and healthy.
Why Construction Dust Is Dangerous
Construction dust is more than just a mess. These tiny particles come from drywall, cement, wood, paint, and other materials. Many types of dust are microscopic, which means you can’t see them, but they can float in the air for hours.
- Health risks: Construction dust can cause breathing problems, trigger allergies, and irritate your eyes and skin. Some dust contains chemicals that are harmful if inhaled.
- Long-lasting: Dust can settle deep into carpets, furniture, and air vents. It can keep recirculating unless you remove it properly.
- Hidden danger: Even if your room looks clean, dust may still be in the air or trapped in hidden places.
According to the World Health Organization, exposure to construction dust can increase the risk of respiratory illnesses, especially if you have asthma or allergies.
Understanding The Types Of Construction Dust
Not all dust is the same. Knowing what you’re dealing with helps you use the right cleaning method.
Common Types
- Drywall dust: Very fine, white or gray, easy to breathe in.
- Wood dust: Larger particles, may settle faster, but still floats in the air.
- Cement dust: Heavy, but can include tiny particles.
- Paint particles: Sticky, may carry chemicals.
- Metal dust: Rare, but sharp and can damage lungs.
- Fiberglass dust: Can irritate skin and eyes.
Particle Size Comparison
Below is a comparison table showing the sizes of common construction dust particles and their behavior in the air:
| Type | Average Particle Size (microns) | Floats in Air | Health Risk |
|---|---|---|---|
| Drywall Dust | 0.5 – 5 | Yes, for hours | High |
| Wood Dust | 5 – 50 | Some particles | Medium |
| Cement Dust | 1 – 10 | Yes | High |
| Paint Particles | 0.5 – 2 | Yes | High |
| Fiberglass Dust | 1 – 5 | Yes | High |
Some particles are so small that even HEPA filters struggle to catch them. That’s why removing dust from the air needs a smart approach.
How Construction Dust Moves And Settles
Many people think dust just falls to the ground, but construction dust behaves differently.
- Airflow: When you open a window or turn on a fan, dust can move and stay airborne longer.
- Static electricity: Some particles stick to walls, ceilings, and electronics.
- HVAC systems: Air conditioners and heaters can spread dust throughout your room.
Pro tip: Dust can stay in the air for up to 8 hours after construction, depending on ventilation and particle size.
Preparing Your Room For Dust Removal
Before you start cleaning, set up your room for maximum safety and efficiency.
- Wear protective gear: Use a mask, goggles, and gloves. Don’t skip this step—even small exposure can cause irritation.
- Remove soft items: Take out pillows, rugs, curtains, and bedding. Wash them separately.
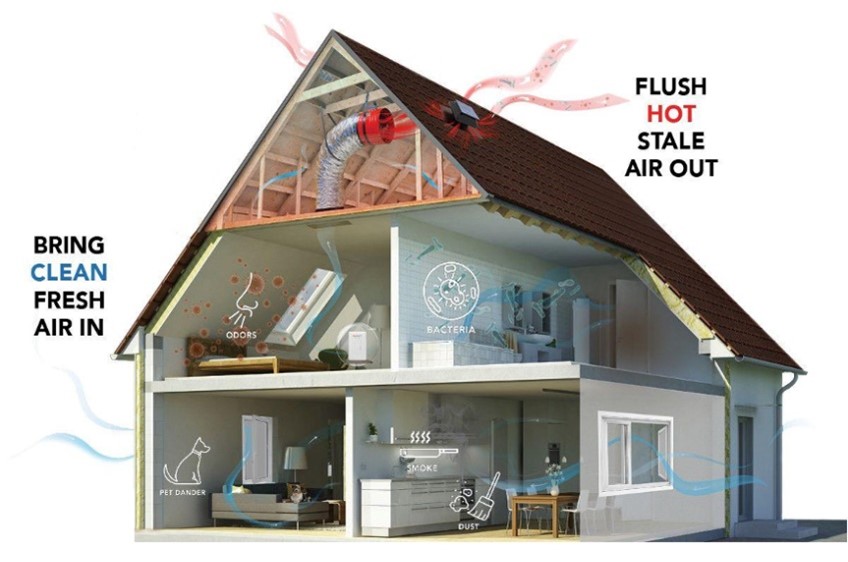
- Seal off vents and doors: Use plastic sheets or tape to cover air vents and door gaps. This prevents dust from spreading to other rooms.
- Turn off HVAC: If possible, shut off heating or air conditioning to avoid spreading dust.
By preparing your room, you reduce the risk of dust moving to other spaces and protect your health.
Credit: basc.pnnl.gov
Step-by-step Guide: Removing Construction Dust From The Air
Cleaning up construction dust is a process. It’s not just one action. Let’s break down each step so you don’t miss anything.
Step 1: Vacuum The Room With A Hepa Filter
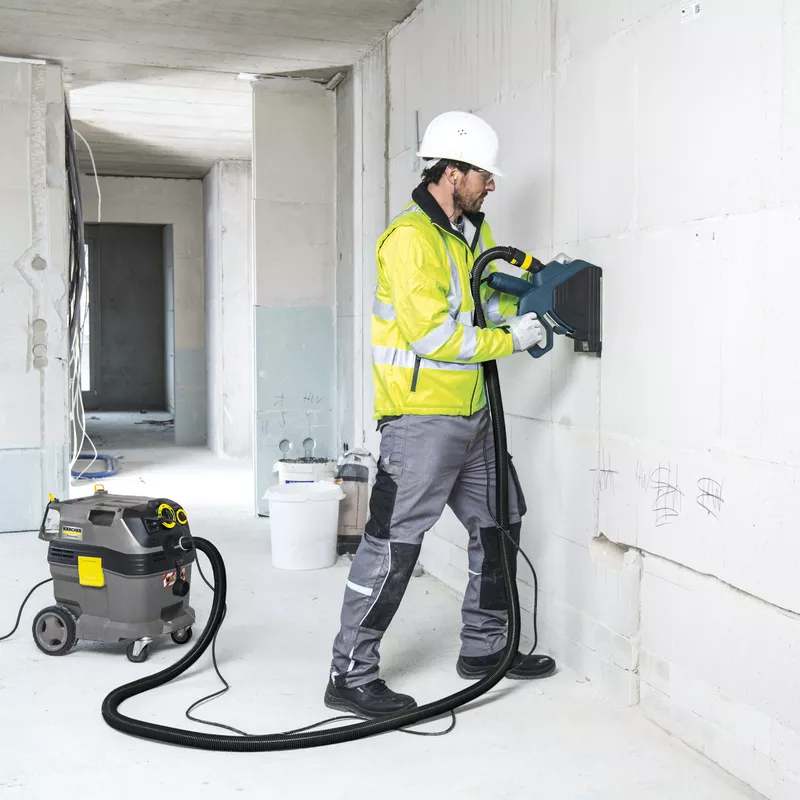
Standard vacuums usually blow dust back into the air. Use a HEPA filter vacuum—this is designed to trap tiny particles.
- Vacuum every surface: Floors, walls, ceilings, furniture.
- Go slow: Fast vacuuming stirs up dust.
- Repeat: After vacuuming once, let dust settle, then repeat.
HEPA filter vacuums remove 99.97% of particles as small as 0.3 microns. This makes them ideal for construction dust.
Step 2: Wipe Down Surfaces With Damp Cloths
Dry dusting just moves dust around. Use a damp microfiber cloth.
- Wipe all surfaces: Shelves, windowsills, doors, light fixtures.
- Change cloths often: Don’t use one cloth for the whole room.
- Avoid soaking: Wet cloths should be damp, not dripping.
Microfiber cloths attract dust better than cotton and reduce the chance of dust returning to the air.
Step 3: Clean Air With Air Purifiers
Air purifiers with HEPA filters are very effective. They pull dust from the air and trap it.
- Place purifier in the center of the room.
- Run it for 24–48 hours after cleaning.
- Change the filter regularly.
Some air purifiers also have activated carbon filters that remove odors and chemicals.
Step 4: Let Fresh Air In (ventilation)
Open windows and doors to let fresh air push dust out.
- Cross ventilation: Open windows on opposite sides for best airflow.
- Avoid windy days: Too much wind can stir up settled dust.
- Combine with fans: Place a fan facing out of the window to blow dust outside.
Ventilation is one of the easiest ways to reduce airborne dust, but only do it when outside air is clean.
Step 5: Mop Floors With Clean Water
After vacuuming and wiping, mop the floors.
- Use clean water and change often.
- Mop slowly, starting from the farthest corner.
- Don’t use dry mops: They spread dust.
For wood floors, use a damp mop with a mild cleaner. For tile, water is enough.
Step 6: Clean Hvac And Air Ducts
If your room has air conditioning or heating, dust may be in the ducts.
- Clean or replace filters.
- Wipe vent covers with a damp cloth.
- Consider professional duct cleaning if dust is severe.
HVAC systems can keep spreading dust unless you clean them. This is a step many people forget.
Step 7: Wash Soft Items Separately
Dust settles on fabrics easily.
- Wash curtains, bedding, pillows, and rugs.
- Use hot water for best results.
- Dry items in a clean area.
Don’t put items back until the room is fully clean.
Step 8: Use A Dehumidifier
Dust sticks less in dry air. A dehumidifier can help reduce dust floating.
- Set humidity to 40–50%.
- Clean the unit’s filter often.
This step is especially useful if your area is humid or if construction involved water.
Step 9: Repeat Cleaning Steps
Dust removal is not a one-time job. After a day, some dust will settle again.
- Vacuum and wipe surfaces again after 24 hours.
- Run the air purifier until you notice less dust.
Repeating these steps ensures you get rid of dust that was airborne during your first cleaning.
Choosing The Right Tools And Products
Not all cleaning tools are equal. Picking the right ones saves you time and improves your results.
Hepa Filter Vacuum Vs. Regular Vacuum
| Feature | HEPA Filter Vacuum | Regular Vacuum |
|---|---|---|
| Particle Capture | 99.97% of particles down to 0.3 microns | Misses fine dust |
| Air Quality | Improved | Can worsen |
| Cost | Higher | Lower |
| Use for Construction Dust | Recommended | Not recommended |
Air Purifier Features
Look for these features in an air purifier:
- True HEPA filter
- Activated carbon filter (for odors)
- High CADR rating (Clean Air Delivery Rate)
- Quiet operation
- Easy filter replacement
Microfiber Cloths Vs. Cotton Cloths
Microfiber cloths have tiny fibers that trap dust better. Cotton cloths often push dust around.
Pro insight: Using the wrong tool can leave dust behind or send it back into the air. Invest in quality products for best results.
Credit: www.coit.com
Advanced Methods For Persistent Dust
Sometimes, basic cleaning is not enough. If you still notice dust after cleaning, try these advanced methods.
Electrostatic Dusting
Electrostatic dusters use static electricity to attract dust. They are good for electronics and hard-to-reach places.
Negative Air Machines
These machines create negative air pressure to pull dust out of a room. Mostly used by professionals during large construction projects.
Professional Cleaning Services
If dust is severe, hire professionals. They use commercial-grade tools and know how to remove dust safely.
Uv Light Air Purifiers
Some air purifiers use UV light to kill germs and break down particles. This is useful if your construction involved chemicals or mold.
Common Mistakes To Avoid
Many people make mistakes when cleaning construction dust. Avoid these to get the best results.
- Skipping the air purifier: It’s not enough to clean surfaces. Dust stays in the air.
- Using a regular vacuum: This spreads dust instead of removing it.
- Dry dusting: Dry cloths release dust back into the air.
- Not cleaning vents: HVAC systems can keep spreading dust.
- One-time cleaning: Dust settles over time, so repeat cleaning.
- Ignoring soft items: Fabrics trap dust and can release it later.
- Poor ventilation: Not opening windows keeps dust trapped.
Pro tip: Many beginners forget to clean ceiling fans and light fixtures. Dust collects there and falls later.
How Long Does It Take To Remove Construction Dust?
Cleaning up construction dust is not a quick job. The time depends on room size, amount of dust, and cleaning methods.
- Small room, light dust: 2–4 hours
- Medium room, moderate dust: 4–6 hours
- Large room, heavy dust: 6–12 hours (may need to split into multiple days)
After the initial cleaning, continue using an air purifier and repeat cleaning for several days. Don’t rush—thorough cleaning protects your health.
Special Tips For Sensitive Groups
Some people are more sensitive to construction dust, including children, elderly, and those with asthma or allergies.
- Keep them away during cleaning.
- Use extra air purifiers.
- Wash hands and face after cleaning.
- Consider professional cleaning for severe cases.
Monitoring Air Quality After Cleaning
You can’t always see dust, but you can measure it.
Using Air Quality Monitors
Air quality monitors measure PM2.5 and PM10 levels. These numbers show how much fine dust is in the air.
- PM2.5 below 35 μg/m³ is considered safe.
- PM10 below 50 μg/m³ is acceptable.
If levels stay high after cleaning, repeat steps or use more air purifiers.
Checking For Residual Dust
Run your finger over surfaces after a day. If you notice a thin layer of dust, repeat cleaning.
Real-life Example: Dust Removal After Renovation
Imagine you just renovated your bedroom. Drywall dust is everywhere. Here’s how one homeowner handled it:
- Removed all bedding and curtains.
- Vacuumed floors and walls with a HEPA vacuum.
- Wiped every surface with damp microfiber cloths.
- Ran two air purifiers for 48 hours.
- Opened windows for cross ventilation.
- Cleaned vents and replaced HVAC filters.
- Washed all fabrics in hot water.
- Used an air quality monitor—PM2.5 dropped from 120 to 22 μg/m³.
This shows that with a systematic approach, you can remove most dust in 2–3 days.
Credit: www.kaercher.com
Cost Breakdown: Dust Removal Tools
Cleaning construction dust can cost money, but some items are worth the investment.
| Item | Average Cost | Importance |
|---|---|---|
| HEPA Vacuum | $100–$300 | Essential |
| Air Purifier | $80–$250 | Highly recommended |
| Microfiber Cloths | $10–$20 (pack) | Essential |
| Dehumidifier | $150–$300 | Optional |
| Air Quality Monitor | $60–$150 | Useful |
| Professional Cleaning | $200–$800 | For severe cases |
Insight: You don’t have to buy everything. Focus on the essentials—HEPA vacuum, air purifier, and microfiber cloths.
How To Prevent Future Construction Dust
Dust removal is hard, so preventing it is even better.
- Seal off construction areas with plastic sheets.
- Use dust barriers and closed doors.
- Ask contractors to use dust control measures.
- Clean as you go during construction.
- Change HVAC filters after any renovation.
Pro insight: Prevention saves you time, effort, and health risks.
Practical Advisor’s Hidden Tips
As someone who’s helped many homeowners, here are two insights most people miss:
- Clean from top to bottom: Always start at the ceiling and move down. Dust falls, so you don’t want to clean floors first.
- Let dust settle: After initial cleaning, wait 2–3 hours before repeating. This gives airborne dust time to settle, so you can catch it in your second round.
These tips make your cleaning more effective and save you effort.
Frequently Asked Questions
How Dangerous Is Construction Dust In The Air?
Construction dust can cause breathing problems, allergies, and skin irritation. Fine particles, especially from drywall or cement, are harmful if inhaled. Some types contain chemicals or fiberglass, which are even more dangerous.
Can I Use A Regular Vacuum To Remove Construction Dust?
No. Regular vacuums often blow dust back into the air. Use a HEPA filter vacuum—it traps tiny particles and improves air quality.
How Long Does Dust Stay In The Air After Construction?
Depending on particle size and airflow, dust can float for hours. Small particles may stay airborne for up to 8 hours. Good ventilation and air purifiers help clear dust faster.
Should I Clean Air Ducts After Construction?
Yes. Air ducts and vents can trap and spread dust. Clean or replace filters and wipe vent covers. For heavy dust, consider professional duct cleaning.
What Is The Best Way To Keep Construction Dust From Returning?
Prevent dust by sealing off construction areas, using dust barriers, and cleaning as you go. Change HVAC filters after renovation, and run air purifiers for several days.
Removing construction dust from your room’s air takes patience and the right tools. With these steps, your space will feel healthy, comfortable, and safe again. For more details on air quality and dust control, see the EPA Indoor Air Quality resources. If you follow this complete guide, you’ll avoid common mistakes and protect your health, making your room truly clean and dust-free.