
Removing an Oatey Caspers shower drain can seem like a big job, especially for those with little plumbing experience. You might be renovating your bathroom, dealing with a leak, or simply replacing an old drain. Whatever the reason, understanding the right steps and tools is essential.
Many homeowners worry about damaging their shower base or pipes during the process. The good news is that with clear instructions, the right tools, and a bit of patience, you can remove an Oatey Caspers shower drain safely and efficiently.
In this guide, you’ll learn everything you need to know about Oatey Caspers shower drain removal. We’ll cover how these drains work, what tools you need, step-by-step removal instructions, troubleshooting common problems, and extra tips for a smooth project. You’ll also discover how to avoid costly mistakes that beginners often make.
By the end, you’ll feel confident handling this task on your own.
Understanding Oatey Caspers Shower Drains
Oatey Caspers shower drains are widely used in residential and commercial bathrooms. They’re known for their durability and ease of installation. Before you start the removal process, it’s helpful to know how these drains are built.
These drains usually have a strainer cover, a drain body, and a locking ring. Some models use a compression gasket, while others are solvent-welded to the drain pipe. The design allows water to flow efficiently while blocking debris, but over time, drains can become clogged or worn out. Understanding your drain’s model and connection type will save time during removal.
Different Oatey Caspers drains may look similar, but small differences affect removal. For example, some models have a visible screw in the strainer, while others use snap-in covers. Knowing which you have means less risk of damaging the shower base.
Tools And Materials Needed
Having the right tools is a key part of successful shower drain removal. Using improper tools can make the process harder and even cause permanent damage.
Here’s a list of tools and materials you’ll typically need:
- Screwdriver (flathead and Phillips, depending on your drain cover)
- Channel-lock pliers or slip-joint pliers
- Drain removal wrench or an internal pipe wrench
- Hammer (for gentle tapping if parts are stuck)
- Utility knife (for cutting caulk or sealant)
- Adjustable wrench
- Mini hacksaw (for cutting plastic drain bodies)
- Shop vacuum (to remove debris)
- Silicone caulk remover (optional, for old caulk)
- Gloves and safety glasses for protection
- Towel or rag (to protect surfaces)
Some Oatey Caspers drains have unique locking mechanisms. If you’re unsure about your model, bring a photo to your local hardware store. They can help you identify the right tool.
Pro Tip: If you plan to install a new drain, keep the old parts in case you need to compare sizes or fittings.
Preparing For Removal
Preparation helps prevent surprises. Before touching any tools, take a few minutes to prepare the work area and gather information.
Identify Your Drain Model
Check if your shower drain is screw-in, snap-in, or solvent-welded. Each type has a slightly different removal process. Look for brand markings or model numbers on the strainer or flange.
Clear The Area
Remove shampoo bottles, mats, and anything else near the drain. Lay a towel or drop cloth to protect the shower base from scratches. If possible, wear gloves to avoid contact with old water or grime.
Turn Off Water (if Needed)
You usually don’t need to shut off the water supply for drain removal, but if you’re working on a larger project, turning off the main water can prevent accidental leaks.
Protect The Drainpipe
Once the drain cover is off, you may expose the drainpipe. Place a rag inside the opening to stop debris from falling in.
Many DIYers skip this step and end up with lost screws or caulk inside the drain.
Step-by-step Oatey Caspers Shower Drain Removal
Follow these steps closely for a smooth, damage-free removal process.
1. Remove The Drain Cover
Most Oatey Caspers drains have a strainer cover on top. Depending on your model, this may be held by screws or simply snapped in.
- For screw-in covers, use a flathead or Phillips screwdriver to remove the screws. Keep them in a safe place.
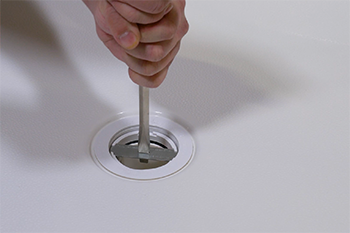
- For snap-in covers, gently pry around the edge with a flathead screwdriver. Work slowly to avoid cracking the cover or the shower base.
If the cover is stuck due to mineral buildup or old caulk, spray a little penetrating oil and let it sit for a few minutes.
2. Loosen The Locking Ring Or Compression Gasket
Under the cover, you’ll see the main drain body. Some Oatey Caspers drains use a locking ring or compression gasket to secure the drain to the pipe.
- For drains with a locking ring, use channel-lock pliers or a drain removal wrench to turn the ring counter-clockwise.
- If the ring is stuck, lightly tap the wrench with a hammer. This helps break loose any mineral buildup.
- For compression gaskets, you may need to insert a screwdriver into the notches and turn.
Be careful not to use excessive force. Old plastic can crack easily.
3. Cut Through Caulk Or Sealant
Many shower drains are sealed with caulk to prevent leaks. Use a utility knife or caulk remover to cut around the edge of the drain body.
- Make several gentle passes instead of one deep cut. This reduces the risk of scratching the shower base.
If you see silicone or plumber’s putty, scrape it away carefully.
4. Remove The Drain Body
Once the locking ring or gasket is loose, grip the drain body with pliers and pull upward. Some drains come out easily, while others may need gentle rocking.
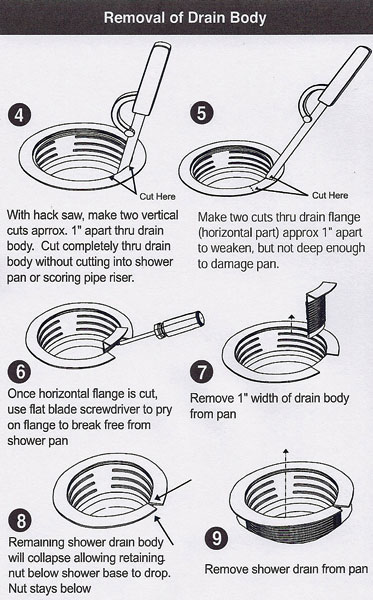
- For stubborn drains, insert an internal pipe wrench or use a mini hacksaw to cut the plastic drain body in sections.
- Never use a standard hacksaw blade directly inside the pipe—you could damage the pipe below.
If your drain is solvent-welded, you’ll need to cut the drain body and possibly the pipe below. This is more complex and may require replacement parts.
5. Clean The Drain Opening
After removal, clean the exposed area:
- Use a shop vacuum to remove debris, old caulk, and hair.
- Wipe the area with a damp cloth.
- Inspect the pipe for cracks or signs of water damage.
This is the best time to check for leaks or mold growth. Address any issues before installing a new drain.
6. Inspect And Measure
Before buying a new drain, measure the opening and pipe size. Oatey Caspers drains come in several sizes, usually 2-inch or 3-inch. Accurate measurement prevents installation problems later.
Write down all measurements, including depth and width. Take a photo if you need to show a hardware store associate.
Troubleshooting Common Problems
Even with careful work, you might face some unexpected issues during removal. Here’s how to handle the most common problems.
Stuck Or Corroded Screws
Older drains often have rusted screws. If a screw won’t budge:
- Spray penetrating oil and wait 15 minutes.
- Tap the screwdriver gently with a hammer to loosen corrosion.
- If the head strips, use a screw extractor or drill a small hole in the screw and use a removal bit.
Drain Body Won’t Move
Drains stuck by mineral buildup or old caulk can be tough. Try these methods:
- Apply heat with a hair dryer to soften caulk.
- Use a plastic putty knife to gently pry around the edge.
- If the drain is still stuck, cut through the body with a mini hacksaw in two or three places.
Damaged Shower Base
If you accidentally crack or chip the shower base:
- Stop immediately and assess the damage.
- Small chips can be filled with a shower base repair kit.
- Larger cracks may require professional repair or even replacement.
Broken Or Cracked Drain Pipe
Sometimes, the pipe below the drain is brittle or cracked. Do not install a new drain on a damaged pipe.
- Cut out the damaged section using a pipe cutter or mini hacksaw.
- Replace with the correct size pipe and coupling.
- Test for leaks before installing the new drain.
Hidden Leaks
If you find signs of water damage around the drain opening, fix leaks before moving forward.
- Use a flashlight to inspect the subfloor.
- If the leak is serious, consult a plumber. Ignoring leaks can cause mold and structural problems.
Comparing Oatey Caspers Drain Types
Different Oatey Caspers drains require slightly different removal steps. Here’s a comparison to help you identify your model:
| Drain Type | Attachment Method | Common Removal Tools | Difficulty Level |
|---|---|---|---|
| Screw-in | Screws secure strainer and body | Screwdriver, pliers | Easy |
| Snap-in | Clips or friction fit | Flathead screwdriver | Easy to Moderate |
| Solvent-welded | Glued to drain pipe | Hacksaw, pipe wrench | Moderate to Hard |
| Compression gasket | Rubber gasket with locking ring | Pliers, internal pipe wrench | Moderate |
Identifying your drain type before starting will save time and frustration.
Mistakes To Avoid
Many beginners make the same errors when removing Oatey Caspers shower drains. Here’s what to watch out for:
- Rushing the process — Going too fast often leads to cracked shower bases or stripped screws.
- Using the wrong tools — Improvised tools can break the drain or even injure you.
- Forgetting to protect the drainpipe — Dropping debris inside can cause future clogs.
- Not measuring before buying a new drain — Even a small size difference can stop a new drain from fitting.
- Ignoring leaks or damage — Installing a new drain on a damaged base leads to bigger repairs later.
Non-obvious insight: Many people skip cleaning the area after removal. Old caulk or debris can prevent a new drain from sealing properly, leading to leaks. Take time to clean thoroughly.
Advanced Tips For Difficult Drains
Some Oatey Caspers drains don’t come out easily, especially if installed decades ago or glued with strong adhesive. Here are advanced tips for tough jobs.
Use An Internal Pipe Wrench
An internal pipe wrench grips the inside of the drain body, allowing you to turn and pull up even stuck drains. It’s a lifesaver for solvent-welded models.
Cut The Drain In Sections
If the drain body won’t budge, use a mini hacksaw to cut it into three or four sections. Remove each piece gently. This technique works best for plastic drains.
Heat The Area
Applying gentle heat with a hair dryer can soften old caulk or adhesive, making removal easier. Don’t use an open flame, which can damage plastic and release fumes.
Apply Penetrating Oil
Spray penetrating oil around stuck parts and give it time to work. Old metal drains often come loose after a few applications.
Use A Shop Vacuum
If debris falls into the pipe, use a shop vacuum with a narrow attachment to suck it out. This prevents clogs and makes installation of the new drain smoother.
Credit: terrylove.com
What To Do After Removal
Once you’ve removed the Oatey Caspers shower drain, you’re halfway to a better shower experience. Here’s what to do next:
Inspect For Damage
Carefully check the pipe and shower base. Look for:
- Cracks or chips
- Signs of water leaks
- Mold or mildew under the old drain
Address any issues before moving forward.
Clean And Dry
Wipe the area dry and remove all old caulk. A clean surface helps the new drain seal properly, preventing leaks.
Prepare For Installation
Measure the new drain and compare with the opening. Gather all necessary tools and materials for the installation. If you need help, the Oatey website and many home improvement stores offer guides and videos.
When To Call A Professional
Not every shower drain removal goes smoothly. If you encounter any of these problems, consider calling a plumber:
- The drain is welded or sealed with metal and won’t budge
- There’s major damage to the shower base or subfloor
- You find hidden leaks or mold beyond your skill level
- The pipe below is cracked or corroded
Professional plumbers have tools and experience to fix problems quickly. They can also recommend the best new drain for your shower.
Safety Considerations
Removing a shower drain is usually safe, but there are some hazards to be aware of:
- Sharp tools: Always cut away from your body and wear gloves.
- Old water or mold: Use a mask and eye protection if you find mold or musty odors.
- Heavy lifting: If your shower base is heavy, ask for help to avoid injury.
Never force a stuck part. Take breaks if you get frustrated—most accidents happen when people rush.
Environmental Disposal Of Old Drains
After removal, don’t just toss the old drain in the trash. Shower drains contain metal, plastic, and sometimes hazardous materials.
- Check if your local recycling center accepts plumbing parts.
- Clean the drain before recycling.
- If the drain is metal, many scrap yards will accept it for recycling.
Proper disposal is good for the environment and may even earn you a few coins for scrap metal.

Credit: www.reddit.com
Comparing Diy Vs. Professional Removal
Is it worth doing the job yourself? Here’s a quick comparison:
| Factor | DIY Removal | Professional Removal |
|---|---|---|
| Cost | Low (tools and time only) | High (labor fees) |
| Time | 2–4 hours for most jobs | 1–2 hours (faster for pros) |
| Risk of Damage | Moderate (if inexperienced) | Low (experienced workers) |
| Learning Experience | High | Low |
| Warranty | None (unless DIY work fails) | Usually included |
Non-obvious insight: Even if you hire a pro, understanding the process helps you discuss your project confidently and avoid overpaying for unnecessary work.
Real-world Example: Removing A 10-year-old Oatey Caspers Drain
Let’s look at a real example. Sarah, a homeowner, noticed water leaking under her shower. She discovered her Oatey Caspers drain was over 10 years old.
Here’s how she solved the problem:
- Preparation: Gathered tools, identified her drain as a screw-in type, and cleared the area.
- Cover Removal: Removed two screws, but one was rusted. Used penetrating oil and a screw extractor.
- Locking Ring: Used pliers to loosen the ring. It was stuck due to hard water buildup, so she tapped gently with a hammer.
- Drain Body: Pulled out the drain body, cut old caulk, and vacuumed debris.
- Inspection: Found minor mold, cleaned with bleach, and repaired a small chip with a repair kit.
- Installation: After measuring, installed a new Oatey Caspers drain with a better seal.
Sarah’s biggest lesson: patience paid off. She avoided damaging her shower base and saved hundreds by doing it herself.
Credit: www.oatey.com
Maintenance Tips After Installing A New Drain
Once your new Oatey Caspers drain is installed, keep it in good shape with regular maintenance.
- Clean the strainer cover monthly to prevent clogs.
- Check for leaks every few months, especially after installation.
- Use enzyme-based drain cleaners instead of harsh chemicals.
- Reapply caulk if you notice gaps or cracks.
Routine maintenance extends the life of your shower drain and prevents costly repairs.
Additional Resources
If you want to learn more, visit the official Oatey website for detailed guides, product manuals, and installation videos. You’ll also find answers to technical questions and can download instructions for specific drain models.
Frequently Asked Questions
What Is The Easiest Way To Remove An Oatey Caspers Shower Drain?
The easiest way is to use the right tools for your drain type. Most screw-in drains come out with a screwdriver and pliers. For stuck or glued drains, an internal pipe wrench or mini hacksaw may be needed. Working slowly and using penetrating oil helps prevent damage.
Can I Remove An Oatey Caspers Shower Drain Without Damaging The Shower Base?
Yes, if you use the correct tools and cut carefully around the drain. Protect the base with a towel and avoid using excessive force. For stubborn drains, cut the body in sections instead of prying hard.
How Do I Know Which Oatey Caspers Drain I Have?
Look for brand markings or model numbers on the drain cover or body. Check the attachment method—screws, snap-in, or welded. If unsure, take a photo and compare with images on the Oatey website or at a hardware store.
What Should I Do If The Old Drain Is Glued (solvent-welded) To The Pipe?
You’ll need to cut the drain body and possibly a small section of the pipe below. Use a mini hacksaw or pipe cutter, then install a coupling and new drain. For beginners, this step is challenging and may require a plumber’s help.
Is It Safe To Use Chemical Drain Cleaners Before Removal?
Avoid harsh chemical drain cleaners before removing a drain. They can damage pipes and make the area unsafe to work in. If you need to clear a clog, use a shop vacuum or enzyme-based cleaner instead.
Removing an Oatey Caspers shower drain isn’t always easy, but with the right information, tools, and a careful approach, most homeowners can handle the job. Remember to work patiently, measure carefully, and consult professionals if needed. Your bathroom will be safer and leak-free when the job is done right.