
A kitchen island is often the heart of a modern kitchen. It offers extra workspace, a place for casual meals, and sometimes even a spot for homework or social gatherings. But there’s a practical side, too: power. Outlets on the kitchen island are essential for using blenders, charging devices, or plugging in a slow cooker. However, many people feel that visible outlets ruin the clean, stylish look of their kitchen island. The good news? There are many creative ways to hide outlets in a kitchen island—keeping them accessible, yet nearly invisible.
This guide explores all the best options to hide outlets in a kitchen island. You’ll discover what works for different island designs, what’s safe, and what building codes you need to keep in mind. You’ll also learn about outlet types, installation tips, and creative tricks that even experienced remodelers sometimes overlook.
Whether you’re planning a new kitchen or updating your current island, you’ll find practical, step-by-step advice to help you combine function and style.
Why Hide Outlets In A Kitchen Island?
The trend toward open-plan homes and minimalism means that every detail matters. Visible outlets can break the visual flow of a beautiful stone countertop or a sleek waterfall edge. But there’s more to it than just looks:
- Safety: Outlets placed out of sight are less likely to get wet or attract curious children’s attention.
- Cleanliness: Fewer gaps and crevices for crumbs or spills to collect.
- Resale value: A seamless look can make your kitchen more attractive to buyers.
- Personal comfort: It’s simply more pleasant to cook and entertain in a tidy, uncluttered space.
Understanding The Basics: Electrical Codes And Safety
Before you choose a way to hide outlets, it’s important to know the rules. In the United States, the National Electrical Code (NEC) sets standards for safety. For kitchen islands, the NEC typically requires:
- At least one GFCI-protected (Ground-Fault Circuit Interrupter) outlet on each island.
- Outlets must be installed in a way that they are accessible but not hazardous.
- Outlets cannot be placed where they might get wet from sinks or spills.
Local codes may have extra rules, so always check with your electrician or local building office. Never sacrifice safety or code compliance for style.
Credit: flushtek.com
Types Of Outlets Commonly Used In Kitchen Islands
Choosing the right outlet is just as important as deciding where to put it. Here are some popular types:
| Outlet Type | Best For | Pros | Cons |
|---|---|---|---|
| Standard GFCI Outlet | Basic power needs | Safe, inexpensive | Always visible unless hidden |
| Pop-up Outlet | Hidden power on demand | Disappears when not in use | More costly, requires more space |
| Recessed Outlet | Flush with surface or side | Low profile, less visible | Not totally hidden |
| USB/Smart Outlet | Charging devices | Modern, multipurpose | May need more wiring |
Understanding these options helps you match your needs with the best solution.
Clever Ways To Hide Outlets In A Kitchen Island
Let’s explore the most effective strategies to hide outlets without losing function or breaking code.
1. Pop-up Outlets
Pop-up outlets are one of the most popular hidden solutions today. When you need power, you press or pull and the outlet rises from the countertop. When you’re done, it disappears, leaving only a small cover.
Advantages:
- Completely hidden when not in use.
- Often includes multiple outlets and USB ports.
- Many are waterproof or spill-resistant.
Disadvantages:
- Requires a hole cut into your countertop (usually 3-4 inches in diameter).
- May not be suitable for natural stone if not installed properly.
- More expensive than basic outlets.
Practical Insight: Many homeowners don’t realize that pop-up outlets can sometimes void a countertop warranty if not installed by a certified professional. Always check with your countertop supplier before cutting.
Example: A round pop-up outlet can be installed near one corner of the island, keeping it away from the main prep area.
2. Under-counter Outlets
Mounting outlets under the countertop lip is a simple but effective way to hide them. The outlets are out of the line of sight, but easy to reach if you duck under a little.
Advantages:
- Keeps outlets off visible surfaces.
- No need to cut into the countertop itself.
- Easier and cheaper to install than pop-ups.
Disadvantages:
- Not as hidden if you’re sitting at the island.
- May be tricky for people with limited mobility.
Non-obvious Tip: Always use a tamper-resistant GFCI outlet for under-counter spots—kids and guests often reach here. Choose a location away from water sources.
3. Outlet Strips Under The Overhang
For islands with a breakfast bar or seating overhang, consider an outlet strip mounted on the underside of the overhang. When you need to plug something in, just reach under the edge.
Advantages:
- Completely hidden unless you crouch down.
- Can provide several outlets in a single strip.
- Good for charging multiple devices.
Disadvantages:
- Not as accessible for children or people with disabilities.
- Can be hard to reach if the overhang is deep.
Installation Tip: Use low-profile outlet strips and secure them with screws, not just adhesive, to prevent sagging.
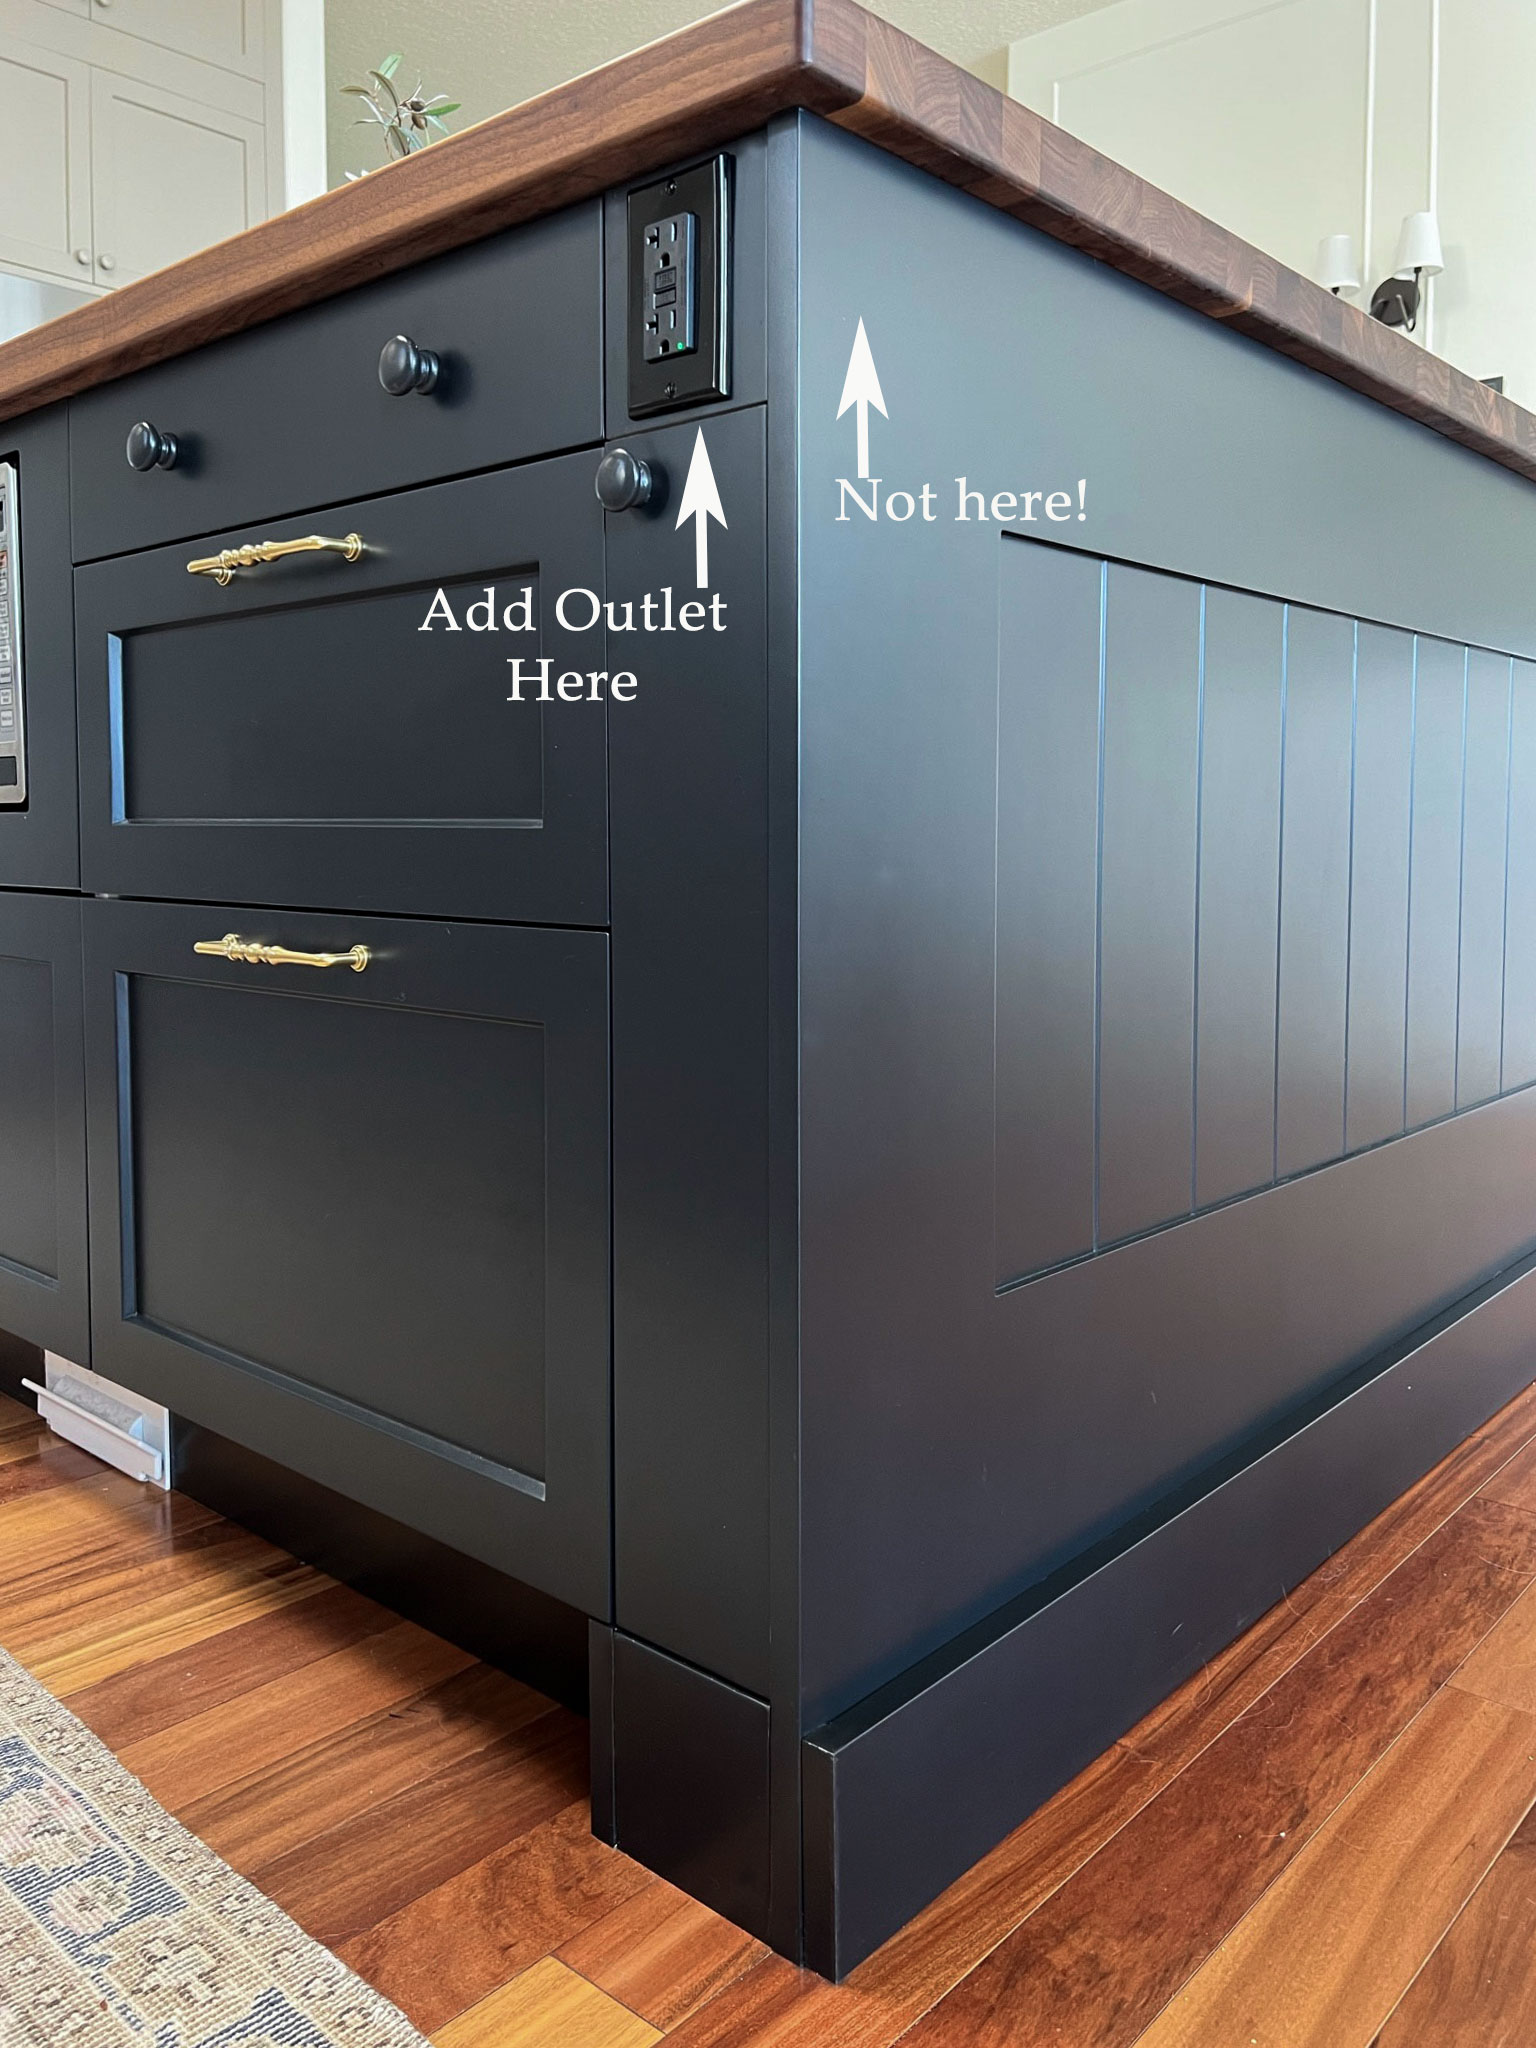
4. Side-mounted Outlets In Painted Panels
If your island has end panels or painted sides, you can place outlets low on the side, then paint the cover to match the panel. The outlet almost disappears against the background.
Advantages:
- Easy to install during construction or remodel.
- Inexpensive solution.
- Works with standard outlet boxes.
Disadvantages:
- Still visible if you look closely.
- May not suit all island designs.
Common Mistake: Many people use a white outlet cover on a dark panel, making it stand out. Always paint the cover or buy a color-matched one for a better blend.
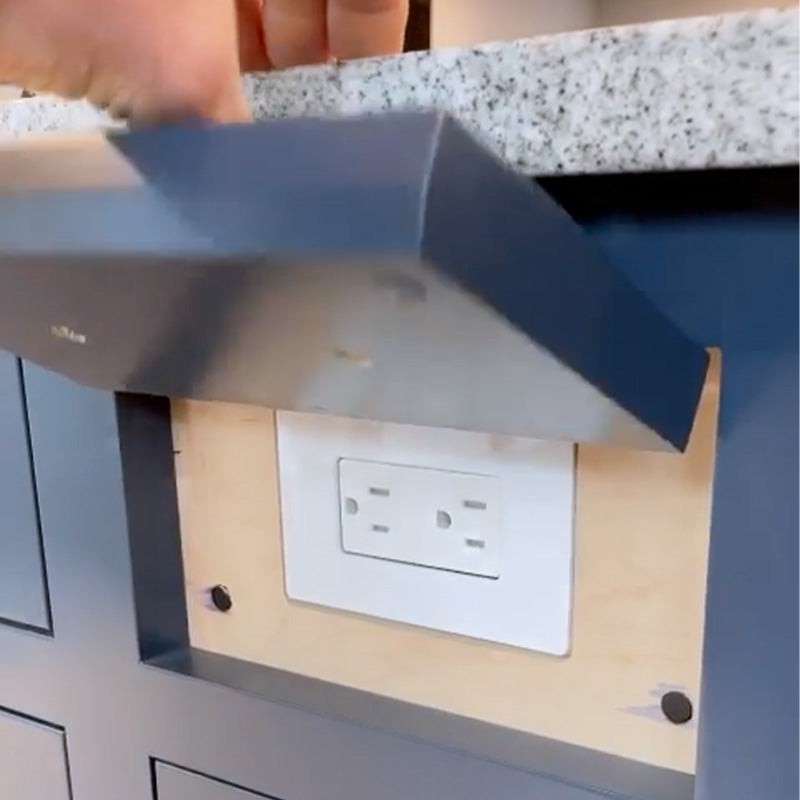
5. Sliding Or Flip-up Outlets
Some modern islands use outlets that are hidden behind a sliding or flip-up panel. When you need them, you slide or lift the panel to reveal the outlets. When not in use, the panel covers them completely.
Advantages:
- Outlets are hidden from view and protected from spills.
- Can be custom-designed to match your cabinetry.
- Good for islands with lots of drawers or doors.
Disadvantages:
- More complex installation.
- Moving parts can wear out over time.
Pro Tip: Choose high-quality hinges and tracks for long-lasting panels. Cheap hardware can break and make the outlet hard to access.
6. Toe-kick Outlets
The toe-kick is the recessed space at the bottom of your island, usually about 4 inches high. It’s possible to place an outlet here, making it almost invisible unless you’re looking for it.
Advantages:
- Completely out of sight during normal use.
- Uses otherwise wasted space.
Disadvantages:
- Harder to access—best for appliances that stay plugged in.
- Not suitable for everyday use.
Safety Note: Toe-kick outlets must be GFCI-protected and should not be used for high-wattage appliances.
7. Drawer Outlets
Adding an outlet inside a kitchen island drawer is a great way to charge devices, power a blender, or run a hand mixer without cluttering the counter.
Advantages:
- Keeps cords, devices, and clutter off the counter.
- Good for charging phones, tablets, or small appliances.
- Very tidy look.
Disadvantages:
- Needs special, flexible wiring to avoid pinching cords when opening/closing.
- More expensive installation.
Non-obvious Insight: Always use UL-listed or certified in-drawer outlets to avoid fire hazards. Not all electricians are experienced with this type of wiring.
8. Hidden Outlets Behind Hinged Panels
Some kitchen islands have false panels or decorative moldings. You can use a small hinge to create a hidden door that flips down or swings open, revealing an outlet inside.
Advantages:
- Totally hidden unless you know it’s there.
- Can be placed almost anywhere on the island.
Disadvantages:
- Requires careful planning and custom carpentry.
- More expensive than standard outlets.
Practical Example: This is popular in high-end kitchens where every detail is customized.
9. Outlet Towers And Power Grommets
Outlet towers (sometimes called power grommets) are similar to pop-up outlets, but they rise higher and often include USB ports, Ethernet, or even wireless charging pads.
Advantages:
- Multiple functions in one spot.
- Hidden when not in use.
- Excellent for home offices in the kitchen.
Disadvantages:
- Requires a larger hole in the countertop.
- More costly than basic outlets.
Non-obvious Tip: Some towers can be wired to lower automatically if you forget to push them down—a handy safety feature.
10. Wireless Or Inductive Charging Pads
If you mainly need to charge phones or tablets, a wireless charging pad built into the countertop is almost invisible. Place your device on the marked spot and charging begins.
Advantages:
- No visible outlet at all.
- No cords or plugs on the countertop.
- Safe from spills.
Disadvantages:
- Only works with compatible devices.
- Slower charging than plug-in outlets.
Important Detail: You can install a wireless pad under granite, quartz, or wood. But thick stone may reduce charging efficiency, so check with your installer.
Credit: erinzubotdesign.com
Creative Camouflage: Making Outlets Nearly Invisible
Sometimes, you can’t move the outlet—but you can make it less noticeable. Here are some smart tricks:
- Paintable Covers: Use covers that can be painted to match your island.
- Pattern-Matched Stone: For stone islands, have your fabricator use a piece of the countertop material to make a custom outlet cover.
- Low-Gloss Finishes: Glossy outlet covers catch the eye; matte finishes blend in better.
- Strategic Placement: Place outlets behind corbels, supports, or decorative trim.
Example: On a marble island, a custom stone cover with matched veining can make the outlet almost disappear.
Installation Steps: What To Expect
Hiding outlets in a kitchen island requires careful planning. Here’s what a typical project involves:
- Design phase: Decide how many outlets you need and where you want them.
- Choose outlet types: Select from pop-up, under-counter, drawer, or other options.
- Hire a licensed electrician: Never DIY island wiring unless you are fully qualified.
- Prepare the island: Cut holes for pop-up or tower outlets, or install boxes for side or under-counter outlets.
- Install wiring: Run power from the main electrical panel, following all codes.
- Install outlets and covers: Make sure GFCI protection is included.
- Test everything: Double-check that each outlet is safe and works as expected.
- Finish surfaces: Paint or cover outlets to blend in.
Common Mistake: Not planning for outlet placement during the design phase. It’s much harder and more expensive to add hidden outlets after the countertop is installed.
Comparing Hidden Outlet Options
Choosing the right hidden outlet method depends on your needs, budget, and kitchen style. Here’s a quick comparison:
| Method | Visibility | Accessibility | Cost | Best For |
|---|---|---|---|---|
| Pop-up Outlet | Invisible when closed | Easy | High | Modern kitchens, heavy appliance use |
| Under-Counter | Mostly hidden | Good | Medium | Traditional islands, kids’ safety |
| Drawer Outlet | Completely hidden | Medium | High | Device charging |
| Side Panel (Painted) | Low if matched | Easy | Low | Budget-friendly updates |
| Wireless Charging | Invisible | Easy | Medium | Phone/tablet users |
Important Safety And Maintenance Tips
No matter which outlet hiding strategy you choose, follow these guidelines:
- Always use GFCI outlets for kitchens to prevent shock hazards.
- Ensure outlets are easily accessible for cleaning and emergency shut-off.
- Never place outlets directly behind sinks or where water can pool.
- Use tamper-resistant outlets if you have children.
- Test GFCI outlets monthly using the built-in test button.
- Check for loose outlets or covers regularly.
Hidden outlets are not maintenance-free. Dust, crumbs, and moisture can still cause problems if you don’t check them from time to time.
Mistakes To Avoid When Hiding Outlets
Even experienced homeowners and remodelers make these common mistakes:
- Cutting stone countertops without professional help: This can lead to cracks or void your warranty.
- Not checking codes: Hidden outlets must still be accessible. If you have to remove a drawer or panel to reach the outlet, it may not pass inspection.
- Forgetting about future needs: Add more outlets than you think you’ll need. It’s much cheaper to install now than to retrofit later.
- Using non-certified parts: Only use outlets and wiring approved for kitchen use.
- Choosing style over safety: Never hide outlets where water can drip or pool.
Matching Outlet Hiding Methods To Kitchen Island Styles
Different kitchen islands need different approaches. Here are some examples:
Waterfall Edge Islands
A waterfall edge has the countertop material flowing down the sides. Outlets can be tough to hide here.
- Best options: Pop-up outlets, wireless charging pads, or custom stone covers on the short side.
Islands With Seating
If your island doubles as a breakfast bar:
- Best options: Under-counter strips, side panel outlets painted to match, or drawer outlets for charging.
Rustic Or Traditional Islands
Wood panels and decorative moldings offer more hiding places.
- Best options: Hinged panels, painted covers, or toe-kick outlets.
Modern, Minimalist Islands
Clean lines mean fewer places to hide outlets.
- Best options: Pop-up towers, wireless charging, or slim outlet strips under the edge.
Non-obvious Insight: Match the outlet hiding method to how you actually use the island—not just the look. If you host a lot of parties, pop-up outlets may be easier for guests to use than hidden side panels.

Credit: www.decorpad.com
Budgeting For Hidden Kitchen Island Outlets
Hidden outlets cost more than standard outlets. Here’s what to expect:
- Pop-up outlets: $100-$500 each, plus installation.
- Outlet strips: $30-$100, plus wiring.
- Drawer outlets: $150-$400, depending on wiring needs.
- Custom covers or hinged panels: $100-$300 each (materials and labor).
Labor is often the biggest cost. Expect to pay $75-$150 per hour for a licensed electrician. Custom carpentry or stone work can add more.
Tip: Installing outlets during a full kitchen remodel is much cheaper than adding them after.
Future-proofing Your Kitchen Island Power
Technology changes fast. Here’s how to keep your island ready for the future:
- Add extra USB-C outlets for new devices.
- Choose modular pop-up or tower units that can be swapped out.
- Leave extra conduit or wiring space for future upgrades.
- Install outlets with smart home features (like voice or app controls).
Pro Example: Some new islands include built-in wireless charging, USB, and smart switches—all hidden under the stone for a futuristic look.
Real-world Examples And Case Studies
Here are a few real-world solutions:
- Family kitchen: Outlet strip under breakfast bar for laptops and homework, plus a pop-up outlet for cooking.
- Modern condo: Wireless charging pad set into quartz island, side panel outlet painted to match for blender use.
- Entertainer’s kitchen: Two pop-up towers with USB and Ethernet, plus drawer outlet for phone charging.
Each solution is different, tailored to the family’s needs, kitchen style, and budget.
Working With Professionals
Most hidden outlet options require a licensed electrician. Stone countertop work should be done by a certified fabricator. Custom panels or drawers need a good cabinetmaker.
Checklist for hiring:
- Ask if they have experience with hidden outlets.
- Request photos of past projects.
- Verify licenses and insurance.
- Make sure they know local codes.
For more about electrical codes, see the National Fire Protection Association.
Frequently Asked Questions
How Many Outlets Are Required On A Kitchen Island?
The NEC requires at least one GFCI-protected outlet on any kitchen island with a countertop. Larger islands may need more, depending on the size and local codes. Always check with your electrician or building department.
Can I Put An Outlet Inside A Drawer In My Kitchen Island?
Yes, but you must use outlets designed for in-drawer use. They need flexible wiring and proper ventilation. Only a licensed electrician should install these to avoid fire hazards.
Are Pop-up Outlets Safe For Use Near Water?
Most pop-up outlets for kitchens are spill-resistant and GFCI-protected. However, never install them directly next to a sink or where water can pool. Follow all manufacturer instructions.
How Do I Match Outlet Covers To My Island’s Finish?
You can buy paintable outlet covers and paint them to match your island. For stone or quartz, ask your countertop fabricator to make a custom cover from scrap material for a perfect match.
Will Hidden Outlets Increase My Home’s Value?
A well-designed kitchen with hidden outlets is often more attractive to buyers. It shows attention to detail and modern design, which can help with resale value.
Designing a kitchen island with hidden outlets is one of those small upgrades that makes a big difference every day. By understanding your options and planning ahead, you can enjoy both beauty and function—without sacrificing safety or convenience. Whether you choose a pop-up outlet, a drawer charger, or a wireless charging pad, your kitchen island will be ready for anything.